Tranquil Garden Design for a Nature’s Calm Oasis at Home

In a world of relentless hustle and bustle, carving out a serene and peaceful space right in our backyard can become our sanctuary. The art of creating such a refuge lies in tranquil garden design – a symphony of carefully curated elements that embody relaxation and connection to nature. This article dives deep into the ethos of tranquil gardens, exploring the myriad themes and elements that transform ordinary spaces into nature’s calm oasis. By the end, you’ll not only appreciate the profound peace a garden can offer but also be equipped with the knowledge to create your own.

Tranquil garden designs are more than just aesthetics. They are an embodiment of harmony, meditation, and mindfulness. A space that allows for reflection, relaxation, and the joy of silent corners, while enveloping the soul in a calm ambiance. As we traverse the journey of understanding and designing such gardens, we will also uncover the various elements and decor choices that contribute to their magic. From the soothing sound of waterfalls to the silent whispers of greenery, every bit plays a role in crafting an oasis of serenity.

In this comprehensive guide, we will dive into various tranquil garden design themes, understand their essence, and delve into the various elements that make these themes come alive. We promise, by the end of this, you’ll be itching to design your very own calming nature’s retreat!

Tranquil Garden Design Themes

Tranquil Garden Design Themes

When envisioning a tranquil garden, understanding different themes can help one align their choices to a specific ambiance and feeling. Here are some themes to consider:

Zen Gardens

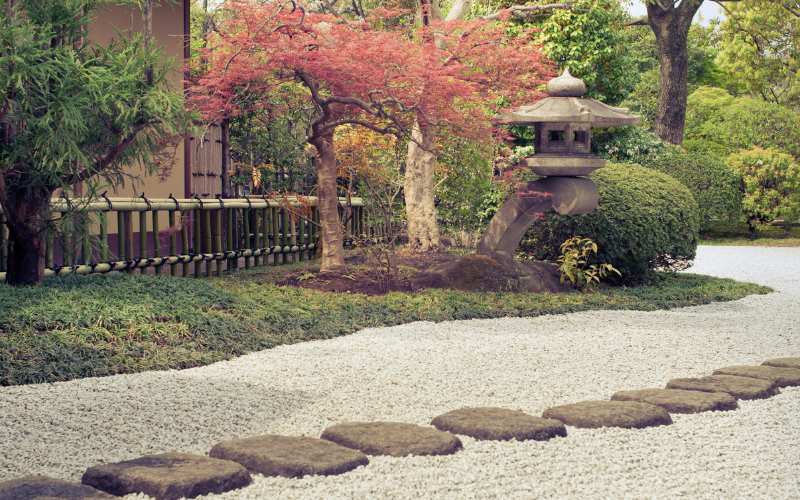
Originating from Japan, Zen gardens emphasize minimalist designs, often using rocks, gravel, and few plants. They evoke a sense of peace and introspection, inviting one to meditation. A classic example would be the Ryoan-ji in Kyoto.

  • Rocks and Gravel: These symbolize mountains and water, respectively. Arranging them in specific patterns can signify various natural elements, creating a symbolic landscape.
  • Greenery: While minimalist, Zen gardens do feature mosses or shrubs, adding a touch of life amidst the monochrome.
  • Pathways: Often made with stepping stones, they lead visitors through the garden, making them mindful of each step.

Nature’s Retreat

These gardens focus on bringing as much of nature’s diversity as possible. Birds chirping, the rustling of leaves, the colors of blooming flowers; it’s nature at its best.

  • Birds: Installing birdhouses or birdbaths can invite these winged wonders. Their chirping adds a lively yet calming dimension.
  • Greenery: From tall trees to flowering plants, nature’s retreat is about diversity.
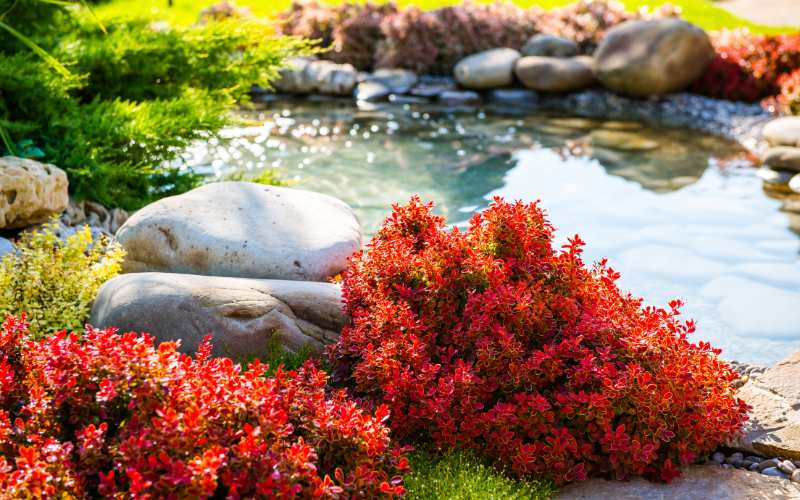
  • Water Features: Small ponds or waterfalls can be a great addition, providing soothing sounds and attracting more wildlife.

Tranquil Garden Elements

The essence of any garden lies in its elements. Here’s a comprehensive look into the elements that play a vital role in creating that perfect oasis.

Tranquil Garden Elements

Water Features

Water, with its soothing sounds and reflective properties, can induce relaxation. Consider adding:

  • Waterfalls: Their rhythmic sound can drown out external noises, providing a calm ambiance.
  • Ponds: Not just for aesthetics, but they also attract frogs, dragonflies, and birds.

Seating and Structures

A tranquil garden is also about comfort and spending quality time.

  • Seating: Benches or hammocks, placed under trees or near water features, can be the perfect nook.
  • Structures: Gazebos or pergolas provide shade and a place to relax. They can be decorated with climbing plants or lighting to add charm.

Lighting

Subtle and warm lighting can set the mood right. Solar-powered or LED lights along pathways, or lanterns hanging from trees, can transform evenings into magical moments.

Plant Choices and Decor

Choosing the right plants and decor is essential.

  • Greenery: Opt for plants that are easy to maintain. Bamboo, for instance, grows quickly and adds a touch of Zen.
  • Decor: Statues, wind chimes, or even garden stones with mindful quotes can enhance the garden’s theme.

Pathways and Rocks

Paths guide visitors while rocks add a natural aesthetic.

  • Pathways: These can be made using gravel, stones, or wood. They give structure to the garden.
  • Rocks: Beyond aesthetics, they can be used for meditation. Large flat rocks, for example, can be places to sit and reflect.

Peaceful Garden Layouts

Creating a serene garden begins with a well-thought-out layout. The arrangement of every plant, path, and structure plays a pivotal role in establishing a feeling of peace and calm.

Peaceful Garden Layouts

1. Central Focus Layout:

Place a significant feature, such as a fountain or a Zen circle, in the middle of the garden. Radiating paths from this center provide a structure and encourage a natural flow of movement. This centralization emphasizes harmony and symmetry, integral to a peaceful atmosphere.

2. Labyrinth Design:

Inspired by ancient practices, labyrinths or maze-like designs encourage meditation and reflection. Walking through these pathways becomes a form of moving meditation, promoting mindfulness and deep thought.

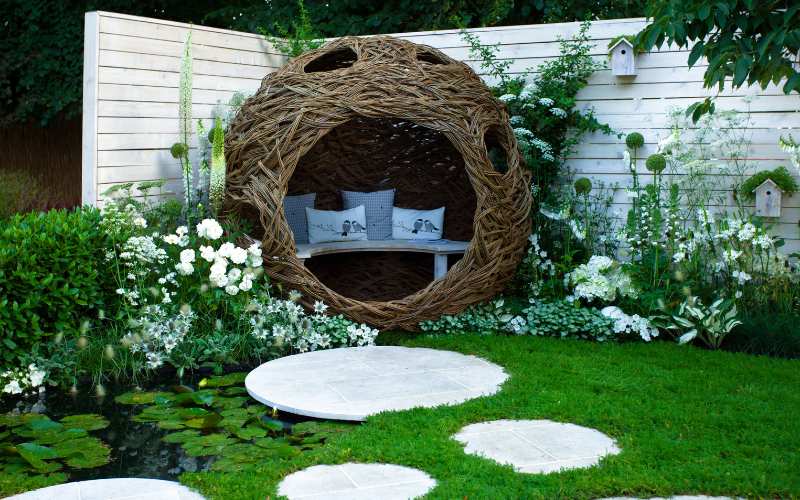
3. Secluded Nooks Layout:

Incorporate little secluded spots, hidden by greenery or a trellis with climbers. These silent corners become personal spaces for introspection, reading, or just soaking in the serenity.

4. Linear Minimalism:

Sometimes, simplicity speaks the loudest. A linear design with well-defined paths, bordered with low hedges or flower beds, can be both modern and peaceful. The emphasis on clean lines removes chaos and induces calm.

Calming Garden Features

Apart from layouts, specific features in the garden can amplify its tranquility.

Calming Garden Features

1. Water Bodies:

Whether it’s a koi pond, a simple birdbath, or a cascading waterfall, the sound and sight of water are inherently soothing. The gentle ripples, reflecting the sky, ground us and connect us to nature.

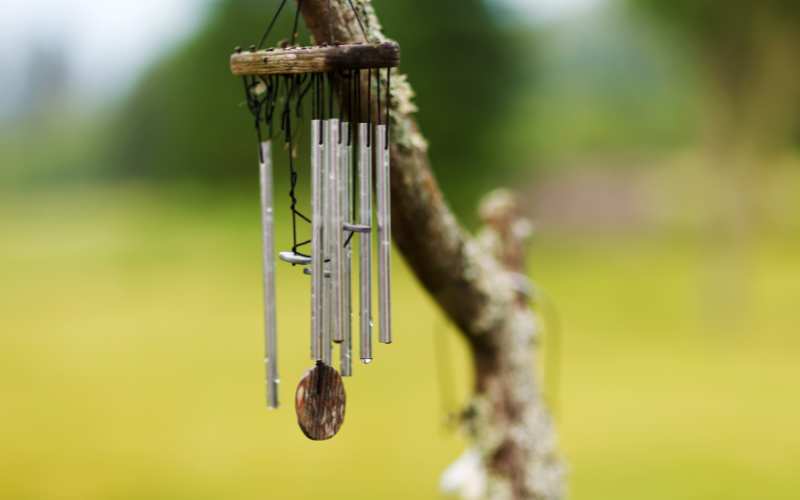
2. Wind Chimes and Bells:

The gentle tinkling of wind chimes or bells, especially those made of natural materials like bamboo or metal, resonate with the wind, creating an ever-changing melody that calms the senses.

3. Sculptures and Stones:

Art pieces or naturally sculpted stones can serve as focal points, drawing attention and encouraging appreciation of form and beauty. They add a touch of personal aesthetics while enhancing the peaceful ambiance.

Harmony in Outdoor Spaces

Harmony in a garden means ensuring every element complements the others.

1. Balancing Flora and Fauna:

Attracting birds and butterflies by choosing specific plants brings in the gentle fluttering and melodies of nature. It’s essential to strike a balance where the fauna feels welcomed but doesn’t overwhelm the space.

2. Furniture Choices:

Wooden or stone benches, hammocks, and even simple mats can be placed strategically. Furniture should blend seamlessly with the natural environment and provide comfort.

3. Lighting:

As the sun sets, your garden can continue to shine with gentle, warm lights. Solar lanterns, fairy lights, or even strategically placed candles can make evenings magical and harmonious.

Plant Choices

The right plants can dramatically influence the tranquility of a garden.

Plant Choices

1. Fragrant Plants:

Jasmine, lavender, and rosemary not only provide a visual appeal but their scents can soothe and calm the mind.

2. Seasonal Blooms:

Ensure something is always in bloom. This ever-changing display keeps the garden vibrant and reminds one of nature’s cycles.

3. Evergreens:

Plants like pine or bamboo stay green throughout, providing a constant, reassuring presence.

4. Ground Covers:

Low lying plants like moss or creeping thyme give a carpet-like appearance, softening the ground and creating a lush, green base.

Nature’s Calm Oasis Concepts

1. Reflection Spaces:

Mirror-like ponds or strategically placed mirrors can provide a sense of space and depth, expanding the garden’s boundaries and encouraging introspection.

2. Natural Sounds:

Consider incorporating elements that rustle with the wind, like tall grasses, or that attract birds and insects, turning the garden into a live orchestra of nature’s sounds.

3. Meditation Zones:

Dedicated spaces with cushions or mats, perhaps surrounded by a circle of stones or under a canopy of trees, can be reserved for meditation, yoga, or deep breathing exercises.

4. Therapeutic Touch:

A garden can also be therapeutic. Incorporate elements like sand pits, which one can run their fingers through, or textured pathways that provide a gentle massage to the feet when walked upon.

In conclusion, creating a tranquil garden design is an amalgamation of layout, features, harmony, plant choices, and adopting various calm oasis concepts. Such a garden becomes more than just an outdoor space; it transforms into a sanctuary of peace, reflection, and deep connection to the essence of nature.

Soothing Garden Decor

Decor elements in a garden are more than mere ornaments; they’re silent narrators of a story you want your space to tell. They should resonate with tranquility and peace.

Statues and Sculptures: A stone Buddha or a serene angel statue can lend a peaceful aura. The rawness of stone, molded into a calming figure, invites contemplation and stillness.

Wind Spinners: Not just aesthetically beautiful, they dance to nature’s tunes, creating captivating patterns and mirroring the dynamic yet soothing nature of life.

Garden Stones with Affirmations: Scattered amidst your greenery, stones engraved with positive affirmations or words like “peace”, “serenity”, or “relax” can act as subtle reminders to take a deep breath and let go.

Birdhouses and Feeders: Encourage the calming chirps and tweets of birds. Watching birds flit and feed can be incredibly therapeutic and grounding.

Natural Elements: Incorporate driftwood, sea stones, or even dried leaves and flowers preserved in clear resin. Their inherent, untouched beauty speaks of nature’s simple delights.

Reflective Water Features

Water, with its reflective and soothing qualities, has always been an essential element in serene landscapes.

Reflective Water Features

Mirror Ponds: True to their name, they act as a mirror to the sky above and the greenery around. The gentle ripples caused by a breeze or a raindrop create mesmerizing patterns.

Cascading Waterfalls: The soft sound of water falling, especially when it cascades over rocks, is therapeutic. It drowns out the noise of the outside world, leaving one with a sense of seclusion.

Rain Chains: An alternative to downspouts, rain chains guide rainwater downwards, creating a pleasing visual and auditory experience during rains.

Floating Planters: Lily pads or floating flowers on water bodies add a touch of life to the stillness, making the setting dynamic yet peaceful.

Relaxing Garden Structures

Structures in a garden define spaces and provide shelter, but they can also be designed to enhance tranquility.

Gazebos: These are shelters that allow you to be amidst your garden, protected from the elements. A well-placed gazebo, perhaps overlooking a water feature or amidst dense greenery, can be a peaceful retreat.

Garden Arches: Laden with climbers and flowering plants, they define entry and exit points. Walking under a flower-laden arch is akin to passing through nature’s embrace.

Hammocks and Swings: Not just for lounging, their gentle motion can be calming. Place them in shady spots, and they become the perfect nook for relaxation.

Green Walls and Vertical Gardens: Especially in urban settings, they provide the serenity of greenery without occupying ground space, forming a living mural of tranquility.

Tranquil Garden Pathways

The journey through the garden should be as calming as the garden itself.

Tranquil Garden Pathways

Stone Pathways: There’s something inherently peaceful about walking on stone. Perhaps it’s their natural coolness or their age-old association with nature.

Moss-covered Trails: Let nature paint your paths. Moss-covered trails feel soft underfoot and radiate a gentle green hue.

Wooden Boardwalks: Especially if your garden has a pond or is marshy. The hollow sound of footsteps on wood, combined with its earthy scent, enhances the experience.

Gravel Paths: The soft crunch underfoot is meditative, and it looks pristine, especially when lined with flowers or low shrubs.

Meditation Garden Ideas

A garden designed for meditation goes beyond aesthetics; it’s a space for soulful connection.

Zen Circles: Simple circles of sand or gravel, perhaps with a single rock in the center, embody Zen principles. Raking the sand in patterns can be a form of active meditation.

Labyrinth: Unlike mazes, labyrinths have a single path in and out. The very act of walking it becomes a meditative journey, symbolic of life’s path.

Seated Meditation Spots: A simple raised platform or even a soft mound, surrounded by fragrant plants like lavender or jasmine, can become your spot for seated meditation.

Sound Gardens: Incorporate elements that produce gentle sounds, like bamboo that rustles or bells that chime softly. Sound can profoundly influence our meditative experiences.

In conclusion, transforming a garden into a tranquil oasis is about tuning into nature’s rhythm and our intrinsic need for peace. Every stone, path, plant, and droplet of water has a role to play in this grand orchestra of serenity. And as we tread these paths or sit silently, we don’t just experience nature’s calm; we become a part of it.

Silent Sanctuary Designs

Designing a silent sanctuary in one’s garden is akin to creating a space of deep introspection, reflection, and serenity. Here are ways to curate such a space:

  1. Sensory Minimalism: Keeping the design minimalistic ensures fewer distractions. Opt for muted colors, simple furniture, and unobtrusive plants. This minimal approach sharpens the other senses and anchors the visitor into the present.
  2. Natural Acoustic Barriers: Planting dense rows of tall shrubs or installing wooden fences can act as a barrier to external noises. Bamboo thickets, for instance, not only block noise but add a serene rustling sound.
  3. Grounding with Earth: Including a small sand or gravel pit, where one can sit and rake patterns or just feel the texture, connects a person to the earth, a grounding experience that’s calming in its essence.
  4. Monochromatic Palette: Using a singular color scheme, especially shades of green or blue, can induce a sense of depth and calmness, amplifying the sanctuary vibe.

Outdoor Spaces for Relaxation

While gardens inherently inspire relaxation, specific design elements can enhance this experience:

  1. Water Features: The gentle sound of a babbling brook or the soft splash of a fountain brings immediate relaxation. Water, by its nature, soothes and calms the nerves.
  2. Layered Canopies: Planting trees and shrubs in layers – taller trees providing shade to shorter shrubs and plants – creates a sense of envelopment, making the outdoor space cozy and protected.
  3. Hammock Havens: A hammock strung between two trees, with a soft throw and a book, is a direct invitation to relax and unwind. The gentle sway is almost meditative.
  4. Fire Pits: A focal point for evening relaxation, fire pits not only provide warmth but watching the flames dance can be incredibly relaxing.
  5. Open Air Lounges: These are shaded areas with comfortable seating, ambient lighting, and perhaps a small coffee table, simulating a living room but in the lap of nature.

Quiet Corners in Gardens

In the midst of a bustling garden, a quiet corner can be your personal escape:

Corners in Gardens

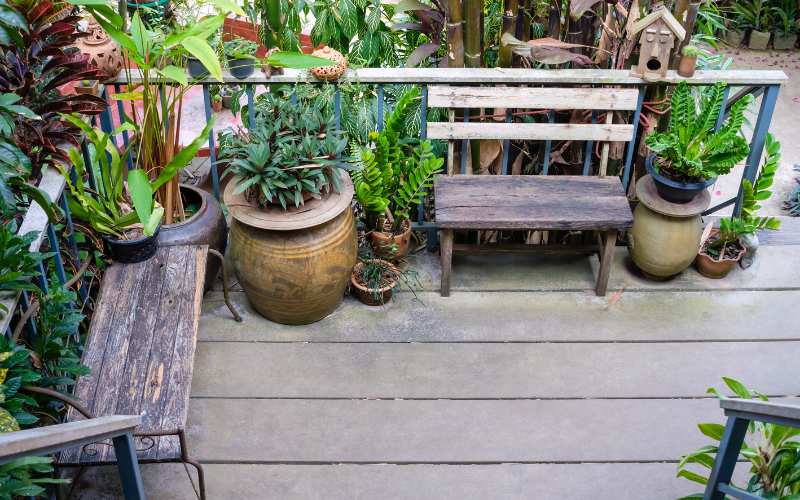
  1. Secluded Benches: A simple wooden bench, when placed strategically behind tall shrubs or under a leafy canopy, becomes a silent spot to sit, think, or just breathe.
  2. Bird Watching Spots: Equip a corner with a bird feeder or bath. Sitting silently and watching birds can be an immensely calming experience.
  3. Reading Alcoves: A dedicated spot with comfortable seating, soft lighting, and a shelf of books surrounded by fragrant plants is a bibliophile’s dream.
  4. Art Corners: For those inclined, a quiet corner with an easel, some paints, and brushes, all set amidst nature, can be a silent solace.

Peaceful Nook Creation

Creating a nook is about dedicating a tiny space for peace and introspection:

  1. Meditation Platforms: Elevated wooden platforms, surrounded by fragrant plants, and equipped with cushions or mats make for perfect meditation spots.
  2. Zen Gardens: These miniature landscapes, designed with sand, rocks, and miniature plants, provide a peaceful point of focus.
  3. Canopy Beds: Think of a four-poster bed, but outdoors. Draped with soft, breezy fabric and equipped with plush cushions, these nooks become relaxation cocoons.

Elements of Calm Greenery

Plants are the soul of a garden, and choosing the right ones can elevate the tranquility quotient:

  1. Ferns and Mosses: Their soft textures and shades of green are immediately calming. They also thrive in shaded, moist spots, making them perfect for those silent, dewy corners.
  2. Lavender: Not just visually soothing, its fragrance is known for its calming properties.
  3. Bamboo: Apart from being a noise barrier, bamboo’s rustling is reminiscent of peaceful forest sounds.
  4. Water Lilies and Lotus: If you have a water feature, these floating beauties add a touch of serenity.
  5. Tall Ornamental Grasses: Their swaying motion and soft textures are visually calming.

In conclusion, gardens, when designed with thought and intention, can become havens of peace, offering spots of introspection, relaxation, and deep connection with nature. It’s about more than just plants and pathways; it’s about curating experiences of serenity.

Lighting

A garden’s lighting plays an intrinsic role in setting the mood.

  1. Ambient Lighting: The gentle glow from solar lanterns or string lights hung from trees and pergolas creates a celestial atmosphere. Placing them on pathways or around seating areas provides a soft illumination, ensuring nighttime navigation without harsh brightness.
  2. Spotlights: These can be used to highlight specific elements in your garden—be it a statue, water feature, or a particularly beautiful plant. However, it’s essential to use them sparingly to maintain the garden’s calm ambiance.
  3. Candle-lit Corners: The flickering flames from candles, especially when housed in beautiful lanterns or terrariums, can evoke a sense of timelessness. Their organic, ever-changing light casts enchanting shadows, adding a layer of mystique.
  4. Water Lighting: Floating candles or underwater LED lights in ponds and fountains can transform water features into shimmering spectacles by night, reflecting and refracting light in gentle, undulating patterns.
  5. Safety and Sensibility: While aesthetics are paramount, safety, too, is crucial. Solar-powered lights are both eco-friendly and safe, ensuring you’re not juggling with wires and electricity outdoors.

Zen-inspired Garden Rocks

Zen gardens, originally from Japan, use rocks to create miniature stylized landscapes.

Zen-inspired Garden Rocks

  1. Strategic Placement: In Zen gardens, rocks represent islands or mountains. Their placement, whether in groups or isolation, is symbolic and usually done with mindfulness and intention.
  2. Raking Sand and Gravel: These gardens often feature white sand or gravel that’s raked in patterns that evoke water ripples. Rocks interrupt these patterns, just as islands interrupt the ocean.
  3. Balance and Asymmetry: Unlike Western design principles, which emphasize symmetry, Zen gardens often thrive on asymmetry, which feels more natural and organic.
  4. Types of Rocks: From tall, upright stones to flat, horizontal ones lying low, each rock has a role in this miniature landscape. Their placement often tells a story or represents a natural scene.

Serene Outdoor Seating

A garden isn’t just a place to admire; it’s a place to be, to immerse, and to relax.

  1. Swing Seats: There’s a gentle joy in the rhythmic motion of a swing. Whether it’s a bench swing under a pergola or a single-seater hanging from a sturdy branch, it’s bound to become a favorite spot.
  2. Lounge Chairs: Perfect for sunbathing by day and stargazing by night, lounge chairs, especially those with plush cushions, spell relaxation.
  3. Floor Seating: Think of sunken seating areas or simply plush floor cushions on a soft carpet of grass. This brings a sense of groundedness, perfect for meditation or a heart-to-heart chat.
  4. Hammocks: Strung between two trees, they’re an invitation to a lazy afternoon nap.

Birds & Tranquility in Gardens

Birds bring life, color, and song to a garden.

  1. Bird Feeders & Baths: These attract a variety of birds. Watching them flit and frolic, listening to their songs, can be incredibly therapeutic.
  2. Plant Choices: Plants like sunflower, millet, and cosmos attract birds. Their seeds provide nourishment, ensuring your garden is always alive with birdsong.
  3. Water Features: Birds love water features, not just to drink from but also to bathe. A gentle fountain or a birdbath can attract them in droves.

Waterfalls for Calm Ambiance

The sound of flowing water is universally calming.

  1. Naturalistic Waterfalls: These mimic nature, using rocks, plants, and irregular shapes to recreate a forest-like waterfall.
  2. Modern Waterfalls: Sleek, geometric designs with clean lines and clear water suit contemporary gardens.
  3. Pond Integration: Combining waterfalls with ponds means the water has somewhere to flow, creating an ecosystem where plants, fish, and birds thrive.

Balancing Nature and Design

The true art of garden design lies in balancing the wildness of nature with human-made structures.

Balancing Nature and Design

  1. Native Plants: Using plants native to an area ensures they thrive and need less maintenance. They also attract local wildlife, maintaining ecological balance.
  2. Garden Zones: While some areas of the garden can be manicured and structured, others can be left wild, allowing nature to take its course.
  3. Eco-friendly Practices: Rainwater harvesting, composting, and organic gardening ensure the garden is sustainable and harmonious with nature.
  4. Integration: Buildings, pathways, seating, and other structures must be integrated seamlessly, ensuring they don’t dominate the greenery but rather complement it.

In conclusion, a tranquil garden design isn’t merely about aesthetics. It’s about creating an environment where nature and design coexist harmoniously, offering solace and rejuvenation to those who seek it.

Conclusion

Crafting a tranquil garden design is a journey of understanding oneself and the elements of nature. It’s about creating an oasis where serenity meets beauty, where every nook and corner beckons one to relax, reflect, and rejuvenate. From the minimalist Zen gardens to the rich tapestry of a nature’s retreat, the themes and elements blend seamlessly to offer a sanctuary.

Your garden, irrespective of its size, can be transformed into such a sanctuary. Remember, it’s less about how much you add and more about the harmony of what you add. Every waterfall, every bird, every rock, and every path contributes to the symphony of tranquility. As you embark on this journey, take a moment to be mindful, to listen to nature, and to weave its wonders into your very own tranquil garden design.

Kitchen Garden Design: From Planning to Harvesting

In the contemporary world, where organic produce and sustainability are increasingly emphasized, kitchen gardens have become the epitome of both functionality and aesthetics. A well-planned kitchen garden design not only provides fresh, organic vegetables and herbs but also brings a touch of nature close to home. Imagine stepping into your backyard to pluck fresh tomatoes for a salad or snipping off some basil for your pasta. This guide delves deep into creating the perfect kitchen garden, from its initial design to the joy of harvesting.

Through this detailed guide, you’ll discover essential aspects of kitchen garden planning and design. From understanding the need for the right garden layout and soil preparation to integrating garden aesthetics, we will cover every aspect of creating a functional and beautiful garden space. Let’s embark on a green journey to self-sufficiency, sustainability, and fresh local produce.

Best Kitchen Garden Design Ideas

Best Kitchen Garden Design Ideas

Edible Landscaping

Transforming your garden into an edible paradise is more than just planting vegetables in rows. Think about integrating edibles into the landscape, a concept known as edible landscaping. This innovative approach involves:

  • Incorporating both vegetables and ornamental plants together.
  • Creating themes like a salsa garden where you grow tomatoes, onions, cilantro, and peppers close together.
  • Utilizing different textures and colors of edible plants to enhance garden aesthetics.

For instance, the deep purple of kale can be contrasted with the vibrant green of lettuce. Remember, garden aesthetics is not just about visuals but also about taste!

Raised Beds and Container Gardening

Raised beds have become synonymous with modern kitchen garden designs. They offer:

  • Better control over soil preparation.
  • Improved drainage and aeration.
  • Easier access and less strain on the back.

On the other hand, container gardening allows those with limited space to grow a plethora of vegetables and herbs. From patios to balconies, pots and containers can be strategically placed to maximize sunlight and space.

Garden Pathways and Sunlight Needs

Every garden requires pathways. They not only allow easy access to plants but also prevent soil compaction. When considering garden layout:

  • Ensure pathways are at least 18-24 inches wide.
  • Use gravel, wood chips, or stepping stones to define pathways and enhance garden aesthetics.

Additionally, understanding the sunlight needs of each plant is crucial. Some plants, like tomatoes, require full sun, while others, like lettuce, can do with partial shade.

Kitchen Garden Planning

Soil Preparation and Composting

A fruitful garden begins with fertile soil. Soil preparation is paramount to ensure plants receive all necessary nutrients. This includes:

  • Testing soil pH and nutrient levels.
  • Amending soil with organic matter, such as compost.

Composting is nature’s way of recycling. It’s a sustainable method of converting kitchen and garden waste into nutrient-rich compost. Composting:

  • Reduces the need for chemical fertilizers.
  • Improves soil structure and water retention.
  • Encourages beneficial microorganisms.

Irrigation and Watering Techniques

Water is the lifeline of a garden. An efficient irrigation system ensures plants receive adequate water without wastage. Here’s what you need to know:

  • Drip irrigation and soaker hoses minimize water loss through evaporation.
  • Watering techniques should be adapted to the specific needs of plants. For instance, leafy greens prefer consistent moisture, while tomatoes require deep watering at longer intervals.

Planting Calendar and Crop Rotation

The key to a year-round harvest is understanding the planting calendar. Knowing when to plant ensures:

  • Optimal growth conditions for each vegetable or herb.
  • A continuous supply of fresh produce.

Crop rotation is a cultivation method that involves changing the type of crop grown in a particular area each season. It:

  • Prevents soil-borne diseases and pests.
  • Enhances soil fertility by avoiding nutrient depletion.

Garden Maintenance: Mulching, Pruning, and Pest Control

Maintenance is an ongoing task. Mulching:

  • Conserves moisture.
  • Reduces weed growth.
  • Regulates soil temperature.

Pruning encourages healthier growth and better yields. But not all plants require it. Tomatoes, for instance, benefit from pruning, while carrots do not.

When it comes to pests, opting for natural pesticides and methods like companion planting can deter garden pests without harming beneficial insects.

Layout Ideas for Small Kitchen Gardens

Gardening in restricted spaces requires creative thinking. The layout of a small kitchen garden should maximize the use of space while maintaining accessibility and aesthetics.

Vertical Gardening

In small spaces, think upwards! Vertical gardening involves growing plants on vertical supports or hanging containers, ensuring:

  • Maximization of vertical space.
  • Reduction of ground space use.
  • Ability to grow a variety of plants in limited areas.

Tiered Planters

Tiered planters are stacked containers or beds at different heights, allowing:

  • Different plants to be grown in the same square footage.
  • Easier access to plants at different levels.
  • Improved sunlight distribution to each tier.

Espalier Techniques

The ancient art of espalier involves training trees or shrubs to grow flat against a wall, fence, or trellis. This method:

  • Saves space by utilizing vertical surfaces.
  • Provides a unique decorative element to gardens.
  • Offers increased sun exposure for wall-facing gardens.

Choosing the Right Plants

Your garden’s success depends significantly on selecting appropriate plants. In a kitchen garden, the focus is typically on edibles, but the right choice can offer both utility and beauty.

Local Produce and Seasonal Planting

Opt for vegetables and fruits that are native or well-adapted to your region. Local produce:

  • Requires less maintenance as they’re suited to local climate and soil.
  • Provides fresher and tastier yields.

Seasonal planting ensures that you’re growing plants during their optimal growth periods, leading to healthier plants and better harvests.

Companion Planting

Some plants benefit from being grown together. This technique, known as companion planting, offers:

  • Natural pest deterrents. For instance, planting marigolds alongside tomatoes can repel nematodes.
  • Improved growth. Beans fix nitrogen in the soil, benefiting neighboring plants.

Integrating Herbs in Your Design

Herbs are a valuable addition to any kitchen garden due to their culinary and medicinal uses.

Herb Spirals

This is a permaculture garden design for growing herbs. An herb spiral is:

  • A space-saving design that provides different growing conditions at different parts.
  • Aesthetically pleasing, adding a sculptural element to gardens.
  • Efficient for drainage, ensuring herbs get the right moisture level.

Window Boxes

For those who have extremely limited space or only have a balcony, window boxes can be a boon. They:

  • Are easy to install and maintain.
  • Allow for quick access to herbs, right from your kitchen.
  • Can be decorative, enhancing the appeal of windows.

Container Gardening for Kitchens

Container gardening offers flexibility, especially for renters or those with limited ground space.

Container Gardening for Kitchens

Choosing the Right Container

The container’s choice can make a huge difference in the health of the plants. Ensure:

  • Adequate drainage holes.
  • Size suitability for the grown plant.
  • Non-toxic materials, especially for edibles.

Self-Watering Containers

These are a boon for those who might forget to water regularly. They:

  • Have a reservoir at the bottom to store water.
  • Use wicking to ensure plants get water as needed.
  • Reduce the frequency of watering, saving time.

Making the Most of Limited Space

Every inch counts in a small garden. Efficient utilization is key.

Multi-Purpose Furniture

Think of garden benches with in-built planters or tables with herb boxes. This furniture:

  • Offers practicality by saving space.
  • Enhances garden aesthetics with unique pieces.
  • Encourages the integration of greenery into daily life.

Hanging Gardens

Utilizing the air space with hanging pots or baskets can:

  • Enhance vertical space usage.
  • Provide unique visual interest to spaces.
  • Allow for growing a variety of plants overhead.

By implementing these ideas and methods, even the smallest spaces can be transformed into lush, productive kitchen gardens. Whether you’re working with a small backyard, a balcony, or even just a windowsill, there’s potential for growth, harvest, and the unparalleled joy of plucking your own produce.

Aesthetics

A kitchen garden, while primarily functional, can be a source of great beauty. Marrying practicality with aesthetics makes for an inviting space that beckons frequent visits and loving maintenance.

Color Coordination

Combining plants with contrasting and complementary colors can elevate the visual appeal of your garden. Think deep purple basil next to bright green lettuce, or yellow marigold amongst deep green spinach. These colors:

  • Create visual interest.
  • Help differentiate between plants.
  • Boost mood and enthusiasm for gardening.

Plant Structure and Layout

Using plants of varying heights and structures can break the monotony. For example:

  • Dwarf fruit trees can serve as a backdrop.
  • Mid-sized plants like tomatoes or peppers in the center.
  • Low-lying herbs or lettuces at the forefront.

Texture Play

Different plants offer various textures. From the feathery leaves of dill to the smooth, shiny exteriors of bell peppers, playing with textures:

  • Adds depth to the garden.
  • Invites touch, engaging more senses.
  • Differentiates areas within the garden.

Incorporating Vegetable Patches

Vegetable patches are the heart of kitchen gardens, providing fresh produce for daily consumption.

Incorporating Vegetable Patches

Raised Beds

Raised beds are wooden or stone structures filled with soil. They:

  • Offer better control over soil quality.
  • Ensure better drainage.
  • Prevent soil compaction, ensuring loose soil for plant roots.

Crop Rotation

Regularly changing where specific vegetables are planted prevents soil depletion and breaks the life cycle of pests. Crop rotation:

  • Enhances soil health.
  • Reduces the need for fertilizers.
  • Prevents diseases specific to certain plants.

Edging

Defining the boundaries of vegetable patches with edging can make them stand out. Edging:

  • Is often made of stone, brick, or wood.
  • Provides a clear demarcation.
  • Adds to the garden’s organized appearance.

Adding Garden Ornaments

Garden ornaments enhance the aesthetic appeal of the garden, providing focal points and breaking the green monotony.

Bird Baths and Feeders

These not only attract birds, adding life and movement but are also decorative. They:

  • Offer a water source for birds.
  • Attract beneficial birds that control pests.
  • Are often made of stone or metal, adding variety.

Wind Chimes and Garden Gnomes

These add a whimsical touch to gardens. The gentle tinkling of wind chimes:

  • Creates an aural appeal.
  • Can be therapeutic.
  • Offers a dynamic element as they move with the wind.

Gnomes or other figurines:

  • Add character to gardens.
  • Serve as interesting visual points.
  • Can be seasonal, changed based on festivals or seasons.

Irrigation Systems

Watering is crucial, but doing it efficiently saves time and resources.

Irrigation Systems

Drip Irrigation

This system provides water directly to plant roots. Drip irrigation:

  • Conserves water.
  • Reduces water loss due to evaporation.
  • Ensures deep watering, promoting root growth.

Soaker Hoses

These are hoses that allow water to seep out along their length. They:

  • Provide moisture over a large area.
  • Are perfect for beds with closely spaced plants.
  • Reduce water wastage.

Automated Systems

For those who travel or can’t water regularly, automated systems with timers are ideal. They:

  • Ensure plants get water at set intervals.
  • Can be adjusted based on seasons or plant needs.
  • Save time and effort.

Garden Pathway Designs

Pathways provide structure, guide movement, and add to the garden’s beauty.

Garden Pathway Designs

Gravel Paths

Made from crushed stone or gravel, these paths:

  • Offer a crunchy sound underfoot.
  • Allow for easy water drainage.
  • Can be lined with bricks or stones for definition.

Stepping Stones

Spread out at regular intervals, they:

  • Guide the visitor through the garden.
  • Can be of varying shapes and sizes.
  • Can be surrounded by moss or ground covers for a natural look.

Wooden Walkways

Made from wooden planks, these:

  • Add a rustic charm.
  • Are raised, preventing contact with mud during rains.
  • Can be combined with other materials for a varied look.

A kitchen garden is more than just a space for growing food. It’s a sanctuary, a canvas where one paints with plants, and an ever-evolving artwork. By integrating aesthetics, structured vegetable patches, ornamental elements, efficient irrigation, and inviting pathways, one can create a masterpiece that feeds both the body and the soul.

Planning for Seasonal Changes

Adapting your kitchen garden to the changing seasons is not only a way to ensure a steady supply of fresh produce but also a way to keep the garden lively and vibrant throughout the year.

Understanding Local Climate

Before setting up your garden, it’s crucial to understand your local climate, including frost dates. Knowing when the first and last frost usually occurs in your region can help in:

  • Timing your plantings correctly.
  • Protecting plants from unexpected frost.
  • Ensuring optimal growth conditions.

Planting Calendar

Creating a planting calendar can make this process more manageable. With a calendar:

  • You can rotate crops effectively.
  • Avoid missing the ideal planting or harvesting time.
  • Ensure a continuous harvest throughout the year.

Succession Planting

This involves planting crops in a staggered manner so that as one batch is harvested, another one is ready to take its place. This method:

  • Maximizes the use of garden space.
  • Provides a consistent supply of vegetables.
  • Keeps the soil always engaged, reducing weed growth.

Mulching for Seasons

Using mulch can protect plants from the extremes of temperature. For instance:

  • Straw or hay can be used in summer to retain moisture and keep the soil cool.
  • In winters, a thicker layer can provide insulation against cold.

Sustainable Kitchen Garden

In an era where sustainability is key, your kitchen garden can be a beacon of organic, sustainable practices that not only produce delicious produce but also nurture the environment.

Composting

Having a compost bin allows for recycling organic kitchen waste. Composting:

  • Reduces the need for chemical fertilizers.
  • Enriches the soil with beneficial microbes.
  • Reduces landfill waste.

Natural Pesticides

Opting for natural solutions like neem oil, diatomaceous earth, or beneficial insects like ladybugs can:

  • Protect your plants without harmful chemicals.
  • Ensure that your produce is organic and healthy.
  • Enhance the biodiversity of your garden.

Water Conservation

Employing techniques like rainwater harvesting, drip irrigation, or using soaker hoses can:

  • Reduce water wastage.
  • Provide plants with a steady water supply.
  • Lower utility bills.

Vertical Gardening in Kitchen Spaces

For those with limited space, vertical gardening is a game-changer, turning walls and vertical spaces into verdant produce patches.

Vertical Gardening in Kitchen Spaces

Hanging Planters

These are excellent for herbs and smaller plants. They:

  • Offer a decorative touch to walls or balconies.
  • Are easy to manage and harvest.
  • Save floor space.

Trellises and Climbing Plants

Using trellises for beans, cucumbers, or even tomatoes can:

  • Maximize yield in a small footprint.
  • Provide shade for plants below.
  • Create a green wall that’s visually appealing.

Pallet Gardens

Repurposing wooden pallets into vertical planters is both sustainable and efficient. These:

  • Can host a variety of plants.
  • Are easily mounted on walls.
  • Offer a rustic aesthetic to the garden.

Color Coordination in the Garden

While productivity is a primary goal, a splash of color can elevate the mood and aesthetics of your garden.

Color-themed Beds

Planting beds can follow a color theme, like:

  • Cool colors: Featuring blues, purples, and greens.
  • Warm colors: Incorporating reds, oranges, and yellows.

Complementary Planting

Planting complementary colors next to each other, like purple basil beside bright yellow peppers, can:

  • Add vibrancy.
  • Enhance visual appeal.
  • Differentiate various sections of the garden.

Combining Flowers and Veggies

Flowers aren’t just for aesthetics. They play a functional role too.

Pest Deterrence

Certain flowers, like marigolds or nasturtiums, can deter pests. Integrating them:

  • Reduces the need for chemical repellents.
  • Adds color and diversity.
  • Encourages beneficial insects.

Companion Planting

Some flowers can enhance the growth of specific vegetables. For instance:

  • Planting chrysanthemums can protect nearby plants from nematodes.
  • Sunflowers can act as natural trellises for climbing beans.

Pollinator Attraction

Flowering plants attract pollinators like bees, butterflies, and birds. This:

  • Ensures better pollination for vegetables.
  • Increases biodiversity.
  • Makes the garden a hub of activity and life.

Incorporating these techniques and ideas can transform your kitchen garden from a simple produce patch to a vibrant, sustainable, and aesthetically pleasing space that nourishes both the body and the soul.

Ensuring Proper Sunlight Exposure

Sunlight: the powerhouse for photosynthesis, a driving force behind every lush, verdant garden. When it comes to kitchen garden design, understanding sunlight needs is pivotal.

Know Your Plants’ Needs

Each plant species has its unique sunlight requirements. While some vegetables thrive in full sun, others prefer partial shade. Research:

  • Full Sun Plants: Most tomatoes, peppers, and squashes require 6-8 hours of direct sunlight daily.
  • Partial Sun Plants: Leafy greens like spinach and lettuce can do well with just 4-5 hours.

Observe and Analyze Your Space

Before planting, observe your intended garden area across different times of the day. Track:

  • Areas that receive consistent sunlight.
  • Spots that remain shaded or receive dappled sunlight.

Adjust According to Seasons

Sun angles change with seasons. Areas bathed in summer sun may be shady in winter. Consider:

  • Temporary structures like shading nets for summer.
  • Moving potted plants to capture seasonal sunlight.

Use Reflective Surfaces

For gardens with limited sunlight, using reflective surfaces can amplify available light. White walls, light-colored fences, or even aluminum foils can:

  • Redirect sunlight to plants.
  • Enhance light in shaded areas.

Incorporating Wildlife into Your Garden

A garden buzzing with life isn’t just about plants. The flutter of butterflies, the hum of bees, and the chirping of birds can add vitality.

Incorporating Wildlife

Create Habitats

Incorporate:

  • Birdhouses: Invite birds that can help with pest control.
  • Bee Hotels: Support pollination by attracting solitary bees.

Plant Pollinator-friendly Plants

Choose flowers like lavender, sunflowers, or marigolds which:

  • Attract bees, butterflies, and other pollinators.
  • Enhance garden productivity.

Water Sources

Adding birdbaths or shallow dishes filled with water:

  • Quenches the thirst of birds and insects.
  • Attracts wildlife, making your garden a lively ecosystem.

Avoid Harmful Chemicals

Pesticides can harm beneficial insects. Opt for organic, wildlife-friendly methods.

Maintenance Tips

A thriving garden requires regular attention. Here are some guidelines:

Regular Inspections

Check plants routinely for:

  • Signs of diseases.
  • Pest infestations.
  • Nutrient deficiencies.

Pruning

Regularly prune:

  • Dead or diseased branches.
  • Overgrown areas to ensure sunlight penetration.

Mulching

Mulch with organic matter:

  • Retains soil moisture.
  • Suppresses weed growth.
  • Enriches the soil.

Garden Tools

Regularly clean and sharpen garden tools to:

  • Ensure efficient gardening.
  • Prevent the spread of diseases.

Organic Gardening Practices

Embracing organic practices means healthier produce and a healthier ecosystem.

Natural Fertilizers

Using compost, manure, or seaweed solutions:

  • Feeds plants sustainably.
  • Improves soil health and structure.

Beneficial Insects

Release natural predators like ladybugs or lacewings to:

  • Combat pests.
  • Reduce the need for chemical pesticides.

Crop Rotation

Changing plant positions each season can:

  • Break pest and disease cycles.
  • Improve soil fertility.

Watering Tips

Water is life. But knowing when and how to water is crucial.

Morning Watering

Watering in the early morning:

  • Reduces water evaporation.
  • Prevents fungal diseases.

Water at the Roots

Direct water to the plant base:

  • Ensures roots receive adequate moisture.
  • Minimizes leaf wetness and related diseases.

Use Soaker Hoses or Drip Irrigation

These systems:

  • Deliver water directly to the root zone.
  • Conserve water and reduce wastage.

Adjust According to Weather

During rainy spells, reduce watering. In hot, dry phases, increase it, but always ensure soil doesn’t remain soggy, as it can harm roots.

Integrating these practices will ensure a sustainable, productive, and lively kitchen garden. It becomes a space not just for food but for life, color, and vitality.

Fertilization and Soil Quality

Soil: The foundation of every thriving garden. Ensuring it’s fertile and well-maintained is paramount for robust kitchen garden growth.

Fertilization and Soil Quality

Understanding Soil Types

Different plants thrive in different soil types. Get a soil test done to:

  • Determine your soil’s pH level.
  • Ascertain nutrient deficiencies or overloads.
  • Plan proper fertilization strategies accordingly.

Organic Fertilizers

Instead of synthetic fertilizers, which might harm the ecosystem, opt for organic ones:

  • Composting: Kitchen waste, lawn clippings, and dried leaves can be transformed into nutrient-rich compost.
  • Manure: Aged cow or chicken manure can provide the soil with essential nutrients.

Soil Aeration

Compact soil impedes root growth. Periodically:

  • Use garden forks to aerate the soil.
  • Ensure water and nutrients seep well into the ground.

Maintaining Soil Moisture

Incorporate coir or peat moss to:

  • Retain soil moisture.
  • Ensure consistent water supply for plant roots.

Pest and Disease Management

An infestation or disease can decimate an entire season’s hard work. Prevention and timely intervention are key.

Beneficial Insects

Encourage natural predators such as:

  • Ladybugs to combat aphids.
  • Birds to manage insect populations.

Organic Pesticides

When intervention is needed:

  • Use neem oil or insecticidal soaps.
  • Ensure they don’t harm beneficial insects or the environment.

Regular Inspections

Check plants for:

  • Discoloration.
  • Holes or bite marks.
  • Signs of fungus or mold.

Natural Repellents

Certain plants act as repellents:

  • Marigolds deter nematodes.
  • Lavender repels moths and flies.

Harvesting and Storage Solutions

Reaping the rewards of your labor is the most fulfilling part. Proper harvesting and storage maximize your garden’s yield.

Harvesting and Storage Solutions

Timely Harvesting

Understanding when to harvest is crucial:

  • Pick leafy greens early morning when they’re most crisp.
  • Harvest tomatoes when they have a rich, even color.

Post-Harvest Care

Once harvested:

  • Clean vegetables and herbs of dirt or pests.
  • Dry them thoroughly to prevent mold during storage.

Storage Solutions

Based on what you grow:

  • Use root cellars for potatoes and onions.
  • Refrigerate leafy greens in moisture-proof containers.
  • Dry and store herbs in airtight jars.

Investing in Garden Furniture

Your kitchen garden can also be a sanctuary of relaxation.

Garden Furniture

Choosing Furniture

Select furniture that:

  • Complements your garden aesthetics.
  • Is durable and can withstand outdoor conditions.

Placement and Integration

Position seats or benches:

  • Facing sunlit areas during the morning or evening.
  • Near fragrant herbs or flowers for a sensory experience.

Maintaining Garden Furniture

Regular upkeep ensures longevity:

  • Clean and oil wooden furniture to protect against decay.
  • Store or cover furniture during harsh weather conditions.

Incorporating these aspects will not only ensure a productive kitchen garden but also create a serene oasis for relaxation, reflection, and reconnection with nature.

Conclusion

Creating the perfect kitchen garden is a blend of art and science. It’s about understanding the intricacies of nature, the needs of each plant, and marrying it with aesthetic appeal. Through careful planning, the right tools, and continuous maintenance, your kitchen garden can be a source of pride, joy, and delicious, fresh produce. Whether you’re a seasoned gardener or a green-thumbed newbie, the beauty of a kitchen garden is its adaptability and scalability. Here’s to fresh salads, organic produce, and the pure joy of harvesting from your backyard!

Potager Garden Design: Creating Beautiful Landscapes

The art of potager garden design brings together aesthetics, functionality, and sustainability. Envision a fusion of the traditional vegetable plot with the beauty of ornamental gardens, where each plant serves dual purposes – nourishing the soul and the body. By embracing potager garden designs, one can transform a simple kitchen garden into a work of art that’s not only visually striking but also offers organic, fresh produce for the kitchen table.

Potager, a French term, stands for “kitchen garden.” It’s the crux of organic cultivation, seamlessly combining the principles of historical gardening with modern sustainable cultivation techniques. These gardens, deeply rooted in French gardening traditions, prioritize the perfect blend of garden aesthetics with productive vegetable plots, ensuring that the garden is a feast for the eyes as much as it is for the palette.

In this article, we delve deep into potager garden design, offering insights and inspiration. We will explore creating an organic haven, integrating raised beds, and practicing companion planting. Let’s begin our journey into the beautiful world of potager garden design.

Potager Garden Design Ideas

Edible Landscape & Kitchen Garden Fusion

Potager Garden Design

The heart of potager garden design lies in its ability to intertwine the edible landscape with the beauty of a kitchen garden. Instead of distinct sections, mix ornamental plants with perennial vegetables and edible flowers. The result? A visually appealing garden layout that also offers fresh produce.

  • Herbs Integration: Nestle herbs amidst flowering plants, allowing rosemary to rub shoulders with roses or basil to bloom beside begonias.
  • Container Gardening & Vertical Gardening: Especially effective for small-space gardening. Use vertical space to grow climbing vegetables or employ containers for dwarf fruit trees.
  • Watering Techniques & Garden Paths: Create gravel paths that lead to distinct sections of your garden, making it easier to water and maintain. These paths add a rustic charm while serving a functional purpose.

Garden Aesthetics & Art

Potager gardens are a celebration of garden aesthetics. Every plant, be it a humble beet or a radiant rose, is chosen for its beauty.

  • Seasonal Planning: Ensure a constant splash of colors by planting flowers and vegetables that bloom in different seasons.
  • Garden Art: Integrate decorative elements like birdbaths, sculptures, or mosaic stepping stones to accentuate the garden’s charm.
  • Garden Maintenance & Care: Regular garden care ensures that the garden remains an inviting haven. Employ organic techniques for pest control and make use of tools & resources that promote sustainable gardening.

Creating an Organic Potager Garden

Organic Potager Garden

Organic Cultivation & Soil Preparation

The foundation of a successful potager garden lies in its soil. Embrace organic cultivation, focusing on enriching the soil with compost, manure, and organic matter.

  • Companion Planting: This age-old method involves planting certain crops next to each other to deter pests and enhance growth. For instance, marigolds can ward off nematodes, benefiting tomatoes planted nearby.
  • Crop Rotation: This permaculture principle ensures soil health, preventing the depletion of essential nutrients and deterring pests.
  • Raised Beds & Perennial Vegetables: Raised beds offer excellent drainage, making them ideal for a potager garden. Fill them with perennial vegetables for year-round produce.

Historical Gardening & Modern Techniques

Drawing inspiration from historical gardening, modern potager gardens utilize contemporary techniques for optimal results.

  • Harvesting Tips: Harvest vegetables when they’re young to ensure the best flavor. For instance, zucchinis taste best when they’re small and tender.
  • Sustainable Cultivation: Embrace methods that reduce water wastage, enhance soil health, and decrease carbon footprints. This includes mulching, drip irrigation, and organic pest control.

Wrap Up

Potager garden designs are a testament to the possibilities that arise when we merge functionality with beauty. By focusing on the principles of organic cultivation, seasonal planning, garden aesthetics, and sustainable practices, one can create a landscape that’s not only breathtakingly beautiful but also bountiful. These gardens are an embodiment of the timeless harmony between nature and design, between the past and the present.

Whether you’re a seasoned gardener or a novice, embarking on the journey of potager gardening promises not just a garden, but a living work of art, a space that nourishes the soul, delights the eyes, and satiates the taste buds.

So, as you step into the world of potager garden design, remember that each plant, path, and art piece you integrate tells a story, crafting a landscape that’s uniquely yours.

Companion Planting

Companion planting is an ancient technique hailing from various indigenous cultures, intertwined in the very fabric of potager garden design. At its core, companion planting is about understanding the symbiotic relationship between different plant species.

  • Benefits: Plants can offer mutual benefits when grown together. Some might deter pests that generally harm their companion, while others can enhance growth or flavor. For instance, tomatoes thrive next to basil, not just in Italian dishes but in gardens too!
  • Common Combinations: Beans and corn are another classic pair. While beans fix nitrogen in the soil benefiting corn, corn provides a natural trellis for beans to climb. Marigolds, with their pest-repellent properties, are beneficial neighbors to a plethora of veggies, especially tomatoes and peppers.
  • Cautions: It’s essential to note that not all plants play nicely together. Potatoes and carrots should be kept apart to avoid cross-contamination of pests and diseases.

Edible Flowers

When we think of potager gardens, edible flowers are quintessential. They add vibrancy to the garden and the dining table.

Edible Flowers

  • Beauty with Benefits: Besides their aesthetic appeal, many flowers offer a burst of flavor and nutrients. Nasturtiums, for instance, provide a peppery zing to salads, while lavender can be transformed into delightful desserts.
  • Integration in Dishes: Flowers like pansies and violas can be candied and used as cake decorations, and rose petals can be turned into sumptuous jams.
  • Safety First: While edible flowers offer a unique culinary experience, it’s essential to be sure of their edibility. Always consult a reliable source, and avoid flowers from commercial nurseries that might have been treated with pesticides.

Essential Plants

Every potager garden, regardless of its size or design, has some quintessential plants that serve both an aesthetic and culinary purpose.

  • Vegetables: Classic vegetables like tomatoes, lettuce, and bell peppers are staple in most kitchen gardens. Not only do they provide fresh produce, but they also come in a variety of colors and shapes, enhancing the garden’s visual appeal.
  • Herbs: Essential both for culinary and medicinal uses. Basil, mint, rosemary, and thyme are just a few herbs that flourish in potager gardens.
  • Fruits: Dwarf fruit trees or berry bushes can be integrated for an added dimension. They offer seasonal blooms and delicious produce, making them invaluable to a potager design.

Seasonal Planning

A thriving potager garden is a result of meticulous seasonal planning, ensuring a year-round supply of fresh produce and a constantly evolving tapestry of colors.

  • Spring: The season of new beginnings. Plant leafy greens, radishes, and peas. Early spring flowers like pansies can also be introduced.
  • Summer: Time for sun-loving veggies like tomatoes, zucchinis, and bell peppers. Integrate summer blooms like sunflowers and marigolds.
  • Autumn: Root vegetables like carrots and beets thrive now. Chrysanthemums can add a splash of color.
  • Winter: While many consider it a dormant period, hardy vegetables like kale and Brussels sprouts can be grown. Evergreen herbs will ensure the garden doesn’t lose its green hue.

Potager Design for Small Spaces

Small space doesn’t mean compromising on a potager garden’s charm or productivity.

  • Vertical Gardening: Use trellises, wall hangers, and stacked planters to maximize space. Cucumbers, beans, and even small melons can be grown vertically.
  • Container Gardening: Perfect for those with patios or balconies. Containers can house a range of vegetables, herbs, and flowers, provided they have adequate drainage and are of the right size.
  • Intensive Planting: Planting closely not only maximizes yield but also reduces weed growth. However, ensure plants aren’t overcrowded, as it can lead to stunted growth or disease spread.
  • Multifunctional Plants: Choose plants that serve multiple purposes. For example, chives can be used as a border plant, offering both visual appeal and culinary use.

Integrating Herbs

Herbs are the aromatic soul of the potager garden, providing both culinary flavors and medicinal benefits.

Integrating Herbs

  1. Diverse Selection: When considering herbs, think beyond just basil and rosemary. Incorporate a range of herbs, from the pungent oregano and thyme to the soft flavors of lemon balm and chamomile.
  2. Medicinal and Culinary: Herbs aren’t only about flavoring dishes. Lavender, known for its soothing fragrance, offers relaxation properties. Echinacea can boost the immune system, and mint aids digestion. Thus, your potager can be a source of both taste and health.
  3. Strategic Placement: Herbs can deter pests. Plant basil near tomatoes to keep whiteflies away. Similarly, chives can prevent aphid attacks when grown near roses.
  4. Harvesting and Preservation: Herbs are best harvested just before flowering for the best flavor. To preserve, consider drying or making herb-infused oils and vinegars.
  5. Seasonal Shift: While many herbs like basil thrive in summer, others like parsley can continue growing in cooler temperatures. Account for these differences in your garden layout.

Permaculture Principles

Rooted in sustainability, permaculture principles are a beacon for the modern potager garden.

  1. Holistic Approach: In permaculture, every element of the garden has a purpose. From plants that fix nitrogen to those that attract beneficial insects, everything plays a part in the ecosystem.
  2. Zoning: Design the garden in zones, with Zone 1 containing frequently harvested plants and Zone 5 being the wilderness area. This strategic planning maximizes efficiency and productivity.
  3. Stacking Functions: The idea is to get multiple benefits from a single garden element. For instance, a fruit tree can provide shade (microclimate), habitat for birds, and of course, fruits.
  4. Water Conservation: Permaculture heavily emphasizes on water-saving techniques, such as contour gardening and swales, to harness rainwater and reduce irrigation needs.

Modern Takes on Traditional Potager Gardens

Modern potagers beautifully blend the timeless charm of traditional designs with contemporary innovations.

  1. Aesthetic Shift: While traditional potagers focused primarily on productivity, modern designs heavily emphasize aesthetics. Think geometric designs, patterns, and themes.
  2. Technological Integration: Drip irrigation systems, smart garden sensors to monitor soil health, and automated lighting in parts are now part of many potager gardens.
  3. Sustainable Practices: Composting, mulching, and organic pest control have found their rightful place in contemporary potager gardens.
  4. Global Influence: While potagers have their roots in France, today’s gardens are a melting pot of global influences. It’s not uncommon to find bok choy, turmeric, or even aloe vera in a modern potager.

Raised Bed Ideas

Raised beds are both functional and aesthetic assets to a potager garden.

  1. Material Diversity: From classic wooden frames to modern metal or even repurposed materials like bricks or cinder blocks, there’s a myriad of choices available.
  2. Shapes and Sizes: While rectangles are common, consider other shapes like hexagons or circles. Various depths cater to different plants, from shallow-rooted greens to deeper-rooted tomatoes or carrots.
  3. Location and Arrangement: Position raised beds for optimal sunlight, and if space allows, in patterns that provide ease of access and aesthetic appeal.
  4. Soil Mix: A benefit of raised beds is the ability to customize the soil mix. Ensure good drainage and nutrient balance.

Soil Preparation for a Productive Potager

Soil health is paramount for a successful potager garden.

Soil Preparation for a Productive Potager

  1. Testing: Begin with a soil test. This will give insights into pH levels and nutrient deficiencies.
  2. Amendment Additions: Based on the test, enrich the soil. Compost adds organic matter, perlite or sand improves drainage, and specific fertilizers can correct nutrient imbalances.
  3. Tilling vs. No-Till: While tilling can aerate and mix in amendments, there’s growing advocacy for no-till gardening. This method preserves soil structure and microbial life.
  4. Mulching: Applying a layer of organic mulch, like straw or wood chips, conserves moisture, suppresses weeds, and gradually breaks down to nourish the soil.
  5. Yearly Maintenance: Post-harvest, consider green manures or cover crops to replenish soil nutrients. Regularly adding compost will also maintain soil vitality.

Ornamental Elements

Ornamental elements in a potager garden strike a balance between functionality and aesthetics.

  1. Floral Borders: Creating a border with flowers like lavender or marigold not only adds a splash of color but also wards off pests. Their vibrant hues attract pollinators essential for vegetable fruiting.
  2. Garden Art: Adding a sundial, a garden gnome, or a decorative birdhouse can introduce whimsy and charm. Such elements become focal points, drawing the eye and making the garden feel personal and lived-in.
  3. Trellises and Arbors: These functional structures, when adorned with climbing roses or grapevines, become ornamental features. They add vertical interest and define different garden sections.
  4. Ponds and Water Features: The gentle sound of trickling water can soothe the senses. Beyond their visual appeal, ponds attract beneficial insects and offer a habitat for aquatic plants and animals.
  5. Structural Plants: Think of plants like rosemary or boxwood. They have a strong form and can be shaped or pruned to create patterns, hedges, or even topiaries. They lend an architectural quality to the potager.
  6. Ornamental Vegetables: Swiss chard with its vibrant stalks, purple kohlrabi, or flowering kale can be both decorative and edible.

Efficient Watering Techniques

Water is the lifeblood of any garden. Using it efficiently is both an economic and an environmental imperative.

Efficient Watering Techniques

  1. Drip Irrigation: This method conserves water by delivering it directly to plant roots. By reducing water contact on foliage, it also curbs fungal diseases.
  2. Soaker Hoses: These porous hoses deliver water slowly, ensuring deep saturation. They are especially beneficial for raised beds or specific rows of plants.
  3. Rainwater Harvesting: Collecting rainwater in barrels or other containers reduces dependence on municipal supply. It’s also softer and free of chemicals, making it ideal for plants.
  4. Mulching: By retaining moisture, mulch reduces the frequency of watering. Organic mulches, as they decompose, also enrich the soil.
  5. Watering Timing: Watering in the early morning or late afternoon minimizes evaporation. It ensures that plants have sufficient moisture during the heat of the day.
  6. Moisture Meters: These tools indicate when plants truly need water, eliminating guesswork and over-watering.

Gravel Paths and Potager Aesthetics

Gravel paths play a multifaceted role in potager gardens.

  1. Defining Spaces: Gravel paths clearly demarcate various sections, guiding visitors and creating distinct garden rooms.
  2. Aesthetic Appeal: The crunch underfoot, the contrasting texture with plant foliage, and the changing color when wet—all add sensory delight.
  3. Ease of Maintenance: Gravel paths suppress weed growth and are easy to refresh by adding a new top layer.
  4. Drainage: Unlike solid paved paths, gravel allows water to percolate, ensuring no waterlogging after rains.
  5. Versatility: Depending on the garden’s design theme, one can choose from fine gravel, pebble-sized, or chunky stone. They can be bordered with bricks, wood, or steel for a polished look.

Vertical Gardening in a Potager

Elevating the garden, literally and figuratively.

Vertical Gardening in a Potager

  1. Space Optimization: For those with limited space, growing upwards makes complete sense. Beans, peas, cucumbers, and even some varieties of tomatoes thrive when allowed to climb.
  2. Pallet Planters: Repurposed wooden pallets can be mounted vertically and filled with soil. They’re ideal for shallow-rooted plants like lettuce, strawberries, or herbs.
  3. Green Walls: These are walls densely covered with plants. Besides being a visual treat, they can be a source of fresh produce right at arm’s length.
  4. Hanging Planters: These are perfect for trailing plants like nasturtium or cherry tomatoes. When hung at different levels, they create a layered look, adding depth and interest.
  5. Trellises and Nets: Simple structures on which plants can be trained to grow. They can be decorative, made of wood or metal, and can also be adorned with fairy lights for a magical night-time effect.

Selecting the Right Vegetables

The core of a potager, vegetables should be chosen based on several factors.

  1. Local Climate: Understand the growing season. While tomatoes might thrive in summer, broccoli and brussels sprouts prefer cooler weather.
  2. Taste Preferences: Grow what you love to eat. It ensures that the harvest is eagerly awaited and consumed.
  3. Growing Conditions: Some vegetables like carrots need deep soil, while lettuce is content with shallow beds. Match plants to the garden’s conditions.
  4. Harvest Time: Introduce a mix of fast-growing veggies like radishes with those that take longer, like pumpkins, ensuring a staggered harvest.
  5. Rotation Benefits: Rotating crops helps break pest cycles and rejuvenates soil. If legumes like beans fixed nitrogen in the soil last season, this season might be great for nitrogen-loving leafy greens.
  6. Companion Benefits: Certain vegetables, when grown together, mutually benefit. Tomatoes and basil are not just a culinary pair; basil deters pests away from tomatoes.

Aesthetically Pleasing Edible Landscapes

The melding of beauty and utility in a garden setting is the pinnacle of successful potager garden design. Edible landscapes have evolved from just rows of crops to be an artist’s palette of colors, textures, and tastes.

  1. Texture Contrast: The feathery fronds of dill or fennel can offset the broad, glossy leaves of a pepper plant. This juxtaposition can create pockets of visual interest, inviting one to linger and explore.
  2. Seasonal Colors: As seasons change, so should your garden’s color palette. From the bright greens of spring lettuces to the rich purples of autumn eggplants, there’s always a hue to dominate and dazzle.
  3. Height Dynamics: Play with plant heights for a layered look. While root vegetables like carrots keep a low profile, corn or Jerusalem artichokes reach for the sky.
  4. Borders and Hedges: Edibles like rosemary or blueberry shrubs can double up as borders, creating a delightful and productive boundary.
  5. Sensory Appeal: Engage more than just the eyes. Fragrant herbs, rustling corn leaves, or the tactile pleasure of fuzzy sage leaves add a multisensory dimension.

Incorporating Garden Art

Art, when integrated into the potager garden, not only serves as a focal point but also tells a story, adding layers of meaning and personal touch.

  1. Sculptures: From classic Greco-Roman statues to modern abstract pieces, sculptures can anchor a space and make powerful visual statements.
  2. Birdbaths and Feeders: These aren’t just ornamental. They attract birds that help in pest control and provide a delightful visual and auditory treat.
  3. Wind Chimes: The gentle tinkling adds an aural dimension, creating a serene ambiance, especially during breezy evenings.
  4. Stepping Stones: Hand-painted or mosaic stepping stones can guide a visitor through the garden, each step telling a story or revealing a pattern.
  5. Garden Benches: Not just for resting, a beautifully crafted bench can serve as a viewpoint, drawing attention to a particularly stunning garden vignette.

Crop Rotation Tips

A vital practice in organic cultivation, crop rotation ensures soil health, breaks pest cycles, and maximizes yield.

  1. Understand Plant Families: Rotating crops effectively requires knowledge of plant families. Plants of the same family, like tomatoes and peppers, might be susceptible to similar pests or diseases.
  2. Follow a Four-Year Rule: Ideally, a particular crop or its family should not be planted in the same spot for at least four years.
  3. Legumes are Friends: Plants like beans and peas fix nitrogen. Planting them replenishes the soil, making it richer for subsequent crops.
  4. Remember Root Depths: Shallow-rooted plants like lettuce can follow deep-rooted ones like carrots. This ensures different soil layers are utilized and nutrients are uniformly consumed.
  5. Keep Records: A garden diary can be a game-changer. It aids in tracking what was planted where, ensuring effective rotation and helping predict potential problems.

Maximizing Space in a Potager Layout

Space is often a premium in gardens, especially urban ones. Making the most of every inch ensures bountiful harvests and a lush look.

  1. Vertical Gardening: As discussed previously, going upwards can save ground space. Trellises, arbors, and climbing frames can support beans, cucumbers, and even melons.
  2. Interplanting: This involves planting quick-growing crops like radishes amidst slower ones like broccoli. By the time the broccoli needs space, the radishes are harvested.
  3. Succession Planting: Once one crop is harvested, immediately plant another. This keeps the soil productive and the garden full.
  4. Square Foot Gardening: Dividing the garden into squares and planting different crops in each maximizes space and offers an organized, clean look.
  5. Containers and Pots: For those who don’t have ground space, container gardening can be the answer. Many vegetables and herbs thrive in pots, which can be aesthetically arranged and easily moved.

Challenges in Potager Garden Maintenance

Potager gardens, an epitome of beauty and functionality, bring forth a unique set of challenges that garden enthusiasts need to address. The melding of ornamental and edible plants can sometimes complicate upkeep.

Potager Garden Maintenance

  1. Balancing Beauty and Bounty: Ensuring that the garden remains attractive while harvesting is a perpetual challenge. Regularly removing mature plants for their produce can leave gaps. Planning is required to ensure successive plantings or integrating plants that remain attractive post-harvest.
  2. Pest Management: Edible landscapes are a magnet for pests. Introducing natural predators, such as ladybugs or lacewings, can be a sustainable way to tackle them, but it requires knowledge and attention to balance.
  3. Seasonal Changes: A potager’s aesthetics can greatly vary with seasons. Winter might strip it of its vibrancy, requiring gardeners to think of strategies like integrating evergreens or winter vegetables.
  4. Soil Health: Mixing various plants means different nutritional needs. Regular soil testing and amendment might become necessary to cater to this diverse plant palate.
  5. Watering Needs: Ornamentals and edibles might have different watering requirements. Zoning the garden based on water needs can help, but it’s a challenge in itself.

Tools for Designing Your Potager

Designing a potager garden necessitates specific tools, not just for creation but also for its continuous evolution.

  1. Garden Planner Apps: Digital apps help in visualizing the garden layout, keeping track of plantings, and even offering crop rotation suggestions.
  2. Soil Test Kits: These kits determine the pH and nutrient levels, enabling gardeners to tailor their soil amendments accordingly.
  3. Sketching Tools: Sometimes, old school is gold. Pencils, rulers, and graph paper can help in creating detailed layout plans.
  4. Reference Books: Books on permaculture, companion planting, and organic gardening can serve as invaluable resources for both beginners and seasoned gardeners.
  5. Weather Apps: Monitoring local weather forecasts helps in planning watering, planting, and harvesting activities.

Garden Care

Diligent care is the linchpin that transforms a potager garden from good to grand.

Garden Care

  1. Regular Pruning: This ensures plants remain healthy, look tidy, and produce bountifully. Whether it’s removing deadheads from flowers or pinching off tomato suckers, regular pruning is paramount.
  2. Soil Enrichment: Regular composting, mulching, and organic fertilization ensure that the garden’s soil remains rich and productive.
  3. Disease Watch: Regularly inspect plants for signs of diseases. Early detection can lead to swift action, saving large sections of the garden from infestation.
  4. Weed Control: Weeds not only mar the garden’s beauty but also hog essential nutrients. Manual weeding, mulching, or using natural herbicides can help in managing them.
  5. Watering Regime: Setting up a regular and efficient watering system, like drip irrigation, ensures plants get water without waste.

Sustainability Practices

A potager garden, with its emphasis on organic cultivation and holistic growth, should underscore sustainability.

  1. Composting: Recycling garden waste back into the soil enriches it and reduces the need for synthetic fertilizers.
  2. Rainwater Harvesting: Collecting rainwater to irrigate the garden is both economical and ecologically sound.
  3. Beneficial Insects: Introducing and protecting insects like bees, ladybugs, and butterflies aids in pollination and pest control, reducing the reliance on chemicals.
  4. Local and Native Plants: Incorporating local or native plants reduces the garden’s water and care needs. They’re naturally adapted to the climate and pest pressures.
  5. Mulching: Using organic mulches, like straw or leaves, not only suppresses weeds but also retains soil moisture and regulates temperature, reducing watering needs.

Conclusion

The potager garden, a beautiful fusion of the practical and the aesthetic, is not just a space but a living testament to the harmony between humans and nature. By acknowledging the inherent challenges in its maintenance and employing the right tools, we pave the way for a vibrant and sustainable garden. With unwavering commitment to care, and an emphasis on sustainable practices, the potager evolves from being merely a plot of land to a holistic ecosystem. As we cultivate our garden, we simultaneously cultivate an understanding of the delicate balances within nature. By intertwining art with edibles, and tradition with innovation, the potager garden stands as a symbol of resilience, beauty, and sustainability in our backyards. It reminds us that with knowledge, creativity, and a dash of love, we can create spaces that nourish both the body and the soul.

Healing Garden Design: A Guide to Therapeutic Landscapes

In today’s fast-paced world, with an ever-increasing disconnect from nature, the importance of having serene spaces for mental and physical wellness cannot be overstated. Enter the realm of healing garden design. These aren’t your typical gardens; they’re thoughtfully designed landscapes created to offer therapeutic benefits, provide a sense of well-being, and serve as catalysts for mental recovery. In this guide, we will delve deep into the principles of healing garden design, and explore the features that make a garden truly therapeutic.

From the lush vegetation that offers a sensory experience to the carefully chosen color palette based on color psychology, healing gardens are a blend of art, science, and nature. Whether it’s integrating art pieces, choosing the right furniture, or even understanding the role of wildlife and seasonality, every detail matters. Ready to embark on this restorative journey?

Healing Garden Design Principles

Healing Garden Design

Therapeutic

A healing garden is, first and foremost, designed for therapeutic benefits. Grounded in holistic approaches, these gardens should:

  • Address emotional, psychological, and physical health needs.
  • Foster recovery and restoration.
  • Promote a sense of peace and tranquility.

Research suggests that being in a nature-based setting can have numerous health benefits, including reducing stress, anxiety, and depression. When designing a therapeutic garden, the ultimate aim is to provide an environment conducive to healing.

Accessibility

One of the primary principles behind healing garden design is accessibility. Everyone, regardless of age or physical capability, should be able to access and enjoy these therapeutic spaces. This means:

  • Smooth pathways.
  • Ramps for those using wheelchairs.
  • Seating at regular intervals.
  • Clearly marked signage.

Ensuring that these gardens are inclusive not only enhances their therapeutic value but also emphasizes a deep respect for all individuals.

Holistic Approach

Gardens designed for healing aren’t just about the physical layout. It’s a combination of:

  • Materials: Natural, organic materials are preferred. Avoiding synthetic or overly processed materials can ensure the space feels genuinely natural.
  • Design Techniques: Techniques like winding paths or secluded nooks can provide a sense of exploration and privacy, respectively.
  • Art Integration: Incorporating art pieces can stimulate the mind and provide focal points in the garden. Whether sculptures, murals, or interactive art pieces, they add a unique touch to the space.
  • Color Psychology: The colors chosen, both in plants and other design elements, can influence emotions. For instance, blues and greens are often seen as calming, while reds can be energizing.

Therapeutic Garden Features

Sensory Plants

Plants play a pivotal role in healing gardens, primarily because they offer a multisensory experience. When selecting plants, consider:

  • A variety of textures.
  • Plants with calming fragrances.
  • Seasonality, ensuring something is always in bloom or has visual appeal.

Some popular choices include lavender for its calming scent and soft texture, and ornamental grasses that rustle gently with the breeze, providing a soothing auditory experience.

Water Features

The sound of flowing water can be deeply restorative. Water features, whether a babbling brook, a fountain, or a tranquil pond, can:

  • Mask unwanted noise from the surroundings.
  • Provide a peaceful focal point.
  • Offer opportunities for interaction, like stepping stones or places to sit and dip hands or feet.

Furniture Choices

Seating arrangements and other furniture should:

  • Be comfortable.
  • Blend seamlessly with the natural environment.
  • Provide options for solitude and group gatherings.

Consider materials that age gracefully outdoors and positions that offer shade during hotter parts of the day.

Maintenance

A well-maintained garden is more inviting and therapeutic. Maintenance considerations include:

  • Pruning and care of plants to ensure they thrive.
  • Cleaning and upkeep of water features.
  • Regular checks for safety hazards.

Wildlife & Cultural Elements

Attracting local wildlife like birds and butterflies can enhance the therapeutic nature of the garden. Bird feeders, butterfly-attracting plants, or even small fish ponds can be instrumental.

Incorporating cultural elements can make the garden resonate more with its visitors. Think of sculptures, designs, or even plant choices that reflect local traditions and history.

Future Trends

Healing garden design is ever-evolving. Some future trends include:

  • Technology integration, where soothing music or guided meditations could be available.
  • More emphasis on sustainability and native plants.
  • Spaces tailored for specific therapies or age groups.

Importance of Gardens for Well-being

The intrinsic relationship between humans and nature is a testament to our evolution. Since time immemorial, people have found solace, peace, and a sense of purpose within the embrace of the great outdoors. Gardens, in particular, have always held a special place in this narrative.

  • Emotional Respite: In an increasingly urbanized world, gardens offer a rare chance to escape the concrete jungle. The sheer act of being surrounded by flora, fauna, and the sounds of nature provides an emotional sanctuary, rejuvenating our tired souls.
  • Physical Benefits: Green spaces invite movement, whether it’s gardening, walking, or practicing yoga. These physical activities boost cardiovascular health, strengthen muscles, and increase flexibility. Moreover, the presence of plants improves air quality by reducing pollutants.
  • Cognitive Stimulation: Engaging with gardens can sharpen cognitive skills. From identifying different plant species to understanding the intricacies of ecosystems, gardens provide a rich tapestry of learning opportunities.

Designing Gardens for Mental Health

When designing gardens with mental health in mind, it’s essential to prioritize spaces that cater to emotional needs and foster a sense of belonging and peace.

Designing Gardens for Mental Health

  • Sacred Spaces: Create secluded areas where individuals can reflect, meditate, or simply escape from the daily hustle and bustle. These spaces should be shielded from the outside world, perhaps using tall plants, walls, or naturally flowing water.
  • Color Psychology: The hues present in the garden can play a pivotal role in influencing emotions. While soft pastels might soothe, bright vibrant colors can invigorate and uplift.
  • Sound Elements: Incorporate elements like wind chimes, rustling leaves, or bubbling brooks. Sound has a profound effect on our psyche, and carefully curated auditory elements can enhance tranquility.

Healing Garden Elements

Incorporating specific elements into the garden can significantly enhance its therapeutic impact.

  • Water Features: Beyond their visual appeal, water features like ponds, waterfalls, or fountains introduce the soothing sound of flowing water. This sound can mask urban noises, creating an oasis of calm.
  • Art Integration: Introducing sculptures, murals, or other artistic elements can provide a focal point, encouraging contemplation and sparking creativity.
  • Furniture Choices: Seating arrangements should not only be comfortable but also positioned to offer the best views, shade during hot days, or sunlight during colder months. Consider materials that age gracefully and echo the natural environment.

Sensory Plants in Therapeutic Gardens

A core aspect of any therapeutic garden is its plant selection. Sensory plants serve to stimulate all five senses, immersing the visitor in a holistic experience.

  • Sight: Brightly colored flowers like marigolds or sunflowers catch the eye and lift the spirits.
  • Touch: Plants with varied textures, like the soft lamb’s ear or the rugged bark of a pine tree, invite tactile exploration.
  • Smell: Fragrant plants like lavender or jasmine can transport an individual to a memory or a place, providing emotional connections.
  • Taste: Incorporating edible plants like mint, rosemary, or even vegetable patches can provide an interactive tasting experience.
  • Hearing: Grasses that rustle in the wind or plants that attract pollinators can introduce a gentle, soothing auditory element.

Nature-Based Therapy Through Gardens

Nature therapy, sometimes referred to as ecotherapy, capitalizes on the bond between humans and their environment. Gardens can be the epicenter of such therapy.

Nature-Based Therapy Through Gardens

  • Guided Interactions: Therapists can guide individuals through the garden, prompting them to engage with specific elements, reflecting on their feelings and emotions.
  • Wildlife Engagement: Attracting wildlife, be it birds, butterflies, or even small mammals, can provide therapeutic interactions, grounding individuals in the present moment.
  • Cultivation and Care: Actively engaging in gardening, from sowing seeds to pruning, offers a sense of purpose and accomplishment, especially beneficial for individuals battling depression or feelings of worthlessness.

In conclusion, therapeutic gardens are more than just a visual delight; they are a haven for the soul, a place of recovery, and a testament to the healing power of nature. Whether it’s the sensory overload from the diverse flora or the carefully designed spaces, every element plays its part in nurturing the human spirit.

Gardens to Promote Healing

The garden, a culmination of design, nature, and intent, holds an ancient promise of serenity and healing. Historically, gardens have been places of reflection, meditation, and recovery. Whether they’ve graced monastic cloisters, hospital courtyards, or simple backyards, their therapeutic essence remains constant.

  1. Historical Context: Many ancient cultures embraced the garden as a space for healing. The Persians introduced paradise gardens, lush areas filled with plants, water, and shaded areas. Meanwhile, medieval monastic gardens were places of meditation and reflection, emphasizing the connection between spiritual and physical wellness.
  2. Emotional Impact: Gardens are a balm for the tired soul, reducing stress and anxiety. The rhythmic sounds of nature, combined with vibrant colors and scents, tap into our innate need for a connection with the natural world.
  3. Recovery Facilitation: There’s growing evidence that patients recovering from illnesses or surgeries in settings with garden access or views have faster recovery times. It emphasizes nature’s role in promoting both mental and physical wellness.

Design Tips for Restorative Gardens

Crafting a healing garden requires attention to detail, understanding the therapeutic intent, and recognizing the potential of each element.

Plants to Enhance Emotional Well-being

  1. Accessibility: Ensure that the garden is accessible to everyone, regardless of physical ability. This could mean adding ramps, wider pathways, or seating at regular intervals.
  2. Water Features: The sound of trickling water can be incredibly soothing. Consider integrating fountains, ponds, or waterfalls to stimulate auditory senses and create a tranquil atmosphere.
  3. Furniture Choices: Opt for furniture that complements the natural surroundings and is comfortable for extended use. It should invite visitors to sit, relax, and immerse themselves in the environment.
  4. Cultural Elements: Infuse the garden with cultural or regional elements to give it a sense of place and identity. This might mean adding sculptures, traditional plants, or design motifs significant to a particular culture.
  5. Seasonality: Design the garden to be engaging throughout the year. Introduce plants that bloom in different seasons, ensuring there’s always a splash of color and activity.

The Science Behind Healing Gardens

Modern research continually validates the health benefits of gardens, delving deeper into the science behind the seemingly magical effects of these green spaces.

  1. Nature Connection: Biophilia, a term popularized by Edward O. Wilson, describes the inherent connection humans have with nature. This bond, when nurtured through environments like gardens, can significantly improve mental well-being.
  2. Sensory Stimulation: Gardens engage all five senses, providing a holistic sensory experience. This kind of stimulation has been shown to reduce stress hormones, lower blood pressure, and improve mood.
  3. Physical Health Boost: The mere act of walking in a garden, being exposed to sunlight, and breathing in fresh air can enhance vitamin D production, muscle activity, and respiratory health.

Layout Ideas

The spatial arrangement in a healing garden is pivotal to its effectiveness. Here are some concepts:

  1. Central Focus Point: Having a central feature, like a water body, sculpture, or a grand tree, provides orientation and a sense of structure.
  2. Varied Pathways: Introduce paths of various materials and widths, meandering through different garden sections. This variation promotes exploration and a sense of discovery.
  3. Secluded Spots: Not everyone wants to be in the open. Incorporate alcoves, gazebos, or shaded benches where visitors can find solace in solitude.
  4. Interactive Zones: Create areas where visitors can actively engage, be it through gardening, bird-watching, or art. These zones make the garden experience more dynamic and participatory.

Plants to Enhance Emotional Well-being

The heart of any garden, plants, chosen with care, can magnify the therapeutic potential.

Plants to Enhance Emotional Well-being


  1. Lavender: Known for its soothing scent, lavender is believed to reduce anxiety and induce sleep.
  2. Sunflowers: These radiant blooms are not just pleasing to the eye; they symbolize positivity and resilience.
  3. Chamomile: Often consumed as tea to calm nerves, its presence in a garden offers a gentle reminder of tranquility.
  4. Jasmine: Its sweet fragrance can uplift spirits, making it an excellent choice for night gardens.
  5. Rosemary: Historically associated with memory and remembrance, rosemary can act as a sensory stimulant, aiding cognitive functions.

In conclusion, healing gardens, through their meticulous design and nature-infused ethos, serve as sanctuaries. They are testaments to humanity’s enduring bond with the earth, illustrating the profound ways in which nature nurtures, heals, and restores us.

How Gardens Aid Recovery

Gardens as Therapeutic Landscapes: Over centuries, gardens have been recognized as sanctuaries of recovery. Their verdant embrace is more than a feast for the eyes; it’s a balm for the soul. The very act of strolling amidst nature, feeling the soft touch of grass, and hearing the whisper of leaves has a therapeutic effect, grounding us and recalibrating our internal rhythms.

The Role of Color Psychology: Gardens burst with colors, each evoking specific emotional responses. The serene blues and purples of lavender, for instance, instill calm, while vibrant yellows and oranges from marigolds and sunflowers stimulate joy and vitality. This visual symphony plays a pivotal role in mental recovery, allowing one to navigate through a spectrum of emotions.

Physical Wellness Boosted by Nature: Apart from the mental reprieve, gardens also provide avenues for physical activity. Gardening, for instance, is a holistic exercise, engaging various muscle groups, improving dexterity, and enhancing cardiovascular health. Moreover, the sunlight experienced during gardening aids in vitamin D synthesis, pivotal for bone health and immune function.

The Role of Water in Healing Gardens

Role of Water in Healing Gardens

Nature’s Melody – The Sound of Water: There’s an innate tranquility in the sound of flowing water. Whether it’s a bubbling brook, a cascading waterfall, or the gentle lap of pond waters, these auditory experiences have a calming effect on the psyche, helping reduce anxiety and stress levels.

Water as a Reflective Surface: Beyond the auditory, water bodies in gardens often act as reflective surfaces, mirroring the sky, trees, and surrounding flora. This visual duality adds depth to the garden, making it a space for introspection and meditation.

Promoting Wildlife Interaction: Water features attract a myriad of wildlife – birds, dragonflies, frogs, and more. Their presence and activity add another layer of therapeutic engagement, fostering a deeper connection with the broader ecosystem.

Restorative Design in Outdoor Spaces

Human-centric Design: A restorative garden should prioritize human well-being. This means pathways that accommodate everyone, including those with mobility challenges, seating at regular intervals for rest, and shaded spots for reprieve from direct sunlight.

Integration of Sensory Elements: Engaging all senses is crucial. This can be achieved through textured plants that invite touch, aromatic flowers for olfaction, visually diverse plant selections, sound elements like wind chimes or water features, and even edible herbs or fruits.

Art Integration: Introducing art pieces, sculptures, or even interactive art stations can elevate the garden experience. Art resonates on an emotional level, and its inclusion can further the garden’s therapeutic potential.

Materials Selection

Choosing Sustainable Materials: With the pressing need for eco-conscious choices, materials used in healing gardens should be sustainable. This could mean using recycled or upcycled elements, locally sourced stones, or sustainable wood.

Texture and Tactile Experience: Materials should also cater to tactile experiences. Rough-hewn stones, smooth pebbles, bark-covered logs – each texture adds a dimension to the garden, inviting visitors to touch, feel, and connect.

Maintenance Consideration: Durability and ease of maintenance are crucial. While a moss-covered path might look enchanting, it might be slippery and challenging to maintain. Similarly, rust-prone metals might not be the best choice for humid regions.

Creating Sacred Spaces in Gardens

Spaces for Solitude and Reflection: Every healing garden should have niches or alcoves where visitors can seek solitude. Whether it’s a secluded bench, a gazebo, or a canopied swing, these spots become havens of reflection and introspection.

Introducing Cultural and Spiritual Elements: Gardens can be infused with elements that resonate with specific cultural or spiritual ideologies. This might include Buddhist stupas, Native American totems, or even Celtic labyrinths. Such inclusions anchor the garden in deeper meanings, making them sacred.

Ensuring Harmony and Balance: The essence of a sacred space lies in its harmony. This balance can be achieved through symmetrical layouts, the Yin-Yang of shaded and sunlit spots, or the thoughtful placement of plants and design elements in alignment with principles like Feng Shui.

In conclusion, gardens are more than just visually appealing landscapes. With thoughtful design, the right materials, and a touch of the sacred, they become sanctuaries of healing, catering to both the body and the soul.

Gardens That Boost Health & Spirits

Nature’s Antidote to Modern Stress: In our increasingly urbanized world, gardens stand as verdant oases, offering a respite from the bustle of modern life. Nature has a profound ability to heal, both mentally and physically. A simple walk through a garden can lower blood pressure, reduce stress hormone levels, and boost mood. The combination of fresh air, the fragrance of flowers, and the sounds of nature come together to provide an immediate health boost.

Mental Recovery and Renewal: Gardens are not merely physical spaces; they offer mental and emotional refuge. As one steps into a garden, the mind is allowed to wander, unfettered by the barrage of daily responsibilities and digital distractions. This mental space is crucial for recovery from cognitive fatigue and emotional distress.

The Biological Connection: Our connection with nature is deep-rooted in our evolution. Humans have evolved in the lap of nature, and our physiological systems are attuned to its rhythms. Therefore, even passive exposure to garden settings – such as sitting and observing – can promote relaxation, enhance mood, and stimulate a sense of well-being.

Design Techniques for Peaceful Gardens

Techniques for Peaceful Gardens

Emphasizing Accessibility: A peaceful garden should be inclusive. Designing pathways that are wheelchair-friendly or adding seating at regular intervals can ensure everyone can enjoy the garden, regardless of age or physical ability.

Water Elements for Serenity: The sound of flowing water, whether from a fountain, a brook, or a waterfall, can greatly accentuate the tranquillity of a garden. Water features can serve as focal points and offer auditory stimulation, enhancing the garden’s peaceful ambiance.

Harnessing Seasonality: A garden should be a place of interest throughout the year. Incorporating plants that bloom or change colors in different seasons ensures that the garden offers fresh appeal and intrigue no matter the time of year.

Incorporating Art in Healing Gardens

Sculptures as Focal Points: Art sculptures, be they modern abstract forms or traditional statues, add depth to the garden narrative. They offer aesthetic value, stimulate contemplation, and can serve as landmarks within the garden.

Interactive Art for Engagement: Art isn’t always passive. Integrating interactive art pieces – like wind chimes, mosaics, or installations that visitors can move or rearrange – can foster a deeper connection between the visitor and the garden.

Murals and Paintings: While gardens are primarily about flora, introducing murals or outdoor paintings can add a splash of creativity. They can narrate stories, introduce vibrant colors, or even serve as backdrops for specific plant arrangements.

Recommended Colors

Cool Tones for Calm: Blue, purple, and green are often associated with tranquillity and peace. Plants like lavender, periwinkle, and various ferns and grasses can introduce these hues, evoking a sense of calm and relaxation.

Warm Tones to Uplift: Yellows, oranges, and reds are invigorating. They can be used sparingly to create points of interest or to infuse energy into specific garden sections. Sunflowers, marigolds, and poppies are great choices for these vibrant splashes.

Balancing with Neutrals: Whites, greys, and browns, while not standout colors, provide a balancing effect. They can serve as transitions between different color zones or give the eyes a place to rest. White roses, grey stones, or bark mulch are simple ways to weave in these neutral tones.

In conclusion, a well-designed healing garden is a confluence of nature, art, and mindful design. It’s more than just a space; it’s an experience that nurtures the body, mind, and soul. The inclusion of therapeutic elements, from art to color choices, amplifies its healing potential, offering solace and rejuvenation to all who visit.

Sound Elements

Natural Soundscapes for Serenity: When designing a healing garden, sound is an integral sensory element that should be considered. The gentle rustling of leaves, the chirping of birds, or the distant hum of insects all come together to create a peaceful soundscape. By incorporating trees and shrubs that sway with the wind, and plants that attract native birds, one can design a garden filled with nature’s own symphony.

Water as an Auditory Feature: The sound of water – be it a bubbling brook, a gentle waterfall, or a soft trickle from a fountain – has a calming effect on the human psyche. This is a key element in many healing gardens, inducing relaxation, lowering stress, and promoting a meditative state.

Mitigating Noise Pollution: Healing gardens in urban settings may face challenges from surrounding noise. Strategic planting of thick shrubs and trees, or the installation of natural barriers, can serve to insulate the garden from unwanted urban sounds.

Best Furniture

Best Furniture for garden

Comfort is Key: When choosing furniture for a healing garden, comfort should be the top priority. Ergonomic chairs and benches, made of natural, durable materials, not only blend well with the garden’s aesthetic but also provide necessary support.

Mobility and Flexibility: Opt for furniture that’s easy to move and reconfigure. This allows visitors to find their perfect spot or even change their seating arrangements based on the sun’s position or their current mood.

Material Matters: Natural materials like wood and stone can complement the garden’s design. However, ensure that the chosen material can withstand the elements, especially if the garden is open throughout the year.

Maintenance Tips

Prioritize Native Plants: By choosing plants native to the area, maintenance becomes easier. Native plants are adapted to the local climate and soil, requiring less water, fewer fertilizers, and minimal pest control.

Mulching: Regular mulching prevents weeds, conserves moisture, and enriches the soil. Organic mulch like bark or compost can also enhance the garden’s natural look.

Scheduled Pruning: Regular pruning keeps plants healthy, ensures a neat appearance, and can prevent overgrowth which might obscure pathways or other garden features.

Importance of Seasonality in Therapeutic Gardens

Changing Visual Display: Every season offers its unique palette. From the fresh blooms of spring to the rich hues of autumn, therapeutic gardens can offer a constantly changing visual treat, providing continuous engagement for visitors.

Year-round Engagement: Seasonality ensures that the garden remains relevant and engaging all year round. Winter might see the garden covered in snow, but this pristine beauty has its own therapeutic value.

Seasonal Therapeutic Benefits: Different seasons can cater to different therapeutic needs. For instance, spring can be invigorating for those battling depression, while the calm of winter might be perfect for those seeking solitude and reflection.

Planning for Wildlife in Healing Gardens

Incorporate Native Plants: Plants native to the area will naturally attract local wildlife, from birds and bees to beneficial insects.

Water Features for Wildlife: A pond or a birdbath can be a haven for birds, frogs, and other wildlife. It’s not just an aesthetic feature but a functional one that boosts the garden’s ecological value.

Safe Sheltering Spots: Providing spaces like birdhouses, log piles, and dense shrubs can offer safe shelter for smaller creatures, ensuring they remain a part of the garden ecosystem.

In conclusion, creating a comprehensive therapeutic garden involves more than just aesthetics. It’s about the symphony of sounds, the thoughtful selection of furniture, the ever-changing allure of seasonality, and the vibrancy brought in by local wildlife. Proper maintenance ensures that this sanctuary remains a haven for both humans and nature alike.

Conclusion

Healing garden design goes beyond just planting trees and flowers; it’s about creating a space that holistically nurtures the soul, body, and mind. It requires a thoughtful integration of therapeutic principles, accessibility, and a bevy of features tailored for well-being. From sensory plants that tantalize our senses to water features that provide auditory solace, every detail matters. And as we look to the future, the importance of these therapeutic landscapes in our urban environments will only grow, offering havens of peace, restoration, and recovery.

Sensory Garden Design: Tips for Creating Therapeutic Spaces

In the fast-paced urban world, there’s a growing trend towards creating spaces that offer an oasis of calm, beauty, and healing. One such space is a sensory garden. These gardens are thoughtfully designed to engage all our senses – sight, smell, touch, taste, and hearing – providing a therapeutic environment that soothes the mind and body. This article will delve deep into the intricacies of sensory garden design, illustrating its immense benefits, the diverse elements that make up these gardens, and providing tips for those looking to embark on this therapeutic journey.

Sensory Garden Design Basics

Understanding Sensory Gardens: At its core, a sensory garden aims to create an environment that stimulates the senses. This goes beyond just creating a visually appealing space. Sensory gardens consider the sounds, textures, and aromas within the space, striving to create a harmonious environment that provides healing and relaxation.

Sensory Garden Design Basics

  • Designing for the Visually Impaired: A major emphasis of sensory gardens is making them accessible to all, especially the visually impaired. This includes the use of tactile pathways, plants with distinct textures, and sound features like wind chimes. Research from leading institutions showcases the benefits of such designs, offering an inclusive space for everyone.
  • Maintaining a Sensory Garden: Maintenance is a critical factor. Gardens change with seasons, and consistent care ensures the sensory elements remain vibrant year-round. From pruning to watering, attention to detail ensures longevity and keeps the therapeutic properties intact.
  • Challenges & Solutions: Every garden comes with its own set of challenges. This could be related to budget constraints, choosing the right materials, or adapting to urban spaces. However, with DIY solutions and keeping an eye on emerging trends, one can overcome these challenges effectively.

Benefits of Sensory Gardens

Therapeutic Healing: Sensory gardens have proven therapeutic benefits. Aromatherapy from certain plants can alleviate stress, while tactile experiences can assist with memory disorders.

  • Multisensory Learning for Children: For children, these gardens serve as an educational tool. They can learn about wildlife, plants, and more in a hands-on, multisensory environment. Not only does this foster a love for nature, but it also aids in cognitive development.
  • Community Involvement: Sensory gardens often become hubs for community activities. They offer urban dwellers a chance to connect with nature and each other, fostering a sense of community.

Sensory Garden Elements

Plant Selection: The choice of plants plays a pivotal role. From aromatic herbs for aromatherapy to textured plants like lamb’s ear, every plant has a purpose.

Sensory Garden Elements

  • Art & Elements: Integrating art elements, such as sculptures or mosaics, can elevate the sensory experience. These artistic features not only enhance visual appeal but also offer tactile exploration.
  • Water Elements & Sound Features: The sound of trickling water or rustling leaves has a calming effect on the mind. Incorporating water elements and other sound features adds an auditory dimension to the garden.
  • Safety First: Especially when designing for children or the elderly, safety is paramount. This includes non-toxic plants, secure pathways, and features that can be navigated without risk.
  • Seasonal Changes: Embracing the seasons means that the garden offers a changing sensory experience throughout the year. Whether it’s the vibrant colors of spring or the rustling leaves of fall, each season brings its own charm.
  • Wildlife Attractions: By introducing certain plants and features, one can attract beneficial wildlife like butterflies and birds, enhancing the sensory appeal.

Designing for Different Senses

Sensory gardens are created with the purpose of stimulating all five senses: sight, smell, touch, taste, and hearing.

Sight: The visual component is one of the most fundamental aspects of garden design. Using vibrant colored flowers, diverse plant shapes, and varying heights can create a visually stimulating environment. For those who are visually impaired, contrast plays an important role. Combining plants and features with contrasting colors can help in differentiating them.

Smell: Aromatherapy plays a therapeutic role. Fragrant flowers like roses, lavender, and jasmine can invigorate the sense of smell. Moreover, herbs like rosemary and basil can serve a dual purpose of being aromatic and also useful for culinary needs.

Touch: The tactile experience in a sensory garden is vital. Plants like lamb’s ear with its soft texture or the rough bark of certain trees provide diverse tactile experiences. It’s also vital to ensure plants that can cause allergies or irritations are clearly marked or, if possible, avoided.

Taste: Edible plants and herbs can provide a delightful tasting experience. From the sweet taste of cherry tomatoes to the refreshing mint, there are numerous options that can be safely ingested. It’s important, however, to clearly differentiate between edible and non-edible plants.

Hearing: This can be stimulated with the sounds of rustling leaves, the buzzing of bees, or the chirping of birds. Incorporating sound features, which will be discussed later, also plays a role in auditory stimulation.

Sensory Plants Selection

The essence of a sensory garden lies in its plants. Their selection is crucial for ensuring each sense is catered to.

Sensory Plants Selection

  • Aromatic Plants: Lavender, with its calming scent, is a top choice. Similarly, eucalyptus can be both aromatic and therapeutic.
  • Tactile Plants: Fuzzy lamb’s ear, the roughness of ferns, or the succulence of aloe vera, each offers a unique tactile experience.
  • Edible Plants: Strawberries, mint, basil, and thyme not only provide taste but also engage sight and smell.
  • Visually Stimulating Plants: Seasonal flowers, with their bursts of color, can keep the garden visually fresh. For instance, marigolds in summer or chrysanthemums in fall can be quite captivating.

Sensory Garden Features

Beyond plants, there are features that can elevate the sensory experience of the garden.

  • Art Installations: Sculptures, mosaics, or even interactive art pieces can provide both visual and tactile engagement.
  • Sound Features: Wind chimes, bamboo rustlers, or even a well-placed gong can provide auditory stimulation.
  • Safety Elements: Especially in a garden designed for children or those with disabilities, safety features like handrails, non-slip pathways, and clear demarcations between edible and non-edible plants are crucial.

Water Elements

Water features serve multiple purposes in a sensory garden. The sound of trickling water is calming, and visually, water elements add dynamic beauty.

Water Elements

  • Fountains: These can be grand, dominating a garden’s center, or small and subtle, placed in corners.
  • Ponds: These can attract wildlife like birds or even serve as habitats for fishes. The reflective property of water also adds a visual depth to the garden.
  • Waterfalls: Even a small waterfall can create a significant impact both visually and auditorily.

Textured Pathways Ideas

Pathways guide a visitor through the garden, and their texture can enhance the tactile experience.

Textured Pathways Ideas in garden

  • Pebbled Pathways: These can provide a unique foot feel, and the sound of crunching pebbles underfoot can be quite satisfying.
  • Wooden Walkways: Especially over water features, these can give a rustic look and feel.
  • Brick or Stone Pathways: These can be interspersed with moss or other ground covers to provide variation in texture.

In conclusion, sensory garden designs go beyond just planting flowers. They are a careful curation of plants and features that engage and stimulate all our senses. With the right elements, these gardens can be therapeutic, educational, and a hub for community engagement. The beauty lies in the details and the thoughtful design that ensures every visitor, regardless of age or ability, has a rich and fulfilling experience.

Aromatherapy Plants in Gardens

Aromatherapy in gardens is a strategic incorporation of plants known for their significant aromatic qualities, which are beneficial for mental and physical well-being.

  • The Power of Scent: Scents have a profound impact on our emotions and mood. For instance, a whiff of jasmine or rose can immediately evoke feelings of contentment and joy. This is because certain scents stimulate the release of mood-enhancing chemicals in the brain.
  • Lavender: Renowned for its calming properties, lavender can promote relaxation and reduce anxiety. It’s an essential plant for a therapeutic garden, particularly in urban spaces where stress levels might be high.
  • Rosemary: This herb isn’t just for cooking; its scent can enhance memory and concentration. The ancient Greeks recognized this, often wearing rosemary wreaths during exams.
  • Eucalyptus: Known for its refreshing and invigorating scent, eucalyptus can clear the mind and has respiratory benefits as well.
  • Mint: Besides its culinary benefits, mint has a rejuvenating aroma that can energize and refresh the mind.

Designing for the Visually Impaired

Designing a garden for the visually impaired goes beyond just considering tactile experiences. It’s about creating a multi-sensory haven where the lack of sight doesn’t diminish the experience.

  • Contrasting Textures: Introducing plants and pathways with contrasting textures can guide the visually impaired. For instance, a smooth pathway could lead to a fountain, while a gravel path might guide them to a seating area.
  • Sound Mapping: By strategically placing sound features, such as wind chimes at crossroads or water features near resting areas, one can create an auditory map of the garden.
  • Plant Labels in Braille: Informational plaques with braille can empower visually impaired visitors, giving them knowledge about the plants they encounter.
  • Safety Precautions: Ensure that there are no obstructions or hazardous features. Handrails, guided paths, and clear demarcations are crucial.

Sound Elements in Gardens

An often overlooked but vital component in sensory garden design is the auditory element.

  • Nature’s Melodies: Attracting wildlife, like birds and bees, can bring natural melodies to the garden. Planting native plants or installing bird feeders can be effective in this.
  • Wind Chimes: Strategically placing them can not only guide but also provide soothing sounds, resonating with the gentle breeze.
  • Water Features: The sound of flowing water, be it from a fountain, waterfall, or brook, can immensely calm the mind, mask city noises, and provide a serene backdrop.
  • Footfall Sounds: Using materials like pebbles or wooden planks for pathways can create distinct sounds as people walk, adding another layer to the auditory experience.

Tactile Plants

Tactile experiences in a garden can be therapeutic, especially for those who rely more on touch.

Tactile Plants

  • Lamb’s Ear: This plant is famed for its velvety soft leaves, making it a delight to touch and a must-have for any sensory garden.
  • Succulents: Plants like aloe vera or jade have fleshy leaves that offer a unique, squishy texture.
  • Ornamental Grasses: With their feathery plumes and slender leaves, they introduce a soft, brush-like feel.
  • Tree Barks: Trees like pine or birch have distinct barks that can range from rough to smooth, adding to the tactile diversity.

Therapeutic Garden Design

The primary goal of therapeutic garden design is to provide healing, both mentally and physically, to its visitors.

  • Zones: Creating different zones, like a quiet reflection area or a more vibrant aromatic section, can cater to different therapeutic needs.
  • Accessibility: Ensuring the garden is accessible to all, including those with physical disabilities, is vital. This might mean wider pathways, wheelchair ramps, or seating areas at regular intervals.
  • Engagement Features: Incorporating features like DIY planting zones or art corners can engage visitors, providing mental stimulation and a sense of accomplishment.
  • Natural Materials: Using natural materials for pathways, seating, or features can enhance the therapeutic experience, bringing visitors closer to nature.
  • Community Involvement: Encouraging community participation in the garden’s maintenance or activities can foster a sense of belonging and purpose, amplifying the therapeutic benefits.

In conclusion, crafting a sensory garden requires a deep understanding of the diverse needs of its visitors. Every element, be it a plant or a pathway, plays a crucial role in offering healing, comfort, and joy. Such gardens stand as a testament to the profound therapeutic power of nature, waiting to be harnessed with thoughtful design.

Sensory Garden for Children

Children are innately curious beings. A sensory garden tailored for them is not just a play area but an educational ground where their senses can be honed.

Sensory Garden for Children

Engagement is Key: Children thrive when they’re engaged. Features like sandpits, water play areas, and interactive elements like wind chimes or textured pathways can keep their attention.

Educational Plants: Opt for plants that can teach children about nature. Sunflowers, for instance, can teach them about growth as they tower high. Plants with various textures, colors, and scents can intrigue and educate.

Safety First: Ensuring the space is child-proof is crucial. Avoid plants that are toxic or have thorns. Pathways should be slip-resistant, and water elements should have safety barriers.

Encouraging Wildlife: Incorporate elements like bird feeders or butterfly-attracting plants. Observing wildlife can be both entertaining and educational for children.

Sensory Spaces in Urban Areas

Urban areas, often devoid of large green spaces, can significantly benefit from sensory gardens, providing residents a therapeutic escape.

Sensory Spaces in Urban Areas

Rooftop Gardens: If horizontal space is limited, look upwards. Rooftop gardens can be lush sensory havens, offering both greenery and city views.

Community Involvement: Engage the local community in designing and maintaining the space. This fosters a sense of ownership and unity.

Noise Buffering: Urban areas are typically noisy. Use tall plants, hedges, and water features to naturally buffer the noise.

Flexible Design: Consider movable planters or modular designs, allowing the space to be adaptable for various community events.

Maintenance

Maintaining a sensory garden is essential to ensure its longevity and that it continues to serve its therapeutic purpose.

Regular Pruning: Some aromatic plants, like lavender or rosemary, benefit from regular pruning, ensuring they grow healthily and release their fragrant oils.

Watering: Depending on the plants chosen and the local climate, establish a consistent watering schedule. Water features also require regular maintenance to prevent algae growth and keep the water clear.

Pathway Upkeep: Pathways, especially those with unique textures for sensory input, need to be kept clear of debris and monitored for wear and tear.

Community Engagement: Encourage the local community or schools to participate in garden upkeep. This fosters a sense of responsibility and connection to the space.

Budgeting

A sensory garden’s budget can vary, but with thoughtful planning, one can create a therapeutic space within any budget.

Prioritize: Determine what elements are essential for your garden’s goals. Perhaps aromatic plants are a priority, or maybe a water feature is essential for its calming sound.

DIY Options: Instead of purchasing expensive installations, consider DIY alternatives. Homemade wind chimes or hand-painted signs can add a personal touch without breaking the bank.

Seek Grants or Donations: Especially for community projects, seek out grants or donations. Local businesses might sponsor certain elements of the garden in exchange for recognition.

Plan for the Long Term: Budget not just for the creation of the garden but also its maintenance. Consider perennials over annuals to reduce replanting costs.

Best Materials

The materials chosen can greatly influence the garden’s sensory experience and its longevity.

Natural Over Synthetic: Natural materials like wood, stone, or bamboo are not only eco-friendly but also provide a richer sensory experience.

Durability: In high-traffic areas, choose materials that withstand wear and tear, like stone pathways or sturdy wooden benches.

Eco-Friendly Choices: Consider permeable paving to prevent water runoff or use recycled materials for planters and benches.

Therapeutic Elements: Materials that can add to the therapeutic value of the garden, like soft grass for grounding exercises or smooth stones for tactile experiences, should be incorporated.

In essence, creating a sensory garden is a delicate dance of practicality and sensory stimulation. Whether for children or urban dwellers, the design must consider the needs of its users, the challenges of its environment, and the budget at hand. When these factors are harmoniously combined, the result is a sanctuary that offers solace, joy, and endless sensory discoveries.

Incorporating Wildlife into Sensory Gardens

Sensory gardens are about cultivating an environment that appeals to our senses. But they can also serve as a haven for local wildlife, amplifying their therapeutic potential.

Wildlife into Sensory Gardens

Attracting Birds: Birds bring sound, movement, and color. Installing bird feeders, birdbaths, and nest boxes can draw a variety of species. Choosing native plants that produce seeds or berries will also attract them. For example, sunflowers, cone-flowers, and berry bushes can be wonderful choices.

Butterfly Gardens: These not only attract butterflies but also caterpillars, which can be equally fascinating to watch. Plants like milkweed, butterfly bush, and lavender can be used. Moreover, it’s crucial to have a mix of host plants for caterpillars and nectar plants for adult butterflies.

Water Features for Wildlife: Ponds or small water bodies can attract frogs, toads, and even dragonflies. The sound of frogs croaking can add to the auditory experience of the garden. Always ensure there are shallow areas or stepping stones to prevent smaller creatures from drowning.

Safety Measures: While it’s a joy to attract wildlife, it’s equally important to protect them. Refrain from using harmful pesticides and create habitats like rock piles or logs where beneficial insects and creatures can find refuge.

Multi-sensory Garden Ideas

To create a truly enriching sensory experience, gardens should stimulate all five senses.

Sight: Opt for plants and features with varying colors and patterns. Seasonal flowering plants can keep the garden visually appealing throughout the year. Incorporate lighting for nighttime appeal.

Sound: Bamboo chimes, rustling grasses, and water features can introduce soothing sounds. Plants that attract songbirds can also add to the auditory experience.

Smell: Fragrant flowers like roses, jasmine, and lilacs can intoxicate the air with their scents. Aromatic herbs like rosemary, thyme, and mint can be added for a richer olfactory palette.

Touch: Fuzzy lamb’s ear, smooth pebbles, or rough bark can stimulate the sense of touch. Consider pathways with various textures, from soft grass to crunchy gravel.

Taste: Edible gardens with berries, herbs, and vegetables can tantalize the taste buds and also encourage healthier eating habits.

Healing Garden Design

Healing gardens are specifically designed to aid in the physical and mental recovery of individuals.

Planning for Peace: The central theme of healing gardens is tranquility. Incorporating elements like flowing water, soft foliage rustling with the breeze, and serene sitting areas can provide comfort.

Color Psychology: Certain colors can evoke feelings of calm and happiness. Pastel blues, soft greens, and gentle lavenders can induce a sense of calm and relaxation.

Physical Recovery: For individuals recovering from physical ailments or surgeries, create smooth pathways for walking exercises. Additionally, tactile plants can aid in sensory recovery and motor skill exercises.

Mental Well-being: Incorporate secluded sitting areas or meditation zones. The presence of water bodies or fountains can be therapeutic for those undergoing stress, anxiety, or trauma.

Incorporating Art in Sensory Gardens

Art and nature, when combined, can create an unparalleled sensory experience.

Incorporating Art in Sensory Gardens

Sculptures: Integrate sculptures that blend with the garden’s theme. They can become focal points, drawing visitors deeper into the space.

Interactive Art: Wind spinners, kinetic sculptures, or art pieces that can be manipulated can engage visitors, especially children, offering tactile and visual stimulation.

Murals and Paintings: Consider having murals on garden walls or fences. This can brighten up spaces that might not receive enough light for lush plant growth.

Art from the Community: Engage local artists or community members to contribute art pieces. This not only diversifies the garden’s appeal but also fosters community involvement.

Art with Function: Benches painted with vibrant colors, mosaic-tiled pathways, or hand-painted plant markers can combine art with function, beautifying the space while serving a practical purpose.

A garden that integrates multiple sensory experiences, healing elements, and art can transform any space into a therapeutic sanctuary. Whether you’re aiming for wildlife interaction, multi-sensory stimulation, or a meditative retreat, a well-planned garden can cater to all needs, becoming an oasis for both body and soul.

Safety Measures

Safety should always be a paramount concern when designing a sensory garden, particularly if the space will be used by children, the elderly, or individuals with disabilities.

Choice of Plants: While some plants are therapeutic to touch or smell, others can be harmful when ingested. It’s crucial to research and ensure none of the chosen plants are toxic. For instance, foxglove and oleander are beautiful but can be poisonous if consumed.

Pathway Design: Pathways should be wide enough to accommodate wheelchairs or walkers. Using non-slip materials can prevent accidents during wet conditions. Edges should be clearly defined, potentially with tactile paving or contrasting colors to aid those with visual impairments.

Water Safety: Any water feature, be it a pond or a fountain, poses a risk. Ensure that any deep water is securely fenced off, and consider having shallow water features which are both safe and provide a pleasing sound.

Night-time Safety: Proper lighting is essential. Not only does it enhance the garden’s beauty, but it ensures that all pathways and features can be safely navigated even after dusk.

Safe Art and Installations: Any art pieces or installations should be anchored securely to prevent accidents, especially in areas with frequent high winds or inquisitive visitors.

Therapeutic Benefits of Sensory Spaces

Sensory gardens are not just pleasing to the senses; they hold profound therapeutic benefits.

Cognitive Benefits: For children, especially those with developmental disorders, sensory gardens can aid in improving attention span and memory. The varied stimuli can help in cognitive development and learning.

Physical Recovery: Post-surgery or injury, walking in such gardens can aid in physical rehabilitation. The gentle textures and scents can also promote the recovery of sensory functions.

Mental Well-being: There’s growing evidence that spending time in green spaces can alleviate symptoms of anxiety and depression. The calming sounds and sights of a garden can act as a stress-buster, making them ideal for urban environments.

Sensory Integration: For individuals with sensory processing disorders, these gardens provide a controlled environment to explore and integrate sensory experiences.

Community Building: Sensory gardens, especially in urban settings, can act as communal hubs, promoting social interactions and community well-being.

Design Challenges

As with any specialized design, creating a sensory garden comes with its set of challenges.

Balancing Sensory Elements: The goal is to stimulate all senses, but the challenge lies in ensuring one doesn’t overpower another. The sound of water shouldn’t drown out the rustling of leaves or birdsong, for instance.

Seasonal Changes: While some plants bloom in spring, others might be autumnal stars. Ensuring that the garden remains engaging throughout the year requires careful plant selection and placement.

Maintenance: A sensory garden, with its variety of elements, can be labor-intensive. Ensuring plants are pruned, water features are cleaned, and installations remain safe can be daunting.

Space Constraints: In urban settings, space is a luxury. Designing a comprehensive sensory experience in limited space without making it feel cramped is a true test of creativity.

Budget: Incorporating diverse plants, art installations, water features, and safety measures can stretch budgets. Striking a balance between aspirations and resources is crucial.

In conclusion, while sensory gardens are undoubtedly beneficial and enchanting, designing one requires careful planning, a keen understanding of the user’s needs, and a vigilant eye on safety. It’s a labor of love, but the therapeutic rewards it offers make every challenge worth it.

Conclusion

Sensory garden designs have opened up a realm of possibilities, not just for those seeking therapeutic benefits but for communities, children, and nature enthusiasts. From the soft rustle of leaves to the gentle fragrance wafting from a rose, these gardens are a testament to the profound impact nature has on our well-being. As more people recognize the benefits, the future might just see these sensory havens popping up in every corner, from urban spaces to schoolyards. So, as you embark on this journey, remember to let your senses guide you, and nature will surely do the rest.

Drought Tolerant Landscaping Ideas A Complete Guide

In an era where climate change and water conservation are of significant concern, drought-tolerant landscaping is becoming an increasingly important and popular concept. This guide will delve into effective and innovative drought-tolerant landscaping ideas, providing you with the essential tools, techniques, and knowledge needed to create a sustainable, water-efficient, and visually appealing outdoor space.

We’ll explore the principles of drought tolerance, the benefits of drought-tolerant landscaping, and how to plan a water-efficient garden. We’ll also guide you in choosing drought-resistant plants, grasses, and succulents, and discuss the role of native plants in your landscape design. Our guide will introduce concepts such as rock gardens, mulching, optimized irrigation systems, and rainwater harvesting.

Moreover, we’ll discuss strategies for shade and windbreaks, how to maintain a drought-tolerant garden, and how to drought-proof your lawn. Other sections will focus on the use of hardscaping, edible plants, pruning, soil amendments, gravel and stone, terracing, and wildlife design. And finally, we’ll touch on the aesthetic aspects like adding color to your garden, the advantages of low-maintenance landscaping, and how to prepare your landscape for climate change.

Understanding Drought Tolerance

Drought tolerance refers to a plant’s capacity to survive and thrive in conditions where water is scarce. Understanding this characteristic requires delving into a plant’s physiological and biological features that allow it to conserve water and manage its use effectively.

Water Efficiency

When a plant exhibits drought tolerance, it’s largely due to its superior water efficiency. These plants have evolved strategies to maximize their water use. For instance, they often have deep root systems that extend far into the soil, accessing water sources unavailable to shallow-rooted plants. Some species employ unique mechanisms such as crassulacean acid metabolism (CAM), enabling them to photosynthesize and transpire at night when temperatures are cooler, resulting in less water loss.

Drought Tolerance

Moreover, many drought-tolerant plants store water in their leaves, stems, or roots, providing a reserve during dry periods. This water storage is particularly noticeable in succulents, which have thick, fleshy parts packed with moisture.

Drought Resistance

Drought resistance is an aspect of drought tolerance. While all drought-resistant plants are drought-tolerant, not all drought-tolerant plants are necessarily resistant. Drought-resistant plants not only survive in dry conditions but also flourish.

These plants have developed specific features like waxy, hairy, or silvered leaves, which reduce water loss through transpiration. Some species also have leaves that change orientation throughout the day to minimize exposure to the sun, further cutting down on water loss. It’s fascinating to witness the different strategies plants have developed to endure in harsh conditions, showcasing the beauty of natural evolution.

Climate Change

Understanding drought tolerance isn’t just relevant for gardeners or horticulturists; it’s crucial for the global community as we face climate change. Rising temperatures and shifting precipitation patterns could result in prolonged and more frequent droughts. Adopting drought-tolerant plants and using water-efficient landscaping techniques are practical ways we can adapt to these changes and mitigate some of their impacts. By understanding and applying the principles of drought tolerance, we can create resilient landscapes that will thrive in the face of climate change.

Benefits of Drought Tolerant Landscaping

Drought-tolerant landscaping, also known as xeriscaping, carries numerous advantages, from ecological benefits to practical perks.

Water Conservation

Firstly, and perhaps most importantly, drought-tolerant landscaping is a significant step towards water conservation. With water scarcity becoming an increasingly pressing issue globally, every drop counts. Drought-tolerant gardens require less watering, thus significantly reducing your water usage and, in turn, your water bills.

Low Maintenance

Drought-tolerant gardens are often low-maintenance. They require less watering, less mowing, and less fertilization than traditional gardens. The plants used are typically more resilient and adaptable, meaning they can thrive with less human intervention.

Drought Tolerant Landscaping

Garden Maintenance

Besides the lowered water and maintenance requirements, a well-planned drought-tolerant garden is generally resistant to pests and diseases, further reducing the need for intervention. These plants have evolved in harsh conditions and developed hardiness against a range of threats.

Planning Your Water-Efficient Garden

Creating a water-efficient garden requires careful planning. It’s not as simple as picking a bunch of drought-tolerant plants and planting them haphazardly. Consideration of the local climate, soil type, and the specific water requirements of each plant are all crucial steps in creating a truly water-efficient garden.

Water-Efficient Garden

Native Plant Selection

Choosing native plants is a key step in designing a water-efficient garden. Native plants are adapted to local climate conditions and, as such, are well-suited to the average rainfall, temperature, and soil type in your area.

Drought Proof Lawn

Traditional lawns are often the most water-consuming part of a garden. By replacing your traditional lawn with drought-tolerant grasses or other ground covers, you can drastically cut down on your garden’s water needs.

Rainwater Harvesting

Consider integrating a rainwater harvesting system into your garden design. Rainwater is a free, sustainable water source that can significantly reduce your reliance on tap water.

Irrigation Systems

An efficient irrigation system can help ensure that the water you do use is utilized effectively. Drip irrigation and soaker hoses are two efficient methods that deliver water directly to the plant’s roots, minimizing evaporation and runoff.

Choosing Drought Resistant Plants

Selecting the right plants is perhaps the most critical step in creating a drought-tolerant landscape. When choosing plants, you should consider their drought resistance, their compatibility with your climate and soil type, and how well they fit with the other plants in your garden.

Drought Resistant Plants

Look for plants with specific adaptations for surviving in dry conditions. For example, some plants have leaves that are small, waxy, or covered in hairs, all of which help reduce water loss. Other plants, like succulents, store water in their leaves, stems, or roots, allowing them to survive for extended periods without rainfall.

Also, consider the plant’s aesthetic qualities and how they fit into your overall garden design. A well-planned drought-tolerant garden can be just as visually appealing as a traditional one, with the added benefit of being more sustainable.

Native Plant Selection

Choosing native plants is one of the best strategies for creating a successful drought-tolerant garden. These plants are naturally adapted to the local climate and soil conditions, making them an excellent choice for a low-maintenance, water-efficient garden.

Native plants are more likely to thrive with minimal intervention, as they are already accustomed to the local rainfall patterns, temperatures, and potential pests. In addition, they provide essential habitat and food sources for local wildlife, contributing to a healthier ecosystem.

When selecting native plants, consider their growth habits, size, and flowering times to ensure they fit into your garden design. Some nurseries and garden centers specialize in native plants and can provide valuable advice and assistance.

Grasses for Dry Climates

Grasses for dry climates are essential components in drought-tolerant landscaping, contributing not only to water efficiency but also to the aesthetic appeal of the landscape. These grasses have adapted to withstand water scarcity and are well-suited for a low-maintenance, drought-tolerant garden.

Grasses for Dry Climates

Dry Grasses

When considering grasses for dry climates, it is crucial to look for species that have deep root systems, enabling them to access water far below the surface. Buffalo grass, Bermuda grass, and Zoysia grass are popular choices that are both attractive and hardy in dry conditions. These grasses require less water and are more resistant to pests and diseases compared to traditional lawn grasses.

Case Studies

Buffalo grass, for example, is a native North American prairie grass that can survive in dry conditions. It is known for its deep root system, which can reach down to 5 feet, allowing it to access water unavailable to many other plants. Similarly, Bermuda grass, a warm-season grass popular in southern United States, is valued for its exceptional drought tolerance and ability to withstand heavy foot traffic.

Drought Proof Lawn

In creating a drought-proof lawn, it’s not just about selecting the right grass species. The management practices also play a significant role. Mowing high allows grass to develop deeper roots, and leaving the clippings on the lawn can help conserve moisture and reduce the need for fertilization. Integrating these practices can make a substantial difference in your lawn’s drought tolerance.

Succulents in Landscape Design

Succulents offer unique textures, forms, and colors, making them a popular choice for drought-tolerant landscapes. Their fleshy leaves and stems are designed to store water, providing reserves during dry periods. From small, low-growing varieties to large, sculptural specimens, succulents can fit into many different areas of the landscape.

Succulents in Landscape Design

Succulents

Succulents such as Agave, Aloe, Sedum, and Echeveria are all excellent choices for a water-wise garden. Not only are they able to withstand long periods without water, but they also bring visual interest to the garden with their unique shapes and vibrant colors.

Garden Color

Many succulents provide stunning color to the garden. Echeverias come in a range of colors from bright green to purple, with beautiful rosette formations. Sedums, or stonecrops, are another versatile group of succulents that can add pops of color, with varieties ranging from ground covers to taller accent plants.

Wildlife Design

Interestingly, succulents can also contribute to wildlife design. Many species of succulents produce nectar-rich flowers, attracting pollinators like bees, butterflies, and hummingbirds. A garden full of flowering succulents can become a buzzing hub of wildlife activity.

Creating a Rock Garden

Rock gardens provide a unique opportunity for showcasing a variety of drought-tolerant plants. With their naturalistic design and low-maintenance approach, rock gardens can be an excellent choice for dry climates.

Creating a Rock Garden

Rock Garden

A well-designed rock garden imitates a natural landscape, often using rocks and stones to create elevations and depressions that mimic mountains and valleys. This terrain is excellent for growing a variety of drought-tolerant plants, from grasses and perennials to succulents and alpine plants.

Gravel and Stone

Gravel and stone play an essential role in a rock garden. Besides providing aesthetic appeal, they also contribute to water efficiency by reducing evaporation from the soil surface. Moreover, they provide excellent drainage, which is crucial for many drought-tolerant plants that prefer dry conditions.

Terracing

In sloped areas, terracing can be an excellent strategy for rock gardens. Terracing can slow down water runoff, allowing more time for the water to soak into the ground. This practice maximizes the effectiveness of rainfall and irrigation, contributing to water efficiency.

Mulching for Moisture Conservation

Mulch is a fantastic tool for moisture conservation. It works by creating a barrier between the soil and the atmosphere, reducing evaporation and keeping the soil moist for longer. It also suppresses weed growth, which can compete with your plants for water.

Mulching

Organic mulches like wood chips, straw, or compost can also improve the soil’s fertility as they decompose, adding nutrients that your plants can utilize. For drought-tolerant plants that prefer well-drained conditions, consider using inorganic mulches like gravel or stone.

Soil Amendments

Incorporating organic matter into the soil can also enhance its water-holding capacity, reducing the need for frequent watering. Compost, well-rotted manure, or peat moss are excellent choices that can improve soil structure and fertility, promoting healthier, more drought-tolerant plants.

Optimizing Irrigation Systems

Proper irrigation is crucial in a drought-tolerant landscape. While these landscapes require less water, the water they do receive must be used efficiently to support plant health.

Optimizing Irrigation Systems

Irrigation Systems

Irrigation systems can be optimized in various ways. Drip irrigation, for example, delivers water directly to the root zone of the plant, minimizing evaporation and runoff. The timing of irrigation is also crucial. Watering in the early morning reduces evaporation, ensuring that more water reaches the plant’s roots.

Rainwater Harvesting

Rainwater harvesting can be an integral part of an efficient irrigation system. By collecting rainwater from roofs and other hard surfaces, you can supplement your garden’s water needs without increasing your water bill. Moreover, rainwater is free of the salts and chemicals found in tap water, making it better for your plants.

Implementing Rainwater Harvesting

Implementing rainwater harvesting is an effective strategy for enhancing water efficiency in a drought-tolerant landscape. Capturing and storing rainwater not only reduces dependence on municipal water supplies but also provides a water source during periods of drought.

Implementing Rainwater Harvesting

Rainwater Harvesting Systems

A typical rainwater harvesting system includes gutters and downspouts for collection, a storage tank (rain barrel or cistern) for holding the water, and a delivery system (gravity-fed or pump) for distributing the water to your garden. The system can be as simple or as complex as needed based on the size of your garden and the average rainfall in your area.

Water Conservation

Rainwater harvesting plays a significant role in water conservation. It reduces the amount of groundwater needed for irrigation, preserving valuable water resources. Additionally, rainwater is free of the salts and chlorine often found in tap water, making it ideal for irrigation purposes.

Climate Change Adaptation

In the face of climate change, where weather patterns are increasingly unpredictable, rainwater harvesting provides a buffer during dry periods. Having a stored water supply can ensure that your garden remains healthy and vibrant, even during extended periods of drought.

Strategies for Shade and Windbreaks

Proper use of shade and windbreak strategies can significantly enhance the drought tolerance of your landscape. Shade reduces water evaporation from the soil and plant leaves, while windbreaks minimize wind-driven evaporation and protect your garden from drying winds.

Shade Strategies

Shade can be created using various elements. Trees are an obvious choice, with their extensive canopy providing shade for smaller plants below. Pergolas, shade sails, or umbrellas can also be used in patio areas or over delicate plants that may not tolerate full sun.

Windbreak Strategies

Windbreaks can be created using fences, walls, or rows of trees and shrubs. They work by slowing the speed of the wind, reducing its drying effect on the garden. When selecting plants for a windbreak, choose species that are wind-resistant and ideally native to your area, as they are more likely to be adapted to local wind patterns.

Wildlife Design

In addition to their water-saving benefits, shade trees and windbreaks can contribute to wildlife design. They provide habitat for a variety of wildlife, from birds and insects to small mammals, enhancing the biodiversity of your garden.

Maintaining a Drought Tolerant Garden

Maintaining a drought-tolerant garden goes beyond just water management. It involves selecting the right plants, ensuring healthy soil, and practicing proper gardening techniques to support the overall health and resilience of your garden.

Garden Maintenance

Proper garden maintenance includes tasks such as pruning, weeding, and checking for signs of pests or disease. Pruning can promote plant health and vigor, while weeding prevents unwanted plants from competing with your garden plants for water and nutrients.

Soil Amendments

The right soil amendments can enhance your soil’s water-holding capacity and improve plant health. Organic matter, for example, improves soil structure, enhances its ability to hold water and nutrients, and promotes a healthy soil ecosystem full of beneficial microorganisms.

Drought Proofing Your Lawn

A drought-proof lawn doesn’t just happen overnight. It’s the result of careful planning and ongoing maintenance, which ensures that your lawn can withstand dry periods without losing its visual appeal.

Selecting the Right Grass

The first step in drought-proofing your lawn is selecting the right grass. Drought-tolerant grass species, such as buffalo grass, Bermuda grass, or zoysia grass, require less water and are more resistant to pests and diseases compared to traditional lawn grasses.

Mowing and Watering Practices

Mowing your lawn at a higher setting allows grass to develop deeper roots, improving its access to water deeper in the soil. Watering deeply and infrequently encourages grass roots to grow deeper, enhancing the lawn’s drought tolerance.

Soil Improvements

Improving the soil can also contribute to a drought-proof lawn. Aeration, for example, can improve water penetration, while adding organic matter can enhance the soil’s water-holding capacity. Both of these practices can promote a healthier, more resilient lawn.

Hardscaping in Dry Climates

In dry climates, hardscaping becomes a crucial component of a drought-tolerant landscape. Hardscaping refers to the non-living elements of a garden, such as pathways, fences, patios, and retaining walls. By reducing the amount of planted area, you can decrease the overall water consumption of your garden.

Water Efficiency in Hardscaping

Choosing porous materials for hardscaping allows rainwater to seep into the ground rather than run off. This can help replenish groundwater and reduce the need for irrigation. Gravel, pebbles, and certain types of pavers are excellent choices.

Hardscaping and Garden Maintenance

Hardscaping also contributes to low-maintenance gardening. By creating clear boundaries between planted and non-planted areas, it can reduce the amount of weeding required. It also provides a permanent structure to the garden that remains attractive throughout the year, regardless of the growing season.

Drought Tolerant Edible Plants

Growing edible plants that are drought tolerant not only saves water but can also provide fresh, local produce for your table. Several fruit trees, vegetables, and herbs are particularly well-suited to dry conditions.

Edible Native Plants

Native plants often have a higher tolerance to drought, having adapted to the local climate over thousands of years. For example, the prickly pear cactus and mesquite tree, both native to the southwestern United States, produce edible fruits and pods, respectively.

Case Studies: Edible Succulents

Succulents such as aloe vera and certain species of opuntia (commonly known as paddle cactus) are not only drought tolerant but also produce edible parts. These plants can be a great addition to a drought-tolerant garden, offering a unique flavor to your meals while conserving water.

Pruning for Drought Tolerance

Pruning is a key aspect of maintaining a drought-tolerant garden. Proper pruning can improve a plant’s health and stress tolerance by reducing its water demands and promoting a stronger, more resilient structure.

Timing and Technique

The timing and technique of pruning depend on the specific plant species. Generally, most pruning is done in late winter or early spring, before the onset of the growing season. The goal is to remove dead or diseased wood, thin out crowded areas, and shape the plant to allow for better air circulation and light penetration.

Pruning and Water Efficiency

By reducing a plant’s total leaf area, pruning can decrease the plant’s water needs. The remaining leaves receive more light and air, boosting their photosynthesis efficiency and the plant’s overall health and drought tolerance.

Water Conserving Soil Amendments

Amending your soil with organic matter can significantly improve its water-holding capacity, nutrient content, and overall fertility. This results in healthier plants that are more resistant to drought, pests, and diseases.

Organic Matter

Compost, well-rotted manure, and leaf mold are excellent sources of organic matter. They improve soil structure, promote soil microbial activity, and increase the soil’s ability to retain water and nutrients.

Mulching

Mulch is another valuable soil amendment for water conservation. Applied to the soil surface, it helps retain soil moisture, reduce weed growth, and moderate soil temperature. Organic mulches such as wood chips, straw, or shredded leaves can also improve soil fertility as they decompose over time.

Using Gravel and Stone

Gravel and stone can be useful in a drought-tolerant landscape in various ways. Besides their role in hardscaping, they can also be used for mulching and creating decorative features.

Gravel Mulch

When used as mulch, gravel and stone help reduce soil evaporation, discourage weed growth, and regulate soil temperature. Their weight makes them a good choice in windy locations where lighter mulches may be blown away.

Decorative Features

In addition to their practical benefits, gravel and stone can also enhance the aesthetic appeal of a drought-tolerant garden. They come in various sizes, shapes, and colors, offering plenty of options for creating attractive designs.

Terracing and Contouring

Terracing and contouring are earthworks that can be incredibly effective at conserving water in your landscape. By manipulating the land, these strategies can slow water runoff, increase infiltration, and reduce erosion, which is particularly useful in sloping gardens.

The Art of Terracing

Terraces are step-like structures built into slopes. They effectively break up the slope into several smaller, flat areas where water can infiltrate rather than run off. These terraces can be created with retaining walls made of stone, wood, or even planted with deep-rooted grasses or shrubs for a more natural look.

Contouring: Working with the Land

Contouring involves shaping the land to follow the natural contours of your landscape. Swales, or shallow ditches, are often created to catch and direct water towards plant roots. Raised beds or berms can also be built to maximize water use efficiency.

Designing for Wildlife

Incorporating elements that attract and support local wildlife can add another layer of interest and beauty to your drought-tolerant garden. Native plants, bird baths, and small ponds not only create a haven for wildlife but also contribute to local biodiversity.

garden Design for Wildlife

Native Plants: Supporting Biodiversity

Native plants are not just drought-tolerant, they are also beneficial to local wildlife. Many native birds, insects, and other animals depend on these plants for food and habitat. By including native plants in your garden, you can help support these species.

Water Features and Wildlife

Even in a drought-tolerant garden, water features can be incorporated responsibly. Small, shallow pools can provide a precious water source for birds and insects. Consider capturing rainwater to fill these features.

Colour in the Drought Tolerant Garden

Contrary to popular belief, drought-tolerant gardens can be as vibrant and colorful as any other type of garden. Many drought-tolerant plants produce striking flowers, while others have colorful foliage or bark.

Flowers and Foliage

Native wildflowers, certain ornamental grasses, and succulents can add a splash of color to your garden. For example, echinacea, lavender, and agave are not only drought-tolerant but also produce beautiful flowers.

Bark and Berries

Some drought-tolerant trees and shrubs, like manzanita and some species of eucalyptus, have intriguingly colored bark that can provide visual interest year-round. Others produce vibrant berries, attracting birds and providing color during the colder months.

Low Maintenance Landscaping

One of the main advantages of drought-tolerant landscaping is its low maintenance nature. With the right plant selection and design strategies, you can create a garden that requires little to no additional water, minimal pruning, and is resistant to pests and diseases.

Drought Tolerance Equals Low Maintenance

Because drought-tolerant plants are adapted to survive with little water, they often require less care than other plants. Many are resistant to common diseases and pests, and their slower growth rates mean less pruning.

Mulching and Maintenance

Mulching is a key strategy in low-maintenance gardening. By suppressing weed growth and conserving soil moisture, a good layer of mulch can save you hours of weeding and watering.

Preparing for Climate Change

With climate change increasing the frequency and intensity of droughts, adopting drought-tolerant landscaping strategies has become more critical than ever. Not only can these strategies help your garden survive under changing conditions, but they can also contribute to the larger goal of water conservation.

Water Conservation

Drought-tolerant landscaping is a form of water-smart gardening. By choosing plants that require less water and implementing strategies to conserve water, you can significantly reduce your garden’s water consumption.

Windbreak Strategies

Climate change can also lead to increased wind speeds in certain areas. Implementing windbreak strategies, such as planting rows of trees or constructing fences, can protect your garden from drying winds and reduce evaporation.

Conclusion

Drought-tolerant landscaping is much more than a response to water scarcity. It represents a paradigm shift in the way we design and interact with our gardens. This type of landscaping leverages nature’s resilience, creating a harmonious blend of beauty and sustainability.

A water-efficient garden incorporates a plethora of plants and design techniques, each contributing to the overall water efficiency. From native plants and dry grasses to the strategic use of gravel and stone, each element is a piece of the puzzle. Strategic choices, like opting for succulents or creating rock gardens, play their part in decreasing water usage while elevating the aesthetic appeal of your garden.

Employing techniques like mulching, optimizing irrigation systems, and rainwater harvesting, we manage the available resources efficiently. The shade and windbreak strategies add another layer of complexity, protection, and beauty to the landscape. Our choices in plant selection, pruning, and the use of soil amendments further influence the overall water efficiency.

The concept of a drought-proof lawn or hardscaping might seem counterintuitive at first, but with strategic implementation, they become vital parts of a water-conserving landscape. Incorporating elements like terracing and contouring, wildlife design, or even introducing color to your garden contributes to creating a dynamic, resilient, and drought-tolerant garden.

Low maintenance landscaping doesn’t imply an absence of care; rather, it emphasizes smarter, more efficient methods of maintaining a garden. It paves the way for a resilient future where our gardens are not just survivors of climate change but also part of the solution.

The philosophy of drought-tolerant landscaping aligns with the future we strive for, a future where we live in sync with our environment, maximizing our resources while minimizing waste. So, as we confront the reality of climate change and water scarcity, let’s turn to these strategies that offer a sustainable, resilient, and beautifully flourishing path forward.

24 Terrace Garden Ideas: A Comprehensive Guide

When it comes to maximizing small spaces and transforming them into serene havens, terrace gardens stand out. With the right design, these gardens become urban sanctuaries perfect for relaxation, and for the urban gardener, they can be a paradise for growing edible plants. In this comprehensive guide, we will explore 24 diverse terrace garden ideas, emphasizing practical tips for optimal plant growth, aesthetic beauty, year-round gardening, and more. We’ll also delve into soil health, organic practices, and pest control to provide you with a well-rounded knowledge of terrace gardening.

Whether you have a compact balcony or a sprawling rooftop, this guide will provide tips, inspiration, and insights on how to best use your space. We will delve into effective methods for maximizing small spaces, the art of selecting the right plants, innovative container ideas, DIY construction, and much more. This guide aims to arm you with the knowledge needed to transform your terrace into a thriving green space, a city oasis, and a personal retreat.

From incorporating vertical elements to weatherproofing your garden, each terrace garden idea in this guide is chosen for its feasibility and capacity to enhance your urban gardening experience. Moreover, for those of you who want to create an environment that attracts wildlife or are interested in making your garden low maintenance, there are sections dedicated just for you. Let’s dive in.

Understanding The Basics Of Terrace Gardening

Creating a terrace garden is more than just placing pots on your balcony or rooftop. Understanding the basic elements involved in terrace gardening is crucial in creating a thriving garden that complements your lifestyle and aesthetic preference. Some of the key basics to consider include:

  • Sunlight Use: Identifying the amount of sunlight your terrace receives helps determine the types of plants suitable for your space. For example, some plants require full sun, while others thrive in shade or partial sunlight.
  • Soil Health: Ensuring soil health is critical for plant growth. High-quality potting soil enriched with organic matter can support healthier, more robust plants.
  • Irrigation Solutions: Proper watering is essential for your terrace garden. Automatic drip irrigation systems or self-watering pots can be efficient solutions.
  • Organic Practices: Organic gardening practices promote plant health and sustainability. These practices can involve using organic fertilizers, composting, or employing natural pest control methods.

Maximizing Small Spaces In Terrace Gardens

For many urban gardeners, terrace gardens provide a great opportunity to explore their green thumb. However, the compact nature of such gardens can pose a challenge. Fear not, though, as even the tiniest of terraces can be transformed into an enchanting green space with some creativity and clever techniques.

Maximizing Small Spaces In Terrace Gardens

  • Use Multi-Level Planters: One practical approach to optimize the use of space is by employing multi-level planters. These structures can house multiple plants in one unit, allowing you to cultivate a variety of species without cluttering the floor space. They can be bought ready-made or can be a fun DIY project for gardening enthusiasts.
  • Hang Plants: Hanging plants not only save valuable floor space but also add an aesthetically pleasing vertical element to the garden. Plants like English ivy, Boston ferns, or spider plants are excellent choices for hanging pots. Additionally, if your terrace has a roof or overhead structure, you could also explore hanging baskets filled with vibrant flowers for a delightful splash of color.
  • Furniture Choices: Selecting the right furniture can make a significant difference in how spacious your terrace garden feels. Opt for sleek, functional pieces that don’t obstruct movement. Foldable or stackable furniture can be stored away when not in use, freeing up more space.
  • Use Corners and Walls: Corners and walls are often under-utilized spaces in small gardens. Corner shelves or wall-mounted planters are great for displaying smaller plants and can add depth and character to your terrace garden.

Incorporating Vertical Elements In Your Terrace

Integrating vertical elements into your terrace garden not only maximizes space but also brings in an element of architectural beauty. Vertical gardening is particularly effective in small spaces, as it exploits the vertical space that might otherwise be left unused.

  • Trellises and Climbing Plants: A classic method for vertical gardening involves using trellises or pergolas with climbing plants. Species like clematis, honeysuckle, or passion flower are excellent climbers, adding a refreshing green curtain to your garden. You could place these structures against a wall or use them as a decorative partition.
  • Vertical Planters: Vertical planters come in various forms, such as wall-mounted pots, vertical pallet gardens, or cloth pocket planters. These allow plants to grow upwards and can host a wide range of plant species. Herbs, strawberries, and small ornamental plants are popular choices for vertical planters.
  • Living Walls: For those looking to make a dramatic visual statement, a living wall, or green wall, could be the answer. This vertical element is essentially a wall completely covered with plants, either directly planted into it or placed in containers attached to the wall. Living walls can serve as stunning focal points, adding a sense of lushness and vitality to your terrace garden.

Ideas For Terrace Garden Plant Selection

Selecting the right plants is pivotal to the success of your terrace garden. Your choices should consider the garden’s microclimate, the amount of sunlight available, and your personal aesthetic preferences.

Terrace Garden Plant Selection

  • Sunlight and Weather: Plants have varying sunlight and weather needs. Some require full sun, others partial shade, and some can even thrive in full shade. Assess the amount of sunlight your terrace receives during the day and choose plants accordingly. Additionally, select plants that can tolerate the weather conditions in your area.
  • Maintenance Levels: Choose plants according to your schedule and ability to care for them. Succulents, for instance, are low-maintenance and can tolerate neglect. On the other hand, certain flowering plants may require regular watering and feeding.
  • Aesthetic Appeal: Consider plants’ colors, shapes, and sizes when planning your terrace garden. For instance, pair plants with contrasting leaf shapes and colors to create visual interest. Varying plant heights can also add depth to your garden.
  • Edible Plants: There’s nothing quite like the satisfaction of harvesting your own produce. If you’re interested in growing your own food, consider planting a variety of vegetables, herbs, and even fruit trees suitable for container gardening.

Practical Irrigation Solutions For Terrace Gardens

Proper watering is critical to the success of a terrace garden. Overwatering can lead to root rot, while underwatering can leave your plants parched. As such, finding a balance is key, and practical irrigation solutions can be a big help.

Drip Irrigation System

  • Self-Watering Pots: These pots have a reservoir at the bottom that holds water, allowing plants to absorb moisture as needed. This setup not only reduces the frequency of watering but also prevents water logging.
  • Drip Irrigation System: A drip irrigation system provides a slow and steady supply of water directly to the plant roots, reducing water wastage. For terrace gardens with a significant number of plants, this can be an efficient watering solution.
  • Automatic Irrigation: If you travel frequently or simply don’t have the time for daily watering, an automatic irrigation system might be a worthwhile investment. These systems can be programmed to water your plants at specific times, ensuring they receive adequate hydration even in your absence.

Creating A Terrace Garden Oasis In The City

City dwellers often crave a touch of nature in their homes, and terrace gardens can provide that much-needed green oasis. Here’s how you can create a city sanctuary right on your terrace:

  • Use a Variety of Plants: A diverse mix of plants can make your terrace feel more like a garden. Mix and match different plant types, including flowering plants, foliage plants, climbers, and perhaps even a few dwarf trees. Don’t forget to include some herbs or veggies for a truly comprehensive garden experience.
  • Incorporate Water Elements: Adding a water feature, such as a small fountain or a birdbath, can bring a sense of tranquility to your garden. The sound of trickling water is known to be soothing and can help drown out city noise.
  • Add Comfortable Seating: Your city oasis should be a place where you can relax and unwind. Adding comfortable seating, like a hammock or a cushioned bench, can transform your garden into a cozy retreat.
  • Install Mood Lighting: The right lighting can create a magical atmosphere in your terrace garden. Consider installing soft, warm lights for a cozy vibe. You could also use solar-powered or LED lights for an eco-friendly lighting solution.

DIY Terrace Garden Construction Tips

Building your own terrace garden can be an enriching experience. Not only does it allow you to create a space that’s truly your own, but it can also be a cost-effective way to develop a green haven right in your home. Here are some tips to guide you through the process:

DIY Terrace Garden

  • Planning: As with any project, planning is crucial in DIY terrace garden construction. Sketch out your ideas, making note of the area’s dimensions, sunlight availability, and the placement of doors and windows. This will help you decide where to place plants, furniture, and other elements.
  • Drainage: Proper drainage is vital in a terrace garden to prevent water logging and to protect the underlying structure of your building. A slightly sloping surface can help direct water to the drainage points. It can be helpful to consult a professional to ensure that your drainage system is adequate.
  • Weight Distribution: One important factor often overlooked in terrace gardening is weight. The weight of planters, soil, furniture, and other elements should be evenly distributed to avoid stressing the structure. Using lightweight containers and potting mixes can help manage weight.
  • Materials: Use weather-resistant materials in your construction to ensure durability. For planters and furniture, consider materials that can withstand the elements, such as treated wood, metal, or sturdy plastic.
  • Safety Measures: Safety should be a priority in DIY construction. Ensure that the edges of the terrace are secured to prevent accidents. If you have children or pets, consider their safety as well when designing your garden.

Planning For Year-Round Terrace Gardening

A well-planned terrace garden can provide beauty and bounty throughout the year. Here’s how you can achieve a vibrant year-round garden on your terrace:

  • Seasonal Planting: Planting a variety of species that bloom or bear fruit at different times of the year can keep your garden lively across all seasons. Mix spring bulbs, summer flowers, autumn foliage, and winter hardy plants to create a garden that’s always in bloom.
  • Protecting Plants: Each season brings its own challenges, so it’s essential to protect your plants accordingly. For instance, consider installing a removable shade net for the harsh summer sun, or providing insulation for your pots during winter.
  • Winterizing: Some plants may need to be brought indoors or provided with additional protection during the winter months. If you have a heated sunroom, this could serve as a winter haven for some of your plants.
  • Indoor Plants: Including indoor plants in your garden design can add to the year-round appeal. Plants like peace lilies, snake plants, or spider plants can be moved inside during harsh weather and brought back out when conditions are more favorable.

Efficient Use Of Sunlight In Terrace Gardens

In a terrace garden, efficient use of sunlight can make all the difference. Here’s how to make the most of the natural light in your garden:

  • Assess Sunlight Availability: Before planting, spend a few days observing the patterns of sunlight on your terrace. This will help you understand which areas receive full sun, partial sun, or shade, and you can choose plants accordingly.
  • Plant Placement: Place sun-loving plants in areas that receive maximum sunlight, while shade-loving plants can be placed in areas with lesser light. Remember, the sun’s path can change throughout the year, so adjustments might be necessary as seasons change.
  • Use Reflective Surfaces: If your terrace garden doesn’t get enough sunlight, you can increase light availability by using reflective surfaces. White walls, mirrors, or even aluminum foil can help reflect light onto your plants.

Maintaining Healthy Soil In Terrace Gardens

Healthy soil is the backbone of any successful garden. Here are some tips to maintain the soil health in your terrace garden:

Maintaining Healthy Soil In Terrace Gardens

  • Soil Composition: A good potting mix should be light, well-draining, and rich in organic matter. You can buy ready-made mixes or make your own by combining garden soil, compost, and perlite or vermiculite.
  • Fertilizing: Over time, plants deplete the nutrients in the soil, so it’s necessary to replenish these nutrients through fertilization. You can use organic fertilizers like compost or worm castings, or synthetic fertilizers available in garden stores.
  • Soil pH: Different plants prefer different soil pH levels. It’s important to know the pH preference of your plants and adjust the soil pH accordingly. You can test the soil pH using a soil testing kit and adjust it using lime (to raise pH) or sulfur (to lower pH).
  • Soil Aeration: Compacted soil can restrict root growth and limit the availability of water and nutrients to the plant. Regularly loosening the soil in your pots can improve aeration and promote healthier plant growth.

Organic Terrace Garden Practices

Embracing organic practices in your terrace garden can contribute to a healthier environment and produce safer, chemical-free produce. Here are some organic gardening practices you can adopt:

  • Composting: Composting is an excellent way to recycle kitchen waste into nutrient-rich compost for your plants. It not only provides essential nutrients to your soil but also reduces the amount of waste that goes to the landfill.
  • Natural Pest Control: Instead of using chemical pesticides, consider natural methods of pest control. For instance, companion planting, where certain plants are grown together to deter pests, can be an effective strategy.
  • Organic Fertilizers: Organic fertilizers, such as compost, manure, or bone meal, can be used instead of synthetic fertilizers. They not only provide nutrients but also improve soil structure and promote beneficial soil microbes.

Pest Control In Your Terrace Garden

Pests can pose a significant challenge in terrace gardening. However, there are ways to control pests without resorting to harmful chemicals:

Homemade Pest Sprays

  • Integrated Pest Management (IPM): This approach combines various organic and non-organic methods to control pests. This could include using pest-resistant plant varieties, encouraging beneficial insects, and using organic or synthetic pesticides only as a last resort.
  • Beneficial Insects: Not all insects are harmful to your plants. Some, like ladybugs, spiders, and praying mantis, are predatory insects that can help control pests in your garden. Encourage these beneficial insects by providing them with a diverse habitat and avoiding the use of broad-spectrum pesticides.
  • Homemade Pest Sprays: Homemade sprays using ingredients like garlic, chilli pepper, or neem oil can deter many pests. However, they should be used sparingly and only when necessary, as they can also affect beneficial insects.

Terrace Garden Ideas For Edible Plants

Growing edible plants is a fantastic way to maximize your terrace garden’s utility and enjoy fresh produce right from your home. Here are some ideas to get you started:

  • Herbs: Herbs are excellent candidates for terrace gardens. They require minimal space, can be grown in pots, and most are relatively easy to grow. Consider basil, mint, parsley, rosemary, and thyme to add fresh flavors to your kitchen.
  • Vegetables: Leafy greens like lettuce, spinach, and kale can thrive in pots. Root vegetables like radishes and carrots can also be grown, but they require deeper containers. Tomato plants, bell peppers, and chillies are also popular choices for terrace gardens.
  • Fruits: Strawberries are a favorite for many terrace gardeners due to their compact growth habit and high yield. Dwarf varieties of fruit trees like apple, pear, and citrus can also be considered if your space allows.
  • Edible Flowers: Edible flowers like nasturtiums, violets, and marigolds can add a pop of color to your garden and your plate.
  • Vertical Gardening: If space is a constraint, consider vertical gardening. Climbing plants like beans, peas, and cucumbers can be grown on trellises to make the most of your vertical space.

Aesthetic Elements In A Terrace Garden Design

While function is important, a terrace garden should also be a pleasing space where you can relax and enjoy. Here are some ways to enhance the aesthetic appeal of your terrace garden:

  • Color Palette: Create a color scheme for your garden. You could choose plants with flowers in shades of a particular color, or use contrasting colors for a vibrant look.
  • Textures and Forms: Mix plants with different textures and forms to create visual interest. For instance, pairing a tall, spiky plant with a sprawling, low-growing plant can create a pleasing contrast.
  • Focal Points: Create a focal point in your garden that draws the eye. This could be a large, dramatic plant, a piece of garden art, or a brightly colored container.
  • Lighting: Incorporate lighting in your garden to make it enjoyable even after sunset. Solar-powered lights, fairy lights, or lanterns can add a magical touch to your garden at night.
  • Garden Art: Statues, wind chimes, bird houses, or a small water feature can add an extra dimension to your garden and reflect your personal style.

Weatherproofing Your Terrace Garden

Weatherproofing is critical for the longevity and success of your terrace garden. Here are some tips:

  • Containers: Choose containers made from weather-resistant materials like plastic, fiberglass, or treated wood. Make sure they have drainage holes to prevent water logging during rainy weather.
  • Plant Selection: Choose plants that are suitable for your local climate. If you live in an area with harsh winters, consider plants that can withstand frost, or be prepared to bring them indoors during the winter months.
  • Protection from Elements: Depending on your local climate, you might need to provide your plants with protection from elements. This could be a shade cloth for areas with intense sunlight, or a greenhouse cover for areas with cold winters.
  • Drainage: Ensure your terrace has good drainage to prevent water logging during heavy rains. Inadequate drainage can lead to root rot and damage the structure of your terrace.
  • Insulation: Insulating your pots can protect your plant’s roots from extreme temperatures. This can be achieved by double potting (placing your pot inside a larger pot) or wrapping your pots with insulating material in winter.

Rooftop Terrace Garden Design Ideas

A rooftop terrace offers an excellent opportunity to create a beautiful garden with a stunning view. Here are some design ideas for your rooftop terrace garden:Rooftop Terrace Garden

  • Lounge Area: A comfortable seating area can turn your rooftop garden into a perfect spot for relaxation or entertaining. You can add a pergola or an umbrella for shade.
  • Raised Beds: Raised beds can provide a significant amount of soil depth for larger plants or small trees. Plus, they can serve as a visual and wind barrier, providing privacy and protection to your garden.
  • Kitchen Garden: A rooftop can be an ideal spot for a kitchen garden due to its access to plenty of sunlight. Grow a variety of herbs, vegetables, and edible flowers for a fresh, organic addition to your meals.
  • Green Roof: Consider turning your entire roof into a lush carpet of low-growing plants. This can provide excellent insulation for your home and create a habitat for local wildlife.
  • Zen Garden: Create a serene, meditative space on your roof with a Zen garden. Use elements like sand, rocks, and simple, elegant plants like bamboo or Japanese maple.

Innovative Container Ideas For Terrace Gardening

While traditional pots and planters work well, there’s no limit to what you can use as a container for your plants. Here are some innovative ideas:

Hanging Baskets for garden

  • Recycled Containers: Items like old buckets, baskets, and even shoes can be converted into unique planters. Just make sure to add drainage holes.
  • Pallet Planters: Wooden pallets can be turned into a vertical garden by filling the gaps with soil and planting small plants like herbs or succulents.
  • Hanging Baskets: Hanging baskets can add a new dimension to your garden and are perfect for trailing plants like ivy or petunias.
  • Window Boxes: If your terrace has windows or railings, window boxes can be a great way to add more planting space.
  • Tiered Planters: Tiered planters can allow you to grow a variety of plants in one spot, making the most of your vertical space.

Choosing The Right Garden Furniture For Terraces

Choosing the right furniture can significantly enhance the comfort and aesthetic appeal of your terrace garden. Here’s a comprehensive guide to help you make the right decision.

Garden Furniture For Terraces

  • Space and Layout: Firstly, consider the size and layout of your terrace. A small bistro set might be perfect for a compact space, while a larger area can accommodate a full dining set or a lounge. Also, if your terrace has a stunning view, opt for seating arrangements that face towards it.
  • Material: Garden furniture is available in a range of materials – from wrought iron and aluminum to wood and rattan. Each has its pros and cons. Wrought iron is heavy and sturdy but may rust over time, while aluminum is lightweight and rust-resistant but may not be as durable. Wood provides a natural, rustic look but requires regular maintenance, and rattan is lightweight and weather-resistant but may fade over time.
  • Comfort: Comfort should be a top priority when choosing garden furniture. Look for pieces with ergonomic design and consider adding cushions for extra comfort. Also, remember to check the quality of the fabric used for outdoor cushions – it should be durable, fade-resistant, and easy to clean.
  • Style: The style of your furniture should complement the overall theme of your garden. A sleek, modern design may fit well in a contemporary garden, while wrought iron or wooden furniture might be more suitable for a traditional or rustic setting.
  • Storage: Consider where you will store your furniture during harsh weather or off-season. If space is an issue, opt for furniture that is easy to disassemble or foldable. Some furniture items also come with waterproof covers for protection during rainy days.

Creating A Low Maintenance Terrace Garden

Having a terrace garden does not always mean you have to invest a significant amount of time and effort in its maintenance. Here’s how you can create a low-maintenance terrace garden:

  • Choose Hardy Plants: Opt for plants that are resilient and require less care. Perennials, succulents, and native plants typically require less water and are more disease and pest resistant.
  • Mulch: Mulching can significantly reduce the need for watering and weeding. Organic mulch like straw, wood chips, or compost can also enrich your soil over time.
  • Irrigation: Consider installing a drip irrigation system or self-watering pots to reduce the time spent on watering.
  • Use Containers: Container gardening can be a lot less work than traditional gardening because it reduces the problems of weeding, pests, and diseases.
  • Minimalist Design: A minimalist design with less variety of plants will be easier to maintain than a garden with a wide variety of species. It also brings a modern, sophisticated look to your terrace garden.

Terrace Garden Design For Wildlife Attraction

Creating a terrace garden that attracts wildlife not only provides an opportunity for you to observe nature up close but also helps to support local biodiversity. Here are some tips:

  • Plant Selection: Opt for native plants, which are familiar to local wildlife and are more likely to attract them. Plants with different flowering times can provide a constant source of nectar.
  • Water Features: Even a small water feature can attract a wide range of wildlife, from birds and butterflies to frogs and toads.
  • Habitats: Providing habitats can attract specific wildlife. Birdhouses, bug hotels, and hedgehog homes can be added to your garden.
  • Avoid Pesticides: Pesticides can be harmful to wildlife. Stick to organic gardening practices and encourage natural pest predators like birds and ladybugs.
  • Feeding Stations: Bird feeders and butterfly feeders can be an excellent addition to attract wildlife to your terrace garden.

The Role Of Water Features In Terrace Gardens

Water features can play an essential role in enhancing the aesthetic appeal and creating a serene atmosphere in your terrace garden. Here’s why:

  • Visual Appeal: A well-designed water feature can become the focal point of your garden, drawing attention and adding a dynamic element to the space.
  • Sound: The sound of running water can be incredibly relaxing and can help to mask city noise if your terrace garden is in an urban area.
  • Cooling Effect: Water features can help to cool the surrounding area, making your terrace garden a more pleasant space in hot weather.
  • Wildlife: As mentioned earlier, water features can attract a variety of wildlife, adding an element of nature watch to your garden.

Water features can be as simple as a bird bath or as elaborate as a waterfall or fountain. Remember to consider the size and style of your garden when choosing a water feature. A large fountain may overpower a small garden, while a tiny bird bath might be lost in a large space.

Terrace Garden Lighting Ideas

Lighting can be a game changer in your terrace garden, emphasizing its beauty and extending its usability into the night. Here’s how you can light up your terrace garden:

  • Ambient Lighting: The primary goal is to cast an even light across the entire space. You could use wall lights, hanging lights or even string lights for this purpose. When placed correctly, these can give your garden a warm, inviting glow.
  • Task Lighting: This is lighting directed at a particular area for specific tasks like grilling or reading. Outdoor-rated task lamps or track lighting can be very helpful in these cases.
  • Accent Lighting: If you have a beautiful statue, a rare plant or a lovely water feature that you want to highlight, accent lighting is the way to go. Spotlights or landscape lighting can accentuate these features.
  • Safety Lighting: Important for steps, pathways and entry points to ensure safe movement after dark. Solar-powered path lights can be a good energy-efficient option.
  • LED Lights: LED lights are energy-efficient, have a longer life span, and come in a variety of colors. They’re a good option for any of the above lighting types.
  • Solar Lights: For a green alternative, consider solar lights. They store energy during the day and provide lighting at night, requiring no electrical connection.

Remember, the trick is to balance the lighting in a way that it’s not too glaring or too dim, creating a comfortable and enchanting atmosphere.

The Importance Of Terrace Garden Drainage

Effective drainage is critical for a terrace garden. Here’s why:

  • Prevents Waterlogging: Proper drainage prevents water from pooling in your garden. Without it, water can accumulate and lead to waterlogging, which can be detrimental to many plants.
  • Protects Your Building: Effective drainage is also essential to protect the integrity of your building. Insufficient drainage can lead to water seeping into your building, causing damp, structural damage and other issues.
  • Promotes Plant Health: Good drainage ensures water is adequately distributed and absorbed, helping to provide a healthy environment for plant roots.

Here’s how you can ensure effective drainage in your terrace garden:

  • Use High-Quality Soil: Loamy soil, which is a mixture of sand, silt and clay, is typically best for drainage.
  • Build a Gradient: Your terrace should have a slight slope to help water flow towards the drain.
  • Install Drainage Layers: These layers, made from materials like pebbles or gravel, can be installed under the soil to help guide water away from the roots and towards the drainage outlets.
  • Regular Maintenance: Keep your drains clean and free from debris to prevent blockages.

Terrace Garden Design: Enhancing Property Value

A well-designed terrace garden not only provides a beautiful space for relaxation and entertainment, but can also significantly enhance the value of your property. Here’s how:

  • Aesthetic Appeal: A beautiful terrace garden can significantly boost the overall aesthetic appeal of your property, making it more attractive to potential buyers or renters.
  • Increased Living Space: Effectively, a terrace garden is an extension of your living space. The additional functional area can be a strong selling point.
  • Environmental Benefits: A terrace garden can improve the air quality and reduce the heat island effect, particularly in urban areas. These environmental benefits can increase your property’s attractiveness.
  • Wellness Factor: Gardens are known for their therapeutic effects. A beautiful outdoor space where one can connect with nature can contribute to the wellbeing of the inhabitants, thereby adding to the value of the property.

Remember, the key is to create a well-planned, low-maintenance garden that looks beautiful throughout the year. Hiring a professional landscape designer can be a worthwhile investment to achieve this goal.

Conclusion

The idea of having a personal oasis right in the heart of a bustling city can be realized with a well-designed and maintained terrace garden. From understanding the basics to planning for a year-round green space, the journey of setting up a terrace garden can be a fulfilling experience. Each aspect – be it selecting the right plants, making efficient use of sunlight, or implementing effective irrigation solutions – contributes towards making your terrace garden a thriving ecosystem.

A terrace garden is not merely about growing plants; it’s about creating an environment where you can relax, unwind, and connect with nature. It’s about lighting up your space to enjoy it after sundown, and it’s about making a haven for local wildlife. It involves an aesthetic blend of various elements and thoughtful considerations for drainage and weatherproofing to keep it sustainable.

Remember that each terrace garden will be unique, reflecting the personal taste and lifestyle of its owner. So whether it’s choosing the right furniture, deciding on the type of containers, or installing water features, make it a space that resonates with you. An attractive, well-planned terrace garden can significantly enhance the value of your property, making it not just an investment for your well-being, but also a financial asset.

The journey of setting up and maintaining a terrace garden can be as rewarding as the end result. Happy gardening!

Cottage Garden Path Ideas And Tips: A Comprehensive Guide

Cottage gardens evoke a sense of nostalgia, comfort, and whimsy. They’re characterized by a dense mixture of colorful flowers, shrubs, and decorative elements. A significant aspect of the cottage garden is its pathways. Winding through a sea of color and fragrance, these paths act as the backbone, guiding visitors through a tapestry of floral beauty. This comprehensive guide will walk you through various cottage garden path ideas, offering tips on materials, design, and much more. So whether you’re renovating an existing garden or starting from scratch, let’s embark on a journey to create the perfect garden path that complements your cottage aesthetics.

Understanding Cottage Garden Aesthetics

Cottage gardens are not just plots of land; they are intimate expressions of love, nostalgia, and an understanding of nature’s rhythms. Here’s a closer look into their signature aesthetics:

  1. Charm Over Structure: Traditional cottage gardens aren’t characterized by rigid layouts or precision. They represent the gardener’s personality, often feeling whimsical and spontaneous. Imagine a relaxed patchwork of colors, textures, and scents rather than a meticulously planned design.
  2. Dense Planting: Overlapping plants, where shrubs nuzzle up against flowers and climbers intertwine, form a lush tapestry. This overlapping creates visual depth and provides habitats for beneficial insects and birds.
  3. Mix of Plants: One of the hallmarks of cottage gardens is the diversity of plants. Classic English roses might share space with delphiniums, foxgloves, lavender, and herbs. The fusion of ornamental and edible plants is not just practical but also aesthetically pleasing.
  4. Sense of Enclosure: Though not claustrophobic, a typical cottage garden feels like a cozy, secluded nook. Hedges, shrubs, and trellises create natural borders, fostering a sense of intimacy.
  5. Naturalism Over Formality: Expect to see plants cascading over paths, roses climbing trellises in delightful disarray, and pockets of wildflowers. It’s nature in its semi-wild form, not tamed entirely but channeled beautifully.

Planning Your Cottage Garden Layout

Crafting the layout of a cottage garden requires a delicate balance between planning and serendipity. Here’s a deeper dive into the process:

Cottage Garden Layout

  1. Sketching & Vision: Begin with a basic sketch of your garden space. Highlight areas of sun and shade, existing plants or structures, and natural slopes or depressions. Understand the microclimates within your garden to place plants optimally.
  2. Prioritizing Pathways: While paths should feel organic, they also need to serve practical purposes. Think about how you’ll navigate the garden for tasks like watering, pruning, or harvesting. The paths will dictate the flow and the garden’s segmented areas.
  3. Focal Points & Features: Every garden benefits from focal points. Whether it’s a vintage bird bath, a majestic rose arbor, or a sunlit reading nook, such features draw the eye and create memorable spots within the garden.
  4. Utility Areas: A true cottage garden often has a functional side. Decide where you’ll have compost heaps, tool sheds, or vegetable patches.
  5. Seasonal Planning: Consider how the garden will evolve across seasons. Spring bulbs give way to summer perennials, which then transition to autumn foliage and berries.

Defining Pathways in Cottage Gardens

The paths in a cottage garden are both functional conduits and storytelling elements. Let’s explore this further:

  1. Purpose & Flow: Decide on the intent behind each path. Main paths should offer clear, unhindered access, while secondary paths might meander, leading visitors on a more exploratory journey.
  2. Width & Accessibility: Paths should vary in width based on their purpose. Main paths, especially those leading to entrances or utility areas, should be wide enough for two people to walk side by side.
  3. Texture & Experience: The feel underfoot can differ. Some paths might be soft, made of bark mulch, inviting barefoot walks, while others might be firm and reliable, crafted from brick or stone.
  4. Borders & Edges: Path edges can be defined by plants, stones, or even physical borders like wooden beams. This creates a visual delineation and prevents path materials from spilling into adjacent plant beds.
  5. Shade & Light Play: Consider how surrounding plants will cast shadows on the path. A path under an arbor might offer dappled sunlight, creating a mesmerizing play of light and shadow.

Choosing Materials for Garden Paths

Selecting the right materials is crucial for both the function and aesthetics of the garden paths. Here are some insights:

  1. Stone Paths: These are enduring favorites in cottage gardens. Materials like flagstone, limestone, or slate can be used. Depending on the type of stone and the laying pattern, these paths can feel rustic or more refined. Remember to consider the local climate; some stones may become slippery when wet.
  2. Brick Paths: Red bricks, with their warm hues, evoke a sense of history. The laying pattern, be it herringbone, basket weave, or running bond, can drastically alter the path’s appearance.
  3. Wooden Paths: Suitable for gardens with a more woodland feel. Materials range from treated lumber to reclaimed wood. Ensure the wood is treated to resist decay, especially in wetter climates.
  4. Gravel & Pebble Paths: These paths are adaptive and easier to shape. The crunch underfoot is delightful, but they may require maintenance like weeding or replenishing the gravel. Edging is crucial to keep them well-defined.
  5. Mulch Paths: Organic mulches like wood chips or bark create soft, permeable paths. They integrate seamlessly into more naturalistic garden sections but do degrade over time and might need periodic top-ups.

Remember that the best material often depends on the garden’s overall theme, the local climate, budget constraints, and personal preferences.

Stone Paths: A Classic Choice

Stone paths have graced gardens for centuries, embodying timeless appeal and robustness that few other materials can rival. Their enduring charm is rooted in a myriad of reasons:

Stone Paths

  1. Variety of Stones: From flagstone to cobblestone, limestone to slate, there’s a stone for every garden’s aesthetic. Each brings its own hue, texture, and character. Flagstones, with their irregular shapes, are great for a relaxed, organic feel. Cobblestones, smaller and often rounder, add quaint charm reminiscent of old European streets.
  2. Durability: Stone paths are incredibly durable. Once set, they can withstand varying weather conditions, from heavy rains to scorching suns, for decades or even centuries.
  3. Natural Fit: Stone paths blend seamlessly into nature, connecting different garden sections while maintaining the organic feel.
  4. Customization: From the gaps between stones (which can be filled with soil and tiny groundcovers) to their arrangement patterns, stone paths can be as unique as the gardener’s imagination.
  5. Maintenance: While stones don’t decay, they might develop moss or become slippery. Regular cleaning and occasional leveling can keep them in pristine condition.
  6. Environmental Considerations: Stone paths are permeable, meaning they allow water to seep through, replenishing groundwater and preventing water runoffs.

Brick Paths: Traditional and Versatile

Red, warm, and timeless, brick paths radiate a sense of history and permanence:

  1. Aesthetic Appeal: Their reddish-brown hues lend warmth to garden landscapes, contrasting beautifully with the lush greens.
  2. Patterns Galore: The rectangular shape of bricks offers myriad laying patterns. Herringbone, basket weave, stretcher bond – each pattern evokes a distinct vibe.
  3. Durability: Bricks are sturdy, and when properly set, can endure for many years. They’re resistant to wear and tear and can withstand heavy foot traffic.
  4. Maintenance: Over time, bricks may accumulate moss or algae, especially in shaded or damp areas. Simple cleaning solutions can remedy this.
  5. Edges and Borders: Bricks are also fabulous for creating raised edges or borders, offering a multi-dimensional feel to garden paths.
  6. Eco-friendly Option: Salvaged or reclaimed bricks, often from old buildings or pathways, are eco-friendly choices that add character and reduce environmental impact.

Wooden Paths: A Rustic Approach

Wooden paths transport us to woodland trails and forest escapes, with their earthy and rustic charm:

  1. Material Options: From pressure-treated lumber to cedar, redwood to reclaimed wood planks, the choice of wood can define the path’s look and longevity.
  2. Earthy Appeal: Wooden paths have a natural, muted tone that blends with surroundings, be it a lush garden or a dry rockscape.
  3. Versatility: They can be laid as wooden planks for a boardwalk effect or log slices for a more whimsical, fairy-tale feel.
  4. Maintenance: Wood is susceptible to rot, especially in damp environments. Regular treatments and choosing rot-resistant wood can mitigate this.
  5. Sustainability: If opting for wood, considering sustainably sourced options or reclaimed wood can be a great eco-conscious choice.
  6. Texture & Feel: The tactile sensation of walking on wood, with its grainy texture, offers a different experience, connecting us more intimately with nature.

Gravel and Pebble Paths: Easy and Affordable

Gravel and pebble paths are the epitomes of simplicity and functionality:

  1. Easy Installation: Laying a gravel path is relatively straightforward, involving the spreading of gravel over a weed-proof membrane.
  2. Budget-Friendly: They are among the most affordable path materials, making them great for larger areas or for those on a tight budget.
  3. Sound & Sensation: The signature crunch underfoot while walking on gravel has a nostalgic feel, evoking memories of countryside walks.
  4. Versatility: The size, shape, and color of the pebbles or gravel can be chosen based on the garden’s theme.
  5. Maintenance: While easy to install, gravel paths can require occasional top-ups and weeding. Edging is essential to prevent the gravel from spilling into plant beds.
  6. Drainage: Gravel and pebbles ensure good water drainage, reducing water logging issues and making them ideal for rain-prone areas.

Creating a Winding Path: Curves and Turns

Winding paths are the epitome of mystery, charm, and romanticism in a cottage garden, urging visitors to explore what lies beyond the next bend.

Creating a Winding Path

  1. Why Winding Paths? Unlike straight paths that reveal their destination from the start, winding ones cultivate an element of surprise. They entice and beckon, creating a journey rather than just a means to an end. Each curve might reveal a new garden tableau or hidden resting spot.
  2. Flow & Harmony: It’s crucial that the curves feel organic. Avoid abrupt turns that can feel forced. Instead, opt for gentle, sweeping curves that mimic natural landscapes, such as the meandering of a stream or the gentle undulation of hills.
  3. Placement: Utilize natural obstacles. Perhaps there’s a grand old tree you don’t want to cut down or a rock feature. Make these the focal points your path curves around, enhancing both the feature and the path itself.
  4. Size Matters: Ensure the path’s width is consistent, even through the curves, ensuring safe passage, especially in damp conditions when the path might be slippery.
  5. Journey & Destination: Remember, while the journey is essential, so is the destination. Ensure your winding path leads to a spot worth reaching – be it a secluded bench, a pond, or a floral alcove.

Straight or Wavy? Path Shapes Decoded

Every garden has a story, and the path you choose sets the narrative tone.

  1. Straight Paths: They’re direct, purposeful, and formal. Leading the eye straight to a focal point, these paths are about efficiency and clarity. Ideal for formal garden layouts, they’re often aligned with a home’s front door or a garden’s main entrance.
  2. Wavy Paths: More relaxed and informal, wavy paths meander leisurely, offering a slower, contemplative journey. They’re the hallmark of cottage gardens, embodying a casual, whimsical charm.
  3. Mix and Match: There’s no rule against combining both! A straight path can lead to a central feature, branching off into winding trails that explore different garden sections.
  4. Purpose & Function: Your choice should also consider the path’s function. If it’s a frequently-used shortcut, straight might be preferable. But if it’s more about leisurely strolls, wavy is the way to go.

Path Edging Ideas for Cottage Gardens

Edging isn’t just functional, preventing gravel or mulch from spilling over—it’s an aesthetic choice that frames your garden path.

Path Edging Ideas

  1. Natural Stone: For a rustic, timeless look, stones like flagstone or cobble can be embedded on the sides. They define the pathway and integrate seamlessly into the natural environment.
  2. Bricks: Laid flat or upright, bricks offer a classic, tidy appearance. Whether you choose new bricks for a uniform appearance or reclaimed ones for character, they’re versatile and enduring.
  3. Wood: Timber or log roll edgings lend a country charm. Treated wood can resist decay and create a delightful contrast with surrounding greenery.
  4. Plants: Low-growing plants like boxwood shrubs or lavender can act as living edgings, adding life, color, and fragrance to path borders.

Garden Path Lighting: Practical and Decorative

Lighting transforms paths from daytime functional walkways to magical nighttime experiences.

Garden Path Lighting

  1. Safety First: The primary role of path lighting is safety, ensuring that paths are visible during the night, preventing trips or missteps.
  2. Ambient Lanterns: Softly glowing lanterns placed intermittently can create a dreamy, fairy-tale ambiance. They cast gentle shadows and are perfect for relaxed evening strolls.
  3. Solar Stakes: Eco-friendly and practical, solar stakes charge during the day and illuminate the path by night. They’re an economical option and come in various designs.
  4. Recessed Lighting: For a modern touch, recessed lights embedded into the path surface can offer a sleek, minimalist aesthetic.
  5. Highlight Features: Use spotlights or uplights to emphasize particular garden features adjacent to the path, be it a statue, a pond, or a unique plant.

Planting Along the Garden Path

The plants flanking your path can transform the entire garden experience.

  1. Sensory Delight: Opt for fragrant plants like roses, jasmine, or lavender. Their aroma will waft up as visitors stroll by, creating a multi-sensory experience.
  2. Changing Seasons: Choose a mix of perennials and annuals. This ensures that even as seasons change, there’s always something blooming alongside your path.
  3. Texture & Height: Play with varying plant heights and textures. Grasses, ferns, and flowering plants can be juxtaposed for a dynamic look.
  4. Ground Cover: For paths with wider gaps or stepping stones, low ground cover plants can grow in between, creating a ‘living path’. Think of creeping thyme or baby’s tears.
  5. Bursts of Color: While green is serene, occasional bursts of color can enliven a path. Seasonal flowers in complementary or contrasting colors can do the trick.

Creating a Scented Pathway with Flowers

The allure of a scented pathway is undeniable. Not only does it please the olfactory senses, but it also elevates the entire garden experience.

  1. Benefits of Scent: Scent can trigger memories and emotions, making your garden not just a visual treat but an emotional haven. A fragrant pathway can serve as a relaxing retreat after a long day, or even uplift your mood.
  2. Choosing Fragrant Flowers: Flowers like Jasmine, Roses, and Lavender are renowned for their fragrances. Gardenias, with their intoxicating scent, can make evening walks memorable. Lilacs and honeysuckles offer a sweet aroma that’s especially potent during late spring and early summer.
  3. Seasonal Rotation: Ensure continuous fragrance by choosing flowers that bloom at different times. This way, as one flower’s scent diminishes, another’s will take its place.
  4. Placement: Positioning is key. Plant fragrant flowers where they can easily waft into open windows or where breezes can carry their scent across main walkways.
  5. Layering Scents: Mix and match different fragrances. While a strong scent like gardenia might dominate, it can be balanced with the subtle sweetness of violets.

Growing Ground Cover Along the Path

Ground covers serve multiple purposes: they’re aesthetically pleasing, prevent soil erosion, and deter weeds.

  1. Why Ground Cover? Besides their practical purposes, ground covers can add a splash of color, especially between stepping stones or wider path gaps.
  2. Variety Selection: Creeping Jenny, with its golden hue, can be a vibrant choice. Thyme, which releases a pleasant aroma when stepped on, offers both beauty and fragrance. For shaded paths, consider Sweet Woodruff or ferns.
  3. Maintenance: Some ground covers, like ivy, can be invasive. Choose plants that fit your maintenance level, ensuring they don’t overtake adjacent plantings.
  4. A Living Carpet: Ground covers can soften the look of hard pathways, creating a verdant carpet that’s inviting and refreshing.
  5. Durable Choices: For frequently-trodden paths, opt for resilient ground covers like Blue Star Creeper or Corsican Mint.

Incorporating Stepping Stones in Your Path

Stepping stones are both decorative and functional, breaking up long stretches of uniform path.

Incorporating Stepping Stones

  1. Material Choices: From slate to sandstone, the options are many. Each stone type offers a unique texture and color, allowing for personalization.
  2. Placement & Spacing: Stones should be placed at a natural stride’s distance apart. For a more whimsical look, vary their positioning slightly off the direct line.
  3. Design Ideas: Consider adding engraved stones with favorite quotes or family names, making the pathway more intimate and personal.
  4. Ground Covers & Stones: As previously mentioned, intertwining ground covers and stepping stones can create a magical, ‘floating’ garden effect.
  5. Safety: Ensure the stones are level and stable to prevent trips and slips, especially after rain.

Adding Seating Along the Path

Seating invites contemplation, rest, and deeper engagement with the garden.

  1. Bench Choices: From rustic wooden benches to ornate metal ones, choose seating that complements your garden’s aesthetic.
  2. Strategic Placement: Position benches at turns, viewpoints, or beside a fragrant flower cluster. It’s not just about rest but also about offering a unique garden perspective.
  3. Integrated Seating: Consider embedding seating within the path itself, like wide flat stones that serve dual purposes, or creating alcoves within shrubbery for secluded resting spots.
  4. Maintenance: Wood, though charming, may need regular treatment to prevent decay. Metal might require anti-rust measures. Choose according to your garden’s conditions and your maintenance capabilities.
  5. Multipurpose Seating: Add storage beneath seats or create benches around tree trunks. Make the most of the space without crowding the path.

Garden Paths as Focal Points

A well-designed path is not just a means to an end but a highlight in itself.

  1. Narrative Paths: Craft a story with your path. Begin with simple plants, evolve into fragrant sections, then culminate at a water feature or a sculpture. Make the journey count.
  2. Color Play: Use the path to showcase seasonal blooms, leading visitors through a chromatic journey from spring’s pastels to autumn’s deep hues.
  3. Texture Transition: Start with soft grass, transition into gravel, and finish with wooden planks. Let visitors feel the change beneath their feet, enhancing their sensory experience.
  4. Elevate and Descend: Use gentle elevations or shallow steps. It adds drama, offers varied viewpoints, and can make a garden seem larger than it is.
  5. Water Integration: Incorporate small streams or rills parallel to the path, or create stepping stones across a pond. The sound and sight of water add a dynamic layer to the garden experience.

Dealing with Path Maintenance

Garden paths, while enhancing the aesthetics of your landscape, require regular maintenance to remain in top shape and ensure longevity.

  1. Routine Cleaning: Regardless of your path’s material, sweeping or blowing off debris like leaves and twigs can prevent potential staining and buildup. Over time, organic materials can decompose on your pathway, leading to slippery surfaces or fostering weed growth.
  2. Weed Control: Those tiny sprouts appearing between your path’s crevices can grow into a significant problem. Regularly inspect for weeds and remove them. Using a weed barrier beneath your path can be a preemptive measure.
  3. Replenishing Materials: Gravel and wood chips degrade over time. Replenish these periodically to ensure a level surface and retain the path’s appearance.
  4. Sealants and Protectants: Especially for wooden and stone paths, using a sealant can protect against weather damage and reduce the frequency of maintenance.
  5. Monitoring for Erosion: Particularly relevant for sloping gardens, rain can cause erosion. Installing a proper drainage system and using edging can mitigate this issue.
  6. Repairing Cracks: For stone or brick paths, cracks might emerge over time. Address these promptly to prevent them from worsening.

Considerations for Garden Path Accessibility

A garden should be a space of relaxation and enjoyment for everyone. Making paths accessible ensures that all, regardless of mobility challenges, can savor your garden.

  1. Width and Clearance: Paths should be wide enough to accommodate wheelchairs. A width of at least 36 inches is generally recommended. Additionally, ensure there’s enough overhead clearance, keeping in mind taller users or those using mobility aids.
  2. Surfacing: Smooth, hard surfaces like compacted gravel, pavers, or concrete are preferable. These surfaces provide stability and ease for wheelchairs, walkers, or strollers.
  3. Gradient: Avoid steep inclines. Adhering to ADA recommendations, a 1:12 slope ratio ensures that the path is not too steep for wheelchair users.
  4. Handrails and Edging: These provide support and direction, especially on sloped paths or near steps.
  5. Lighting: Properly illuminating pathways ensures visibility during dusk and nighttime, aiding those with visual impairments.
  6. Signage: Installing clear signage can assist visitors in navigating the garden without hassle.

Paths for Small Cottage Gardens

Smaller gardens present unique challenges, but with clever design, they can appear spacious and inviting.

  1. Maximizing Space: Zigzag or curved paths can make a garden appear larger. They create an illusion of extended space and add an element of surprise.
  2. Scale: In smaller gardens, everything should be in proportion. Opt for narrower paths, but still ensure they’re wide enough for comfortable walking.
  3. Multipurpose Areas: Perhaps a section of the garden path widens into a small patio or seating area, maximizing utility without wasting space.
  4. Vertical Elements: Tall, slender plants or structures can draw the eye upwards, creating a sense of height rather than breadth.
  5. Avoid Clutter: The temptation might be to showcase various plants or path materials, but in smaller spaces, less is often more. A cohesive design can make small spaces feel organized and spacious.

Eco-friendly Path Materials and Practices

Embracing sustainability in garden design is not only beneficial for the environment but can also be aesthetically pleasing.

Eco-friendly Path Materials

  1. Recycled Materials: Consider paths made from reclaimed wood, recycled rubber mulch, or bricks from old constructions. They add character while being eco-friendly.
  2. Permeable Paving: Materials like permeable concrete or certain types of gravel reduce runoff, allowing water to seep into the ground and replenish groundwater supplies.
  3. Local Sourcing: Using locally-sourced materials reduces the carbon footprint associated with transporting materials from afar.
  4. Natural Weed Control: Instead of chemical herbicides, opt for natural solutions like boiling water or vinegar for weed control.
  5. Maintenance: Opt for organic cleaners and sealants. By avoiding harsh chemicals, you ensure that any runoff from your path doesn’t contaminate the surrounding soil or water sources.
  6. Durability: It’s eco-friendly in the long run to choose durable materials that don’t require frequent replacement, reducing resource consumption over time.

Creating a Romantic Moonlit Path

A moonlit path offers an ethereal ambiance that draws people into the mysterious charm of the night garden. To craft a magical, moonlit pathway:

  1. Moonlight Garden Plants: Introduce plants with white or pale-colored blooms that glow under moonlight. Favorites include Moonflowers, Evening Primrose, and White Bleeding Hearts. Their gentle luminescence will reflect the moon’s soft glow, elevating the romantic setting.
  2. Reflective Surfaces: Using light-colored path materials like white gravel can help reflect the natural moonlight. Incorporating water features, like a small pond or fountain, can also capture and mirror the soft glow of the moon.
  3. Strategic Lighting: Solar-powered or low-voltage LED lights can recreate a moonlit effect. Position them to cast shadows of taller plants or garden ornaments, creating a dynamic, ever-changing atmosphere.
  4. Aroma: Night-blooming jasmine or honeysuckle releases intoxicating fragrances after dusk. Plant them alongside your path to engage all the senses.
  5. Seating: A moonlit garden is the perfect setting for reflection or romantic evenings. Incorporate comfortable seating areas along the path to soak in the ambiance.

Inspiring Cottage Garden Path Examples

Drawing inspiration from classic and innovative designs can help in conceptualizing your unique path.

Cottage Garden Path

  1. English Country Garden: A quintessential design featuring cobblestone paths winding their way through beds overflowing with roses, lavender, and foxgloves. The sporadic placement of benches offers a spot to enjoy the fragrant surroundings.
  2. Mediterranean Allure: Sun-baked terracotta tiles interspersed with creeping thyme or sedum, evoking a rustic Mediterranean landscape. Olive trees and lavender bushes further accentuate the theme.
  3. Rustic Wilderness: Bark-covered paths meandering through wildflower meadows, reminiscent of woodland walks. Log stepping stones and fern-lined routes complete this untamed look.
  4. Seaside Retreat: Crushed shell pathways leading to a garden bursting with sea grasses, asters, and beach roses, recreating the charm of a coastal garden.
  5. Formal Elegance: Symmetrically designed paths of cut stone bordered by neatly trimmed boxwood hedges or rose arbors, exuding sophistication and order.

Creating Your Dream Cottage Garden Path

The path in your cottage garden should be a reflection of your personal style, desires, and the functional needs of the space.

Dream Cottage Garden Path

  1. Vision and Theme: Start by visualizing the mood you want to evoke. Do you dream of a whimsical fairy-tale setting or a more structured, formal design? This initial vision will guide your material and plant choices.
  2. Functionality: Ensure the path serves its purpose. If it’s a frequently traveled route, it needs to be wide, stable, and easily navigable. If it’s more of a decorative feature, you can focus on aesthetics over functionality.
  3. Incorporate Personal Touches: Whether it’s an heirloom rose variety passed down through generations or mosaic tiles crafted from a memorable vacation, weave in elements that resonate with personal memories and stories.
  4. Iterate and Experiment: Garden paths can evolve. Don’t be afraid to try different plants, switch out materials, or introduce new decorative elements. Gardens are living canvases that can be redesigned as they grow.
  5. Seek Inspiration: Regularly visit botanical gardens, peruse garden design books, or join gardening forums online. Exposing yourself to a plethora of designs will refine your preferences and introduce you to novel ideas.
  6. Professional Consultation: If you’re unsure or overwhelmed, consider hiring a landscape designer. They can provide valuable insights, resource connections, and design expertise to bring your vision to life.

Conclusion

Cottage gardens, with their whimsical charm and inviting ambiance, offer homeowners a sanctuary of natural beauty and serenity. The paths that weave through these gardens are more than just functional walkways; they’re narrative threads that tell stories, guide explorations, and introduce visitors to the garden’s myriad delights.

In creating your perfect cottage garden path, the possibilities are as endless as your imagination. Whether you opt for the traditional stone or the rustic wood, a moonlit allure or a scented flower trail, the key is to craft a path that resonates with your personal style and the unique spirit of your garden. Gardens are a reflection of the heart and soul of the gardener, and the paths you lay down are invitations for others to step into your world. With the right planning, inspiration, and care, your garden path can become the journey and destination in itself, a testament to nature’s beauty and your personal touch.

Japanese Rock Garden Design: A Comprehensive Guide To Balance

Japanese Rock Gardens have been the symbol of Zen Buddhism, peace, and meditation for centuries. Their design, while rooted in ancient tradition, embodies principles that are more relevant today than ever before. This comprehensive guide aims to delve deep into the intricacies of Japanese Rock Garden design, shedding light on the myriad elements that make up its aesthetics, history, and significance.

From the symbolic meaning of each stone to the therapeutic benefits one can derive from them, this article intends to provide readers with a thorough understanding of the philosophy and practicalities behind these serene spaces. Embark with us on this journey to discover balance, tranquility, and the profound connection with nature that Japanese Rock Gardens have to offer.

Understanding Japanese Rock Garden Concepts

Japanese Rock Gardens, often referred to as Zen Gardens, are an emblem of minimalism, tranquility, and deep-rooted philosophy. At a glance, these gardens appear to be simple arrangements of rocks and raked gravel. However, they embody a universe of concepts and ideas that stem from ancient Japanese culture and Buddhist teachings.

Japanese Rock Garden

The term ‘rock garden’ might seem limiting, but it captures the essence of this art form — the representation of larger natural landscapes in a minimalist setting. Each element, be it a stone or a gravel pattern, is chosen and positioned deliberately. The gardens represent both the tangible and intangible — mountains, rivers, islands, and the vastness of the universe, to name a few.

Moreover, these gardens encourage contemplation. The observer isn’t merely looking at an arrangement of stones but is prompted to delve into introspection, finding meaning and peace in the simplicity. The gardens also stress the impermanence of life; as the raked patterns in the sand can be wiped away and recreated, so too do the moments in our lives come and go.

Essentials Of Zen Garden Design

At the core of a Japanese Rock Garden’s design principles is Zen, a form of Buddhism emphasizing introspection and meditation. Zen gardens are physical manifestations of Zen teachings, fostering mindfulness and inner peace.

  • Simplicity (Kanso): This principle highlights the garden’s minimalist nature. Unnecessary elements are omitted to create a clean, uncluttered space.
  • Subtlety (Yugen): While the gardens may seem straightforward, they carry a depth of meaning. This principle emphasizes the mysteries hidden in simplicity.
  • Naturalness (Shizen): Even though Zen gardens are man-made, they should appear natural and unforced, seamlessly integrating with the environment.

Understanding and incorporating these principles is essential for anyone wishing to design an authentic Zen garden. The elements used must not only be harmonious but should also stimulate deeper thought and meditation.

The Art Of Karesansui

Karesansui, which translates to “dry landscape”, is an art form central to the design of Zen gardens. It involves the representation of water elements using gravel and stones, eliminating the need for actual water. This creates a unique sensory experience, allowing the observer to ‘see’ water where there is none.

The Art Of Karesansui

The primary tools of Karesansui are rocks and a rake. The rocks represent islands or natural features, while the raked patterns in the gravel or sand symbolize ripples or waves in water. The act of raking, often done by Zen monks, is meditative in itself. The repetitive motion, the focus on creating precise patterns, and the transient nature of the designs (which can be easily erased and redone) are reflections of the impermanence and cyclical nature of life.

Japanese Landscape Aesthetics

The aesthetics of a Japanese Rock Garden are deeply rooted in the nation’s cultural appreciation for nature and its transient beauty. Unlike the lush, green gardens of the west, Zen gardens might appear stark. However, they capture the essence of Japanese aesthetics which value subtlety over grandeur.

Japanese Landscape Aesthetics

  • Mono no Aware: This term roughly translates to “the beauty of transience”. It’s an appreciation of the fleeting nature of life, echoed in the temporary patterns raked into the garden’s sand or gravel.
  • Wabi-Sabi: This principle finds beauty in imperfection. In Zen gardens, this might manifest in the form of irregularly shaped rocks or asymmetrical arrangements, emphasizing naturalness and imperfection as facets of true beauty.

The quiet, subdued tones of the gardens also instill a sense of peace, allowing for introspection. Instead of vibrant flowers or flowing water features, the muted colors and designs create a subdued backdrop, directing focus inward.

Arrangement Techniques For Zen Gardens

Creating a Zen garden is not just about placing stones and raking sand; it’s an art that requires an understanding of balance, symbolism, and space.

Arrangement Techniques For Zen Gardens

  • Stone Placement: Stones are the primary elements in a Zen garden. Their positioning is done with care, considering their size, shape, and relationship to other elements. Often, stones are placed in groups of odd numbers, symbolizing natural formations like waterfalls, mountains, or animals.
  • Space: Emptiness or ‘Ma’ is as vital as the elements themselves. The empty spaces are just as intentional as the filled ones, representing voids, distance, and the vastness of the universe.
  • Patterns: The sand or gravel is raked into intricate patterns, each with its symbolism. Waves, ripples, and other designs not only depict water elements but also emphasize the fleeting nature of life. The patterns can be changed daily, reflecting the ever-changing nature of existence.

Arrangement techniques, while rooted in tradition, can be adapted and evolved. Modern Zen gardens sometimes incorporate new elements or designs, but the core principles of balance, symbolism, and simplicity remain unchanged.

Incorporating Natural Elements

Japanese Rock Gardens, known for their minimalist design, emphasize harmony with nature. This spiritual and aesthetic alignment is achieved through the meticulous incorporation of natural elements, ensuring each addition complements the garden’s tranquility.

Sand and Gravel: Often used as the primary base of Zen gardens, sand and gravel represent the vastness of the ocean or emptiness. Their neutral hues provide a serene backdrop, upon which patterns resembling water ripples or waves can be raked, signifying movement and life.

Moss: This unassuming greenery symbolizes age and the slow passage of time. Its gentle growth across stones or in patches adds a touch of color and softness, creating a balance with the hardness of the rocks.

Plants: While not always present, plants, when included, are carefully chosen for their aesthetic and symbolic value. They signify growth and the fleeting nature of life. The changing seasons add dynamic beauty to the garden, reflecting the impermanence and cyclical nature of existence.

Water Features: Although many Zen gardens are dry landscapes (karesansui), some do incorporate actual water elements, like small ponds or streams. These features further evoke a sense of calm, with the gentle sound of flowing water aiding meditation.

Stone Selection And Placement

Stones are the heart and soul of a Zen garden. Their selection and arrangement demand deep contemplation and an understanding of their symbolic weight.

Selection: The stones used in a Japanese Rock Garden are never polished or shaped artificially. They are chosen for their natural form, which often dictates their symbolic meaning. A tall vertical stone might represent a mountain, while a flat one could symbolize the earth.

Placement: Every stone is placed with intent. The positioning often follows the “Rule of Threes”, a principle borrowed from traditional Japanese art. The largest stone, representing heaven, is accompanied by a slightly smaller stone symbolizing humanity, and an even smaller one for earth. Their positioning—whether forming a triangle or a straight line—carries different meanings and is meant to invoke specific feelings or thoughts in the observer.

Groups and Solitude: While some stones stand in groups, representing islands or mountain ranges, others stand alone, symbolizing isolation or prominence. The spaces between them, as much as the stones themselves, tell a story and hold meaning.

The Philosophy Behind Japanese Rock Gardens

The essence of Japanese Rock Gardens extends beyond mere aesthetics. They are spiritual landscapes, grounded in deep philosophical tenets.

Zen Buddhism: The gardens are, foremost, an embodiment of Zen concepts. They emphasize meditation, mindfulness, and the transient nature of existence. The minimalist designs, void of distractions, serve as tools for meditation, prompting introspection and a deeper understanding of oneself and the universe.

Impermanence: Everything in the garden, from the raked patterns in the sand to the positioning of the stones, underscores the impermanent nature of life. Like the fleeting patterns in the sand, life’s moments come and go.

Harmony: The gardens illustrate the importance of balance and harmony. Every element, be it a rock or a moss patch, finds its rightful place in the layout, emphasizing a harmonious coexistence with nature and the world around us.

The History Of Japanese Zen Gardens

Tracing their origins to Japan’s Heian period (794-1185), Zen gardens have evolved over centuries, intertwining with Japan’s cultural, spiritual, and artistic journey.

Early Beginnings: The concept was influenced by Chinese rock gardens and the introduction of Zen Buddhism to Japan. Initially, these gardens were primarily found in Zen monasteries, serving as aids in meditation.

Maturity in Muromachi Period: It was during the Muromachi period (1336-1573) that Zen gardens gained prominence. Famous gardens, like the Ryoan-ji in Kyoto, were established during this era, showcasing the dry landscape style (karesansui).

Modern Times: Today, while the principles remain rooted in tradition, Zen gardens have found a place in modern homes, offices, and public spaces worldwide. They have been reinterpreted and adapted to contemporary settings while preserving their philosophical essence.

Symbolism In Japanese Rock Gardens

Every element in a Zen garden is symbolic, with layers of meaning waiting to be unraveled by the observer.

Japanese Rock Gardens

Stones: As the primary features, stones often represent natural landscapes like mountains, islands, or even animals. Their placement, shape, and size all carry specific meanings.

Raked Sand/Gravel Patterns: More than just aesthetic designs, these patterns represent water, waves, and the ripples of life. They echo the fluidity and impermanence of existence.

Moss: Its growth signifies age and the continuous march of time. It’s a gentle reminder of life’s fleeting nature.

Empty Spaces: Often overlooked, the empty spaces or ‘Ma’ are intentional. They represent voids, vastness, and the uncharted realms of the universe, encouraging observers to delve deep into introspection.

How To Create A Zen Garden

Creating a Zen garden, while deeply rooted in tradition and philosophy, can be an immensely personal journey. The objective remains constant: to craft a space of serenity, introspection, and harmony.

How To Create A Zen Garden

  1. Choosing a Location: Begin by selecting a suitable location, preferably a quiet spot where you can meditate or simply enjoy the peace. This could be your backyard, a corner of your garden, or even an indoor space.
  2. Defining the Space: Establish boundaries for your garden using wooden edges, stones, or any other suitable material. This creates a visual perimeter and maintains the garden’s sanctity.
  3. Ground Preparation: Clear the chosen area of any weeds or grass. Then, lay a weed barrier fabric to prevent any unwanted growth in the future.
  4. Sand or Gravel: Fill the space with white sand or fine gravel. This represents the vastness of the sea or an empty universe and serves as the primary canvas for your garden.
  5. Stones as Main Elements: Strategically place stones, which act as the garden’s primary elements. Consider the principles of placement and symbolism while choosing and positioning these stones.
  6. Raking Patterns: Using a rake, create patterns in the sand or gravel. These patterns can be wavy, representing water, or more intricate, echoing personal introspections or imitating natural landscapes.
  7. Plant Additions: While traditional Zen gardens often skip flora, modern interpretations may include moss, bonsai, or other low-maintenance plants, adding a touch of color and life.

Miniature Zen Garden Ideas

Miniature Zen gardens, or “desktop Zen gardens”, offer tranquility in compact form. These gardens can be a personal oasis in busy office settings or small living spaces.

  1. Basic Tray: Start with a shallow tray. Wooden trays give a traditional feel, but ceramic or glass can also work depending on personal preference.
  2. Sand Base: Fill the tray with fine white sand. This acts as your blank slate, ready to receive your creative imprints.
  3. Miniature Stones: Using small stones, replicate the larger landscapes of traditional Zen gardens. Think of them as “mountains in a tray”.
  4. Tiny Rakes: Craft or buy small rakes. Use these to create patterns, transforming the sand’s surface into a dynamic landscape.
  5. Decorative Elements: Consider adding tiny bridges, pagodas, or even small figurines. These add an element of charm and can be symbolic too.

DIY Japanese Rock Garden Tips

Creating a Japanese Rock Garden yourself can be both therapeutic and fulfilling. Here are some DIY tips to guide you:

How To Create A Zen Garden

  1. Research and Inspiration: Before starting, dive deep into the history, philosophy, and aesthetics of Zen gardens. Understand their significance and draw inspiration.
  2. Budgeting: Plan your expenses. While Zen gardens can be created on a tight budget, knowing your limits can help in sourcing materials wisely.
  3. Local Stones: Instead of purchasing expensive rocks, scout your local surroundings. Often, nature provides the most beautiful, unaltered stones.
  4. Rake Crafting: Create your own rake using bamboo or wood. Personalizing tools adds a unique touch to your garden.
  5. Maintenance: Remember, a Zen garden requires upkeep. Regular raking, occasional weeding, and periodic checks are crucial to maintain its serenity.

Role Of Sand And Gravel In Rock Gardens

In the realm of Zen gardens, sand and gravel are more than just decorative elements. Their importance is multifaceted:

  1. Representational Role: The most prominent role of sand and gravel is their representation of water. The vast expanse of raked sand or gravel symbolizes oceans, rivers, or lakes.
  2. A Canvas for Patterns: Sand and gravel serve as a canvas for the intricate patterns raked onto them, echoing waves, ripples, or other natural phenomena.
  3. Simplicity and Minimalism: Their neutral colors underline the principles of minimalism and simplicity, fundamental to Zen gardens.
  4. Auditory Experience: The sound of gravel crunching underfoot adds an auditory dimension, enhancing the sensory experience of the garden.

Rake Patterns And Their Meanings

Rake patterns in Zen gardens are imbued with symbolism and intent. They aren’t mere designs; they are stories etched in sand:

Rake Patterns

  1. Waves: Wavy patterns often represent water, embodying movement, fluidity, and life’s ever-changing nature.
  2. Concentric Circles: These patterns, usually surrounding a stone, can signify ripples in water, originating from a point of impact or a profound thought.
  3. Parallel Lines: Representing tranquility, peace, and still waters, these patterns evoke calm and stability.
  4. Checkerboard: This intricate design can symbolize the interconnectedness of life, where everything is interwoven and related.
  5. Freeform Patterns: Sometimes, gardeners create patterns that represent personal introspection or current emotions. These designs are deeply personal and unique to each creator.

Maintaining A Japanese Rock Garden

Maintaining a Zen garden is a meditative act, echoing the same principles of balance and harmony that the garden embodies.

  1. Raking the Sand or Gravel: Consistent raking of sand or gravel not only retains the garden’s aesthetics but also represents the ever-evolving nature of life. The act can be therapeutic, cultivating mindfulness and presence.
  2. Stone Care: Over time, stones can accumulate moss, dirt, or other natural materials. While some appreciate the organic evolution, others prefer to maintain their pristine state. Use soft brushes to clean stones, and occasionally, they may require washing or gentle scrubbing.
  3. Weeding: Despite meticulous planning, weeds can emerge in your Zen garden. Regularly check for intrusions, removing them from the roots to ensure they don’t return.
  4. Plant Maintenance: For gardens incorporating plants, regular pruning and care are crucial. Ensure they are watered adequately and pruned to maintain the desired shape and size.
  5. Mindfulness: Above all, the most essential maintenance task is to immerse oneself in the garden, sensing its needs, and nurturing it as an extension of oneself.

Indoor Japanese Rock Garden Design

Creating an indoor Zen garden can infuse indoor spaces with peace and harmony.

  1. Choosing the Right Container: A shallow tray or container, preferably with a flat base, is ideal. Consider materials like wood, glass, or ceramic based on your room’s aesthetics.
  2. Lighting: While traditional gardens utilize natural light, indoor spaces might require thoughtful lighting. Soft, diffused lighting works best, casting gentle shadows and enhancing the garden’s serene ambiance.
  3. Adapting the Elements: While the fundamental elements remain sand, stone, and perhaps a rake, consider adding indoor-friendly plants like succulents or air plants.
  4. Size and Scale: Given space constraints, it’s crucial to select elements proportional to your container. Smaller stones, finer sand, and mini tools can maintain the balance and proportion.
  5. Climate Control: Ensure the indoor environment suits any added plants. Avoid placing the garden near radiators or air conditioners that might disrupt its harmony.

Balancing Elements In A Zen Garden

Balance, in the context of Zen gardens, is not just aesthetic but deeply philosophical.

  1. Stone Configurations: Stones, often in odd numbers, should be positioned in a way that feels balanced, without being symmetric. This might mean pairing a tall stone with a flat one or arranging them to suggest a natural landscape.
  2. Colors and Textures: The hues of sand, stones, plants, and moss should complement each other. This doesn’t mean they should match, but rather harmonize as elements of nature do.
  3. Natural vs. Man-made: While natural elements dominate, man-made components, like bridges or pagodas, must integrate seamlessly, neither overshadowing the other.
  4. Yin and Yang: This ancient principle of balance and duality should be evident. Dark and light, soft and hard, vertical and horizontal, every aspect should suggest a harmonious equilibrium.

Plant Selection

Choosing the right plants for a Zen garden is a process dictated by symbolism, aesthetics, and practicality.

  1. Moss: A favorite for Zen gardens, moss represents age, growth, and the gentle passage of time. It’s also low maintenance, thriving in shaded areas.
  2. Bonsai: These miniature trees encapsulate nature’s grandeur in a tiny package. However, they require meticulous care and are often used in larger Zen gardens.
  3. Grasses: Tall, swaying grasses like bamboo or pampas can be mesmerizing, evoking the gentle dance of nature.
  4. Evergreens: Representing eternity and constancy, evergreen shrubs or trees are a symbol of unchanging truths.
  5. Seasonal Blooms: Some Zen gardens incorporate seasonal flowers, which, in their fleeting beauty, remind us of the transient nature of life.

Incorporating Water Features

Water, symbolic of purity, clarity, and fluidity, can be a literal or representational element in Zen gardens.

  1. Real Water Features: Ponds or streams, often with koi fish, bring life and dynamism. The sound of water can be incredibly calming, adding an auditory dimension.
  2. Stone Basins (Tsukubai): Often found at the entrance, these basins are for ritual purification, where visitors cleanse their hands and mouth before entering.
  3. Waterfalls: A cascading feature, even if small, can emulate nature’s grand waterfalls, embodying energy, movement, and grace.
  4. Dry Water: In many Zen gardens, water is only suggested, not present. Raked sand or gravel patterns can imply a vast ocean, a tranquil lake, or flowing rivers, leaving it to the observer’s imagination.
  5. Bridges: Over real or dry water features, bridges symbolize the journey of life, crossing from one phase or understanding to another.

Incorporating Moss

Moss has been a mainstay in Japanese rock gardens for centuries, revered for its simplicity and serenity.

Incorporating Moss

  1. Symbolism of Moss: Moss represents age, endurance, and the gentle passage of time. It’s delicate, yet resilient, growing steadily, covering stones and ground with a velvety layer. Moss, in its humble growth, can often teach us lessons in patience and persistence.
  2. Varieties: Not all mosses are the same. From cushion moss to hair cap moss, there are different types, each with its unique texture and hue. Learning about these varieties can help in choosing the right kind of moss to evoke specific feelings or themes.
  3. Maintenance: While moss is low-maintenance, it does require a certain degree of care. It thrives in shaded, moist areas. In dry seasons, occasional misting can help maintain its lush green appearance.
  4. Integration with Other Elements: Moss complements stones, water, and other elements, offering a soft counterpoint to their hardness. It can cover vast stretches or appear as tiny islands amidst raked sand or gravel.

The Influence Of Buddhism

Buddhism has been the cornerstone of many concepts related to Japanese rock gardens.

  1. Historical Context: Introduced to Japan in the 6th century from China, Buddhism brought along with it Zen principles. Zen gardens emerged as places for monks to meditate and contemplate.
  2. Zen and Gardens: The core of Zen is understanding the essence of existence. Gardens were designed to promote deep thought, with every rock, plant, and water feature serving as a meditation tool.
  3. Symbols: Elements in the garden often have Buddhist symbolism. For instance, rocks can symbolize unmoving mountains or islands, guiding meditation towards stability and eternity.
  4. Emptiness and Potential: Empty spaces, often depicted using sand or gravel, are reminiscent of the Buddhist concept of emptiness, highlighting the potential of the void.

Japanese Rock Garden Accessories

Apart from the main elements, several accessories accentuate the essence of a Japanese rock garden.

  1. Lanterns: Stone lanterns, often with intricate carvings, are not just sources of light but symbolize illumination, guiding one’s path both physically and spiritually.
  2. Bridges: Wooden or stone, bridges serve as transitions, guiding one from the worldly to the spiritual, or from one thought to the next.
  3. Gates: These are symbolic entrances, marking a departure from the external world and an entrance into a sacred, introspective space.
  4. Basins: Stone basins, or Tsukubai, are often placed near garden entrances, used in purification rituals.
  5. Garden Tools: From rakes to shears, the tools themselves, when placed thoughtfully, can become part of the garden’s aesthetics, representing care and human interaction with nature.

Famous Japanese Rock Gardens To Visit

Japan is home to countless iconic rock gardens, each narrating its tale of serenity and introspection.

Famous Japanese Rock Gardens

  1. Ryōan-ji: Located in Kyoto, this temple’s rock garden is perhaps the most famous, captivating visitors with its simplicity and depth.
  2. Tōfuku-ji: Also in Kyoto, this Zen temple has four gardens, each representing a distinct theme, from the dragon garden to the moss and azalea garden.
  3. Daisen-in: A sub-temple of Daitoku-ji in Kyoto, its garden allegorically represents the journey of life, from birth to death, using rocks and sand.
  4. Adachi Museum of Art: Not just a rock garden, but the entire landscape here is a testament to the potential of harmonious design.

The Therapeutic Benefits Of Japanese Rock Gardens

These gardens, beyond their beauty, offer profound therapeutic effects.

  1. Mindfulness and Meditation: Raking sand, placing rocks, or merely sitting and observing can cultivate mindfulness, grounding one in the present.
  2. Stress Reduction: The simplicity and serenity can significantly reduce stress levels, offering an escape from the chaotic outside world.
  3. Sensory Engagement: The texture of sand, the sound of water, the sight of moss-covered rocks – all engage the senses, promoting a deep sense of calm.
  4. Connection to Nature: In today’s digital age, these gardens offer a tangible connection to nature, reminding us of the healing power inherent in the natural world.
  5. Reflection and Insight: By symbolizing life’s larger themes – impermanence, balance, harmony – they offer avenues for introspection and personal insight.

Conclusion

Japanese rock gardens are not just an aesthetic endeavor, but a deeply spiritual and philosophical one. Interwoven with history, cultural influences like Buddhism, and the meticulous design elements such as moss, stones, and water, these gardens resonate with profound symbolism. Each accessory, from lanterns to basins, contributes to the story these gardens tell, urging introspection and mindfulness. Gardens like Ryōan-ji and Tōfuku-ji stand as timeless testaments to the art form, beckoning visitors from all corners of the world to witness their serene beauty. Yet, beyond the visual delight and historical significance, these gardens play a therapeutic role. In the hustle and bustle of the modern world, they offer solace, a place of meditation, and a tangible connection to nature. As we’ve journeyed through the nuances of these gardens, it’s evident that they are more than just landscapes – they’re a bridge to inner peace, balance, and deeper understanding of existence. Whether you’re a passionate gardener, a history enthusiast, or someone seeking tranquility, the world of Japanese rock gardens offers a haven of insights and inspirations.

Low Maintenance Garden Design: A Guide to Easy Care

Low maintenance garden design is the dream of every gardener who desires a beautiful outdoor space but lacks the time for daily upkeep. These gardens prioritize sustainability, functionality, and ease of care, but they don’t sacrifice aesthetics. With the right planning, you can have a garden that thrives with minimal effort, saving you time and reducing unnecessary stress. This guide will take you on a journey through the essential elements of low-maintenance gardens, from selecting the right plants to adopting time-saving techniques. So, whether you have a balcony or a backyard, let’s dive in and explore the magic of easy care gardening.

Low Maintenance Garden Design for Small Spaces

Small gardens, including balconies, can be the most charming spaces if designed with care. These tiny patches, whether in urban settings or compact suburban plots, can be transformed into lush green retreats.

Low Maintenance Garden Design

Designing a Low Maintenance Balcony Garden

Balcony gardens are ideal for those living in apartments. Here’s how to design one:

  • Choose drought-resistant plants like succulents that require less water.
  • Container gardening is a must. It not only saves space but also allows for easy rearrangement.
  • Include raised beds for vegetables or herbs. They allow better soil control and are easier on the back.
  • Consider artificial grass for a touch of green that requires no mowing or watering.

Rock Gardens: An Easy Care Option

Rock gardens utilize various stones and drought-resistant plants to create a natural, low-maintenance landscape. They are especially suitable for sloped areas where soil erosion can be a concern. Combine rocks with plants like sedums or ornamental grasses for a balanced look.

Utilizing Container Gardening for Easy Upkeep

Containers provide flexibility:

  • They can be moved according to sunlight needs.
  • Soil quality can be easily controlled.
  • They’re perfect for balconies, patios, or placing within larger garden spaces.
  • Ensure you have good drainage in your containers to prevent root rot.

Essential Elements of Garden Design

Garden design, at its core, is about creating a space that reflects both beauty and functionality. It’s a harmonious blend of art and science.

  1. Purpose & Functionality: The first step in any garden design is understanding its primary function. Is it a space for relaxation, entertainment, or perhaps growing vegetables? Recognizing the garden’s role will influence every other decision you make.
  2. Spatial Awareness: Understand your space. Measure your garden area, take into account the sunlight it receives, the natural gradient, and any existing plants or structures. This will determine the placement of new plants, pathways, or features.
  3. Aesthetics & Theme: Do you want a tropical oasis or a rustic European retreat? The overall theme will influence your choice of plants, structures, and accessories. Keep your desired look in mind when planning.
  4. Maintenance Level: Not everyone has the time for a high-maintenance garden. Considering how much time you can realistically dedicate to garden upkeep is essential. The more ambitious the design, the more care it typically requires.
  5. Sustainability: Given the changing climate and environmental concerns, many gardeners are opting for sustainable designs. This includes choosing native plants, implementing water-saving techniques, and avoiding harmful pesticides.

Characteristics of a Low Maintenance Garden

Creating a garden that’s both gorgeous and low-maintenance is an art. Here are the traits that define such a space:

  1. Drought Resistance: These gardens prioritize plants that thrive with less water, making them eco-friendly and less demanding.
  2. Mulched Beds: Mulch is a multi-functional hero. It helps prevent weeds, retains moisture, and breaks down into nutrients. A mulched bed is a hallmark of an easy-care garden.
  3. Hardscaped Areas: Integrating non-living elements like stone pathways, patios, or decorative boulders not only adds aesthetic value but reduces areas that require maintenance.
  4. Perennial Dominance: By using plants that return each year, you save the annual effort of replanting.
  5. Natural Pest Control: Instead of constantly battling bugs, low-maintenance gardens incorporate plants or features that naturally deter pests.

Choosing the Right Plants

Selecting the right plants is akin to casting actors for a movie. They need to play their roles perfectly and contribute to the overall story.

Choosing the Right Plants

  1. Understand Your Zone: Plants have specific climate zones where they thrive best. Make sure your choices align with your location’s hardiness zone.
  2. Consider the Soil: Different plants have varied soil needs. Some need well-draining sandy soil, while others prefer loamy or clayey ground. Test your soil and amend it accordingly.
  3. Sunlight & Shade: Observe your garden throughout the day. Notice which areas receive full sun, partial sun, or remain in shade. Choose plants based on their light requirements.
  4. Size & Growth Pattern: Remember to account for how large a plant will grow. Planting a future giant next to a smaller perennial can overshadow the latter.

Drought-Resistant Plants for Easy Care

Water conservation is crucial in today’s world. Drought-resistant plants not only save water but also reduce maintenance.

  1. Lavender: This aromatic herb thrives in dry conditions. Its purple flowers attract pollinators and its scent deters pests.
  2. Ornamental Grasses: Plants like blue fescue or feather grass give the garden movement and structure and are resilient to water scarcity.
  3. Sage: Both ornamental and culinary sages are excellent choices. They bring in pollinators, resist pests, and ask for little water.
  4. Yarrow: A lovely flowering plant, yarrow is sturdy and can survive with minimal moisture.

Utilizing Perennials

Perennials are the loyal friends of the garden; they promise to return each year, reducing effort and cost.

Utilizing Perennials

  1. Daylilies: These vibrant flowering plants are a favorite among gardeners for their hardiness and prolonged bloom time.
  2. Russian Sage: With its tall, purple spires, Russian sage adds height and drama to the garden.
  3. Coneflowers: Also known as echinacea, these daisy-like flowers are a hit with pollinators and have medicinal properties.
  4. Hostas: Perfect for shaded areas, hostas come in various sizes and leaf patterns. They provide a lush green presence and occasionally bloom with tall flower spikes.
  5. Peonies: These bushes offer large, fragrant blooms in late spring and early summer. Once established, they can thrive for years with minimal care.

Succulents for a Carefree Garden

Succulents are the darlings of the modern gardening world. Their unique shapes, varied textures, and vast color palette make them standout choices for a visually engaging garden. Beyond their aesthetic appeal, there are numerous reasons to introduce them to your garden landscape.

Succulents for a Carefree Garden

  1. Water Efficiency: Originating from arid regions, succulents store water in their thick leaves, stems, or roots. This natural capability means they require infrequent watering, making them a prime choice for drought-prone areas or for those who prefer gardens that don’t require regular hydration.
  2. Versatility: Succulents come in a multitude of shapes, sizes, and hues. Whether you desire the towering presence of an Aloe vera or the carpeting touch of a sedum, there’s a succulent to meet your design aspirations.
  3. Container Gardening Compatibility: Due to their compact nature and shallow root systems, succulents are perfect candidates for container gardening. This allows for mobility, ensuring you can adjust your garden layout whenever you fancy.
  4. Minimal Pests and Diseases: Unlike many other plants, succulents rarely suffer from pests or diseases. This means fewer chemicals and less time tending to plant health, reinforcing their low-maintenance appeal.

Integrating Hardscape

Hardscape, the non-living elements in your garden such as pathways, patios, and walls, offers more than just functionality. When artfully incorporated, it enhances the overall visual appeal of the space and reduces areas that require constant upkeep.

Integrating Hardscape

  1. Balance and Contrast: Hardscape provides a contrast to the soft textures of plants, creating a balanced look. For instance, a smooth stone pathway meandering through a lush lawn or garden bed can provide a visual break, drawing the eye and making the greenery stand out even more.
  2. Erosion Control: For gardens on slopes or in areas prone to erosion, integrating hardscape elements like retaining walls can be both a functional and aesthetic solution.
  3. Reduced Maintenance: Areas covered with hardscape don’t need watering, mowing, or weeding. This can significantly reduce the time and resources you spend on garden care.

Use of Mulch in Low Maintenance Garden

Mulch is more than just a decorative layer; it’s a functional component of any low maintenance garden.

Use of Mulch

  1. Weed Control: Mulch acts as a barrier, preventing weeds from getting the sunlight they need to grow. By suppressing weed growth, gardeners save time and effort that would otherwise be spent on weeding.
  2. Moisture Retention: Mulch helps the soil retain moisture by reducing evaporation. This means you’ll need to water less frequently, saving both time and water.
  3. Temperature Regulation: By acting as an insulating layer, mulch helps regulate soil temperature, ensuring it doesn’t get too hot in summer or too cold in winter.
  4. Soil Enrichment: Organic mulches like wood chips or straw decompose over time, enriching the soil with essential nutrients and improving its texture.

Rock Gardens: An Easy Care Option

Rock gardens, inspired by mountainous terrains and arid landscapes, bring a unique aesthetic to the yard. But their appeal goes beyond their beauty.

  1. Low Water Requirement: Rock gardens typically feature plants adapted to less fertile soils and minimal water, such as alpines, succulents, and some perennials. This means less frequent watering.
  2. Minimal Maintenance: With most of the ground covered in rocks, there’s little space for weeds to grow, resulting in reduced weeding chores.
  3. Year-Round Interest: Many rock garden plants are evergreen, ensuring your garden remains vibrant throughout the year.

Benefits of Artificial Grass in Garden Design

Artificial grass, once only popular in sports arenas, has found its way into home gardens, offering a lush, green appearance without the upkeep of natural grass.

Artificial Grass in Garden Design

  1. Consistent Aesthetic Appeal: Unlike natural grass, which can turn brown in droughts or require frequent mowing, artificial grass remains green and neatly trimmed year-round.
  2. Water Conservation: Artificial turf doesn’t require watering, making it an environmentally friendly option, especially in regions with water restrictions.
  3. Child and Pet Friendly: Many types of artificial grass are designed to be soft and non-abrasive, making them safe for children and pets to play on. Plus, there’s no mud or mess after a rain.
  4. Durability: High-quality artificial grass is designed to withstand heavy foot traffic, intense sunlight, and other environmental factors, ensuring it remains pristine for years.

Utilizing Container Gardening for Easy Upkeep

Container gardening offers a perfect solution for individuals with limited garden space or those wanting to make gardening tasks more manageable. By growing plants in pots or containers, one can enjoy the pleasures of cultivating a garden without the extensive upkeep of a traditional garden bed.

  1. Flexibility in Design: Containers come in various shapes, sizes, and materials, from ceramic pots to wooden boxes. You can rearrange them to adapt to seasonal changes or personal preferences, providing dynamic design possibilities.
  2. Soil Control: One major advantage is the ability to curate the soil type for each container, ensuring each plant gets the perfect medium for its needs. This can be especially useful in areas with poor native soil.
  3. Less Weeding: Containers drastically reduce the invasion of weeds. Any weeds that do sprout are easily identified and removed.
  4. Improved Pest Management: Elevated containers can deter certain pests, and it’s easier to spot and handle pests in a contained environment.
  5. Accessibility: For those who have trouble bending or kneeling, container gardening can be a boon. Containers can be placed at convenient heights, making them accessible for seniors or individuals with mobility issues.

Raised Beds: An Option for Easy Garden Care

Raised garden beds are precisely what they sound like: gardens raised above the natural ground level. They can be as simple as mounded soil or as elaborate as framed boxes filled with soil.

  1. Enhanced Drainage: Raised beds naturally allow for better water drainage. This is essential for plants that don’t like “wet feet,” preventing root rot and over-watering issues.
  2. Soil Optimization: Much like container gardening, you can tailor the soil mix in a raised bed to suit the specific plants you’re growing.
  3. Fewer Pests and Weeds: The elevation deters some pests, such as slugs and snails. Additionally, the clear separation from the ground means fewer weeds infiltrate the bed.
  4. Back-Friendly Gardening: Raised beds reduce the need to bend over, making gardening tasks easier on the back and knees.
  5. Extended Growing Season: Raised beds warm up faster in the spring and retain heat longer into the fall, effectively extending the growing season.

The Role of Automatic Irrigation Systems

Watering is fundamental in gardening, but it can be time-consuming. Automatic irrigation systems promise to ease this chore.

Automatic Irrigation Systems

  1. Consistency: These systems provide consistent moisture. Plants thrive best with a steady water supply, and automated systems eliminate the risk of human forgetfulness.
  2. Water Conservation: Drip irrigation systems, a popular type of automated watering, target the base of plants, reducing water wastage through evaporation or runoff.
  3. Time-Saving: Once set up, the system takes over, freeing gardeners from the daily watering task.
  4. Flexibility: Modern systems come with features like timers or moisture sensors, allowing gardeners to customize watering schedules.
  5. Healthier Plants: Proper watering can prevent many plant diseases that arise from waterlogged soil or moisture on plant leaves.

Designing a Low Maintenance Balcony Garden

Urban dwellers often only have a balcony for their gardening aspirations. However, a balcony garden can be both lush and low maintenance.

  1. Choosing the Right Containers: Opt for containers with good drainage. Self-watering pots can also be a game-changer, ensuring plants get steady moisture without daily attention.
  2. Vertical Gardening: Use vertical space by installing shelves or using hanging planters. This maximizes space and creates visual interest.
  3. Select Hardy Plants: Choose plants suited to your balcony’s light and exposure. Many herbs, succulents, and perennials thrive in balcony environments.
  4. Easy-Care Flooring: Consider easy-to-clean and water-resistant flooring options like interlocking deck tiles.
  5. Furniture Choices: Opt for foldable or stackable furniture. This ensures more space for your plants and easier cleaning.

Wildlife-Friendly Low Maintenance Gardens

A wildlife-friendly garden attracts birds, bees, butterflies, and other fauna, turning your garden into a vibrant ecosystem. But it can also be low maintenance.

Wildlife-Friendly

  1. Native Plants: Native plants have evolved in your region and are naturally adapted to local conditions. They typically require less care and attract native wildlife.
  2. Provide Water Sources: A simple birdbath can attract various birds. Ensure the water is fresh to prevent mosquito breeding.
  3. Avoid Chemicals: Pesticides can harm beneficial insects. Opt for natural pest solutions or simply accept a few chewed leaves in exchange for lively fauna.
  4. Shelter for Wildlife: Elements like shrubs, log piles, or birdhouses can provide nesting sites and protection for wildlife.
  5. Plant Diversity: A mix of flowering plants, shrubs, and trees can cater to different types of wildlife, ensuring a bustling garden ecosystem.

Low Maintenance Garden Design for Seniors

Gardening for seniors can be therapeutic and fulfilling, but it’s essential to keep the demands of maintenance in check. Here are ways to design a senior-friendly garden:

  1. Elevated Garden Beds: Raised garden beds or planters can significantly reduce the need for bending or kneeling. They can be designed at a comfortable height, allowing seniors to garden while standing or sitting. The elevation also improves drainage and offers better control over soil quality.
  2. Easy-Grip Tools: Ergonomically designed gardening tools can reduce strain on the wrists and hands. These tools are crafted to ensure maximum efficiency with minimum effort, accommodating common issues like arthritis.
  3. Pathways: Wide, slip-resistant pathways are crucial. They provide safe navigation through the garden, reducing the risk of slips or falls. Materials like crushed gravel or flat stones can be used.
  4. Perennial Gardens: Opting for perennials reduces the need for frequent replanting. Once established, these plants return year after year, offering continuous blooms without the annual effort of sowing.
  5. Automatic Irrigation: Setting up a drip irrigation system can eliminate the need for daily watering, ensuring plants receive consistent moisture.

Child-Friendly Low Maintenance Garden Designs

Designing a garden with kids in mind requires balancing aesthetics with safety and functionality.

  1. Soft Lawn Areas: Artificial grass or soft grass varieties provide a cushioned area for kids to play. They’re resilient to foot traffic, ensuring the garden remains green even with active play.
  2. Edible Plants: Incorporate fruit-bearing shrubs, vegetable patches, or herb gardens. Not only does this reduce maintenance (as kids will eagerly harvest their produce), but it’s educational.
  3. Durable Plants: Kids can be rough, so opt for plants that can handle a bit of mishandling. Plants like ornamental grasses, succulents, or robust shrubs can withstand some playful wear and tear.
  4. Safe Play Zones: Consider integrating sandpits, soft play areas, or designated zones where kids can play without damaging plant beds.
  5. Avoiding Toxic Plants: It’s essential to steer clear of plants that can be harmful if ingested. Research and select plants that are non-toxic and safe for curious children.

Time-Saving Tips for Garden Maintenance

To make the most out of your gardening time and reduce daily chores, consider the following:

  1. Mulching: Mulch conserves soil moisture, suppresses weeds, and enhances soil health. By reducing the need for frequent watering and weeding, it’s a true time-saver.
  2. Group Plants by Water Needs: Design your garden so that plants with similar water requirements are together. This optimizes watering routines and ensures plants get just what they need.
  3. Perennial Ground Covers: Ground covers like creeping thyme or sedum can suppress weed growth and reduce bare spots, minimizing maintenance.
  4. Regular Pruning: A bit of regular trimming can prevent many garden problems. By removing dead or diseased portions of plants promptly, you prevent the spread of diseases and reduce the need for more significant interventions later.
  5. Use Quality Soil: Invest in good-quality soil with proper nutrients. Healthy soil supports plant growth, reducing the need for frequent fertilizations.

Low Maintenance Landscaping for Seasonal Change

As seasons change, gardens can require different care routines. However, with some forward planning, seasonal transitions can be seamless.

  1. Evergreen Plants: Incorporate plants that retain their leaves year-round. They provide continuous cover and reduce the need for seasonal replacements.
  2. Deciduous Trees with Interest: Some trees, like the Paper Bark Maple, have exfoliating bark, offering winter interest. Others might have berries or seed heads that attract wildlife.
  3. Bulb Layering: Planting bulbs at different depths can result in a succession of blooms from early spring to late summer, reducing the need for frequent plantings.
  4. Adaptive Plants: Opt for plants that can adapt to varying conditions. Drought-resistant plants, for example, can endure the hot summer months without constant watering.
  5. Weather-Resistant Hardscaping: Incorporate hardscape elements that can withstand seasonal changes, like frost-resistant tiles or weather-resistant outdoor furniture. This ensures the garden remains functional and beautiful throughout the year.

Practical Advice

Gardening can be both an art and a science. As we delve into the world of low-maintenance garden designs, here are some practical pieces of advice to guide your journey:

  1. Start Small: It’s tempting to revamp an entire outdoor space all at once, but starting with a smaller section allows you to learn and adapt without feeling overwhelmed. This approach enables you to understand the specific needs of plants and the peculiarities of your garden space.
  2. Soil Testing: Before investing in plants and other garden elements, it’s wise to test your soil. This will inform you about its pH level, nutrient content, and type (clay, sand, silt). Such information is invaluable in choosing the right plants and amendments.
  3. Plan for Growth: While plants might look perfectly spaced when young, remember they’ll grow. Ensure there’s adequate space for mature plants, so your garden doesn’t become overcrowded.
  4. Be Patient: Plants need time to grow and settle. Resist the urge to frequently move or replace them. With time, most plants will flourish if their basic needs are met.
  5. Local Nurseries: Instead of big-box stores, consider shopping at local nurseries. The staff often have a wealth of knowledge about plants that thrive in your specific region, providing insights that generic stores might not offer.

Tools for Easy Garden Care

The right tools can significantly streamline garden maintenance. Here’s a list of tools that can make a gardener’s life easier:

  1. Ergonomic Tools: Designed with comfort in mind, ergonomic tools reduce strain during prolonged use. They’re especially beneficial for individuals with joint issues or arthritis.
  2. Drip Irrigation Systems: These systems deliver water directly to plant roots, ensuring efficient watering without wastage. They can be set up with timers, further reducing manual intervention.
  3. Mulching Mower: If you have a lawn, a mulching mower cuts grass clippings finely and returns them to the lawn. This acts as a natural fertilizer, reducing the need for supplemental feeding.
  4. Garden Cart: For larger gardens, a cart helps in transporting plants, tools, and soil. It’s easier on the back compared to carrying heavy items.
  5. Weeding Tools: Specialized tools like weed pullers can extract weeds from the root, ensuring they don’t return in a hurry.
  6. Pruners with Adjustable Grips: These allow for better control and can be adapted to the user’s hand size and strength.

Mistakes to Avoid

Even seasoned gardeners make mistakes, but here are some common pitfalls to avoid in low-maintenance gardening:

  1. Overwatering: More plants die from overwatering than underwatering. It’s crucial to understand the specific water needs of your plants. Always check the soil before watering; if it’s damp a couple of inches below the surface, you can probably wait.
  2. Ignoring Soil Health: Healthy soil is the foundation of any thriving garden. Neglecting soil health can lead to weaker plants more susceptible to pests and diseases.
  3. Planting Inappropriately: Not every plant is suitable for every location. Always consider factors like sunlight, soil type, and space before planting.
  4. Skipping Mulch: Mulch is a low-maintenance gardener’s best friend. By skipping it, you miss out on its benefits like moisture retention, weed suppression, and temperature regulation.
  5. Not Planning for Pests: While we aim for low-maintenance, it doesn’t mean no maintenance. Regularly inspect plants for signs of pests or diseases, and tackle issues head-on before they escalate.
  6. Being Impatient with Perennials: Perennials often have a saying associated with them: “First year they sleep, second year they creep, third year they leap.” They might not look impressive initially, but with time, they’ll establish themselves and flourish.

Conclusion

A low maintenance garden design is not just a dream; with the right approach and tools, it’s an achievable reality. The essence of such a garden lies in thoughtful planning, understanding the specific needs of your space, and adapting practices that reduce the need for frequent intervention. By embracing the principles discussed, from selecting drought-resistant plants and perennials, utilizing hardscapes, and making informed choices about watering methods, you set the stage for a garden that’s both beautiful and easy to maintain.

Moreover, it’s not just about having a garden that’s easier on the gardener but also one that is sustainable and harmonious with the environment. Whether you’re a senior looking for less physically demanding gardening options, a parent aiming for a child-friendly space, or simply someone with a busy schedule, the principles of low-maintenance gardening can cater to all.

Remember, the journey to a low-maintenance garden doesn’t mean removing the heart and soul of what makes gardening special. Instead, it streamlines the process, ensuring that you can enjoy the beauty and tranquility of your outdoor space without feeling overwhelmed by its upkeep. Here’s to gardens that bring joy, with less effort but the same passion!

Moon Garden Design: Essential Elements and Aesthetic Tips

Moon gardens are tranquil spaces designed to capture the beauty and essence of the night. Evoking the romance of moonlight, these gardens are meticulously crafted with plants that shimmer under the pale glow of the moon, blooming and releasing their fragrance when the sun sets. In this comprehensive guide, we’ll delve deep into the concept of the moon garden design, showcasing how to transform your outdoor space into a lunar sanctuary.

With emphasis on ‘Moon Garden Design’, our journey will encompass everything from the science of moonlight to the best choices for nocturnal plants, shedding light on design principles and planting techniques. Whether you are an avid gardener or a novice looking for a new project, this article will guide you to design a moon garden that provides year-round interest, attracting wildlife and enveloping you in its moonlit ambiance.

Prepare to embark on a celestial journey, discovering the beauty of pale petals, the nuances of white flowers, and the tranquility of evening blooms, creating a backyard sanctuary under the stars.

Understanding the Basics of Moon Garden Design

Moon garden design is the intricate art of cultivating a garden space that primarily comes alive during the evening, harnessing the power of moonlight to display its true splendor. Unlike traditional gardens, which aim to capture the vibrancy of daylight, moon gardens focus on the softer, more ethereal glow of nighttime.

Moon Garden Design

Night Garden is another term synonymous with moon gardens. They are specially designed landscapes that blend both form and function, intertwining with nature’s nocturnal rhythm. The basis lies in choosing plants that bloom or release their intoxicating fragrance primarily during the evening or at night, creating a sensory haven for those late-night strolls or tranquil moments.

Moon Shadows, subtle and evocative, play a significant role. They are the soft silhouettes that plants cast under the moonlight. The contrasts between light and dark, the gentle glow of the flowers, and the mysterious allure of the shadows make moon gardens a distinct and captivating experience.

Creating Your Own Moon Garden

Dreaming of creating your very own moon garden? Begin with a vision. Visualize the kind of ambiance you wish to establish – whether you want a cozy corner for meditation or a sprawling landscape teeming with nocturnal wildlife.

Creating Your Own Moon Garden

Location is key. Look for an area in your backyard or garden space that is primarily exposed to moonlight. Avoid places that have too many artificial lights nearby. Moon gardens thrive in authenticity, and their beauty is best appreciated in genuine moonlit conditions.

Mapping your garden is the next step. Sketch out the area, marking places for larger plants, seating areas, water features, and pathways. It’s essential to have a blueprint as it helps in systematically planting and organizing.

Lastly, consider the Practical Aspects. Think about garden maintenance, accessibility, and safety. For instance, ensuring that the pathways are slip-resistant, especially if you have water features, or ensuring easy access to the plants for regular care.

Essential Elements

At the heart of every moon garden are certain quintessential elements that truly define its character:

White Flowers: The mainstay of any moon garden, white flowers like Moonflowers, Jasmine, and Gardenias are chosen primarily for their ability to reflect moonlight, creating a shimmering spectacle. Their bright petals stand out in the evening, capturing every bit of light and illuminating the surroundings.

Fragrance: Night-blooming plants often come with the added advantage of a strong fragrance. This is nature’s way of attracting nighttime pollinators. Scents become more pronounced in the cool evening air, adding another sensory layer to the garden.

Silver Foliage: Plants with silver or grayish foliage, such as Artemisia or Russian Sage, act as wonderful accent plants. They not only reflect moonlight but also add a different texture to the garden.

Moonlight Garden Design Ideas

Moon gardens, while centered around moonlight, can be as diverse and creative as one’s imagination allows:

Tranquil Spaces: Incorporate cozy nooks or seating areas surrounded by blooming plants. Adding a soft throw or cushion can enhance the comfort factor.

Reflective Surfaces: Think about adding small mirrors, glistening pebbles, or even glass shards in a safe manner. These surfaces can beautifully catch and scatter the moonlight, amplifying its effect.

Vertical Structures: Consider adding trellises or archways draped with night-blooming climbers. Not only do they add height and structure, but they also provide a fantastic canvas for plants like Moonflower vines to showcase their blooms.

Water Features: A small pond or a fountain can be a mesmerizing addition. The water captures the reflection of the moon and the surrounding plants, doubling the beauty. The gentle sound of water also adds to the garden’s tranquility.

Choosing the Right Plants

Plant selection for moon gardens goes beyond just picking plants with white flowers. It’s an integration of various factors:

Choosing the Right Plants

Night-Blooming Plants: As the stars of the show, plants like the Night-Blooming Jasmine, Four O’Clocks, and Night Phlox are essentials. They not only bloom in the evening but also have intoxicating fragrances.

Plant Texture: Mix and match plants with different textures. While silky petals of blooms provide softness, architectural plants or those with unique leaves can add a contrasting touch.

Wildlife Attraction: Some plants, especially those with tubular flowers, attract nighttime pollinators like moths. This can add a dash of activity and life to the serene space.

Seasonal Considerations: While summer might offer a plethora of options, think about the colder months. Plants like Snowdrops can bring life to a winter moon garden.

Creating a Lunar Landscape in Your Backyard

Creating a lunar landscape is akin to crafting a scene straight from a fantasy tale. The idea is to encapsulate the serenity and otherworldly beauty of the moon’s terrain in your garden. This involves a mix of strategic design, color palette choices, and plant selection.

  1. Elevation and Mounding: The moon’s surface is characterized by a vast array of craters and elevations. Mimicking this requires adding different levels to your garden. Use soil and compost to create mounds and small hills. These elevations not only replicate the lunar surface but also play with moon shadows, adding depth and drama to the garden.
  2. Rock Features: Incorporating rocks and boulders can simulate the rugged landscape of the moon. Think about creating patterns or even a rock garden in certain sections. Rocks also reflect a soft glow in the moonlight, amplifying the lunar ambiance.
  3. Silver and Gray Plants: Emphasizing plants with silver or gray foliage can lend a metallic hue, reminiscent of the moon’s surface. Plants like Dusty Miller, Lamb’s Ear, and Artemisia can be excellent choices.
  4. Reflective Surfaces: Consider adding reflective elements, such as mirrored accessories, to emulate the moon’s shimmering light. It can be in the form of gazing balls, mirrored stepping stones, or even reflective water bodies.
  5. Sandy Paths: Just as the moon has vast stretches of dust and sand, adding pathways with a base of silver sand or white pebbles can bring that lunar touch. It also adds an element of crunch underfoot, enhancing the sensory experience.

Moon Garden Design: Key Considerations

When designing a moon garden, understanding the elements that would best showcase its beauty in the nighttime is crucial. This involves a blend of functionality and aesthetics.

  1. Lighting Considerations: While the primary light source is the moon, on nights when it’s not as luminous, having a backup can be essential. Opt for soft lighting, perhaps solar-powered lights or lanterns with a gentle glow. Overly bright lights can ruin the moon garden’s essence.
  2. Location: As with any garden design, location is paramount. A spot that receives ample moonlight, preferably away from artificial lights, should be chosen. Consider places with a clearer view of the sky, allowing the moonlight to cascade unhindered.
  3. Maintenance: Moon gardens might require slightly different maintenance. Evening watering, for instance, can make blooms last longer. Also, nighttime is an excellent time to prune or trim these plants as you get to see them in their full glory.
  4. Safety: Ensure pathways are clear, and there’s adequate (but not overpowering) lighting to navigate. Moon gardens are meant to be enjoyed during the evening, so safety is paramount.
  5. Space Planning: Balance is essential. Make sure the space doesn’t become overcrowded, allowing each plant its moment in the moonlight.

Nighttime Garden Design

Creating a garden that thrives at night involves understanding both the aesthetics and the natural biology of nocturnal plants and creatures.

Nighttime Garden Design

  1. Nocturnal Wildlife: Gardens come alive at night with various creatures, from fireflies to owls. Incorporating plants or features that attract these beings can enhance the nighttime experience. A small water feature, for instance, might attract frogs or toads.
  2. Sound Elements: The gentle chirping of crickets, the rustling leaves, or the soft gurgling of water can add an auditory dimension to your garden. Consider adding wind chimes or rustling plants to amplify this effect.
  3. Plant Placement: Think about how plants will look under the moonlight. Those with larger blooms or more reflective surfaces can be placed as focal points.

Aesthetic Principles when Designing a Moon Garden

Moon gardens carry a unique aesthetic, heavily reliant on the senses.

  1. Color Palette: Emphasizing whites, silvers, and pale pastels can make the garden truly glow. These colors are not only reflective but also evoke a sense of calm and serenity.
  2. Texture Play: Combine plants that have varied textures. The juxtaposition of silky petals with rough foliage can create a tactile experience for anyone walking through.
  3. Fragrance: A moon garden is as much about scent as it is about sight. Interspersing highly fragrant plants can create pockets of aromatic delight, guiding visitors from one scent zone to another.
  4. Movement: Incorporate plants that sway gently with the breeze, like ornamental grasses. This movement, combined with the moon’s glow, can create mesmerizing patterns.

How to Create a Night-Blooming Garden

A garden that predominantly blooms at night is a wondrous sight.

Night-Blooming Garden

  1. Research: Understand the plants that bloom primarily during the nighttime. Moonflowers, Evening Primrose, and Night-Blooming Jasmine are some favorites.
  2. Planting Schedule: Most night-blooming plants have specific growth cycles. Ensuring you plant them at the right time is crucial for optimum blooms.
  3. Support Structures: Many night-bloomers, like the Moonflower, are vines. They’ll need trellises or supports to grow optimally.
  4. Moisture Levels: Nighttime gardens can benefit from evening watering. The cooler air reduces water evaporation, and many night bloomers prefer the added humidity.
  5. Companion Planting: Integrate night bloomers with daytime bloomers. This ensures that your garden remains vibrant round the clock, with some plants taking the spotlight as others retreat.

Lunar Landscape Design Tips

Crafting a lunar landscape in your garden is about evoking the serene and mystical aura of the moon. Achieving this requires a strategic blend of design elements:

Lunar Landscape Design

  1. Varied Elevations: Much like the moon’s craters and hillocks, introduce different levels in your garden. This can be achieved with raised beds, mounded soil structures, or sunken gardens. These levels create intriguing moonlit shadows that add depth and drama.
  2. Soft Palette: Mimic the moon’s color palette by integrating plants with silver, grey, and blue hues. These colors create a muted and calming backdrop, essential for that moon-like glow.
  3. Water Elements: Introducing still water bodies can serve as a reflective surface, mimicking lunar seas. Consider a serene pond or a still basin, which can reflect the moonlight and enhance the mystical feel.
  4. Sensory Experience: A lunar garden should be a multisensory experience. Incorporate elements that rustle with the breeze, or add gentle, melodious sounds reminiscent of a tranquil night.
  5. Natural Pathways: Create meandering paths using pale gravel or white stepping stones, which can glow under the moonlight. This not only provides a practical walking path but also adds to the aesthetic appeal.

Fragrant Plants for Your Moon Garden

A moon garden’s charm isn’t just in its visual appeal; the aromatic allure plays a significant role.

  1. Moonflower: Aptly named, the moonflower opens its petals in the evening, releasing a sweet, sultry scent that perfumes the night air.
  2. Night-Blooming Jasmine: This plant produces small, white flowers that pack a fragrant punch as the sun sets. The intoxicating scent is a favorite among many garden enthusiasts.
  3. Tuberose: Their elegant white blooms emit a rich, heavy aroma at night, acting as a magnet for nighttime pollinators and humans alike.
  4. Evening Primrose: Beyond its visual appeal, evening primrose offers a gentle, sweet scent, making it an excellent addition to a fragrant moon garden.
  5. Gardenia: Known for its robust and sweet fragrance, Gardenia blooms can fill your garden with a delightful aroma, especially in the evenings.

Lighting in a Moon Garden: What You Should Know

While moonlight is the primary source of illumination, additional lighting can enhance the garden’s beauty and safety.

  1. Soft Lighting: Choose soft, ambient lighting. Harsh lights can disrupt the garden’s serene ambiance. Solar lanterns or fairy lights can offer a gentle glow without overpowering the moon’s natural light.
  2. Strategic Placement: Place lights where they highlight specific plants or features without creating unnecessary glare. Using downward-facing lights can help achieve this.
  3. Solar Options: Considering the garden’s theme, solar lights are not just eco-friendly but also apt. They store energy during the day and provide a gentle glow at night.
  4. Safety: Ensure pathways and steps are adequately lit to prevent accidents. But remember, it’s about subtle illumination, not a glaring spotlight.
  5. Natural Candles: Introducing candles can add a touch of romance. Opt for citronella candles that also keep mosquitoes at bay.

Architectural Plants

Architectural plants serve as focal points and provide structure to your garden.

  1. Yucca: With its tall spires and sword-like leaves, Yucca brings height and drama, especially when its white flowers bloom under the moonlight.
  2. Ornamental Grasses: They sway gracefully with the breeze and can add movement and texture to the moon garden.
  3. Palms: Their distinct silhouette can create intriguing shadows and offer a tropical touch to the lunar landscape.
  4. Agave: With their rosette shape and spiky leaves, they add structure and intrigue, especially when highlighted with lighting.
  5. Cacti: While not traditionally seen in moon gardens, their unique shapes can become moonlit sculptures, offering both texture and form.

Tools Needed

Creating and maintaining a moon garden does require specific tools:

Tools Needed

  1. Pruners: Essential for trimming and shaping plants, ensuring they’re at their best for nighttime viewing.
  2. Spade and Trowel: Fundamental for planting, these tools help dig holes and move soil with precision.
  3. Watering Can with a Fine Rose: Many moon garden plants are delicate and benefit from a gentle shower, making this tool crucial.
  4. Gloves: Protecting your hands from thorns, soil, and moisture, gloves are a gardener’s best friend.
  5. Wheelbarrow: For transporting soil, compost, or plants, a wheelbarrow can save time and effort.
  6. Garden Fork: Useful for aerating the soil and integrating compost, ensuring that the plants get all the nutrients they need.
  7. Garden Hose with a Gentle Spray Setting: For watering larger areas or when the garden needs a more thorough soaking.

Colors and Textures

Colors play a crucial role in curating the feel of a moon garden. The emphasis is on tones that shimmer in the moonlight, evoking serenity and mystique.

  • Whites and Pale Hues: Incorporate plants with white and pale-colored flowers. This not only gives an ethereal glow under the moon but also accentuates the moonlit ambiance. Examples include white roses, lilies, and moonflowers. These light colors serve as focal points in the nocturnal landscape, drawing the eye and illuminating the surroundings.
  • Silvers and Greys: Plants with silver or grey foliage, such as lamb’s ears or silver mound Artemisia, reflect moonlight exceptionally well, adding a shimmering quality to the garden.
  • Darker Backdrops: Incorporate plants with deep purples or dark green leaves. These provide a beautiful contrast to the lighter blooms, enhancing the garden’s depth. Think of plants like dark-leaved heucheras or black mondo grass.

Textures add a tactile dimension, making the garden appealing not just visually but also to touch.

  • Soft and Fuzzy: Plants like lamb’s ear offer a velvety texture, inviting visitors to touch and feel, heightening the sensory experience.
  • Rigid and Structured: The pointed foliage of plants like yucca or agave can provide architectural interest, juxtaposing softer plants.
  • Flowy and Graceful: Ornamental grasses move with the breeze, adding dynamism and a whimsical touch to the garden’s texture palette.

Seasonal Considerations for Moon Gardens

A moon garden’s charm should transcend seasons, ensuring year-round appeal.

  • Spring: Early bloomers can set the tone. Consider white tulips or daffodils that herald the start of warmer days.
  • Summer: This is when the garden comes alive. Night-blooming jasmine, gardenias, and moonflowers take center stage, ensuring a garden bustling with nocturnal activity.
  • Fall: As the temperature drops, incorporate autumn bloomers like white chrysanthemums or Japanese anemones. The fall also brings about a change in foliage colors, adding a new dimension to your garden.
  • Winter: While blooms might be sparse, focus on plants with interesting stems or bark, like white birch trees. Their silvery bark glistens under the moon and snow, ensuring the garden remains engaging.

Water Features

Water elements bring movement, sound, and a reflective quality to moon gardens.

Water Features

  • Still Ponds: A tranquil pond can serve as a mirror, reflecting the moon and stars. It also becomes a hub for nocturnal wildlife, like frogs or water-loving insects.
  • Fountains: The gentle gurgle of water can elevate the garden’s sensory appeal. When lit subtly, fountains become mesmerizing centerpieces, their water droplets sparkling in the moonlight.
  • Water Plants: Introducing night-blooming water lilies or lotuses can enhance the appeal of water features. They not only provide visual interest but also contribute to the overall ecosystem.

Designing a Moon Garden for the Whole Year

To ensure your moon garden thrives throughout the year:

  • Layering: Incorporate plants with varying blooming cycles. This ensures that as one plant’s flowers fade, another begins to bloom, offering continuous interest.
  • Evergreen Plants: Plants like hellebores or certain ferns remain green throughout the year, ensuring the garden never looks barren.
  • Structural Plants: These plants retain their form throughout seasons, like ornamental grasses or certain shrubs, providing consistency.
  • Seasonal Decor: Beyond plants, introduce seasonal decor. Snow globes in winters or illuminated pumpkin trails in the fall can keep the garden festive and inviting.

Design Tips for Night Gardens

  • Viewpoints: Ensure there’s a comfortable spot to soak in the garden’s beauty, maybe a bench or hammock.
  • Pathways: Light them subtly to guide visitors, using solar lanterns or glow-in-the-dark stepping stones.
  • Wildlife Attraction: Incorporate plants or features that attract nocturnal wildlife, enhancing the garden’s dynamism.
  • Sensory Emphasis: A night garden should tantalize all senses. From fragrant blooms to rustling leaves and soft textured plants, make it an immersive experience.
  • Safety: While the idea is to keep lighting minimal, ensure it’s safe. Hidden obstacles or deep water bodies should be adequately marked to prevent accidents.

Moon Garden Maintenance

Maintaining a moon garden is as essential as its design. Proper care ensures longevity and vibrancy throughout the seasons.

  • Regular Pruning: Keeping plants pruned not only maintains their shape but also promotes healthy growth. Especially for white flowering plants, removing faded blooms can encourage more blossoms. Night-blooming jasmines and moonflowers, for instance, benefit from occasional trimming.
  • Soil Health: The key to vibrant plants lies in the health of the soil. Ensure regular composting and use of organic fertilizers. Moon gardens, with their specific array of plants, might require a slightly acidic or alkaline soil. It’s wise to periodically test the soil and adjust its pH accordingly.
  • Pest Control: Moon gardens can attract nighttime pests. It’s essential to monitor for signs of infestations and use organic pest control methods to maintain the garden’s health without harming the beneficial nocturnal visitors.
  • Watering Regime: Many plants suited for moon gardens might have specific water needs. While some might be drought-tolerant, others may require regular watering. It’s crucial to establish a consistent watering schedule, preferably during the evening hours, to reduce evaporation loss.
  • Seasonal Care: Each season brings its own set of challenges and requirements. From protecting plants in winter frost to preparing the garden for spring blossoms, understanding and addressing these seasonal needs is paramount.

Creating a Lunar Landscape

A lunar landscape captures the essence of the moon, providing a moonlit realm right in your backyard.

  • Hardscaping: Think of gravel paths that shimmer under the moon or pale boulders that mimic moon craters. The use of light-colored hardscaping materials can evoke a lunar surface feel.
  • Elevation Changes: Creating small mounds or hillocks can provide depth and contour, mimicking the undulating lunar terrain.
  • Pale Plants: Incorporating plants with silver foliage or white blooms further enhances the lunar appeal. Silver Mound Artemisia or Dusty Miller can be ideal choices.
  • Moonlight Reflective Surfaces: Incorporating elements like gazing balls or mirrors can amplify the moon’s light, enhancing the moonlit effect.
  • Subtle Lighting: To mimic the moon’s glow on days when it’s not visible, use soft, pale-blue lighting. This can provide the desired moonlit ambiance even on dark nights.

Attracting Wildlife with a Moon Garden Design

A moon garden can serve as a haven for nocturnal creatures, adding life and dynamism.

  • Plant Choices: Some plants naturally attract nighttime pollinators. Flowers like evening primrose or night-blooming jasmine can draw moths and bats, which play a vital role in the ecosystem.
  • Water Features: A still pond or fountain not only adds beauty but also attracts frogs, toads, and other nocturnal amphibians.
  • Sheltered Spots: Providing small shelters or nesting spots can invite creatures like hedgehogs or nocturnal birds. It’s essential to ensure these spaces are safe from potential predators.
  • Natural Food Sources: Incorporating plants that produce nighttime nectar or berries can serve as food sources. This will naturally draw more wildlife.
  • Avoiding Harsh Chemicals: Using organic pest control ensures the garden remains safe for all its nocturnal visitors.

Enhancing Your Moon Garden with Accessories

Accessories can elevate a garden’s aesthetics and functionality.

  • Seating: Consider installing benches or swings. This ensures visitors have a place to relax and soak in the garden’s beauty.
  • Decorative Stakes and Spinners: These can capture and reflect moonlight, adding a touch of whimsy.
  • Moon-themed Decor: From moon-shaped lanterns to celestial wind chimes, there are countless decor pieces that can accentuate the theme.
  • Stepping Stones: Glow-in-the-dark stepping stones can not only guide visitors but also add an enchanting touch.
  • Gazing Balls and Reflective Ornaments: These accessories can reflect moonlight, creating captivating patterns and enhancing the moonlit ambiance.

By meticulously maintaining the garden, creating a lunar landscape, attracting diverse wildlife, and incorporating strategic accessories, a moon garden can truly become a nocturnal paradise.

Conclusion

Moon gardens, with their ethereal charm and allure, beckon nature lovers and avid gardeners alike to embark on a unique horticultural journey. They represent not just a landscape choice but a holistic experience, merging visual aesthetics with sensory delights. From the careful selection of white and silvery blooms to the thoughtful introduction of nocturnal wildlife, each element plays a crucial role in creating a serene sanctuary.

The nuances of crafting a moon garden, as explored throughout this article, reveal the depth and complexity involved in its creation. Whether it’s the lunar landscape’s mimicry, the choice of fragrant night-blooming plants, or the use of appropriate garden tools and accessories, every detail is a testament to the garden’s thematic integrity.

Moreover, the article underscores the importance of year-round maintenance, ensuring that this nighttime haven remains vibrant across seasons. By incorporating the insights and tips shared here, one can achieve a moonlit ambiance that transcends the ordinary, offering a tranquil space for reflection, relaxation, and connection with nature.

In essence, a well-designed and maintained moon garden serves as a testament to the harmonious blend of nature and artistry, providing a mesmerizing retreat that glows under the soft luminescence of the moon. Whether you’re a seasoned gardener or a novice enthusiast, let the allure of the moon guide your design choices, and you’ll undoubtedly craft a backyard sanctuary that resonates with beauty, tranquility, and magic.

Winter Garden Design: Your Guide to a Cold-Season Paradise

Winter’s icy embrace often creates a misconception that gardens are dormant or dull. However, with thoughtful winter garden design, your outdoor space can be transformed into a magical, cold-season paradise. This comprehensive guide will explore various facets of creating and maintaining a vibrant winter garden, offering both beginners and seasoned gardeners a plethora of ideas and insights to consider during the colder months. From the aesthetics of winter landscaping to the practicalities of garden care, we’ve got it covered.

A garden, regardless of the season, is a place of relaxation, creativity, and connection with nature. In winter, this connection can be even more profound, with the stark beauty of frosty mornings, snow-covered landscapes, and the subtle palette of winter flora. The importance of effective winter garden design lies in harnessing this beauty, ensuring year-round enjoyment and vibrancy, and understanding the unique challenges posed by the colder months.

Without further ado, let’s delve deep into the world of winter garden design, understanding its nuances, and uncovering the myriad of possibilities it presents.

Winter Garden Design Ideas

Winter garden design isn’t just about surviving the cold months but about celebrating them. A winter garden should encompass beauty, functionality, and resilience. Here’s a more in-depth look into how you can achieve this.

Winter Garden Design

Use of Colors: While winters can sometimes seem gray and lifeless, with the right plants, you can bring a burst of color to your garden. Consider evergreens, which provide a constant hue amidst the snow. Additionally, plants like Winter Jasmine and Pansies can introduce subtle color splashes.

Emphasis on Texture: The absence of foliage in many trees and plants during winter offers an opportunity to focus on textures. The bark of some trees, like the silver birch, becomes more prominent and can act as a feature in itself.

Winter Garden Structures: A trellis or an archway, laced with frost or snow, can be a captivating focal point. Similarly, a frozen pond or a water feature that’s designed to look beautiful even when it’s ice-covered can elevate the aesthetics of the garden.

Layering: Creating layers in your garden by placing shorter plants in the foreground and taller ones behind can add depth and interest. This becomes particularly effective when frost or snow outlines each layer.

Embracing The Snow: Instead of dreading the snow, use it to your advantage. A garden blanketed in snow is a canvas. Use darker plants or structures that contrast beautifully against the white backdrop.

Effective Winter Landscaping Ideas

Effective winter landscaping revolves around understanding the challenges and embracing the beauty of the season.

Winter Landscaping Ideas

Paths and Walkways: These should not only be aesthetically pleasing but also safe. Ensure they’re made from non-slip materials and are easy to clear of snow. A gravel path, for example, provides traction and can look gorgeous with a light dusting of snow.

Hardscaping: During winter, plants might not be the main attraction. This is where hardscaping comes in. Beautifully designed patios, stone walls, and other architectural features can provide structure and design appeal.

Winter Containers: Use winter-friendly plants in containers placed strategically around your garden. The containers themselves can be a feature if they’re designed with winter aesthetics in mind.

Accentuating Focal Points: Whether it’s a garden bench or a statue, emphasizing certain focal points during winter can create visual interest. Surround these focal points with winter-blooming plants or decorative mulch to make them stand out.

Creating a Winter Wonderland in Your Backyard

Turning your garden into a winter wonderland is about capturing the magic of the season.

Lighting: Utilize fairy lights to illuminate paths, trees, or garden structures. The twinkling lights amidst the frosty backdrop can create a dreamy ambiance.

Snow Art: Embrace the snowy canvas. From snow sculptures to intricate patterns made with footprints, there’s a lot you can play with.

Reflective Ornaments: These can catch and magnify the limited winter light, adding a touch of sparkle to your garden.

Natural Decor: Use pinecones, holly branches, and other winter botanicals to decorate your garden. They not only look beautiful but are also in harmony with the season.

Cold-Resistant Plant Selection

Choosing the right plants can be the difference between a barren garden and a vibrant one during winter.

Cold-Resistant Plant

Evergreens: Plants like Pine, Cedar, and Juniper not only stay green, but they also act as windbreakers and privacy screens.

Berries: Plants such as Winterberry and Snowberry can introduce vibrant colors and also attract winter birds.

Bark and Stems: Some plants, like Dogwood and Silver Birch, have distinct barks or stems that stand out in winter.

Winter Bloomers: Plants like Witch Hazel, Snowdrops, and Hellebores defy the cold by blooming in winter. These can be real game-changers for a garden’s aesthetics.

Winter Gardening Tips and Tricks

Gardening during winter comes with its set of challenges, but with the right tips and tricks, it’s not just feasible but enjoyable.

Mulching: This is crucial in winter. Mulch acts as a blanket for your plants’ roots, retaining moisture and preventing them from freezing.

Pruning: Winter is the ideal time to prune many trees and shrubs since they’re dormant. This not only keeps them in shape but promotes better growth in spring.

Protection: Use burlap screens to shield sensitive plants from harsh winter winds. Also, consider frost cloths for especially cold nights.

Bird Feeders: These serve a dual purpose. They provide food for birds during the scarce winter months and also attract these beautiful creatures to your garden.

Stay Active: Gardening activities like raking leaves, chipping ice, and even walking around assessing your plants can be great forms of exercise during the cold months.

Practical Winter Landscape Design

Winter landscaping is more than aesthetics; it’s about functionality. The season’s constraints require a delicate balance of planning, pragmatism, and beauty.

Paths and Walkways: Consider the snow when designing paths. Ensure they are made of non-slip materials and have accessible spaces where snow can be piled without obstructing views or damaging plants. Think about the path of the sun; snow melts faster on south-facing areas. Gravel or sand can provide traction and prevent slips.

Hardscaping: This involves the non-living elements of landscaping, such as patios, pathways, and benches. During winter, plants might not be the main attraction. A beautiful stone wall, or an artistically laid out patio, can be both functional and visually pleasing. Consider materials that weather well in freezing temperatures and can resist salt or sand if used for ice prevention.

Storage Solutions: Winter requires tools and materials like snow shovels, ice melt, and more. Design your winter landscape with practical storage solutions that are easily accessible, yet subtly blend into the background.

Windbreaks: Cold, biting winds can turn a beautiful winter garden into a harsh environment. Consider planting hedges or building walls that serve as windbreaks, protecting the more delicate areas of your garden.

Best Winter Garden Aesthetics

Winter gardens can be stunning with the right aesthetic approach. The stark beauty of the season provides a canvas ripe for creative touches.

Contrast: Winter is often painted in shades of white and gray. This offers an opportunity for contrasts. Dark barks, like that of the Black Pine, can stand out dramatically against the snow.

Winter Blooms: Several plants, including Snowdrops and Winter Jasmine, bloom in the cold, bringing color and life to the garden. Their resilience and vibrancy can elevate a garden’s aesthetic appeal.

Water Features: A frozen birdbath or pond can catch the winter sunlight in enchanting ways. While many water features are dormant during this time, they can still serve as a focal point with their icy beauty.

Art and Sculpture: Winter gardens can benefit from non-plant elements. Consider adding a beautiful statue or wind chimes that sound their notes in the cold air.

Gardening Tools for Winter

Winter gardening demands specialized tools to tackle the challenges posed by the cold, snow, and frost.

Gardening Tools for Winter

Snow Shovels: A must-have. Opt for ergonomic designs to prevent back strain. A smaller blade can help manage weight, and plastic shovels are generally lighter than metal ones.

Ice Chippers: These are essential for breaking down thick layers of ice that might form on pathways or other areas.

Pruning Shears: Many plants require pruning during the dormant winter months. Ensure your shears are sharp and clean to make precise cuts.

Frost Cloth and Burlap: These materials can be draped over sensitive plants during particularly cold nights, offering an extra layer of protection.

Heated Water Hose: If you need access to water during freezing conditions, a heated hose can prevent ice blockages.

Preparing Your Garden

Winter preparation is about shielding your garden against potential threats and ensuring its vitality come spring.

Mulching: This acts as insulation for your plants’ roots. Organic mulch, such as straw or bark, will degrade over time, enriching the soil.

Winterize Irrigation Systems: Water left in pipes can freeze and cause damage. Ensure you drain your system and insulate any exposed pipes.

Protect Vulnerable Plants: Some plants might require extra care. Consider transplanting them to sheltered spots or using frost cloths for protection.

Clean and Store: Before the first frost, clean your gardening tools and store them properly. This ensures longevity and prevents potential disease spread in the next season.

Care and Maintenance

Even in its dormancy, a garden requires attention. Winter care ensures the health and beauty of your space.

Regular Inspections: Winter weather can be unpredictable. Regularly inspect your garden for signs of plant stress, frost damage, or pest activity.

Pruning: Winter is an optimal time for pruning many trees and shrubs. This promotes healthier growth in the coming warmer months.

Watering: Believe it or not, winter droughts are a thing, especially when the ground is frozen, and plants can’t access the water below. Watering during warmer days ensures plants remain hydrated.

Avoid Salt: While salt can melt ice quickly, it’s harmful to plants. If you need traction on icy paths, use sand or a more eco-friendly alternative.

Bird Feeders: Keeping bird feeders stocked not only attracts beautiful wildlife but also ensures that birds help with pest control, picking off any unwanted bugs.

Garden Design for Cold Climates

Designing a garden for cold climates presents unique challenges, but it also offers the opportunity to be truly creative. The key is to anticipate the harshest elements and design a resilient and robust garden.

Strategic Planning: Before even planting a seed, conduct a thorough analysis of your space. Understand where snow accumulates, which areas are most exposed to wind, and where the sun’s rays hit longest during short winter days. This will guide plant placement and infrastructure decisions.

Soil Preparation: Cold climates often come with challenging soil. Whether it’s rocky, clay-heavy, or prone to freezing, the right soil amendments can make all the difference. Consider adding organic matter to improve drainage and support root growth.

Choosing Perennials: In colder regions, perennials can be your best friends. Once established, these hardy plants return year after year, withstanding frost and snow. From Siberian iris to Bleeding Heart, the options are vast and varied.

Integrated Windbreaks: Shielding your garden from harsh winds can increase its lifespan and maintain its beauty. Consider planting thick shrubs or setting up trellises with climbing plants to act as natural windbreaks.

Utilizing Raised Beds: Raised garden beds offer multiple advantages. They drain better, warm up faster in the spring, and can be designed to be deeper than the existing soil, allowing for healthier root development.

Creating Color in a Winter Garden

Winter doesn’t mean a compromise on color. With thoughtful plant selection and placement, a winter garden can burst with hues that rival any summer bloom.

Winter-flowering Plants: Plants like Winter Jasmine and Witch Hazel provide surprising pops of color in the coldest months, proving nature’s resilience.

Colorful Stems and Bark: While they might lose their leaves, many plants, like the Red Twig Dogwood or Silver Birch, have vibrant stems or bark that shine in the winter sun.

Berries and Fruits: Plants such as Holly or Pyracantha are not only loved by birds but also add vibrant reds and oranges to the winter palette.

Foliage Variations: Evergreens like Blue Spruce or variegated plants like Dead Nettle maintain their color throughout the season, offering consistent vibrancy.

Winterizing Your Garden Design

To ensure your garden thrives throughout the winter, certain preparatory steps are essential.

Mulching: This is vital. Applying a thick layer of organic mulch protects plant roots from freezing temperatures and retains soil moisture.

Watering Before Freeze: Watering your plants before a heavy freeze can protect them. The reason is that wet soil holds heat better than dry soil, thereby protecting roots.

Prune Appropriately: Some plants benefit from a late fall pruning, while others are best left until spring. Know your plants and prune accordingly.

Protecting Young Trees: Young trees, especially, are susceptible to cold. Consider wrapping their trunks in burlap or a specialized tree wrap to prevent frost cracks.

Ideas for Decorations

Beyond plants, decorative elements can elevate a winter garden’s beauty and charm.

Birdhouses and Feeders

Garden Sculptures: Whether it’s a stone statue or a metalwork piece, sculptures can become focal points, especially when highlighted by a dusting of snow.

Birdhouses and Feeders: These serve a dual purpose. They add a decorative touch and attract birds, which can be a delight to watch during the snowy months.

Seasonal Decor: Think of adding winter-themed ornaments, fairy lights, or even outdoor lanterns. They can add warmth and glow to your garden.

Water Features: Frozen water features, be it a birdbath or pond, can sparkle in the winter sunlight, adding a magical touch.

Indoor Gardening During Winter

For those who miss the joy of gardening during winter’s harshest months, bringing the garden indoors can be deeply satisfying.

Indoor Gardening

Houseplants: From Fiddle Leaf Figs to Succulents, houseplants purify the air and bring a touch of nature indoors.

Herb Gardens: Many herbs thrive on windowsills. Imagine the joy of picking fresh basil or rosemary in the middle of January!

Container Gardens: Using containers, one can grow a range of plants, including dwarf fruit trees, indoors. They can be easily moved around according to light needs.

Greenhouses and Conservatories: For those with space and resources, these structures allow for year-round gardening, protecting plants from the cold while offering them ample sunlight.

Hydroponics: This soil-less method of gardening is gaining popularity. From leafy greens to tomatoes, a multitude of plants can be grown hydroponically indoors, making fresh produce available even in the dead of winter.

Lighting Solutions

Lighting plays an essential role in winter garden design, emphasizing the beauty of the landscape even during the shortest days.

Lighting Solutions

Pathway Lights: Lighting up pathways not only adds an aesthetic appeal but ensures safety. Solar LED lights, when placed intermittently, can guide the way and highlight the path’s edges. This also gives your garden a structured appearance, especially when snow covers the ground.

Uplighting for Trees and Structures: Positioning lights at the base of trees or garden structures can create dramatic shadows and silhouettes. This uplighting technique accentuates the unique features of bare tree branches or intricate trellises, creating a mesmerizing effect.

Pendant and String Lights: Hanging lights, particularly in sitting areas or over patios, can produce a warm and cozy ambiance. Imagine a winter evening under the fairy lights, sipping hot cocoa and enjoying the serenity of your winter garden.

Spotlights for Focal Points: Do you have a water feature, sculpture, or a particular plant that stands out? Use spotlights to highlight these elements, drawing attention even from a distance.

Sensors and Timers: Given that winter days are shorter, using sensors that activate lights when it gets dark or timers that turn them off and on at set times can save energy and provide convenience.

Keeping Your Garden Vibrant in Winter

A vibrant winter garden breaks the monotony of the cold months, offering a feast for the eyes and soul.

Evergreens: Beyond their classic green, evergreens like Blue Spruce or Gold Thread Cypress can add varying shades, from silvery blues to bright yellows, to the winter landscape. Their persistent foliage ensures year-round vibrancy.

Berries and Seed Heads: Plants like the Winterberry or Coneflower retain their berries and seed heads throughout winter. These not only provide visual interest but also attract birds, bringing movement and life to the garden.

Grasses: Ornamental grasses like the Switchgrass or Feather Reed Grass sway gracefully in the winter wind. Their dried stalks and seed heads can catch and reflect sunlight, adding dynamism to the garden.

Garden Art: Colorful sculptures, painted pots, or even mosaics can contribute to the garden’s vibrancy. Such elements can be strategically placed to break the potential monotony of a snowy landscape.

DIY Winter Garden Project Ideas

For those who love getting their hands dirty and personalizing their spaces, DIY projects can transform a winter garden.

Homemade Bird Feeders: Using simple materials like pinecones, peanut butter, and bird seeds, one can create feeders to attract winter birds. This not only offers a lifeline to the birds but also brings activity to the garden.

Winter Terrariums: Create miniature winter landscapes inside clear containers. Add layers of pebbles, charcoal, soil, and then plant succulents, moss, or even small evergreens.

Painted Stones: Painting stones with bright colors or designs and placing them around the garden can bring unexpected pops of color amidst the snow.

Ice Sculptures: Fill balloons with water and let them freeze outdoors. Once frozen, peel off the balloon, and you’ll have a round ice sculpture. Several of these, placed together, can create a mesmerizing effect.

Twig and Branch Decor: Collect fallen twigs and branches. These can be assembled into structures or even decorative wreaths. Spray painting them can add an extra layer of charm.

Planning for a Winter Garden

Forward-thinking is crucial when envisioning a winter garden. Planning ensures that the garden remains beautiful and functional throughout the cold season.

Start Early: Winter garden planning ideally begins in summer. This allows you to plant trees and shrubs that will mature by winter, providing structure and form to the garden.

Understand Your Zone: Different plants thrive in various cold hardiness zones. Knowing your zone ensures that you select plants that can survive and flourish in your specific winter conditions.

Visualize Layers: A good winter garden has layers – from ground-covering plants to medium shrubs, followed by tall trees. This layering effect offers depth and texture to the garden view.

Water Features: If you’re planning to include water features, think about how they’ll appear and function in winter. Some might freeze, creating natural ice sculptures, while others might need winterizing to protect them.

Think Long-term: The true beauty of a winter garden often comes out in its maturity. While it’s tempting to cram the space with plants for immediate effect, remember to account for growth and spread over the years.

Structures and Layouts

When considering winter garden design, it’s essential to recognize the importance of structures and layouts. These elements serve as the backbone of your garden, providing shape, support, and aesthetics during the colder months.

Garden Arches and Pergolas: These can provide striking silhouettes against a snowy backdrop. Covered with climbers that bear winter interest, like winter jasmine or evergreen ivies, they can become focal points in the landscape.

Raised Beds: Elevated garden beds not only aid in soil drainage but also act as design elements. In winter, their geometric shapes can provide contrast to the softness of snow or dormant lawns. They can be filled with cold-resistant plants or evergreens for year-round interest.

Garden Paths: Laying out paths using cobblestones, bricks, or gravel can create patterns and guide the visitor’s eye. Edged with hardy plants, these paths ensure that the garden remains navigable even during snowfalls.

Patios and Decks: These structures offer gathering spaces in the garden. By adding a firepit, heaters, or enclosing them partially, they can be made usable even during colder months.

Fences and Screens: Beyond their utility, they can become design elements if chosen with care. A well-placed lattice or decorative fence can frame garden views or provide a backdrop for winter plants.

Budget-Friendly Winter Garden Ideas

Creating a winter paradise doesn’t have to burn a hole in your pocket. Here are ways to craft a winter garden without splurging.

Repurpose Summer Plants: Some plants like ornamental cabbages and kales have winter interest. Instead of purchasing new plants, consider what you already have and how they might be showcased in winter.

DIY Decor: Simple DIY projects, like painted pots, twig sculptures, or homemade bird feeders, can add charm without costing much.

Thrift Store Finds: Garden decor doesn’t have to be bought new. Often, thrift stores or garage sales offer unique garden ornaments at a fraction of their original cost.

Mulch: Not only does mulch protect plant roots from extreme cold, but it also gives the garden a tidy appearance. Leaves, straw, or pine needles can act as budget-friendly mulching materials.

Propagate Plants: Instead of buying new plants, consider propagating from existing ones. Many shrubs and perennials can be propagated from cuttings or by division.

Cozy Garden Spaces for Winter

Firepits and Outdoor Fireplaces: The warmth and flicker of flames can transform a winter garden into a cozy retreat. Positioned correctly, they can become gathering spots for family and friends.

Enclosed Seating Areas: Using trellises, screens, or even transparent sheets, one can create sheltered seating areas. Throw in some outdoor cushions, blankets, and perhaps a portable heater, and you have a snug garden corner.

Garden Nooks: Small, defined spaces in the garden, surrounded by tall plants or structures, can offer a sense of enclosure. A simple bench, a bird feeder nearby, and you have a peaceful spot to relax and watch winter birds.

Warm Color Palette: Incorporating plants and decor with warm colors – reds, oranges, yellows – can psychologically add warmth to the space.

Water Features: The gentle sound of flowing water can add to the cozy ambiance. Heated birdbaths or small fountains that don’t freeze can achieve this effect.

Design Mistakes to Avoid

Winter garden design requires foresight. Avoiding these common pitfalls ensures your garden remains beautiful and functional during the cold months.

Overcrowding: It’s crucial to account for the growth and spread of plants. While they might look sparse initially, remember they will fill in the space as they mature.

Ignoring Winter Interest: While a plant might look beautiful in spring or summer, consider its winter appearance. Opt for those with winter interest, be it through berries, bark, or form.

Forgetting Wildlife: A garden teeming with birds and beneficial insects adds life. Ensure there are food sources and shelters for them.

Inadequate Pathways: Neglecting to provide clear, well-maintained paths can make the garden inaccessible after snowfall or during wet winter days.

Neglecting Maintenance: Winter gardens require care too. Whether it’s protecting plants from extreme cold, pruning, or general maintenance, ensuring regular upkeep keeps the garden in top shape.

Conclusion

Designing a winter garden is an art, weaving together nature’s stark beauty with human innovation. While the cold months might seem like a dormant period, they present a unique canvas upon which a gardener can paint a serene landscape, alive with subtleties and contrasts. From choosing the right structures and layouts to incorporating cozy nooks, the winter garden becomes an oasis of tranquility amidst the chill. However, like all great endeavors, it requires meticulous planning, a dash of creativity, and a sprinkle of foresight. By embracing the cold-resistant wonders of nature, experimenting with DIY projects, and avoiding common design pitfalls, any space can be transformed into a cold-season paradise. Remember, the essence of a winter garden lies not just in its aesthetics, but also in its ability to evoke warmth, wonder, and well-being in the heart of its beholder. As you embark on this journey, may your garden not just survive, but thrive, becoming a beacon of hope and beauty in the heart of winter.

Rain Garden Design: Key Considerations & Best Practices

Rain gardens, a marriage of design and ecology, are rapidly gaining popularity among homeowners, environmentalists, and urban planners. Offering both aesthetic and ecological benefits, these specially designed gardens focus on managing and making the most of rainwater runoff. In this comprehensive guide, we delve deep into the art and science of rain garden design, shedding light on its significance, benefits, and the intricate considerations involved.

From choosing the right plants and calculating the optimal size to ensuring effective drainage and achieving sustainability, this guide covers it all. As urban areas grapple with increasing pollution and depleting groundwater levels, rain gardens emerge as a solution that caters to the environment, biodiversity, and aesthetic appeal. Join us as we embark on this enlightening journey into the world of rain gardens.

Rain Garden Design Basics

Rain gardens are more than just visually appealing spaces; they serve a critical environmental function. At its core, a rain garden is a depression in the ground filled with plants, aiding in the collection and absorption of rainwater.

Design

Every successful rain garden starts with a solid design plan. A properly designed rain garden not only handles water runoff efficiently but also becomes an aesthetic highlight of a landscape. When planning, it’s crucial to consider the source of the water runoff, which often includes rooftops, driveways, and patios. The design should ensure that water flows smoothly into the garden, minimizing the chances of erosion or overflow.

Water Drainage

Effective drainage is the heart of rain garden design. The garden should be situated in a location where water can be naturally channeled, and it should be deep enough to hold significant runoff. Importantly, the garden should drain within 24 hours to prevent mosquitoes from breeding. Soil permeability, often overlooked, is a critical aspect, ensuring that water doesn’t remain stagnant, causing plant roots to rot.

Benefits of a Rain Garden

Rain gardens, while beautiful, serve functional purposes with a slew of benefits that cater to both the environment and homeowners.

  1. Water Management: One of the primary benefits of a rain garden is its role in mitigating stormwater runoff. By absorbing rainwater, it reduces the burden on city drainage systems, preventing potential flooding.
  2. Ecosystem Conservation: Rain gardens promote biodiversity. By using native plants, they provide habitats for local wildlife, promoting a balanced ecosystem.
  3. Pollution Reduction: They play a significant role in filtering out pollutants from rainwater runoff, thus preventing them from entering our water bodies.
  4. Aesthetic Value: With the right plants and design, a rain garden can become a focal point in a landscape, enhancing the aesthetic appeal of a property.

Plants Selection

The right plants can make or break a rain garden. They must be resilient, able to handle occasional flooding while thriving in drier conditions.

Native Plants for Rain Gardens

Local or native plants are particularly suited for rain gardens. Accustomed to the local climate and soil, they generally require less maintenance and watering once established. Examples might include various sedges, rushes, and certain flowering plants that are native to a specific region.

Biodiversity Enhancement

To maximize the benefits of a rain garden, a diverse selection of plants should be chosen. This not only creates a visually captivating space but also attracts a myriad of wildlife, ranging from birds to beneficial insects, enhancing the biodiversity of the area.

How to Calculate Size for Rain Gardens

The size of a rain garden is crucial for its efficiency. Too small, and it may overflow; too large, and it might look out of place.

Size for Rain Gardens

  1. Assess Runoff Volume: First, estimate the volume of rainwater runoff your property produces. This is primarily influenced by the area of hard surfaces (like roofs and driveways) that direct water to the garden.
  2. Consider Soil Type: Different soils have varied absorption rates. Sandy soils absorb water faster than clayey soils. Thus, rain gardens in sandy areas can be smaller compared to those in clayey regions.
  3. Account for Local Rainfall Patterns: The average and maximum rainfall in your area will also influence the garden’s size. It’s vital to design for the maximum expected, ensuring the garden can handle heavy downpours.

Soil Preparation for Effective Drainage

The foundation of any garden, particularly a rain garden, is its soil. Its quality determines the health of the plants and the efficiency of water drainage.

  1. Infiltration Tests: Before starting the garden, conduct an infiltration test. This will tell you how fast water seeps into your soil, which can guide you on the necessary amendments.
  2. Organic Matter: Adding compost or other organic matter can improve soil structure, enhancing its water infiltration capability. This not only aids drainage but also provides vital nutrients to plants.
  3. Avoid Compaction: When preparing the garden, avoid compacting the soil. Compacted soil hinders water absorption. Use equipment and techniques that ensure the soil remains loose and aerated.

Optimal Placement

The placement of a rain garden is pivotal to its success. Positioning it strategically not only maximizes its effectiveness in handling water runoff but also enhances its aesthetic appeal.

  1. Proximity to Runoff Source: Ideally, the rain garden should be placed where it can easily collect runoff. This includes areas downhill from rooftops, driveways, or other impervious surfaces. However, it’s essential to maintain a safe distance from building foundations to prevent any potential water damage.
  2. Sunlight Consideration: Sunlight plays a crucial role in the health of your garden plants. Some plants might require full sun, while others thrive in partial shade. Ensure the location meets the sunlight needs of your chosen plants.
  3. Existing Landscape Integration: While the rain garden serves a functional purpose, it should also be integrated seamlessly into the existing landscape. This involves considering the contours, existing plants, and overall design of your yard.
  4. Distance from Trees: Large trees can compete with your rain garden plants for water and nutrients. Ensure that your rain garden is placed sufficiently far from large trees to minimize competition.

Native Plants for Rain Gardens

Incorporating native plants in rain gardens is not just a trend; it’s a strategy with multiple benefits.

Native Plants for Rain Gardens

  1. Adaptation to Local Conditions: Native plants have evolved in the region over countless years, making them particularly resilient to local climate, pests, and diseases. Their deep roots, often deeper than those of non-native plants, enable better infiltration and filtration of rainwater.
  2. Biodiversity Boost: Native plants contribute significantly to local biodiversity, attracting native wildlife, including birds, butterflies, and beneficial insects. This creates a harmonious ecosystem within the garden.
  3. Low Maintenance: Given their inherent adaptation to local conditions, native plants generally require less maintenance. They demand less water outside of rainfall and are less prone to pests and diseases, meaning less reliance on pesticides.
  4. Examples of Native Plants: Depending on your region, some excellent choices for rain gardens might include Butterfly Milkweed, Blue Flag Iris, Swamp Milkweed, and various sedges and rushes.

Maintenance Tips

A well-maintained rain garden not only looks beautiful but also functions efficiently over time.

  1. Regular Inspection: Regularly check for signs of erosion or sediment buildup. These can hinder the flow of water into the garden and reduce its efficiency.
  2. Pruning and Weeding: While native plants require minimal maintenance, periodic pruning helps them thrive. Regular weeding ensures unwanted plants don’t compete for essential resources.
  3. Mulching: Mulch plays a dual role. It prevents weed growth and helps in moisture retention, ensuring the plants have a consistent water supply, especially during dry periods.
  4. Replanting: Over time, some plants might die or become less robust. Replanting ensures that the garden remains lush and continues to serve its water management role.
  5. Monitoring Water Drainage: Ensure that water drains from the garden within 24 to 48 hours after a rain event. Prolonged stagnation can become a breeding ground for mosquitoes.

Rain Garden Design Techniques

Designing a rain garden involves a blend of artistry and technical know-how.

  1. Layering: Just as with traditional gardens, layering plants by height can create depth and visual interest. Position taller plants at the center or the back of the garden, with shorter ones in the front.
  2. Incorporating Stones and Boulders: Strategically placed stones or boulders can enhance the garden’s aesthetic appeal. They can also serve as natural barriers, directing water flow and preventing erosion.
  3. Curved Contours: Instead of a strictly circular or oval shape, consider incorporating gentle curves in your rain garden design. This can make the garden look more natural and integrated with its surroundings.
  4. Creating a Focal Point: Whether it’s a particular plant, a sculpture, or a water feature, having a focal point can draw attention and make your rain garden stand out.
  5. Color Coordination: Plan your garden such that it remains colorful throughout the seasons. Select plants that bloom at different times, ensuring a continuous splash of color throughout the year.

Avoiding Common Mistakes in Rain Gardens

Rain gardens are an eco-friendly and beautiful way to manage stormwater runoff. Yet, for all their benefits, they come with pitfalls that novice and even experienced gardeners can fall into.

  1. Incorrect Sizing: One common error is the misjudgment of the garden’s size. A garden too small may become overwhelmed during heavy rains, while an oversized garden can be an unnecessary use of space and resources. Regularly assess the amount of runoff and adjust the garden dimensions accordingly.
  2. Improper Placement: Placing a rain garden too close to home foundations or large trees can cause foundational damage or nutrient competition, respectively. It’s essential to consider the existing landscape and structures when deciding on placement.
  3. Choosing Non-Native Plants: While exotic plants might look appealing, they may not be suited for the specific water and soil conditions of a rain garden. Native plants, having evolved in the local conditions, often fare better and require less maintenance.
  4. Overlooking Maintenance: A misconception is that rain gardens are “set and forget.” Periodic weeding, mulching, and inspection are crucial to their longevity and functionality.
  5. Ignoring Soil Quality: The quality and type of soil play a pivotal role in water infiltration. Neglecting soil tests can lead to water stagnation and reduced garden efficacy.
  6. Overcomplicating Design: Simplicity can be the key. Over-designing with too many plant species or elements can make maintenance challenging and might detract from the garden’s primary purpose: water management.

Materials Needed

  1. Soil Mix: A blend of compost, sand, and topsoil usually works best for rain gardens, ensuring good water infiltration and plant health.
  2. Plants: Choose native species suited for wet conditions. The selection should also consider plant height, bloom time, and aesthetic appeal.
  3. Mulch: Organic mulch, like shredded bark, can help in moisture retention, suppress weeds, and provide a neat appearance.
  4. Edging Materials: Stones, steel, or wood edging can help define the garden’s shape and prevent soil erosion.
  5. Tools: Basic gardening tools like spades, trowels, gloves, and a wheelbarrow will be necessary for the garden’s installation and maintenance.
  6. Water Source: While the primary water source is rain, in prolonged dry spells, having a supplementary water source can be beneficial.

Rain Garden Design for Small Spaces

Urban environments or homes with limited outdoor space can still benefit from rain gardens. Here’s how:

Rain Garden Design for Small Spaces

  1. Vertical Planting: Using plants that grow tall rather than spread out can help maximize limited space. Plants like Joe Pye Weed or certain grasses might be suitable.
  2. Tiered Design: A terraced or multi-level garden can effectively manage water while saving horizontal space.
  3. Incorporate Functional Aesthetics: In tight spaces, every element should serve a dual purpose. For instance, a decorative boulder can also direct water flow.
  4. Utilize Containers: If ground space is extremely limited, consider container-based rain gardens. While they won’t handle as much runoff, they can still contribute to sustainable water management.
  5. Integration with Hardscapes: Rain gardens can be designed alongside patios or walkways, serving both as functional water managers and decorative elements.

Sustainable Water Management with Rain Gardens

Rain gardens represent a shift from traditional water management techniques towards more sustainable practices.

Water Management with Rain Gardens

  1. Reducing Surface Runoff: By capturing rainwater, these gardens reduce the rapid runoff that can erode soils and transport pollutants into local waterways.
  2. Recharging Groundwater: They promote infiltration, allowing water to percolate down and replenish groundwater reserves, a critical source of drinking water in many regions.
  3. Biodiversity Enhancement: Rain gardens foster biodiversity, providing habitats for various species, from beneficial insects to birds.
  4. Natural Filtration: The plants and soils in rain gardens act as natural filters, trapping and breaking down pollutants. This ensures that the water that infiltrates is cleaner, benefiting the broader environment.
  5. Carbon Sequestration: Plants in rain gardens capture and store carbon dioxide, contributing to efforts to combat climate change.
  6. Educational Value: These gardens can serve as educational tools, showcasing the importance of sustainable water management and native plantings to communities.

The Aesthetics of Rain Gardens

Rain gardens not only serve functional purposes but can also be a visually captivating addition to any landscape. Their unique design and diverse plant selection make them stand out.

Aesthetics of Rain Gardens

  1. Seasonal Beauty: As rain gardens often incorporate a variety of native plants, they offer seasonal interest. From the fresh greens of spring, vibrant flowers of summer, to the rich hues of fall, there’s always something to catch the eye.
  2. Dynamic Water Play: Unlike static gardens, rain gardens have an ever-changing water level. This dynamic water play, especially after a rain, adds a unique visual element. The reflection of plants in the pooled water can be enchanting.
  3. Diverse Textures and Heights: With careful plant selection, rain gardens can offer a medley of textures, from feathery grasses to broad-leafed plants. This variety creates a multi-layered aesthetic appeal.
  4. Attracts Wildlife: The sight of butterflies hovering over flowers, birds perched on shrubs, or bees buzzing about not only boosts the garden’s aesthetics but also adds life and motion.
  5. Natural Look: In a world where many gardens can sometimes look over-manicured, the natural, slightly wild appearance of rain gardens can be a refreshing change.

Necessary Tools

To create and maintain a thriving rain garden, certain tools are indispensable.

  1. Planning Tools: Before you break ground, tools like graph paper, rulers, and garden design software can help in plotting out the garden’s size, shape, and placement.
  2. Digging Tools: Shovels and spades are essential for excavating the garden bed. A garden fork can be useful for loosening compacted soil.
  3. Measuring Tools: A measuring tape or a yardstick ensures accurate dimensions. A level helps in ensuring the garden bed has a slight depression for water pooling.
  4. Planting Tools: Trowels are great for planting smaller plants, while a dibber can assist in planting bulbs.
  5. Maintenance Tools: Pruners and shears are essential for trimming plants, ensuring the garden remains aesthetically pleasing. Gloves, meanwhile, protect hands during gardening tasks.

Enhancing Home Value with Rain Gardens

The addition of a rain garden can significantly boost a property’s value.

  1. Curb Appeal: A well-maintained rain garden adds instant charm and appeal to any property, making a home more attractive to potential buyers.
  2. Sustainable Feature: With an increased emphasis on sustainability, homes with eco-friendly features like rain gardens are often in high demand. Such features can command a premium in the real estate market.
  3. Water Management: Properties that effectively manage water runoff can save homeowners on potential water damage costs. This management can make homes with rain gardens more appealing.
  4. Low Maintenance: Compared to traditional gardens, rain gardens can be lower in maintenance. This factor can be an attractive selling point for potential homeowners who are wary of extensive gardening chores.
  5. Unique Selling Point: Not every home has a rain garden. Having one can differentiate a property from others in the market, making it stand out to potential buyers.

Rain Garden vs. Traditional Gardens

Rain gardens and traditional gardens, while both beautiful, have different purposes, designs, and benefits.

  1. Purpose: Traditional gardens are often designed primarily for aesthetics or produce. Rain gardens, on the other hand, are primarily designed to manage stormwater runoff, though they are aesthetically pleasing too.
  2. Plant Selection: While traditional gardens can house a variety of plants, rain gardens specifically feature plants that tolerate both wet and dry conditions.
  3. Design: Traditional gardens can be flat or even raised. Rain gardens have a distinct design with a depression to capture rainwater, allowing it to slowly infiltrate the ground.
  4. Maintenance: Traditional gardens might require regular watering, especially in dry periods. Rain gardens, designed to capture rainwater, often need less supplemental watering.
  5. Environmental Impact: Rain gardens have an edge when it comes to environmental benefits. They reduce stormwater runoff, filter pollutants, and enhance biodiversity.

Cost and Budgeting

Rain garden design doesn’t have to break the bank, but costs can vary based on several factors. Understanding these can help homeowners budget effectively:

  1. Size & Depth: A larger garden naturally demands more resources, from plants to soil amendments. The depth also plays a role; deeper gardens might require more excavation, which can up the costs.
  2. Plant Selection: Native plants, which are recommended for rain gardens, might sometimes cost more than non-native alternatives. However, they usually require less maintenance in the long run, potentially saving costs.
  3. Soil Amendments: If your native soil lacks the right permeability, you might need to invest in soil amendments or specific rain garden soil blends.
  4. Labor Costs: While DIY enthusiasts can save on labor costs, hiring professionals might be a good idea for larger or more intricate designs.
  5. Maintenance Over Time: While rain gardens are generally low-maintenance, initial costs should factor in some budget for the garden’s upkeep, like mulching or periodic plant replacements.

Environmental Advantages

The environmental benefits of rain gardens are manifold, making them a sustainable choice:

Environmental Advantages

  1. Pollution Reduction: They capture stormwater runoff, which often contains pollutants. As the water is filtered through the soil, many of these pollutants get removed, ensuring that cleaner water is returned to the environment.
  2. Recharge Groundwater: By promoting infiltration, rain gardens can help replenish local groundwater supplies, crucial in areas facing water scarcity.
  3. Habitat Creation: With native plants at their core, rain gardens provide habitats for local wildlife, from birds to beneficial insects.
  4. Temperature Regulation: Plants and the water in rain gardens can help mitigate the urban heat island effect, cooling their immediate surroundings.
  5. Carbon Sequestration: Like all green spaces, the plants in rain gardens capture and store carbon, playing a role in combating climate change.

Designing Rain Gardens for Wildlife

A rain garden can be a sanctuary for wildlife if designed with care:

Designing Rain Gardens for Wildlife

  1. Plant Diversity: Incorporating a diverse range of native plants can attract different types of wildlife, from pollinators like bees and butterflies to birds.
  2. Water Features: Small ponds or water-holding areas can attract amphibians and provide water sources for birds and mammals.
  3. Layering Plants: Different wildlife species prefer different levels of vegetation. Including ground covers, mid-height shrubs, and taller plants can provide varied habitats.
  4. Natural Food Sources: Opting for plants that produce seeds, berries, or nectar can provide food sources for wildlife.
  5. Safe Shelter: Dense shrubs or tall grasses can offer shelter for wildlife, providing them a safe space from predators and harsh weather.

Troubleshooting Rain Garden Issues

Despite careful planning, some issues might arise in a rain garden:

  1. Poor Drainage: If water stands for more than 48 hours, it might be due to compacted soil or a design that doesn’t allow for adequate infiltration. It’s essential to address this to prevent mosquito breeding.
  2. Plant Health: If plants are wilting or not thriving, consider their placement. Some plants might prefer the rain garden’s drier edges, while others thrive in the center where water pools.
  3. Erosion: If you notice signs of erosion, consider incorporating more ground cover plants or adding stones to dissipate the energy of incoming water.
  4. Weeds: While some weeds are inevitable, an overgrowth can indicate too much nutrient-rich runoff entering the garden. Adjusting the garden’s input or using mulch can help.
  5. Wildlife Concerns: While rain gardens attract wildlife, unwanted visitors like pests can sometimes be a problem. Opt for plants that aren’t known to attract these pests, or consider natural deterrents.

Incorporating Rain Barrels

Integrating rain barrels into rain garden design provides a dual approach to sustainable water management.

What are Rain Barrels?: Simply put, a rain barrel is a system designed to capture and store rainwater, typically from rooftops. They can range from simple barrels to more elaborate, decorative containers.

Incorporating Rain Barrels

  1. Conservation of Water Resources: By capturing rainwater, homeowners can reduce their reliance on municipal water supplies. This water can be used for watering plants during dry periods, ensuring a constant supply for your garden.
  2. Economic Benefits: Rain barrels can lead to savings in utility bills. Water collected can be used for multiple purposes, from gardening to cleaning.
  3. Reducing Runoff: Directly linking rain barrels to the rain garden ensures that excess water, especially during heavy downpours, is stored rather than leading to excessive runoff. This stored water can then be slowly released to the rain garden, ensuring efficient water use and reducing potential flooding.
  4. Aesthetic Integration: Modern rain barrels aren’t just functional; they can be designed to fit seamlessly into your garden’s aesthetic. From wooden barrels that give a rustic look to sleek designs that fit urban settings, there’s a rain barrel for every garden.
  5. Maintenance and Care: While rain barrels are relatively low-maintenance, it’s vital to ensure they’re cleaned periodically. Check for debris in the filters, ensure the spigots aren’t blocked, and use the stored water regularly to prevent stagnation.

The Science Behind Rain Gardens

Rain gardens are more than just aesthetic features; they’re grounded in solid environmental science.

  1. Biological Filtration: As water flows through the garden, plants and microbes in the soil work in tandem to break down pollutants, acting as natural filters. This is crucial in urban settings where runoff can contain various pollutants.
  2. Hydrology: The design of a rain garden respects the natural flow of water. By mimicking natural processes, rain gardens slow down runoff, allowing it to infiltrate the soil, replenishing groundwater reserves and reducing erosion.
  3. Ecology: Rain gardens, especially those planted with native species, restore habitats. This is vital in urban environments where natural habitats are fragmented. Over time, a well-maintained rain garden can contribute significantly to local biodiversity.
  4. Soil Science: The right soil mix is crucial. A blend that is too dense will not allow for adequate water infiltration, while too loose a mix might not support plant life. The ideal soil for a rain garden strikes a balance, promoting both infiltration and plant health.

Rain Garden Design Trends

As sustainability becomes more mainstream, rain garden designs evolve, blending functionality with aesthetics.

  1. Edible Rain Gardens: Merging the utility of vegetable gardens with rain gardens, homeowners are planting edibles that can thrive in the specific conditions of a rain garden.
  2. Interactive Designs: Some designs now incorporate seating areas or pathways, allowing homeowners and visitors to interact with the garden, turning it from a passive feature to an active living space.
  3. Smart Technology: With the rise of smart home technology, there’s a trend towards integrating tech solutions into rain gardens, from moisture sensors that can alert homeowners about soil moisture levels to automated rain barrel systems.
  4. Vertical Rain Gardens: Especially in urban settings with limited space, vertical gardens, which make use of wall space or specially designed structures, are gaining popularity.

Key Considerations in Rain Garden Design

  1. Purpose and Goals: Before starting, it’s essential to understand the primary goal. Is it mainly for managing runoff, promoting biodiversity, or aesthetics? This primary goal can guide many design choices.
  2. Site Assessment: Understand the natural flow of water on your property, existing vegetation, and soil type. This can inform placement and size.
  3. Regulations and Permissions: In some areas, creating rain gardens, especially those that might alter the flow of water significantly, might require permissions. It’s crucial to check local regulations.
  4. Maintenance and Longevity: While rain gardens are generally low maintenance, it’s essential to plan for their care. This includes choosing plants that are suitable for the local climate and ensuring easy access for periodic maintenance tasks.
  5. Safety: Especially in homes with young children, safety is paramount. Deep sections of the garden or any water features should be designed with safety in mind.

Conclusion

Rain gardens have emerged as a beacon of sustainable landscape design, merging aesthetic allure with ecological responsibility. By integrating natural processes into urban and suburban settings, they offer a solution to many challenges, from managing stormwater runoff to enhancing local biodiversity. Their adaptability – from incorporating rain barrels, choosing native plants, to their evolving design trends – means they can be tailored to virtually any space or aesthetic preference.

But more than their physical benefits, rain gardens symbolize a broader shift towards a more sustainable coexistence with our environment. They remind us that we can craft our spaces in harmony with nature, reaping both practical and aesthetic rewards. Whether you’re a homeowner considering a landscape revamp or a passionate environmentalist, the depth and breadth of rain gardens offer myriad possibilities. As with any venture, the keys to a successful rain garden lie in thorough planning, understanding the underlying science, and a commitment to its ongoing care. In doing so, we not only beautify our immediate surroundings but also contribute to a larger narrative of environmental conservation and sustainable living.

Forest Garden Design: A Detailed Guide to Sustainable Spaces

Forest gardens, often recognized by terms such as agroforestry or forest farming, represent the very pinnacle of sustainable land design. These spaces are meticulously crafted with the principles of permaculture in mind, seeking to recreate the layered and intricate ecosystems found in natural forests. From the towering canopy to the underbrush, each layer serves a function, be it providing edible plants or sheltering essential wildlife. In this guide, we’ll journey into the world of forest garden design, unveiling the steps, practices, and principles that underline these sustainable spaces.

The term “Forest Garden Design” not only alludes to the aesthetic aspect of these spaces but also the functional, ecological, and holistic nature of their planning and establishment. It’s about building a thriving ecosystem that benefits the environment, wildlife, and human inhabitants alike. As we delve deeper into this topic, you’ll learn about the benefits of forest gardens, how to design one with permaculture principles, and the intricacies of plant selection.

Forest Garden Design for Small Spaces

Urban landscapes and limited yard spaces don’t have to be a barrier for forest garden design. With the right planning and understanding, even a compact area can be transformed into a lush, multi-layered, productive space.

Forest Garden Design for Small Spaces

  • Vertical Layering: In smaller spaces, think upwards. Employing vertical layering by stacking plants of different heights ensures that every inch is utilized. This includes canopy trees, shrubs, and ground cover plants.
  • Microclimate Utilization: Every garden, no matter the size, will have little pockets of differing temperatures and light exposures. Recognizing these microclimates can help in placing plants more effectively.
  • Natural Design Principles: Mimic nature. Instead of straight rows, consider using winding pathways and clustering plants in patches. This can give even a small space a sense of expansiveness and depth.

Benefits of Forest Gardens

Forest gardens aren’t just about beauty; they’re teeming with benefits, both tangible and intangible.

Biodiversity Boost:

One of the primary advantages of these gardens is the significant increase in biodiversity. Diverse plantings attract a myriad of wildlife, from pollinators to birds.

Soil Health and Fertility:

Organic practices like mulching, composting, and companion planting work harmoniously in a forest garden, fostering soil health and ensuring long-term fertility.

Water Management:

Through natural design techniques, forest gardens often manage water efficiently, reducing runoff and ensuring plants get the moisture they need.

Sustainable Harvest:

With a polyculture setup, gardeners can reap a diverse harvest throughout the year, ensuring sustenance and sustainability.

Designing a Permaculture Forest

Incorporating permaculture principles into forest garden design entails observing and mimicking natural systems to create a resilient and productive landscape.

Designing a Permaculture Forest

  • Observing Nature: Permaculture begins with observation. Understanding the local climate considerations, natural pests, and existing ecosystem helps tailor the design more effectively.
  • Ecosystem Mimicry: The emphasis in permaculture forest gardens is on creating a self-sustaining ecosystem. This includes practices like succession planting, promoting natural pests control, and fostering a wildlife habitat.
  • Sustainability: The aim is to create a space that’s not just productive now but remains so for future generations. This involves organic practices, shade plants considerations, and fostering a balance in the garden.

Plant Selection

The choice of plants in a forest garden is pivotal. While there’s a focus on edible plants, the overall goal is to ensure a diverse, self-sustaining ecosystem.

Native Plants:

Choosing plants native to the region ensures they’re adapted to the local climate and soil, reducing the need for inputs and care.

Polyculture Plantings:

Incorporating a mix of species encourages biodiversity, with plants fulfilling various roles, from nitrogen fixers to insect attractors.

Canopy to Understory:

Considering each layer—from the canopy, shrub layer, and down to the ground cover—ensures a holistic design. It’s a play of light and space, ensuring each plant has its niche.

Climate Considerations:

Being mindful of the local climate, rainfall patterns, and temperature fluctuations can guide plant choices, ensuring their success and longevity.

Maintaining a Forest Garden

The act of maintaining a forest garden is both an art and a science. Unlike traditional gardening methods, forest gardens necessitate a holistic approach.

Observation is Key: Regularly walking through the garden allows you to observe changes, understand patterns, and anticipate needs. Over time, you’ll recognize which plants are thriving, which need support, and where gaps might be forming.

Natural Pests Control: Instead of relying on synthetic pesticides, consider introducing beneficial insects or employing companion planting to ward off pests. For example, plants like marigolds can deter nematodes, while ladybugs are excellent for aphid control.

Sustainable Harvest: It’s essential to harvest in a manner that promotes regeneration. This might mean taking only a portion of available fruits or leaves, allowing plants to recover and continue to contribute to the ecosystem.

Water Management and Mulching: Using techniques like swales can help direct water where it’s needed. Mulching, meanwhile, can suppress weeds, retain soil moisture, and gradually break down to feed the soil.

Regular Pruning: Some plants, especially in the canopy and shrub layers, will benefit from regular pruning. This can stimulate growth, increase yield, and ensure sunlight reaches the understory.

The Role of Edible Plants

Edible plants serve as the backbone of many forest gardens. But their role extends beyond merely providing sustenance.

The Role of Edible Plants

Diverse Diet: From berries to roots, the sheer variety of edibles one can cultivate ensures a diversified diet, rich in essential nutrients and antioxidants.

Medicinal Benefits: Many edible plants also boast medicinal properties. For instance, elderberries are known for their immune-boosting attributes, while plants like yarrow can aid in wound healing.

Intercropping and Polyculture: Edible plants can be paired with beneficial companions that deter pests, fix nitrogen, or provide shade, enhancing overall garden health.

Economic Value: For those inclined, there’s potential for economic gain. Specialty crops, medicinal herbs, or heirloom vegetables can fetch a premium price in local markets.

Wildlife Attraction in Forest Gardens

Attracting wildlife is not merely about aesthetic appeal. These creatures play pivotal roles in maintaining a balanced ecosystem.

Pollinators: Plants depend on pollinators like bees, butterflies, and birds. By including a variety of flowering plants, you can ensure a constant presence of these vital creatures.

Natural Predators: Creatures like spiders, frogs, and certain bird species can keep pest populations in check, eliminating the need for chemical interventions.

Biodiversity: A garden teeming with wildlife is a sign of health and diversity. These creatures can help with seed dispersion, soil aeration, and more, ensuring the garden thrives.

Layering Techniques

Layering in a forest garden isn’t merely about aesthetics. It’s a strategic approach to maximize space, light, and resources.

Canopy Trees: These are the tallest trees, providing shade and forming the garden’s backbone. Their deep roots pull nutrients from far below, benefiting the entire system.

Shrub Layer: This includes smaller trees and shrubs that thrive in the dappled light beneath the canopy. They often provide fruits, nuts, or berries.

Herbaceous Layer: Comprising perennial herbs, these plants offer medicinal, culinary, and pollinator-attracting benefits.

Ground Cover: These low-growing plants, like clover or creeping thyme, protect the soil, prevent erosion, and can also fix nitrogen.

Vertical Climbers: Plants like beans or certain flowering vines can be trained to climb trees or structures, utilizing vertical space.

Forest Garden Soil Preparation

Good soil is the bedrock of a successful forest garden. Preparation ensures plants have the nutrients they need while promoting effective water management.

Soil Testing: Before embarking on any soil amendments, it’s crucial to know your soil’s pH, nutrient content, and structure.

Composting: Regularly adding compost improves soil structure, introduces beneficial microbes, and provides a steady nutrient supply.

Mulching: This not only conserves moisture but also suppresses weeds. Over time, organic mulches like straw or wood chips break down, further enriching the soil.

No-Till Approach: Instead of traditional tilling, consider layering compost, leaves, and other organic matter. This minimizes soil disturbance, preserving its structure and the beneficial organisms within.

Introduce Mycorrhizal Fungi: These fungi form symbiotic relationships with plant roots, aiding in nutrient absorption. They’re a cornerstone of healthy forest garden soil.

Water Management

In any garden, especially one that seeks to emulate the natural efficiency of a forest, managing water is critical. Water is the lifeblood of an ecosystem, and how it’s utilized can make or break your forest garden.

Water Management

Conservation Techniques: Capturing rainwater using barrels or creating rain gardens can both store water for drier periods and reduce the runoff, which can lead to erosion. This not only conserves precious resources but also decreases the garden’s water costs.

Swales and Contour Planting: Swales are shallow trenches that capture and slow down the movement of water across the land. When combined with contour planting, they can effectively distribute water throughout a garden, ensuring that it reaches the plants that need it most without causing erosion.

Drip Irrigation: Instead of using traditional sprinklers, consider employing a drip irrigation system. These systems deliver water directly to plant roots, reducing evaporation and ensuring that water is used as efficiently as possible.

Mulching: By covering the soil around plants with mulch, you can significantly reduce water evaporation, keeping the soil moist for longer periods. Mulches like straw or wood chips also slowly break down, improving soil health over time.

The Importance of Native Plants

Native plants are those that have evolved in a particular region over a long period. Their significance in forest garden design cannot be overstated.

Adaptation to Local Conditions: Native plants are attuned to local soil, climate, and pests. They’ve evolved strategies to thrive, which often means they require less maintenance than exotic species.

Supporting Local Wildlife: Many local wildlife species have co-evolved with native plants and rely on them for food, shelter, and breeding purposes. By incorporating native plants, you’re bolstering local ecosystems.

Disease Resistance: Native plants often show better resilience against local pests and diseases, reducing the need for chemical interventions.

Biodiversity Enhancement: By planting native species, you’re also preserving genetic diversity, which can be crucial for the adaptability and resilience of ecosystems in the face of challenges like climate change.

Companion Planting Strategies

Companion planting is the practice of placing plants together for mutual benefit. In a forest garden, this strategy can be crucial.

Pest Control: Some plants repel pests that might threaten others. For instance, marigolds are known to deter nematodes, protecting neighboring plants.

Soil Enrichment: Legumes, like peas and beans, can fix nitrogen from the air, enriching the soil and benefiting nitrogen-hungry neighbors.

Shade and Support: Taller plants can provide necessary shade for sun-sensitive plants or act as natural trellises for climbing plants.

Attracting Beneficial Insects: Certain plants can attract insects that prey on garden pests. For instance, flowers like calendula might bring in ladybugs, known aphid predators.

Sustainable Practices

Building a forest garden is about more than just plant selection; it’s about creating a system that will thrive for generations.

Composting: Instead of discarding organic waste, composting returns these nutrients to the soil, reducing the need for synthetic fertilizers.

Natural Fertility Management: Emphasize plants that naturally enhance soil fertility, and consider incorporating animals like chickens, which can help manage pests while contributing valuable manure.

Succession Planting: This practice involves planting crops in succession to ensure continuous harvest and optimal use of space and resources.

Climate Considerations: With the changing global climate, understanding and preparing for shifts in weather patterns is crucial for a garden’s long-term viability.

Pests and Disease Management

Pests and diseases can challenge even the most diligent gardener. In a forest garden, the approach to these issues emphasizes balance over extermination.

Pests and Disease Management

Biological Controls: Introduce natural predators into the garden. For instance, ladybugs can manage aphid populations, while nematodes can target various pests.

Cultural Practices: Rotating crops, ensuring proper spacing, and keeping the garden clean can prevent many disease issues before they start.

Resistant Varieties: Choosing plant varieties known for their disease or pest resistance can significantly reduce potential problems.

Healthy Soil: A vibrant soil ecosystem can suppress many diseases. Regular composting, mulching, and avoiding synthetic chemicals can foster this environment.

Seasonal Considerations

Every garden ebbs and flows with the rhythm of the seasons. It’s a dance of life that underpins the very essence of forest garden design.

  1. Spring: This season heralds the onset of growth. Saplings spring forth, and perennial plants break their dormancy. It’s crucial to ensure that soil fertility is at its peak. Companion planting can start in earnest, setting the tone for the coming months. Also, remember to account for the “last frost” date in your area before planting frost-sensitive species.
  2. Summer: As temperatures soar, effective water management becomes critical. The mulch applied in spring will conserve moisture, reduce weed growth, and maintain a steady soil temperature. It’s also a period of vigilance against pests that thrive in the warmth.
  3. Autumn: This season is about preparation. The garden begins its gradual retreat, and deciduous trees shed their leaves. It’s an ideal time for composting fallen leaves and preparing beds for winter crops. Seasonal vegetables, like pumpkins and gourds, can be harvested.
  4. Winter: While growth grinds to a near halt, it’s a season of planning. Perennial plants are in dormancy, but their roots are still active. Mulching and adding compost are recommended to protect and nourish these vital underground systems.

Tools and Software

Modern forest gardening combines traditional wisdom with the benefits of technology.

  1. Garden Planners: Software like “GrowVeg” or “Garden Planner” can help gardeners visualize their space, rotate crops, and integrate polyculture designs.
  2. Soil Test Kits: To ascertain soil health, pH, and nutrient levels, these kits provide a detailed analysis that can guide fertilization and plant selection.
  3. Weather Apps: Apps like “Weather Underground” offer gardeners insights into local climate patterns, crucial for seasonal planting decisions.
  4. Drip Irrigation Systems: Automated and efficient, these systems reduce water wastage, ensuring plants receive moisture right at their roots.

Training and Pruning Techniques

Training and pruning are vital for optimizing space, light exposure, and ensuring healthy plant growth.

Training and Pruning Techniques

  1. Espalier: This technique involves training trees to grow flat against walls or fences. It not only saves space but also maximizes sun exposure.
  2. Tip Pruning: Regularly pinching off the tips of young plants can encourage bushier growth and prevent them from becoming leggy.
  3. Thinning: By removing some of the smaller, weaker plants, gardeners can ensure that remaining plants get more nutrients and space to grow.
  4. Formative Pruning: In the early years of a tree or shrub’s life, selective branch removal shapes future growth, aiding in disease prevention and fruit production.

Building a Garden Canopy Structure

The canopy is the garden’s roof. It protects, shades, and defines the very nature of the ecosystem below.

  1. Selection of Trees: Trees like oak, maple, and beech are wonderful canopy trees in temperate regions, providing broad shade and establishing the garden’s uppermost layer.
  2. Vertical Layering: Beneath the main canopy, secondary trees and large shrubs form a sub-canopy. They fill the gaps, creating a layered effect and maximizing the garden’s vertical space.
  3. Support Structures: For climbing plants, trellises, pergolas, and arbors can be incorporated. They add an architectural element and further diversify the canopy.
  4. Density Consideration: Ensuring the canopy isn’t too dense is essential. An overly thick canopy might block sunlight from reaching the understory.

The Value of Ground Cover Plants

Ground cover plants are the unsung heroes of forest gardens.

  1. Erosion Control: Their extensive root systems bind the soil, preventing it from washing away during heavy rains.
  2. Weed Suppression: By occupying space and shading the soil, they prevent weeds from taking hold, reducing the need for constant weeding.
  3. Soil Health: Plants like clover fix nitrogen, enhancing soil fertility. Others, like comfrey, have deep roots that pull nutrients from far below the surface, benefiting shallower-rooted neighbors.
  4. Habitat Creation: Ground covers often provide essential habitats for beneficial insects, promoting a balanced garden ecosystem.
  5. Aesthetic Value: With varied textures, colors, and flowering periods, ground cover plants can add significant visual appeal to the garden.

Propagation Techniques for Forest Plants

Propagation is a cornerstone of forest gardening, enabling gardeners to multiply their plants and ensure a thriving ecosystem.

  1. Seed Collection and Sowing: Many forest plants propagate readily from seeds. Collect seeds after they mature, dry them, and store in a cool, dry place. When ready, sow them either directly or in pots. Some seeds, especially native plants, may require stratification (exposing seeds to cold) to germinate.
  2. Cuttings: Some woody plants and trees can be propagated using cuttings. This involves taking a piece of a parent plant, often a stem or a leaf, and allowing it to root. Using rooting hormones can increase the chances of success.
  3. Layering: This technique involves bending a low branch to the ground and covering a part of it with soil. Over time, this buried section develops roots. Once established, the new plant can be severed from the parent and transplanted.
  4. Division: Perennials often grow in clumps. Every few years, these can be dug up and divided into smaller portions, each with roots attached, and replanted.
  5. Grafting: Involves joining a piece of one plant (the scion) onto another (the rootstock). This technique is often used for fruit trees to combine the best traits of two varieties.

Harvesting and Yield Expectations

Harvesting is the reward for all the hard work put into a forest garden, but understanding when and how much to harvest is key.

  1. Observation: Keep a keen eye on fruit and nut trees. Harvest when the fruit is mature but before it’s fully ripe. This ensures maximum flavor and reduces the chance of pest infestations.
  2. Regular Harvesting: Some crops, like leafy greens, benefit from regular harvesting. This can promote further growth and yield.
  3. Yield Mapping: Maintain a journal of harvest yields. Over time, this provides invaluable data on which plants are most productive and how yields vary year-to-year.
  4. Sustainable Harvesting: It’s tempting to harvest as much as possible, but restraint is essential. Always leave seeds, fruits, or plants to ensure future harvests and maintain the ecosystem’s balance.
  5. Post-Harvest Care: After harvesting, plants might require extra care. This includes watering, fertilizing, or even pruning to prepare for the next growth cycle.

Forest Garden Pathway Designs

A well-designed pathway is more than just a way to navigate through the garden; it’s a journey through an ecosystem.

  1. Material Choices: Depending on the garden’s theme and the local climate, pathways can be made from gravel, wood chips, stone, or even grass. Each material has its own aesthetic and functional advantages.
  2. Width and Accessibility: Pathways should be wide enough to comfortably walk, push a wheelbarrow, or accommodate those with mobility challenges.
  3. Curves and Contours: Instead of straight lines, consider winding pathways. They can create intrigue, offer changing vistas, and encourage a slower, more contemplative pace.
  4. Integration with Plants: Allow ground cover to creep onto the path’s edges, or use taller plants to create natural archways. This can blur the lines between the path and the garden, offering a more immersive experience.

Balancing Aesthetics with Functionality

A forest garden, while a productive space, is also a place of beauty and relaxation.

  1. Plant Placement: While plants are chosen for their ecological role, their colors, textures, and forms can create visual harmony. Place contrasting plants next to each other for maximum visual impact.
  2. Functional Beauty: Elements like composting areas or water collection systems can be designed to be both functional and visually pleasing. For instance, a rain barrel can be painted or decorated, or a composting area can be surrounded by flowering plants.
  3. Artistic Touches: Introduce art into the garden. Whether it’s a sculpture, a painted fence, or wind chimes, these elements can elevate the garden’s aesthetic appeal.
  4. Dynamic Design: A forest garden is ever-evolving. Embrace change and be willing to adapt. As plants grow, or as new plants are introduced, the garden’s design may need tweaking. This dynamic process ensures that the garden remains both beautiful and productive.

Incorporating Water Features

Water features are not just aesthetic additions; they play a vital role in forest garden ecosystems by providing hydration, habitats, and microclimates.

  1. Types of Water Features: From ponds and streams to waterfalls and fountains, the choices are diverse. Each has its own set of benefits and challenges. Ponds, for instance, can be a habitat for aquatic life, while fountains aerate the water, benefiting certain plants.
  2. Location: Choose a site that naturally collects water or can be easily supplied. Remember, water features in sunnier spots encourage algal growth, so some shade is beneficial. Additionally, placing water features uphill can use gravity to create natural streams or waterfalls.
  3. Ecological Balance: Water features can become habitats for beneficial organisms. Introduce fish that control mosquito larvae or plants that filter and clean the water.
  4. Safety: If the water feature is deep or has strong currents, consider safety precautions, especially if children frequent the garden.
  5. Maintenance: All water features require some upkeep, from cleaning pumps to removing debris. However, a well-balanced water ecosystem will reduce maintenance needs.

Integrating Wildlife Habitats

A forest garden teems with life, and designing it to be a haven for various wildlife magnifies its ecological impact.

  1. Bird-friendly Designs: Birds are great pest controllers. Introduce birdhouses, feeders, and native plants that produce berries or seeds.
  2. Pollinator Patches: Bees, butterflies, and other pollinators are vital. Plant flowers with different bloom periods, ensuring there’s always something in flower.
  3. Mammal Hideouts: Hedgehogs, bats, or even rabbits can be beneficial. Consider log piles, hedgerows, and other shelters.
  4. Pond Life: If you have a water feature, introduce native aquatic plants and animals. They’ll help balance the ecosystem and attract other wildlife.
  5. Avoid Chemicals: The use of pesticides or herbicides can harm the wildlife you’re trying to attract. Instead, opt for organic practices and let nature find its balance.

Shade Tolerance in Forest Plantings

Understanding shade tolerance is crucial since a forest garden has varying light levels due to its multilayered structure.

  1. Types of Shade: Not all shades are the same. There’s dappled shade under loose canopies, deep shade under dense ones, and seasonal shade depending on the plant’s growth phase.
  2. Choosing Plants: Some plants thrive in full sun, while others prefer the cool of the shade. Research and choose plants based on their light requirements, ensuring they’re placed in optimal conditions.
  3. Benefits of Shade: Shade can be beneficial. It keeps the soil moist, reduces the need for frequent watering, and can protect sensitive plants from harsh sunlight.
  4. Managing Shade: As trees and shrubs grow, they can cast more shade than desired. Prune strategically to ensure that all plants receive their required light levels.
  5. Maximizing Productivity: Even in shaded areas, you can achieve high yields. Opt for shade-loving edible plants or those that require protection from the intense midday sun.

Transitioning Traditional Gardens to Forest Gardens

Switching from a conventional garden to a forest garden requires understanding, patience, and time.

  1. Assessment: Start by assessing your current garden. Understand its soil type, sunlight distribution, existing plants, and wildlife.
  2. Layering: One of the hallmarks of a forest garden is its layers, from canopy trees to ground covers. Gradually introduce these layers, ensuring that each layer’s plants coexist harmoniously.
  3. Soil Preparation: Enhance your soil’s fertility by introducing organic matter and compost. As you introduce more plants, their organic matter, like fallen leaves, will further enrich the soil.
  4. Water Management: Traditional gardens might have different water requirements compared to forest gardens. Adapt your watering routines, and consider integrating water features or rainwater harvesting systems.
  5. Continuous Learning: Transitioning isn’t just about changing the physical aspects of the garden; it’s also about adopting a new mindset. Dive into permaculture principles, learn from other forest gardeners, and be ready to adapt based on what your garden tells you.

Conclusion

Forest garden design is not just about cultivating a green space; it’s about creating a thriving, self-sustaining ecosystem that benefits both nature and the gardener. By skillfully incorporating water features, we not only add a serene beauty but also ensure the health and balance of our garden’s ecosystem. Integrating wildlife habitats enhances biodiversity, making the garden a sanctuary for various species and promoting natural pest control. Understanding shade tolerance is vital, as it ensures every plant, from sun-loving to shade-reliant, thrives in its chosen spot. Transitioning from traditional gardens to forest gardens may seem daunting, but with careful planning, patience, and a deep understanding of nature’s intricate web, the transformation can be both rewarding and environmentally impactful. As we venture into this holistic approach, let’s remember that forest gardening is a continuous journey of learning, adapting, and co-existing harmoniously with nature.


14 Circular Garden Design And Layout Ideas And Tips

Gardening is not just about planting; it’s also about designing. It’s about transforming an outdoor space into a vibrant, colorful, and relaxing haven. One of the most effective ways to create a dynamic and visually interesting space is by employing a circular garden design. Circular gardens provide a unique aesthetic appeal through their rounded form, offering a sense of balance and symmetry. This article will delve into various ways to maximize the potential of circular gardens, from principles of planning, to flower bed ideas, symmetry, plant selection, and much more.

We will also examine how circular gardens can be leveraged for space maximization, particularly in urban environments or small spaces, through creative layout ideas and elevated planting. Further, we’ll touch upon how you can enhance your circular garden through the inclusion of various elements such as water features, pathways, lighting, stone arrangements, and focal points.

Finally, the article will explore how circular garden design can add value to your property and incorporate organic practices, which are becoming increasingly essential in today’s environmentally conscious society. Now, let’s get started.

Principles of Circular Garden Planning

Designing a circular garden requires a good understanding of some basic principles. A circular design can provide a visually pleasing aesthetic, allowing for natural paths and flowing borders that create a sense of continuity. The following principles should guide your planning:

  • Symmetry: Circular gardens often draw on the principle of symmetry. This balance in design can be achieved by placing similar or identical plants on opposite sides of the circle. This can also extend to other features such as pathways, water features, or stone arrangements.
  • Focal Point: Every circular garden should have a focal point, something that immediately grabs attention. This could be a unique plant, a water feature, or even a statue. The focal point often serves as the center of the circular design, around which other elements are arranged.
  • Space Maximization: For smaller spaces, a circular garden can help maximize the use of available space. By using raised beds or tiered plantings, you can create depth and variety in a small area.

Maximizing Space In A Circular Garden

Creating a garden that maximizes available space is not just about fitting in as many plants as possible; it’s about understanding how to utilize space effectively to foster a sense of openness, continuity, and balance. Circular gardens, due to their unique design, can be ideal for this purpose, especially in small or urban spaces.

Maximizing Space In A Circular Garden

The first strategy involves layering. This utilizes the concept of planting shorter plants at the front of your garden and taller plants at the back. In a circular garden, this can be achieved by planting the tallest plants in the center and gradually reducing the height of the plants as you move outward. Layering adds depth to your garden, enabling you to grow a greater variety of plants in the same space.

Vertical gardening is another effective way to maximize space. Incorporating climbing plants or installing vertical planters can add height and depth to the garden, making it appear larger and more dynamic. This can be particularly beneficial for small circular gardens, where ground space is limited.

Elevated planting can also be a valuable technique. Raised beds or planters allow you to grow more plants in the same area, and the added height can bring an extra dimension to your garden. Arranging these beds or planters in a circular pattern around the garden’s focal point can enhance the visual impact of the design.

Furthermore, the use of hanging baskets or containers suspended from structures like pergolas or trellises can provide additional planting space while contributing to the overall aesthetic of the garden. For a circular garden, these hanging elements can be arranged in a radial pattern to accentuate the circular theme.

Lastly, the incorporation of multipurpose garden features can further maximize the use of space. For instance, a seating area or gazebo in the center of a circular garden can serve as a relaxing focal point, while planters integrated into the seating or surrounding it can provide additional planting opportunities.

Circular Garden Flower Bed Ideas

Flower beds in circular gardens offer endless opportunities for creativity. By playing around with different shapes, sizes, and arrangements, you can transform your circular garden into a stunning, vibrant sanctuary.

Circular Garden Flower Bed

A large, central flower bed is a common feature in circular gardens. This can be filled with a single, eye-catching variety or a mix of complementary plants. If you opt for multiple plant varieties, consider using the color wheel to guide your choices. Complementary colors, which are opposite each other on the color wheel, can create striking contrasts, while analogous colors, which are adjacent on the wheel, can create harmonious blends.

Another idea is to create several smaller flower beds radiating from the center of the garden, similar to the petals of a flower. This design can give your garden a unique, dynamic feel. You could plant each “petal” with different flowers to create a colorful burst, or use the same flowers for a more uniform look.

If you’re looking to create a sense of depth in a small garden, tiered flower beds can be an excellent option. Starting with the tallest plants in the middle, you can create concentric rings of progressively shorter plants. This can give the illusion of a larger garden while providing plenty of planting space.

Flower beds can also be incorporated into other elements of the garden. For example, a flower bed bordering a pathway can guide visitors’ eyes and feet, while flower beds around a central water feature can enhance its visual appeal.

Creating Symmetry

Symmetry is an essential aspect of circular garden design, bringing balance and harmony to the garden. It creates a sense of order and calm, guiding the eye across the garden and creating a pleasing visual effect.

One of the simplest ways to achieve symmetry is through plant pairings. This involves placing matching plants or groups of plants on opposite sides of the garden. The pairing could be two identical rose bushes, two clusters of daffodils, or even two small trees. By mirroring the plants on either side of the garden, you create a balanced, cohesive look.

Water features and garden ornaments can also be used to enhance symmetry. A central water feature, like a fountain or pond, automatically creates symmetry, with the garden space evenly distributed on all sides. Similarly, placing identical garden ornaments or sculptures on opposite sides of the garden can reinforce the sense of balance.

Pathways, too, can contribute to a symmetrical design. A circular pathway that encircles the garden is inherently symmetrical. But even within this, you can create symmetry through the placement of stepping stones, the bordering of the path with identical plants, or the positioning of benches or other resting spots at symmetrical points along the path.

However, while symmetry is key, it’s also important not to be overly rigid. A certain level of variation or asymmetry can add interest and character to a garden. The goal is to find a balance that feels harmonious and visually pleasing.

Selecting Plants For Circular Garden Layouts

Selecting the right plants is crucial for any garden, but especially so for a circular garden, where the layout and the overall visual effect depend heavily on the choice of plants.

Selecting Plants For Garden

Firstly, consider the mature size of the plants. Since a circular garden layout often involves a central point with plants arranged around it, you want to ensure that your plants will fit comfortably within your space when they’re fully grown. Research the typical height and spread of your chosen plants to ensure they won’t overcrowd each other or the garden space.

Secondly, consider the shape and growth habit of the plants. Plants that naturally grow in a round or mound-like shape can be an excellent fit for a circular garden. Similarly, plants that have a spreading growth habit can be used effectively at the edges of the garden to soften the boundaries and create a flowing, organic look.

The color of the plants, both flowers, and foliage, is another important factor. A monochromatic color scheme can create a modern, minimalist look, while a multi-colored scheme can create a vibrant, lively feel. Consider also the bloom times of the plants to ensure color throughout the seasons.

Lastly, think about the maintenance needs of the plants. If you want a low-maintenance garden, opt for plants that are well-suited to the local climate and soil conditions, and that don’t require frequent watering or pruning. Consider also the wildlife in your area and choose plants that can coexist well with local birds, bees, and other creatures.

Incorporating Water Features Into Circular Gardens

Water features can bring an element of tranquility and beauty to any garden, and circular gardens are no exception. When designed correctly, a water feature can serve as a stunning focal point, drawing the eye and lending a sense of calm to the garden.

central water fountain for garden

A popular choice for circular gardens is a central water feature, such as a fountain or pond. Placed in the center of the garden, this type of water feature is automatically symmetrical and helps define the circular layout of the garden. It also provides an attractive focal point that can be enjoyed from all angles of the garden.

You could also incorporate smaller water features, such as birdbaths or mini waterfalls, at various points around the garden. These could be placed symmetrically to maintain balance, or asymmetrically to create points of interest.

Water plants can add to the appeal of your water feature. Plants like water lilies, reeds, or rushes can provide color and texture, and can also attract a variety of wildlife, from frogs to birds.

Lastly, consider the sound of the water feature. The gentle sound of trickling water can contribute greatly to the sense of tranquility in a garden. By choosing a water feature with a pleasing sound, such as a babbling brook or a gentle waterfall, you can enhance the sensory experience of your garden.

Designing Pathways For Circular Garden Spaces

In a circular garden design, pathways play a critical role in both aesthetic and practical aspects. They guide visitors through your garden, connecting different areas, and enhancing the overall garden experience. Creating a pathway that complements the circular layout can be an enjoyable design challenge.

One approach is to create a central pathway that circles around the garden. This radial design is not only visually pleasing, but it also allows visitors to explore the entirety of the garden without missing any sections. The path material can vary from natural stone, gravel, wood, to even grass, depending on your style preference and the desired level of maintenance.

Multiple intersecting paths that converge on the central point of the garden can create a dynamic sense of movement. These paths can be made from the same material for a unified look or from different materials to differentiate between main and secondary routes. The intersecting pathways also provide an opportunity to create additional planting spaces in between, breaking the circular area into manageable, unique segments.

Pathways can also be created to weave through key areas or around focal points in your circular garden, such as flower beds or water features. This meandering style can lend an organic, free-flowing feel to your garden, inviting visitors to meander and discover. For a more visually impactful design, you could edge your pathways with contrasting plant varieties or colorful stones.

Finally, remember to consider accessibility and functionality when designing your pathways. They should be wide enough for comfortable walking, and the surface should be suitable for all weather conditions. Lighting can also be added along the pathways to provide safety and visual interest during nighttime.

Creating Focal Points In A Circular Garden Design

Focal points are critical in any garden design, providing a visual draw and helping to structure the layout. In a circular garden, where the eye is naturally drawn to the center, creating a compelling focal point can be especially impactful.

The choice of focal point largely depends on your personal preference and the overall style of your garden. Traditional options include a statue, a striking plant, a tree, or a water feature. The placement in the center of the garden ensures that it can be viewed and admired from all angles.

A more contemporary approach might involve creating a central seating area, such as a patio or a gazebo. This not only provides a place to relax and enjoy the garden but also becomes an attractive focal point in itself. The seating area can be surrounded by plantings to enhance its visual appeal.

The use of color is another powerful way to create a focal point. A splash of bright, contrasting color in a circular garden can draw the eye and make a powerful statement. This can be achieved with flowering plants, colored foliage, or even brightly colored garden furniture or accessories.

Remember, the goal of a focal point is not only to attract attention but also to integrate with the rest of the garden in a harmonious way. Therefore, when designing your focal point, consider how it will fit with the surrounding plants, pathways, and other elements of your garden.

Elevated Planting In Circular Gardens

Elevated planting is a clever technique that can add an extra dimension to a circular garden, enhancing its aesthetic appeal and maximizing the available planting space. By using raised beds, planters, or containers, you can create different levels of planting, drawing the eye upwards and creating a more engaging visual landscape.

Elevated Planting In Circular Gardens

Raised beds can be particularly effective in circular gardens. Arranged in concentric circles or segments around the garden’s central point, they can reinforce the circular design and create a visually pleasing tiered effect. Raised beds also offer practical benefits, including improved drainage, easier maintenance, and better pest control.

Vertical planters can add height to your circular garden and make it appear larger. They can be freestanding, or they can be attached to walls or fences. Using a variety of plants with different growth habits in your vertical planters can create a visually striking display.

Hanging baskets or pots can also be used to create elevated planting. They can be hung from pergolas, arches, or other structures, and can add a charming, whimsical touch to your garden. These hanging elements can be arranged in a radial pattern to accentuate the circular theme.

Regardless of the method, elevated planting in a circular garden can add depth and interest, making your garden feel larger and more diverse. However, it’s important to ensure that the plants chosen for elevated planting are suitable for their environment, considering factors such as light exposure and watering requirements.

Circular Garden Ideas For Small Spaces

Designing a circular garden in a small space can be challenging, but with a bit of creativity, even the tiniest of gardens can be transformed into a beautiful, inviting space. Here are some ideas for maximizing your small circular garden.

First, consider creating a series of smaller circular beds within your garden. This not only maximizes the planting area but also breaks up the space, making it feel larger. The beds can be filled with a variety of plants, from vibrant flowers to lush foliage, to create a diverse and visually engaging display.

Vertical gardening is another effective way to maximize space in a small circular garden. Using walls, fences, or custom-built structures, you can grow plants upwards, saving ground space for other elements. This can also add height and depth to your garden, making it appear larger.

Incorporating multipurpose features can also save space. For example, a bench with built-in planters can provide a place to sit as well as a place to grow plants. Similarly, a central water feature with a flat top can serve as a table or display area when not in use.

Lastly, don’t forget about the power of illusion. Light colors can make a space feel larger, so consider using light-colored plants, stones, or garden furniture. Mirrors can also be used to reflect light and create the illusion of more space.

Lighting Considerations

Proper lighting can significantly enhance the beauty and usability of a circular garden, transforming it into a magical space during the nighttime. Lighting can highlight focal points, illuminate pathways, and create a welcoming ambiance for outdoor gatherings.

Start by identifying key features of your garden you’d like to highlight. These could include a central water feature, specific plant specimens, or interesting architectural elements. Use spotlights or uplighting to bring these features to life at night. Be mindful of the light’s direction and intensity to avoid creating harsh shadows or overwhelming the natural beauty of the feature.

Pathways should be illuminated for safety and navigational purposes. Low-level lighting, such as bollards or recessed ground lights, are perfect for this task. They cast a gentle, downward glow on the path, guiding visitors without being glaringly bright. Solar-powered lights could be an excellent, energy-efficient option for this purpose.

Ambient lighting can create a magical atmosphere in a circular garden. String lights, lanterns, or softly glowing orbs can create a warm, inviting ambiance, perfect for evening relaxation or social gatherings. These lights can be hung from trees, structures, or even installed within plants.

Don’t forget to consider the color temperature of your lights. Warm white light is generally best for creating a welcoming, cozy atmosphere, while cool white light can bring out the vibrancy of your garden’s colors.

Lastly, consider investing in smart lighting solutions that allow you to control the intensity, color, and even the direction of your garden lighting. With these, you can easily adjust your garden lighting to suit different moods or occasions.

Unique Stone Arrangements

Stone arrangements can add texture, color, and interest to a circular garden, providing a counterpoint to the softness of plants. They can be used in a variety of ways, from creating pathways and defining garden borders to building water features or providing decorative accents.

Unique Stone Garden

One intriguing idea is to create a stone spiral in the center of your circular garden. This could be a simple spiral of pebbles or a more elaborate construction using a variety of stone types. A stone spiral can serve as a focal point, drawing the eye and inviting visitors to explore.

You could also create stone ‘rivers’ that meander through your garden, simulating the natural flow of water. These ‘rivers’ could wind their way around flower beds, trees, or other features, adding dynamic movement to your garden.

Stone circles can enhance the circular theme of your garden. These could be large, standing stones arranged in a circle around the garden’s perimeter or smaller, flat stones laid out in circular patterns within your garden. These stone circles can add a touch of mystery and ancient allure to your garden.

Lastly, consider using stones to create raised beds or terraces. Not only do these structures add dimension to your garden, but they also provide excellent drainage and create unique microclimates for your plants.

When selecting stones, consider their color, size, and texture. Aim for a balance that complements your plants and other garden features. And remember, the beauty of stone lies in its natural irregularities, so don’t be afraid to embrace stones with unique shapes and patterns.

Circular Herb Garden Layout Ideas

A circular herb garden can be both aesthetically pleasing and practical. The design makes excellent use of space, allows for easy access, and can display a wide variety of herbs in an organized manner.

Circular Herb Garden

Consider creating a traditional ‘wheel’ herb garden, with different ‘spokes’ or sections for different types of herbs. The center of the wheel can be reserved for taller herbs or a focal point like a birdbath or statue. Alternatively, a spiral herb garden, which creates a continuous winding path, can be a visually striking and space-efficient design.

Raised beds or planters can also be used to organize your herbs and add visual interest. These could be arranged in concentric circles or radial segments, with different herbs in each section.

For a more naturalistic look, consider creating an herb meadow in your circular garden. Instead of rigidly defining planting areas, allow herbs to intermingle and self-seed. This can create a beautiful, dynamic display of colors and textures.

Remember, when planning your herb garden, consider each herb’s requirements in terms of sunlight, water, and soil type. Also, consider their growth habits and mature size to ensure that each herb has adequate space to grow without overcrowding its neighbors.

Using Circular Gardens To Enhance Property Value

A well-designed and maintained garden can significantly enhance the value of a property, and circular gardens are no exception. They offer unique visual appeal, make efficient use of space, and can be a strong selling point for potential buyers.

Firstly, circular gardens can make a strong visual impact, creating a lasting first impression for visitors or potential buyers. The unique shape and design of a circular garden can make a property stand out from others on the market, which can be a significant advantage in competitive real estate markets.

Secondly, circular gardens can make excellent use of space, especially in smaller or awkwardly shaped yards. By maximizing the use of available space and creating a diverse, visually engaging garden, homeowners can demonstrate the property’s potential to prospective buyers.

Lastly, the design elements of a circular garden, such as water features, stone arrangements, or elevated plantings, can add perceived value to the property. These features not only enhance the garden’s aesthetics but also demonstrate a level of care and investment in the property.

It’s worth noting, however, that while a beautiful garden can certainly enhance property value, it’s also important to keep maintenance requirements in mind. A garden that requires extensive maintenance could potentially deter some buyers, so it’s a good idea to strike a balance between aesthetics and practicality.

Conclusion

Circular garden designs are a captivating blend of aesthetics and functionality, marrying the essence of nature with human creativity. They maximize space, ensure easy navigation, and allow for diverse plantings, all while providing visual harmony and a sense of tranquility. From the planning principles to the selection of plants, pathways, and stone arrangements, every element plays a significant role in making your garden a living piece of art.

Whether you are using these gardens to enhance the property value or to create a personal sanctuary, every element should be meticulously planned and executed. Consider the varying sizes and types of plants, the patterns of the paths, the symmetry of the design, and the crucial element of lighting. Each of these factors contributes to creating a distinctive and inviting space, which invites exploration and promises serenity.

Remember, a circular garden design does not mean it has to be large scale. Even in smaller spaces, circular gardens can be designed creatively using raised beds or even spiral herb gardens. The unique stone arrangements, integrated water features, and strategically placed focal points make every visit to the garden an experience in itself.

This comprehensive guide to circular garden design provides an overview of various aspects and components that go into creating a beautiful, functional, and inspiring circular garden. Implement these ideas and tips in your design, ensuring it resonates with your personal style and fits the environmental conditions of your region. Your circular garden will undoubtedly become the jewel of your property, enhancing not just the visual appeal but also your lifestyle and wellbeing.

By giving thoughtful consideration to each element of your garden – from initial planning to maintenance – you can create a circular garden that serves as a personal oasis, a captivating showpiece, and a valuable enhancement to your property. Through its seasonally changing colors, textures, and aromas, your garden will continue to enchant, inspire, and evolve, mirroring the ever-changing yet eternal beauty of nature herself.

15 Greenhouse Layout Ideas To Maximise Your Yield

Greenhouses have become essential tools in the realm of sustainable gardening and commercial crop production. They offer an exclusive environment where plants can thrive throughout the year, regardless of the season. However, a greenhouse’s effectiveness is significantly dependent on its layout and design. This article discusses various greenhouse layout ideas, focusing on maximizing crop yield and optimizing space usage. From small-scale urban designs to commercial applications, we will delve into features such as plant arrangement, temperature control, hydroponics, and lighting considerations. Whether you’re a beginner seeking to encourage plant growth in your backyard or an experienced gardener looking for organic strategies and customization, this guide has something for you.

Optimal Greenhouse Design Techniques

When designing a greenhouse, the end goal is to create an environment that can support plants to reach their full potential. Therefore, it is important to ensure that the overall structure is in sync with the geographical conditions and the types of crops to be grown.

  1. Location: A fundamental aspect of greenhouse design is the location. It’s essential to choose a site that allows for maximum sunlight exposure throughout the year, primarily during the winter months. For locations in the Northern Hemisphere, a south-facing orientation is often the best choice to capture the most light.
  2. Size and Shape: The size of the greenhouse should correlate with the intended use. For personal use, a smaller structure might suffice, whereas commercial operations might require a larger structure. The shape of the greenhouse, whether it is a hoop, dome, A-frame, or Quonset, can impact how light and air circulate within the structure.
  3. Materials: The selection of materials can greatly influence the greenhouse’s performance. Glass and polycarbonate panels allow for optimal light transmission, while polyethylene is an affordable, albeit less durable, alternative. Frame materials could range from wood, which is aesthetically pleasing and offers good insulation, to steel, which is sturdy and long-lasting.
  4. Foundation and Flooring: A solid foundation is crucial to the longevity of the structure. Options range from concrete, which is durable and offers a flat surface, to natural soil, which can provide good drainage. Flooring should be chosen considering drainage, insulation, and ease of cleaning.

Designing Effective Greenhouse Interiors

Effective interior design is crucial in creating a plant-friendly environment and is where customization and organic strategies come into play.

Designing Effective Greenhouse Interiors

  1. Temperature Control: Investing in a high-quality heating and cooling system can help maintain the optimal temperature range for your plants. Insulated curtains or thermal screens can be used to conserve heat during the night or cool periods. Cooling can be facilitated by ventilators, evaporative coolers, or shade cloths.
  2. Humidity and Ventilation: An optimal humidity level is essential for plant growth. Overly humid conditions can promote disease, while low humidity can stress plants. A well-designed ventilation system can help maintain appropriate humidity and ensure the exchange of air, removing excess heat and maintaining carbon dioxide levels for photosynthesis.
  3. Lighting: Supplemental lighting can be beneficial, especially for winter production or propagation. High-intensity discharge lamps (HID), fluorescent lights, and the increasingly popular LED lights can provide supplemental light in different spectra to promote plant growth and development.
  4. Workspace and Storage: The interior layout should also accommodate space for potting, preparing seeds, and storing tools and supplies. This makes the greenhouse more functional and efficient.

Plant Layout for Maximum Yield

Strategically arranging your plants can maximize yield, improve growth, and prevent disease spread. Here are some strategies:

  1. Plant Spacing: Plants should be spaced adequately to allow for air circulation and light penetration. Crowding can lead to competition for resources and disease spread. Use a uniform grid pattern for maximum efficiency.
  2. Vertical Gardening: Utilizing vertical space can significantly increase your greenhouse’s production. Use trellises, hanging baskets, or vertical planting towers to grow vining crops or small fruits.
  3. Zoning: Group plants with similar growth requirements together. This makes it easier to manage watering, temperature, and light requirements.
  4. Succession Planting and Crop Rotation: Succession planting allows for continuous harvest by planting new crops as soon as the previous ones are harvested. Crop rotation, on the other hand, can prevent the buildup of pests and diseases and improve soil health.

How to Plan a Greenhouse

Planning a greenhouse requires careful consideration of several factors:

How to Plan a Greenhouse

  1. Define Your Purpose: Whether you’re growing exotic plants, vegetables for personal use, or plants for commercial sale, your purpose will significantly impact your greenhouse plan.
  2. Consider the Climate: The local climate will affect your choice of structure, glazing material, and heating systems. For colder climates, a robust heating system and insulated glazing are crucial.
  3. Budget: Greenhouses can range from inexpensive hoop houses to high-end glass structures. Define your budget early in the planning stage and select options that give you the most value.
  4. Size and Layout: Your greenhouse’s size will depend on what you plan to grow, the available land, and your budget. The layout should be efficient and allow for easy movement, storage, and plant care.
  5. Building Codes and Regulations: Check local regulations and obtain necessary permits before construction to avoid legal issues.

Arranging Plants in a Greenhouse

Arranging plants in a greenhouse is not as simple as filling up all the available space. It requires careful planning to ensure optimal plant growth:

  1. Light Requirements: Arrange plants according to their light requirements. Tall or vine plants should be placed where they won’t block the light for smaller, less towering plants.
  2. Temperature and Humidity Preferences: Some plants prefer a warm, humid environment, while others need cooler, drier conditions. Group plants with similar preferences together for easier climate control.
  3. Growth Habits: Fast-growing plants can quickly overshadow slower-growing ones, so ensure each plant has enough space to grow without hindrance.
  4. Disease Control: Spacing plants adequately and regularly monitoring for signs of disease can prevent disease spread.
  5. Accessibility: Frequently tended plants should be easy to access, while those requiring less care can be placed further away.

Greenhouse Setup Guide for Beginners

Creating a greenhouse from scratch can be daunting, especially for beginners. Here’s a step-by-step guide to set you on the right path:

Greenhouse Setup Guide

  1. Understanding Your Needs: The first step involves understanding what you want from your greenhouse. Are you a hobby gardener looking to extend your growing season? Or are you considering a commercial venture? Your purpose will guide your subsequent decisions from the choice of structure to the types of plants you’ll grow.
  2. Selecting the Location: The location of your greenhouse is vital. As a rule of thumb, the best spot for a greenhouse is a south or southeast side of a building or shade trees. Morning sun is most beneficial because it allows the plant’s food production process to begin early, hence, higher growth efficiency.
  3. Choosing a Greenhouse Structure: There are several types of greenhouses: freestanding, attached, hoop houses, and even underground greenhouses. Your choice will depend on your budget, available space, and specific needs.
  4. Installing the Greenhouse: After you’ve chosen your greenhouse type, the next step is installation. While some greenhouses are DIY-friendly, others might require professional help. Either way, ensure that the installation process follows the manufacturer’s guidelines.
  5. Setting Up the Interior: The interior setup involves installing heating and cooling systems, ventilation, workbenches, and other essential features. It’s recommended to have a detailed floor plan to guide the setup process.
  6. Plant Selection and Arrangement: Finally, it’s time to introduce plants to your greenhouse. Consider the light, temperature, and humidity requirements of each plant species during the arrangement process.

Best Greenhouse Layout for Every Season

The ideal greenhouse layout may vary with the changing seasons. Here’s how to plan for each season:

  1. Spring: In spring, seedlings and young plants are a common sight in greenhouses. They need plenty of light, so layout your greenhouse to maximize exposure. Installing grow lights can ensure that your seedlings get an early start even if spring days are short.
  2. Summer: During summer, the main challenge is overheating. Your layout should facilitate efficient ventilation to help regulate temperatures. Arrange heat-tolerant plants like tomatoes and peppers near the top of the greenhouse where it’s warmer.
  3. Fall: As light levels start to drop in the fall, your layout should maximize light exposure. You can do this by reducing clutter, using reflective materials on walls and floors, and setting up supplemental lighting.
  4. Winter: The primary concern in winter is maintaining heat. Your layout should allow for effective use of thermal mass materials like water barrels or stone that can absorb heat during the day and release it at night.

Greenhouse Design for Optimal Sunlight

Designing a greenhouse for optimal sunlight involves several factors:

  1. Orientation: In the northern hemisphere, a greenhouse should be oriented east-west to capture maximum sunlight. This is especially important in winter when the sun is low in the sky.
  2. Glazing Material: The material used for the greenhouse’s walls and roof can impact light transmission. Glass and polycarbonate are excellent choices due to their high light transmission rates.
  3. Roof Pitch: A steeper roof pitch can capture more light during the winter months when the sun is low. However, a steep roof may require more heating due to the increased volume of air inside the greenhouse.
  4. Interior Colors: Light colors on the interior can reflect sunlight and help to distribute it evenly to all plants.
  5. Shading: During hot summer months, shading can help prevent overheating and protect plants from excessive light that can cause scorching.

Maximizing Greenhouse Space Usage

Maximizing space usage in your greenhouse can lead to higher yields and efficiency:

  1. Vertical Gardening: One of the best ways to maximize space usage is by utilizing vertical space. Use trellises, vertical planters, and hanging baskets to grow vertically.
  2. Use Multi-Tier Shelving Systems: Multi-tier shelving systems can hold several plant trays, effectively increasing your growing area.
  3. Train Plants to Grow in Certain Directions: You can train certain plants to grow in specific directions using trellises and supports. This can help you maximize both vertical and horizontal space.
  4. Incorporate Companion Planting: Planting certain plants together can increase productivity, as some plants can benefit others by attracting beneficial insects, repelling pests, or improving soil nutrition.

How to Organize a Greenhouse

Proper organization of a greenhouse can improve work efficiency, optimize space, and help maintain a healthier environment for plants:

  1. Establish a Flow: Your greenhouse should be organized in a way that allows for a smooth workflow. Place potting benches near the entrance, store tools and supplies within easy reach, and arrange plants in an orderly manner for ease of maintenance.
  2. Group Similar Plants Together: Grouping plants with similar needs together can make care routines more efficient. For example, all the moisture-loving plants can be located in one section of the greenhouse.
  3. Leave Room for Working: Ensure you have enough space to move around easily. There should be ample room for you to perform tasks like repotting, pruning, and harvesting.
  4. Regular Cleaning and Decluttering: Regularly clean your greenhouse to keep it organized and disease-free. Remove any dead or diseased plants promptly, keep tools and supplies tidy, and periodically declutter to keep your space functional and efficient.

Greenhouse Planning for Energy Efficiency

Designing an energy-efficient greenhouse is a complex, but a rewarding process. There are various strategies to ensure energy efficiency:

  1. Solar Design: The design and orientation of your greenhouse can greatly affect its energy efficiency. Orient the greenhouse to maximize sun exposure, with longer sides facing south to catch the low winter sun.
  2. Insulation: Proper insulation is crucial for energy efficiency. Use double-layered panels, add thermal screens, or consider using insulative materials like polycarbonate sheets. An insulative curtain can be used during the night to reduce heat loss.
  3. Thermal Mass: Use of thermal mass objects like water containers or bricks can store heat during the day and release it at night, moderating temperature swings.
  4. Efficient Heating Systems: Choose energy-efficient heating systems. Radiant heating systems, for example, heat objects directly and are more efficient than traditional forced-air systems.
  5. Using Energy-efficient Lighting: Choose energy-efficient lighting options like LED lights, which consume less electricity and produce less heat.

Small-scale Greenhouse Layout Ideas

Designing a small-scale greenhouse efficiently can help you get the most out of your limited space:

  1. Vertical Gardening: Utilize vertical space to increase growing area. Use hanging baskets, vertical planters, and trellises.
  2. Compact Furniture: Opt for compact, multi-functional furniture. A worktable with built-in storage, for example, can save space.
  3. Use of Shelves: Install shelves to utilize vertical space. Ensure they are adjustable to cater to plants of different heights.
  4. Maximize Light: Use reflective materials on walls, floors, and even ceilings to enhance light distribution, ensuring all plants get their share of light.
  5. Compact Varieties: Choose plant varieties that are bred for their compact growth habit. These varieties can give good yields without taking up much space.

Greenhouse Irrigation System

An effective greenhouse irrigation system is crucial for plant health and can help save water:

Greenhouse Irrigation System

  1. Drip Irrigation: This is one of the most efficient watering systems. It delivers water directly to the root zone, reducing evaporation.
  2. Misting Systems: Misting systems are ideal for greenhouses that house plants needing high humidity. They provide a fine spray of water that can also help cool the greenhouse.
  3. Capillary Mats: These are ideal for small greenhouses. They deliver water from underneath, ensuring that the plants draw up just what they need.
  4. Automated Systems: Automated systems are great for reducing labor and ensuring regular watering. They can be timed or even connected to moisture sensors to deliver water when needed.
  5. Rainwater Harvesting: Collecting and using rainwater is an environmentally friendly irrigation option. It also provides plants with a natural and nutrient-rich water source.

Greenhouse Ventilation

Ventilation is crucial in maintaining the right temperature and humidity levels in a greenhouse:

  1. Natural Ventilation: This involves using vents, doors, and even roll-up sides in a greenhouse to let the wind naturally circulate air.
  2. Forced Ventilation: Forced ventilation systems use fans to circulate air. These are necessary in large greenhouses or in designs where natural air movement is not sufficient.
  3. Vent Placement: Vents should ideally be placed on all sides of the greenhouse for cross-ventilation. Roof vents are particularly effective in letting out hot air.
  4. Automated Ventilation: Automated systems can be programmed to open and close vents based on temperature, ensuring optimal conditions at all times.
  5. Combination with Cooling: During hot weather, ventilation can be combined with evaporative cooling systems to lower temperatures.

Commercial Greenhouse Layout Optimization

The layout of a commercial greenhouse can significantly affect productivity and profitability:

  1. Efficient Workflow: The greenhouse should be designed to minimize travel time and labor. Regularly accessed areas like potting stations, tool storage, and water sources should be easily accessible.
  2. Maximized Growing Space: Space is money in a commercial greenhouse. Use multi-tier growing systems, mobile benches, and vertical gardening to maximize growing area.
  3. Automation: Automated systems can reduce labor costs and improve efficiency. This includes automated watering, climate control, and even robotic harvesting systems.
  4. Crop Rotation: Plan for crop rotation to keep the soil healthy and avoid pest build-up. Different crops have different nutrient requirements and pest profiles, so rotating them can ensure sustainable productivity.
  5. Pest Management: Integrated pest management strategies, including the use of beneficial insects, can help keep pest levels under control, reducing the need for costly and potentially harmful pesticides.

Conclusion

Creating the perfect greenhouse layout is not a one-size-fits-all affair. It demands meticulous planning, taking into account numerous factors such as the type of plants to be grown, the local climate, space availability, and of course, the purpose of the greenhouse.

Starting from optimal design techniques, one needs to consider energy efficiency, maximization of available space, lighting conditions, and ventilation. Not to forget the vital role played by an efficient irrigation system in fostering plant health and saving water.

For beginners, understanding the basics, including plant arrangement, is crucial, while experienced growers might focus on fine-tuning the conditions to maximize yield. Seasonal changes call for adaptability in the greenhouse layout, while small-scale and commercial greenhouses present their unique challenges and opportunities.

From the hydroponics enthusiast in the urban apartment to the commercial farmer seeking to optimize yield, greenhouse gardening presents a world of exciting possibilities. The key to successful outcomes lies in careful planning, continuous learning, and, of course, a good deal of experimentation. As a flexible, sustainable, and highly productive method of growing, well-planned greenhouse gardening truly is the future of horticulture.

A Companion Planting Guide For Optimised Garden Health

Companion planting is a time-honored tradition that intertwines nature’s diversity to create a symbiotic relationship among your garden plants. In this detailed guide, we will focus on companion planting layouts, which bring together the principles of companion planting with an emphasis on garden health. Our discussion will span from plant selection for vegetable gardens to tips for maximizing yields in small spaces, from soil considerations to water management, and from organic gardening practices to permaculture.

This guide is designed to appeal to both novice and seasoned gardeners. We will provide valuable insights into how to create a low maintenance, disease-preventive garden that thrives year-round and attracts beneficial wildlife. We will discuss strategies for different types of gardens, including herb gardens, fruit trees, greenhouses, and even colorful flower beds. By the end, you will have a comprehensive understanding of how to harness the power of companion planting for a healthier, more productive garden.

Whether you are planning a new garden or seeking ways to enhance your existing one, this guide will empower you with the knowledge and strategies to create an optimized garden layout using the principles of companion planting. Let’s dig in!

Understanding The Principles Of Companion Planting

Companion planting is a principle that uses the natural benefits of certain plants to help others. Plants can help each other in various ways: by deterring pests, improving soil health, and promoting pollination, among others. Companion planting takes advantage of these symbiotic relationships, improving your garden health as a whole.

Principles Of Companion Planting

  • Nitrogen Fixation: Some plants, like legumes, have a beneficial relationship with nitrogen-fixing bacteria. They add nitrogen to the soil, an essential nutrient for many plants.
  • Shade and Support: Larger plants can provide shade for smaller, sun-sensitive plants, and sturdy plants can provide support for climbing or vining plants.
  • Pest Deterrence: Certain plants can deter pests that commonly affect other plants. For instance, marigolds can deter nematodes, and garlic can repel aphids.
  • Pollination Promotion: Plants with bright flowers can attract pollinators, benefiting nearby plants that require pollination.

Maximizing Garden Health Through Companion Planting

Companion planting is more than a mere practice; it’s an approach to create a thriving ecosystem within your garden. Maximizing garden health through companion planting involves several key strategies.

Companion Planting

  • Biodiversity Boost: Companion planting encourages a diverse array of plants, fostering a rich ecosystem within the garden. This variety makes it more difficult for pests and diseases to spread and wipe out an entire crop. Additionally, a diverse garden is more likely to attract a wide range of beneficial insects, including predators of common pests, pollinators, and insects that help in decomposing organic matter and enriching the soil.
  • Soil Health Enhancement: Certain companion plants, like legumes, harbor beneficial bacteria that help fix atmospheric nitrogen in the soil—a vital nutrient for most plants. On the other hand, deep-rooted plants bring up nutrients from the subsoil layers, making them accessible to shallow-rooted companions. Companion plants with different root depths also maximize the utilization of nutrients at different soil levels, reducing competition and promoting mutual growth.
  • Integrated Pest and Disease Management: Through strategic plant selection, companion planting can significantly reduce pest issues. Some plants exude chemicals that repel specific pests, while others attract beneficial insects that prey on common pests. Companion planting also helps in disease prevention by making it harder for diseases to spread across a mono-crop.

Choosing The Right Plants For Companion Planting

Selecting suitable companions involves understanding individual plant needs, potential benefits, and possible adverse interactions. Here are some essential considerations.

  • Compatibility Check: It’s crucial to pair plants with similar environmental needs. Group sun-loving plants together and do the same for shade-tolerant plants. Water and nutrient requirements should also align to prevent competition and ensure harmony within your plant groupings.

Right Plants For Companion Planting

  • Beneficial Traits Identification: Some plants offer specific advantages that can benefit their companions. Legumes, for instance, enrich the soil with nitrogen—a boon for nitrogen-loving companions. Certain herbs and flowers, like basil and marigold, deter pests, offering a protective shield to vulnerable neighbors.
  • Negative Interactions Avoidance: Just as certain plants can benefit each other, some combinations can be counterproductive. For instance, planting carrots next to dill can stunt carrot growth, as both plants compete for resources. Studying potential negative interactions can prevent such pitfalls and contribute to a thriving garden.

Companion Planting Layout For Vegetable Gardens

Creating a companion planting layout for vegetable gardens requires careful planning. The goal is to maximize space usage and symbiotic relationships among the plants.

Layout For Vegetable Gardens

  • Three Sisters Planting: A classic example comes from Native American agriculture— the “Three Sisters” method. Corn, beans, and squash are planted together, each offering unique benefits. Corn stalks serve as natural trellises for the beans, beans enrich the soil with nitrogen, benefitting corn and squash, and the squash leaves shade the soil, retaining moisture and deterring weeds.
  • Intercropping: Intercropping involves planting two or more crops together in close proximity. For instance, radishes and spinach can be intercropped with slower-growing vegetables like carrots. By the time the carrots need more space, the radishes and spinach will have been harvested.
  • Edge Planting: Planting insect-repelling plants like marigold or garlic around the edge of your vegetable garden can protect vulnerable crops from pests.

Remember, companion planting layouts should consider the specific requirements of your local climate and soil conditions.

Effective Companion Planting To Deter Pests

Companion planting can be an effective organic pest management strategy. Here are some powerful pairings:

  • Tomatoes and Basil: This combination works wonders in deterring tomato hornworms and aphids, as basil emits a strong scent that pests dislike.

Tomatoes and Basil

  • Cabbage and Mint: Mint can help repel cabbage moths, a common pest for cabbage, broccoli, and other members of the Brassica family.
  • Beans and Marigolds: Marigolds exude a substance that deters nematodes—soil-dwelling pests harmful to many garden plants, including beans.
  • Sage and Cabbage: Sage’s strong aroma can ward off the cabbage moth, a common pest that affects cabbage and other Brassicas.

Companion Planting Strategies For Small Spaces

With careful planning and the right companion planting strategies, even small spaces can yield bountiful harvests. Here’s how:

  • Vertical Gardening: Capitalize on vertical space by growing climbers and vine plants like beans, cucumbers, and tomatoes. They can be paired with tall, sturdy plants like corn and sunflowers that act as natural supports.
  • Succession Planting: Succession planting allows you to plant more by making efficient use of time and space. Once a quick-maturing plant is harvested, immediately plant a new crop in its place. For example, once the spinach harvest is done, the same space can be used for planting heat-tolerant peppers.
  • Pot Gardening: If you only have a patio or balcony, pot gardening allows you to reap the benefits of companion planting. For instance, a large pot can house a tomato plant, basil (which improves tomato flavor and repels pests), and marigolds (which deter nematodes).

Implementing these companion planting strategies can make your small-space garden a diverse, productive, and harmonious ecosystem.

Creating A Year-Round Companion Planting Plan

A year-round companion planting plan provides the opportunity to maximize your garden’s productivity throughout all seasons, ensuring you have a bounty of fresh produce at your fingertips all year round.

  • Understanding Plant Life Cycles: Begin by understanding the life cycles of the plants in your garden. This includes their sowing and harvesting times, as well as how long they take to mature. This information helps in planning what and when to plant.
  • Consider Succession Planting: One way to keep the garden productive throughout the year is through succession planting. As soon as one crop is harvested, immediately sow the next. Pair crops that have different growing seasons but similar cultural needs. For example, plant cool-weather crops like spinach and lettuce in early spring and follow them with heat-tolerant crops like peppers and tomatoes.
  • Plan For Continuous Bloom: A garden that blooms throughout the year is not just visually appealing, but it also provides a constant source of nectar and pollen for beneficial insects. Pair plants that bloom in different seasons to achieve this effect. For example, pair spring-blooming daffodils with summer-blooming roses.
  • Integrate Perennials: Incorporate perennial plants into your garden plan. These plants provide stability to the ecosystem as they remain in place for many years. Perennials can be both edible, like asparagus and rhubarb, or ornamental, like peonies and hostas.

Companion Planting Layout For Herb Gardens

Herb gardens can particularly benefit from companion planting, as many herbs are excellent pest deterrents and can enhance the flavor of other plants.

Herb Gardens

  • Companion Planting for Pest Control: Plant garlic chives among roses to deter aphids. Similarly, lavender can repel moths and flies, making it a good companion for plants susceptible to these pests.
  • Herbs for Enhancing Flavor: Certain herbs can enhance the flavors of vegetables when planted together. Basil, for instance, is said to improve the flavor of tomatoes.
  • Herb Guilds: Create herb guilds by grouping herbs with similar sunlight, water, and soil needs together. For instance, Mediterranean herbs like rosemary, thyme, and oregano prefer full sun and well-drained soil and can be planted together.
  • Herb Spirals: A herb spiral is an excellent layout for a small herb garden. It provides different microclimates, with the top being the sunniest and driest, and the bottom the shadiest and moistest. Arrange your herbs based on their cultural needs along the spiral.

Companion Planting Tips For Fruit Trees

Companion planting can significantly improve the health and yield of your fruit trees. Here are some tips:

  • Companion Plants for Soil Improvement: Certain plants can improve soil health, which in turn benefits fruit trees. For instance, comfrey has deep roots that bring up nutrients from the subsoil, which can then be used by shallow-rooted fruit trees.
  • Pest Deterrence: Some plants, when planted near fruit trees, can deter pests. For instance, marigolds repel nematodes, which can be detrimental to many fruit trees.
  • Attracting Pollinators: Planting flowering plants that bloom at the same time as your fruit trees can attract more pollinators, improving fruit set.
  • Using the Space Beneath the Trees: You can plant shade-tolerant plants beneath fruit trees. For instance, currants and gooseberries can grow under the dappled shade of a larger fruit tree.

Soil Considerations For Companion Planting

The success of your companion planting efforts can be significantly influenced by your soil conditions. Here’s how to tailor your soil for companion planting:

  • Understanding Soil Types: Each plant has a preference for a particular soil type – sandy, loamy, or clayey. By understanding these preferences, you can group plants with similar soil needs together.

Soil Considerations

  • Improving Soil Fertility: Certain plants, like legumes, can fix atmospheric nitrogen in the soil, making it available to other plants. Planting such nitrogen-fixers next to heavy feeders can improve your garden’s productivity.
  • Balancing Soil pH: Some plants prefer acidic soil, while others prefer alkaline. By grouping plants with similar pH preferences together, you can make soil amendments that benefit all plants in the group.
  • Managing Soil Moisture: Different plants have different water needs. By grouping plants with similar water needs together, you can ensure that all plants receive the right amount of water without overwatering or underwatering.

Companion Planting For Improved Pollination

Companion planting can boost pollination in your garden, leading to better fruit set and increased yields.

  • Attracting Pollinators: Planting a variety of flowers can attract different types of pollinators to your garden. For instance, bees are attracted to blue, purple, and yellow flowers, while butterflies prefer red, orange, and yellow flowers.

Improved Pollination

  • Providing a Succession of Blooms: Ensure that something is in bloom throughout the growing season. This provides a constant source of nectar and pollen for pollinators, encouraging them to make your garden their home.
  • Planting in Clusters: Planting in clusters rather than single plants can attract more pollinators. They prefer to visit one type of flower before moving on to the next, and clusters make it easier for them to do so.
  • Considering Flower Shapes: Different pollinators are attracted to different flower shapes. For instance, bees prefer flowers they can easily crawl into, like daisies, while hummingbirds prefer tubular flowers like honeysuckle.

Water Management In Companion Planting Layouts

Water management is crucial for the success of companion planting. How and when to water your plants can drastically affect their health and productivity.

  • Plant Grouping Based on Water Needs: Different plants have different water requirements. By grouping plants with similar water needs together, you can ensure that each plant receives the appropriate amount of water. For instance, tomatoes, cucumbers, and basil are all plants that enjoy similar watering schedules and can be grouped together.
  • Mulching: Mulching is not only an effective method for controlling weeds, but it also aids in water retention. Some companion plants, such as beans, have large leaves that can act as living mulch for nearby plants, reducing evaporation from the soil surface.
  • Watering Methods: Drip irrigation and soaker hoses are preferred over overhead watering in a companion planting setup. These methods deliver water directly to the root zone, reducing water waste and preventing the spread of foliar diseases among closely spaced plants.
  • Monitoring and Adjusting: Keep a close eye on your plants and adjust watering as needed. Signs of overwatering include yellow leaves and stunted growth, while wilting and browning leaves can indicate underwatering.

Maximizing Yields Through Companion Planting

Companion planting can significantly increase garden yields by creating a more efficient and supportive ecosystem for your plants.

  • Companion Plants for Soil Improvement: Certain plants, like legumes, improve the soil fertility by fixing nitrogen. Plant these nitrogen-fixers near heavy feeders to provide a direct source of nutrients.
  • Intercropping: Planting fast-growing crops alongside slow-growing crops can maximize garden yields. By the time the slow-growing crop needs more space, the fast-growing crop will have been harvested.
  • Trap Cropping: Planting crops that pests prefer near more valuable crops can lure pests away, reducing damage and improving yields of your primary crops.
  • Attracting Pollinators: Including plants that attract pollinators can increase fruit set and improve yields. Consider planting flowers with different shapes, sizes, and colors to attract a variety of pollinators.

Companion Planting For Organic Gardening

Organic gardening focuses on cultivating plants without the use of synthetic pesticides or fertilizers. Companion planting is a powerful tool for organic gardeners.

  • Natural Pest Control: Many plants have natural pest-repelling properties. Planting these pest-repelling plants near susceptible crops can reduce pest problems without the need for harmful chemicals.
  • Soil Enrichment: As mentioned earlier, some plants, particularly legumes, can enrich the soil by fixing nitrogen, reducing the need for synthetic fertilizers.

Organic Gardening

  • Plant Health: Certain plant combinations can enhance each other’s growth and overall health. For example, the classic ‘Three Sisters’ combination of corn, beans, and squash supports the health and productivity of all three plants.

The Role Of Companion Planting In Permaculture

Permaculture is a system of agricultural and social design principles centered around simulating or directly utilizing the patterns and features observed in natural ecosystems. Companion planting plays a key role in permaculture design.

  • Guilds: In permaculture, plants that benefit each other when grown together are often grouped into “guilds”. These guilds are designed to mimic the interactions found in natural ecosystems.
  • Polyculture: Permaculture promotes the cultivation of multiple crops in the same space, which increases biodiversity and resilience. Companion planting is a form of polyculture that maximizes beneficial interactions between plants.
  • Layering: Permaculture design often incorporates vertical layering, where plants are grown at different heights to maximize use of space and resources. Companion planting can be used to select plants that will thrive together in each layer.

Companion Planting Layout For Greenhouses

Greenhouses offer a controlled environment for year-round gardening, and companion planting can help you make the most of this space.

  • Maximizing Space: Greenhouses often have limited space. Planting vertically growing crops like tomatoes or cucumbers with lower growing plants like lettuce can maximize the use of space.
  • Managing Microclimates: Greenhouses can create different microclimates depending on their orientation, ventilation, and shading. Companion plants should be selected and positioned based on their tolerance or preference for these microclimates.
  • Disease Prevention: In a greenhouse, diseases can spread quickly due to the close spacing of plants. Companion planting can help mitigate this risk by alternating plant species to prevent the spread of disease.
  • Pollination: With no access for natural pollinators, manual pollination may be necessary in greenhouses. Planting a variety of crops can encourage beneficial insects for natural pollination.

Companion Plants For Colorful Flower Beds

Designing colorful flower beds is not just about aesthetics. The right companion plants can help increase bloom time, enhance flower colors, and even deter pests, all while contributing to a vibrant, ever-changing display.

  • Extended Bloom Times: By pairing early-blooming plants with late bloomers, you can extend the flowering season of your beds. Bulbs like daffodils and tulips can provide early spring color, while perennials like black-eyed Susans and coneflowers can keep the show going into fall.
  • Color Combinations: Some colors complement each other better than others. Combining plants with contrasting colors can make each plant stand out more. For instance, pairing orange marigolds with blue delphiniums can create a striking contrast.
  • Attracting Beneficial Insects: Flowers like yarrow, cosmos, and zinnias are excellent at attracting beneficial insects. These insects can help with pest control, pollination, and maintaining overall garden health.
  • Plant Sizes and Shapes: For the most visually pleasing effect, arrange plants so that tall ones are at the back of the bed, medium-sized ones are in the middle, and low-growers are at the front. Consider also the shape and texture of the plants to add interest and depth to the flower bed.

Creating A Low Maintenance Companion Planting Layout

Companion planting is not only beneficial for improving plant health and productivity, but it can also lead to a lower maintenance garden.

  • Plant Selection: Choose plants that are hardy and well-suited to your climate and soil. Native plants often require less maintenance as they are adapted to local conditions.
  • Natural Pest Control: As we’ve discussed, many plants can deter pests. By choosing the right companions, you can reduce pest problems and the need for interventions.
  • Self-Seeding Plants: Some plants, such as calendula, dill, and lettuce, readily self-seed. These can provide continuous growth and coverage with minimal effort on your part.
  • Weed Suppression: Companion plants with dense growth or ground-covering habits, such as sweet potatoes or nasturtiums, can suppress weeds, reducing the time you need to spend weeding.

Using Companion Planting For Disease Prevention

Disease prevention is a crucial aspect of maintaining a healthy garden, and companion planting can play a key role in this.

  • Rotation: Regularly changing the position of crops in your garden can prevent the build-up of soil-borne diseases. Companion planting encourages crop diversity and makes crop rotation easier.
  • Trap Crops: Some plants can act as a sacrificial crop, attracting disease-carrying pests away from more valuable crops.
  • Beneficial Insects: Certain plants attract insects that prey on disease-carrying pests. Having a diverse garden with these plants can help maintain a balanced ecosystem.
  • Air Circulation: Companion planting can help improve air circulation, which can prevent many fungal diseases. Avoid planting tall crops where they will block airflow to smaller, more susceptible plants.

Companion Planting Layout For Balcony Gardens

Even if you only have a small balcony, you can still take advantage of companion planting.

  • Container Companions: Some plants grow well together in containers. For example, tomatoes, basil, and marigolds can share a large pot. The tomato provides shade for the basil, the basil enhances the tomato’s flavor, and the marigold deters pests.
  • Vertical Space: Use the vertical space in your balcony by installing trellises or hanging baskets. Plants like beans, peas, and cucumbers can climb, while plants like lettuce, radishes, and herbs can be grown below.
  • Sunlight Considerations: Consider the direction and amount of sunlight your balcony receives. Place taller plants where they won’t block sunlight to shorter plants.
  • Microclimates: Balconies can create unique microclimates due to factors like building heat, wind, and reflected light. Choose plant companions that can handle these conditions and support each other’s growth.

Companion Planting Layouts For Perennial Gardens

Perennial gardens are those that house plants that live for more than two years. By carefully planning your companion planting layout, you can design a perennial garden that thrives year-round.

  • Succession Planting: Perennials bloom at different times, so a well-designed garden will have a continuous display of flowers. For example, snowdrops and crocuses bloom early in the spring, while black-eyed Susans and asters continue to bloom into fall.
  • Building a Plant Community: In nature, plants live in communities where they benefit each other. You can mimic this in your garden by choosing plants with similar soil, water, and light needs that also provide benefits to each other.
  • Layering: In perennial gardens, plants are typically arranged in layers, with taller plants in the back and shorter ones in the front. This not only creates a visually pleasing effect, but it also allows each plant to receive adequate light.
  • Perennial Polycultures: Incorporating diverse species of perennials can lead to an array of benefits including pest deterrence, nutrient cycling, and creating habitat for beneficial insects.
  • Ground Covers: Low-growing perennials can function as living mulch, suppressing weeds and conserving soil moisture. Examples include creeping thyme and sweet woodruff.

Incorporating Vertical Space In Companion Planting

Vertical gardening is an excellent way to maximize your growing space, and it can also be incorporated into a companion planting strategy.

  • Climbing Plants: Plants such as pole beans, peas, and certain varieties of cucumbers and squash can be trained to grow up a trellis or fence.
  • Creating Microclimates: A tall, trellised plant can create shade underneath it. This can be beneficial for plants that prefer cooler conditions or less intense sunlight.
  • Intercropping: This involves growing a fast-maturing crop in the understory of a slower-growing, taller crop. For example, radishes or spinach can be grown beneath tomatoes or corn.
  • Living Walls: Vertical plantings don’t have to be limited to climbing plants. Vertical pallet gardens or wall planters can be used to grow a variety of herbs, greens, and flowers.
  • Vertical Layering: In forest gardening, a method of permaculture, the vertical space is divided into several layers, including a canopy layer, shrub layer, herbaceous layer, and ground cover. This allows for diverse, productive, and resilient plantings.

Sunlight Requirements For Companion Planting

When planning a companion planting layout, it’s crucial to consider the sunlight requirements of each plant.

  • Sun-loving Plants: Many vegetables, such as tomatoes, peppers, and squash, need full sun to produce well. Pair these with other sun-loving plants, or with plants that have a shorter height or a sprawling habit that won’t block their light.
  • Partial Sun and Shade Plants: Some plants, such as lettuce and spinach, can benefit from a bit of shade, especially in hot climates. They can be paired with taller plants that can provide them with afternoon shade.
  • Shade-tolerant Plants: Some plants, including many herbs and leafy greens, can tolerate or even thrive in low light conditions. These can be grown underneath taller plants or on the north side of a garden where they will receive less intense light.
  • Sun Mapping: It’s important to observe your garden throughout the day and throughout the year to understand where the sunniest and shadiest spots are. This will help you place plants where they will thrive.

The Impact Of Companion Planting On Biodiversity

Companion planting can greatly enhance biodiversity in a garden, leading to improved health and resilience.

  • Increasing Plant Diversity: By mixing different types of plants, you are creating a diverse ecosystem that can support a wider variety of insects, birds, and other wildlife.
  • Supporting Beneficial Insects: Many insects are beneficial for the garden, aiding in pest control and pollination. Diverse plantings can provide these insects with nectar, pollen, and habitat.
  • Enhancing Soil Life: Different plants have different root systems and draw different nutrients from the soil. Planting a variety of plants can support a diverse soil microbiome, which is crucial for plant health.
  • Resilience: Biodiverse systems are generally more resilient to pests, diseases, and climate extremes. This is because the presence of many different species can help to keep any one pest or disease from becoming too dominant.

Conclusion

Companion planting is a method of garden layout design that capitalizes on the benefits that plants can provide for each other. By understanding the fundamental principles and effects of companion planting, a gardener can maximize garden health and yield, all while improving the aesthetic appeal of their space.

From vegetable gardens to herb gardens, balconies to greenhouses, the applications of companion planting are as varied as the plants themselves. This technique can significantly enhance pollination, pest deterrence, and overall plant health. Soil considerations and water management are crucial components of a successful companion planting strategy, and their importance cannot be understated.

An approach like companion planting, which considers and respects the complex interactions of living organisms, aligns with the principles of organic gardening and permaculture. These philosophies prioritize biodiversity and sustainability, fostering a harmonious relationship between humans and the natural world.

As we continue to navigate the challenges of the modern era, techniques like companion planting offer us a way to live more sustainably, grow our own food, and find joy and satisfaction in the cultivation of life. Whether we have a sprawling garden or a humble balcony, we can each find ways to incorporate these principles into our lives, contributing to the overall health of our communities and the planet.

In conclusion, companion planting is a time-tested, scientifically backed, and holistic gardening strategy that anyone with an interest in plants can employ. The result is not only more productive and resilient gardens, but also spaces of beauty that nurture the human spirit and foster a deeper connection with nature.

Container Garden Layout Ideas A Complete Guide

Container gardening is an innovative way to bring a touch of green to even the most limited spaces. From balconies to small courtyards, any space can be converted into a green haven with the right container garden layout. This comprehensive guide aims to provide you with all the information you need to create a vibrant container garden, from the basics to seasonal considerations and everything in between.

In this guide, we will walk you through the process of selecting the right containers, choosing plants that suit your space, climate, and lifestyle, and creating an attractive and functional layout. We’ll also discuss how container gardening can be adapted to urban areas, balconies, and even for growing edible plants.

Understanding the intricacies of container gardening—such as maintaining soil health, maximizing sunlight, and practicing effective irrigation—can enable you to create a low maintenance garden that’s not only beautiful but also sustainable and eco-friendly. So whether you’re new to gardening or a seasoned green thumb looking for a fresh challenge, let’s dive into the world of container gardening.

Understanding Container Garden Basics

Container gardening is more than just placing plants in pots. It’s about creating a miniature ecosystem that meets the needs of your chosen plants while enhancing your living space. Here are some basic principles of container gardening:

Container Garden

  • Size and Depth: The size of the container should be proportionate to the plant. Some plants need more room for their roots to spread, while others can thrive even in shallow pots.
  • Drainage: Good drainage is essential to prevent waterlogged roots. Most containers should have one or more holes in the bottom.
  • Material: The material of the container can impact the plant’s health. Plastic and metal pots can heat up in the sun, which can damage delicate root systems.
  • Weight: Consider the weight of the container, especially if you’re planning to place it on a balcony or a rooftop. Some materials, like terracotta or stone, can be quite heavy.

Selecting The Right Containers For Your Garden

Choosing the right container for your garden is a delicate balance between functionality, aesthetic appeal, and the specific needs of your plants. The options available are vast, ranging from traditional terracotta pots to unique containers like old boots, wooden crates, or recycled metal cans.

The first and foremost consideration when selecting a container is its size. It’s important to choose a container that provides enough space for the plant’s roots to grow. Smaller containers can restrict root growth and may require more frequent watering. Large containers, on the other hand, provide more room for root growth and retain moisture for a longer duration. However, they can become quite heavy and may not be suitable for balconies or rooftops.

Right Containers For Your Garden

Next, consider the material of the container. Different materials have different properties that can affect the health of your plants. Plastic pots, for instance, are lightweight, inexpensive, and retain moisture well, but they can become brittle over time when exposed to sunlight. Clay or terracotta pots are more durable and provide good insulation from heat, but they can be heavy and may dry out quickly. Metal containers can add a unique aesthetic touch to your garden, but they can heat up in the sun and may not be suitable for plants with delicate root systems.

The shape of the container can also play a role. Deep pots are ideal for plants with long taproots, while shallow, wide pots can accommodate plants with extensive root systems that spread horizontally. Some plants, such as most succulents, prefer pots that are wide and shallow, while others, like tomatoes or beans, need deeper pots to support their root systems.

Finally, the aesthetic appeal of the container should align with your overall garden theme. Brightly colored pots can add a splash of color to your garden, while a natural wood or stone container can provide a more rustic or natural look. Remember, the container is not just a vessel for the plant; it’s an integral part of your garden’s overall design.

Effective Layouts For Small Space Container Gardens

Small spaces should not restrict your creativity or desire to have a lush, vibrant garden. With effective layout strategies, even the tiniest of balconies or patios can be transformed into a blooming oasis. An effective container garden layout makes optimal use of the available space while considering the plants’ needs and maintaining an aesthetically pleasing arrangement.

Small Space Container Gardens

One of the best ways to maximize space in small areas is vertical gardening. Utilize the walls, railings, or even hanging spaces from the ceiling to place your pots. You can use hanging baskets, wall-mounted planters, or shelves to create layers of greenery without consuming floor space. Climbing plants like ivy or trailing plants like string of pearls can create a beautiful green curtain, giving depth and dimension to your space.

Tiered planting is another effective strategy for small space gardening. Use multi-tier plant stands, ladder shelves, or stackable pots to grow multiple plants vertically. This not only saves space but also creates a visually appealing hierarchy of plants, adding interest to your garden.

Lastly, don’t overlook the potential of corners. They can be ideal for placing large, columnar plants or arranging multiple small pots in a tiered manner. By incorporating these strategies, you can maximize your space and create a thriving container garden irrespective of the size of your area.

Choosing Plants For Your Container Garden

Choosing the right plants for your container garden is essential to its success. Not all plants thrive in container environments, and selecting suitable species can save you a lot of time and effort.

Begin by considering the conditions of your garden space. How much sunlight does it receive? Is it exposed to harsh winds or extreme temperatures? Some plants prefer full sun, while others need partial shade. If your space receives less than six hours of sunlight, choose plants like ferns, begonias, or impatiens that thrive in low-light conditions. For sun-drenched spaces, opt for sun-loving plants like succulents, petunias, or marigolds.

Choosing Plants For Your Container Garden

Next, consider the size and growth habit of the plants. Some plants, like cucumbers or tomatoes, need ample space for their roots and produce extensive vines, which can quickly overwhelm a small space. On the other hand, compact or dwarf varieties, such as dwarf zinnias or baby lettuce, can flourish in small containers without crowding the space.

Lastly, consider the maintenance needs of the plants. Some plants require frequent watering, pruning, and feeding, while others are low-maintenance. If you have a busy lifestyle, opt for hardy, drought-tolerant plants like succulents or herbs like rosemary and thyme.

Container Gardening Techniques For Urban Areas

Urban areas, with their concrete jungles and skyscrapers, may seem like the least likely places for a garden. However, container gardening can turn rooftops, balconies, or even windowsills into verdant spaces. Here are some techniques to make urban container gardening successful:

Vertical gardening, as mentioned earlier, is especially beneficial in urban settings. It not only maximizes space but also adds a dash of greenery to the otherwise drab urban landscape. You can use wall-mounted planters, vertical garden panels, or even DIY structures made from pallets or ladders.

Container Gardening Techniques

Another technique is to make use of multi-purpose containers. Think of planters that also function as seating or storage. This not only saves space but also adds a unique element to your garden.

Rooftop gardening is another trend gaining popularity in urban areas. Roofs provide ample sunlight, which is often limited in urban homes. However, rooftop gardening requires careful consideration of the roof’s weight-bearing capacity and protection against strong winds. It’s also important to have a proper watering and drainage system in place to prevent water damage to the building.

Lastly, joining a community garden can be a great way to engage with other gardening enthusiasts, learn from their experiences, and gain access to larger plots of land.

Seasonal Considerations

Seasonal changes greatly affect the health and growth of plants, and a successful container garden layout needs to adapt with these changes. Each season presents its unique set of challenges and opportunities.

In spring, the garden comes alive, and it’s the best time to plant most annuals, perennials, and vegetables. However, spring weather can be unpredictable, so protect young plants from late frosts with covers or by bringing them indoors on cold nights.

Summer, with its long days and abundant sunlight, can lead to rapid growth. But high temperatures and limited rainfall mean that plants may need more frequent watering. Some plants, especially cool-season crops, may need protection from intense midday sun.

Autumn is a time to prepare the garden for winter. Plant cold-hardy species and begin moving sensitive plants indoors. It’s also a good time to harvest and compost dead plant material.

Winter can be tough for container gardens as most plants do not tolerate freezing temperatures. Move containers indoors or to a sheltered location. If that’s not possible, insulate containers with bubble wrap or burlap and group them together to minimize heat loss.

By understanding and adapting to seasonal changes, you can ensure a vibrant, healthy container garden throughout the year.

Maintaining Soil Health

Maintaining soil health is pivotal for a thriving container garden. The soil is the primary source of nutrients for your plants and plays a significant role in water retention, aeration, and root health. The first step towards maintaining soil health is choosing the right soil. A well-draining potting mix, ideally fortified with organic matter like compost or peat moss, is ideal for container gardening.

Maintaining Soil Health

Water management is another essential aspect of maintaining soil health. Overwatering can lead to waterlogged soil, which deprives the roots of oxygen and can lead to root rot. Conversely, underwatering can lead to dry soil that fails to deliver necessary nutrients to the plants. The right balance, depending on the specific needs of your plants and the local weather conditions, is key.

In addition, plants take up nutrients from the soil, so regular fertilization is necessary to replenish these nutrients and maintain soil fertility. An organic, slow-release fertilizer is a good choice for container gardens. It feeds the plants gradually and minimizes the risk of over-fertilization, which can damage the plants and upset the soil ecosystem.

Lastly, refreshing the soil periodically is necessary as even with fertilization, the soil in containers can become depleted over time. Replacing old soil with fresh potting mix once every year or two can help ensure your plants have access to abundant nutrients.

Container Garden Ideas For Balconies

Balconies are perfect for container gardening. They can provide adequate sunlight, shelter from harsh weather conditions, and easy access for regular care. Here are some creative and effective container garden layout ideas for balconies.

Utilize the railing: Balcony railings provide a great opportunity for hanging planters. These planters not only save floor space but also give your balcony a lush, cascading effect. Choose plants with drooping foliage or flowers like sweet alyssum or ivy for a stunning visual effect.

Use tiered plant stands: These stands can accommodate multiple pots in a compact space, and their vertical arrangement creates a visually appealing display.

Create a plant corner: Choose one corner of the balcony to group your plant containers together. This is not only an efficient use of space, but it also creates a green sanctuary that is pleasing to the eye.

Use furniture with built-in planters: Multipurpose furniture, such as a bench with a planter box on either end, is a smart space-saving solution.

Incorporate a small water feature: A small container water garden or a tabletop fountain adds a sense of tranquility to your balcony garden.

Creating A Low Maintenance Container Garden

A low-maintenance container garden is a perfect solution for those who love gardening but have busy schedules. Here are some strategies for creating a low-maintenance container garden:

Choose low-maintenance plants: Succulents, cacti, and drought-tolerant plants like lavender and rosemary require less frequent watering and overall care.

Opt for larger containers: Larger containers retain moisture for a longer period, reducing the frequency of watering.

Use self-watering pots: These pots have a built-in reservoir to hold water, which the plants can draw from as needed, reducing watering frequency.

Install a drip irrigation system: This can automate the watering process and ensure your plants receive the right amount of water.

Use a slow-release fertilizer: This reduces the frequency of feeding your plants.

Mulch your pots: A layer of mulch on top of the soil can help retain moisture, suppress weeds, and reduce the need for watering and weeding.

Incorporating Vertical Space In A Container Garden

Vertical gardening is a smart and stylish way to maximize space in a container garden. It utilizes the upward space, allowing you to grow more plants without consuming much ground area. Here are some ideas for incorporating vertical space in your container garden:

Use climbing plants: Plants like beans, cucumbers, and certain varieties of flowers like sweet peas and clematis are natural climbers and can be trained to grow upward using trellises or stakes.

Vertical Space In A Container Garden

Invest in vertical planters: These planters are designed with multiple pockets or shelves to hold your plant containers, allowing you to grow plants vertically.

Install hanging baskets: Hanging baskets not only make use of the vertical space but also add an element of beauty and charm to your garden.

Wall-mounted planters: These planters can be attached to any vertical surface and can turn a bare wall into a lush green display.

Using A Container Gardens For Edible Plants & Vegetables

Growing edible plants and vegetables in a container garden is a rewarding and practical application of container gardening. It provides a source of fresh, organic produce right at your doorstep.

When choosing vegetables for your container garden, consider the size of the plant and the container it needs. Some vegetables like tomatoes, cucumbers, and squash need larger containers and support structures to grow. Compact varieties of these vegetables are more suited for container gardening.

Leafy greens like lettuce, spinach, and swiss chard are excellent for container gardening. They have shallow root systems and grow well in shallow containers. Similarly, root vegetables like radishes and carrots can be grown in deep pots.

Herbs like basil, thyme, rosemary, and mint are excellent choices for a container herb garden. They can be grown in individual pots or in a large container with compartments for different herbs.

The Role Of Container Gardens In Permaculture

In permaculture, the emphasis is on creating sustainable and self-sufficient ecosystems. Container gardens play a vital role in this system. They can make gardening possible where space is limited or soil conditions are poor, thereby promoting local food production.

Container gardens can also contribute to resource efficiency in permaculture. For instance, containers made from repurposed materials like old buckets, pallets, or tires can reduce waste and promote recycling.

Container gardens also provide a degree of control over the growing conditions, which can be adjusted to suit different plants, promoting plant diversity. They can also facilitate companion planting, a key permaculture principle, where beneficial relationships between different plants are utilized to improve growth, deter pests, and save space.

In a permaculture design, a container garden can serve multiple functions. It can provide food, contribute to aesthetic beauty, provide privacy, create habitat for beneficial insects, and more, all of which align with the permaculture principles of multifunctionality and integration.

Unique Container Ideas

When it comes to container gardening, thinking outside the box can lead to a garden that is as aesthetically pleasing as it is productive. Here are some unique container ideas:

Old furniture: An old chair, dresser, or desk can be repurposed into a unique and eye-catching garden container. You can either place pots on them or plant directly in the drawers or seating area.

Unique Container Ideas

Reclaimed wood pallets: Pallets can be transformed into vertical garden spaces. Their slatted design is perfect for creating rows of plants, with each slat acting as a shelf for a row of containers.

Recycled containers: Everyday objects like old tires, washtubs, watering cans, and wheelbarrows can be turned into unique and charming garden containers.

Aquariums and terrariums: These glass containers make excellent mini indoor gardens. They are especially good for growing small, low-maintenance plants like succulents and air plants.

Best Flower Pot Arranging Tips

Arranging flower pots effectively can greatly enhance the overall look of your container garden. Here are some tips:

Height Variation: Varying the heights of your pots can create visual interest and depth. You can achieve this by using pots of different sizes or placing smaller pots on stands or furniture.

Color Coordination: Try to create a color scheme with your pots. You could use pots of the same color in different shades or colors that complement each other.

Plant Grouping: Group plants with similar light and water requirements together. This not only makes maintenance easier but also ensures that all the plants in a group thrive.

Focal Points: Create a focal point in your garden using a large pot or a group of pots. This can act as the centerpiece of your garden, drawing the eye and providing a sense of structure.

Best Plants For Containers

While most plants can be grown in containers, some are particularly well-suited for it. Here are some of the best plants for containers:

Flowers: Petunias, marigolds, begonias, and pansies are all excellent choices for container gardening. They are relatively low maintenance, thrive in containers, and provide vibrant pops of color.

Vegetables: Tomatoes, peppers, lettuce, radishes, and herbs like basil, parsley, and chives are great for containers. They have compact growth habits and provide a rewarding harvest.

Succulents: Due to their low water needs and compact size, succulents are perfect for container gardening. Varieties like echeveria, jade, and sempervivum are excellent choices.

Shrubs: Some shrubs can be grown in large containers. Boxwood, azaleas, and dwarf conifers can add structure and greenery to your container garden.

Ideas for Maximising Colorful Displays

A well-planned, colorful display can turn a container garden into a stunning visual spectacle. Here are some ideas:

Use colorful containers: Brightly colored pots can add color to your garden even when plants are not in bloom.

Plant vibrant flowers: Choose flowering plants with bright, showy flowers. You can create color schemes or go for a riot of colors for a more informal look.

Layer your plants: Plant taller plants at the back of the container, medium-sized ones in the middle, and trailing plants at the front for a layered, abundant look.

Use foliage: Don’t rely solely on flowers for color. Many plants have colorful foliage that can provide color throughout the season.

Container Garden Layout for Shade Areas

Designing a container garden for a shady area can be challenging, but with the right plant selection and layout, it can be just as vibrant as a sunny garden. Here are some tips:

Choose shade-loving plants: Ferns, hostas, and impatiens are all plants that thrive in shade and can be grown in containers.

Use light-colored containers: Light colors reflect light and can brighten up a shady area.

Arrange plants according to light needs: Place plants that need more light at the edge of the shaded area and those that require less light deeper in the shade.

Maximize vertical space: Hanging pots and vertical planters can allow plants to catch more light in a shady area.

Designing a Container Water Garden

Creating a water garden in a container can be a delightful addition to your garden or balcony, adding serenity and attracting beneficial wildlife. To start with, select a water-tight container that suits your aesthetic preferences. This can be a ceramic pot, a half barrel, a plastic tub, or even a glass aquarium. Ensure the container is deep enough to support the aquatic plants you wish to grow.

Water Garden

Next, select a range of aquatic plants for your water garden. Water lilies are a popular choice, offering vibrant flowers and a pleasant scent. Other aquatic plants include water lettuce, duckweed, and water hyacinths, which offer excellent foliage and help maintain the health of the water. Remember, variety adds interest. Combine plants with different forms and textures, such as floaters, submerged plants, and emergent plants, each contributing to different layers of the water garden.

Water gardens also attract a host of beneficial creatures like frogs, dragonflies, and birds, so consider your wildlife-friendly options. Adding a small water feature, like a fountain or a waterfall, not only adds movement and sound but also helps oxygenate the water.

Planning A Year-Round Container Garden

To enjoy a vibrant container garden year-round, you’ll need to carefully plan for each season. In the spring, consider bulbs like tulips and daffodils that will bring early color to your garden. They can be followed by annuals like pansies and primroses.

During the hot summer months, opt for drought-tolerant plants like succulents and ornamental grasses, as well as heat-loving flowers like marigolds and petunias. You can also grow a range of vegetables and herbs, such as tomatoes, peppers, and basil during this period.

As temperatures cool in autumn, switch to cool-season plants. Chrysanthemums and ornamental kale can offer a spectacular fall display. Late autumn is also the time to plant spring-flowering bulbs in your containers.

Winter doesn’t have to be a dull period for your container garden. Many plants offer winter interest, such as evergreen shrubs, winter-flowering heathers, and plants with colorful or textured bark like dogwoods.

How To Deter Pests

Pests can be a challenge for any garden, including container gardens. Here are a few tips to keep pests at bay. Start by choosing healthy plants that are less likely to attract pests. Inspect new plants carefully before adding them to your garden to prevent introducing pests.

Proper maintenance is essential. Water appropriately and avoid overcrowding plants, as damp and crowded conditions can encourage pests. Also, remember to clean your containers and tools regularly to prevent the buildup of pests and diseases.

Deter Pests

If pests do appear, identify them correctly to use the most effective control method. Some pests can be removed by hand, while others may require organic or chemical pesticides. Always follow the instructions on the pesticide label to use it safely.

Aesthetic Considerations To Consider

Finally, when designing your container garden, consider the aesthetic elements. Balance is important in any design. Create visual balance by placing larger pots or groups of smaller pots at various points throughout your space.

The choice of containers can also greatly affect the overall aesthetic of your garden. Whether you choose traditional terracotta pots, colorful ceramic containers, or rustic wooden crates, make sure the style complements your home or outdoor space.

Color is another key factor. You can create a color scheme by selecting plants and pots in complementary or contrasting colors. Consider not only the color of the flowers but also the foliage and even the bark or stems of some plants.

Don’t forget about the role of texture in your garden design. A mix of different leaf shapes, sizes, and textures can add depth and interest to your container garden.

Lastly, consider the view from inside your home. Arrange your containers in a way that can be enjoyed from your windows for year-round enjoyment.

Conclusion

Container gardening presents a wonderful opportunity to create unique, vibrant, and versatile gardens, irrespective of the size or location of your outdoor space. Whether you’re an urban dweller with a small balcony, or have a shaded area that receives little sunlight, the ideas and tips we’ve explored in this guide can help you create a beautiful, healthy, and productive container garden.

Remember, the key to successful container gardening lies in understanding the basics and carefully selecting the right containers, plants, and layout. Consider the specific conditions and needs of your space, such as sunlight, watering, and aesthetics, and plan accordingly. Your choice of plants should not only be guided by their visual appeal but also by their compatibility with your environmental conditions, their growth habits, and their maintenance needs.

Don’t forget to explore creative ideas, like using unique containers, designing a water garden, or planning a year-round garden, and to be mindful of best practices, such as maintaining soil health, deterring pests, and using organic practices. The potential for creativity and personalization is limitless in container gardening. So why wait? Start planning your container garden layout today, and before you know it, you’ll have a slice of nature’s beauty right at your doorstep.

20 Inspired Sloped Garden Ideas: A Comprehensive Guide

When it comes to landscaping, not all spaces are created equal. Sloping gardens offer unique opportunities for creativity and innovation, transforming what may initially seem like a challenge into a beautiful, dynamic environment. With careful planning and the right strategies, you can transform your sloping garden into a spectacular and functional space.

From ingenious drainage solutions and terrace designs to hillside pathways and rock gardens, this comprehensive guide covers a wide range of inspiring sloped garden ideas. Whether you’re considering lawn establishment on a slope, contemplating a water feature, or looking to illuminate your garden with strategic lighting, these ideas offer myriad ways to enhance the aesthetic appeal and usability of your sloping garden.

So, delve into this comprehensive guide to explore the multifaceted world of sloped garden design, where creativity meets practicality. We will discuss the challenges and solutions associated with sloping gardens, and then delve into the specific aspects of these features.

Understanding the Challenges of a Sloping Garden

A sloping garden may initially seem like a landscaping nightmare due to issues like soil erosion, poor drainage, and difficulty in establishing lawns and gardens. However, understanding these challenges is the first step in overcoming them, and transforming your sloping garden into an inviting, vibrant space.

  • Soil Erosion and Instability: With sloping gardens, the risk of soil erosion and instability is higher, especially during heavy rain. Measures like installing retaining walls or creating terraces can be implemented to hold the soil in place.
  • Drainage Issues: Sloping gardens tend to have quick water runoff, leading to poor water absorption by the plants and potential erosion. Effective drainage solutions can prevent waterlogging and ensure optimal water distribution.
  • Difficulty in Establishing Gardens: Planting on a slope can be challenging due to the uneven terrain and fast water runoff. However, selecting the right plants and using specific planting techniques can overcome this issue.

Effective Drainage Solutions for Sloping Gardens

Effective water management is a cornerstone of any sloping garden design. With inclines come the rapid movement of water, which can lead to problems like soil erosion and nutrient depletion. However, several innovative strategies can combat these issues, allowing you to maintain a healthy and vibrant garden.

Drainage Solutions for Sloping Gardens

Terracing is a traditional yet highly effective technique for managing water in sloped gardens. By creating level platforms across the slope, terraces slow down water runoff, allowing it to soak into the ground and reach the roots of plants. Beyond functionality, terraces can be designed to add visual interest to your garden. Incorporate stone steps or flowering plants for added aesthetic appeal.

Dry Creek Beds serve both aesthetic and practical purposes in a sloping garden. You can construct these by digging a shallow, meandering trench along the path of natural water flow, lining it with landscape fabric, and filling it with decorative stones or gravel. Not only does this structure guide runoff water, but it also mimics the charming feature of a babbling brook.

Another solution is to install a French Drain, an underground system that redirects excess water. It consists of a slightly sloped trench filled with gravel, enclosing a pipe that draws water away from your garden. While more labor-intensive to install, a French Drain is highly effective and unobtrusive, preserving the visual integrity of your garden.

Lastly, consider rain gardens—depressed areas planted with water-loving plants. They provide a natural basin for rainwater to collect and gradually infiltrate the soil, reducing runoff and enhancing your garden’s biodiversity.

Terrace Design for Sloping Gardens

When it comes to combating erosion and creating usable space in a sloping garden, terracing is an elegant solution. Beyond their practical benefits, terraces offer unique opportunities for creating stunning visual displays and diverse microclimates.

Terrace Design for Sloping Gardens

The choice of material for your terraces can dramatically alter the style of your garden. Stone or brick can create a classic, timeless aesthetic, while timber may lend a more casual, rustic ambiance. Recycled concrete, known as urbanite, can also be used for an eco-friendly and modern look.

The shape and size of your terraces should not only be determined by the steepness and size of your slope but also by the intended use of each level. Wide terraces can house vegetable patches, play areas, or outdoor dining spaces. On the other hand, narrower terraces might be perfect for cascading flower beds or vine-covered trellises.

Consider also the orientation of your terraces. In hot climates, north-facing terraces will benefit from less intense sun exposure, while south-facing terraces in cooler climates will receive more warmth and light.

Retaining Wall Ideas for Hillside Gardens

Retaining walls are workhorses in a sloping garden, countering soil erosion and helping to manage water flow. But they also present an opportunity to add structural beauty to your landscape.

Stone Wall Garden

Natural stone walls blend well with virtually any landscape, exuding a timeless, organic appeal. Whether it’s sandstone for its warm tones, slate for its blue-gray hues, or granite for its speckled appearance, natural stone is durable and versatile.

Timber walls, particularly those made from hardwoods or treated pine, impart a warm, casual vibe to your garden. However, they may require more maintenance to prevent rot and insect damage.

Concrete or brick walls are extremely durable and can be painted or stained to complement your garden’s color scheme. Their clean lines lend themselves well to modern or formal gardens.

Recently, corten steel has become a popular choice for retaining walls. Its weathered look adds a contemporary edge to your garden, while its strength makes it a long-lasting option.

For a more budget-friendly approach, consider gabion walls—cages filled with rocks or recycled materials. Gabions not only provide texture and interest but also promote good drainage.

Essential Plants for Sloping Garden Landscapes

The right plant selection can turn the challenge of a sloping garden into a distinctive design feature. Planting strategies can range from establishing groundcovers and ornamental grasses to creating tiered flowerbeds or a woodland garden under mature trees.

Sloping Garden Landscapes

Groundcovers are the first line of defense against soil erosion, their root systems knitting together to form a living mulch. These might include flowering varieties like Creeping Phlox or Sedum, or foliage-focused plants like Vinca or Ajuga.

Ornamental grasses with their deep roots and textural beauty, are another excellent choice for sloping gardens. Blue Fescue, Fountain Grass, or Feather Reed Grass can create an eye-catching display as they sway in the wind.

Shrubs provide year-round interest, their bulk helping to stabilize soil. Low-growing, spreading shrubs like Juniper or Cotoneaster are great for sunny spots, while Hydrangeas or Azaleas might be more suitable for shady slopes.

Lastly, trees can be a wonderful addition, their roots providing structural support and their canopy creating a lovely dappled light effect. Consider planting trees like Dogwood, which offers stunning spring flowers, or Redbud, renowned for its heart-shaped leaves and autumn color.

The Art of Landscaping a Sloping Garden

Landscaping a sloping garden is both a science and an art—balancing the practical needs of the site with aesthetic considerations. When done correctly, it offers an opportunity to create a dynamic and captivating garden.

Creating levels or terraces is a common strategy in slope landscaping, breaking up the steep incline into more manageable, flat areas. This not only controls erosion and improves water absorption but also provides distinct areas for different uses or plantings.

Pathways are crucial in sloping gardens. They provide accessibility, allowing you to navigate the garden without struggling up a steep incline. The choice of materials—whether brick, gravel, stepping stones, or timber—can complement the overall design theme.

Planting in groups or clusters can create a more natural and cohesive look. This also works well for erosion control, as the group’s combined root systems can better hold the soil. Try to create a mix of textures, colors, and heights for the best visual effect.

Lastly, don’t forget the power of views. If your slope is positioned correctly, it might afford fantastic views. Ensure your design capitalizes on this—whether by positioning seating areas to face the view, creating viewports through planting, or using the downward perspective to emphasize certain design elements.

Benefits of Having a Sloping Garden

While sloping gardens may present unique challenges, they also provide an array of benefits. From enhanced views to increased biodiversity, a sloping garden offers countless opportunities for an inspired gardener.

One of the most apparent benefits is the natural drainage a slope provides. Unlike flat landscapes, where water may pool or cause soggy areas, a sloping garden allows for runoff, reducing the chances of waterlogged plants and promoting healthier growth.

Sloping gardens also provide an opportunity for varied microclimates. The top of the slope often experiences more wind and sunlight, making it suitable for plants that enjoy full sun and well-drained conditions. The slope’s base may offer shadier, moister conditions ideal for plants that prefer less sun.

The dynamic views are another advantage of a sloping garden. It allows you to view plants from different perspectives, adding depth and dimension. Plus, the higher vantage point can afford beautiful views of the surrounding landscape.

The unique terrain of a sloping garden can also lead to increased biodiversity. The varying conditions from top to bottom of a slope can accommodate a wide range of plant species. This, in turn, attracts a variety of wildlife, making your garden a hub for local ecosystem interactions.

Finally, a sloping garden lends itself perfectly to terracing, an aesthetic and functional technique that can be used to create stunning stepped gardens, each level offering its own unique planting opportunity.

Decking Options for Hillside Gardens

Decking can transform a sloping garden, providing level areas for entertaining or relaxation. The hillside setting offers an opportunity to create decks with stunning views, and there are various options to consider based on your garden’s specific needs.

Ground-level decks work well for slight slopes, providing a flat, stable surface. They typically require less material and can be a cost-effective solution.

For steeper slopes, multi-level decks may be the best solution. These decks can follow the terrain, with steps or ramps connecting different levels. This style of decking can create separate ‘rooms’ within your garden, each with its own purpose.

Cantilevered decks, which are supported on one side, can provide an unobstructed view of your landscape. They give the illusion of floating above the slope, offering a unique aesthetic.

Choosing the right material is another crucial aspect of decking. While wood provides a traditional look, it requires regular maintenance to prevent decay. Composite decking, made of wood and plastic, is a durable and low-maintenance alternative.

Lastly, consider incorporating railing into your design, particularly for decks with a significant drop-off. Not only can they ensure safety, but they also provide an opportunity to add design interest, whether you choose a minimalist cable railing or a more traditional wooden style.

Hillside Garden Pathways: A Comprehensive Guide

Paths are an essential component in any sloping garden, guiding the visitor through the landscape while protecting plants from trampling. They can range from functional solutions, like staircases for steep inclines, to aesthetic features, like meandering gravel paths through a woodland garden.

Hillside Garden Pathways

Stepped paths can turn the challenging gradient of a slope into an architectural feature. The steps can be made from various materials such as stone, brick, or timber, each providing a different aesthetic. Incorporate landings at intervals to provide resting spots and areas to admire the view.

Switchback paths, which zigzag across the slope, can be a good solution for very steep gradients. They make the journey up less strenuous, while adding interest to the garden design.

Meandering paths can offer a sense of exploration, leading visitors through different ‘rooms’ in the garden. They can be designed to reveal views or features gradually, adding an element of surprise.

Pathways should also take into account drainage, with materials like gravel or spaced paving allowing water to permeate. Edging can also be beneficial in preventing soil from washing onto the path.

Creating a Rock Garden on a Slope

Rock gardens are a natural fit for sloping terrains, mimicking the rugged beauty of mountainous landscapes. They can provide the perfect conditions for a variety of alpine plants, while the rocks add year-round structure and interest.

Creating a Rock Garden

Select rocks that complement the size and style of your garden. Local rocks can often blend well with the surrounding landscape, and consider the size and shape of the rocks for variety and interest.

The arrangement of rocks should appear as natural as possible, mimicking nature’s randomness. Larger rocks can be partially buried for stability and to give the illusion that they have been there for centuries.

Rock garden plants often prefer well-drained soil and full sun. Alpine plants, succulents, small ferns, and dwarf varieties of shrubs can all work well. Plant in crevices between the rocks or in pockets of soil, considering the plant’s size at maturity to ensure they have room to grow.

A rock garden can also incorporate a water feature, such as a trickling stream or a small pond, enhancing the naturalistic setting.

Tips for Installing a Patio on a Slope

Installing a patio in a sloping garden can be challenging but, with the right approach, it can become a striking feature. The slope can provide unique design opportunities, and a well-placed patio can offer beautiful views over the garden or the surrounding landscape.

One method is to level the area where you want to build the patio. This can be done by cutting into the slope and using a retaining wall to hold back the soil. Ensure proper drainage to prevent water from pooling on your patio.

Choosing the right materials is important. Consider non-slip materials like textured concrete or natural stone, which offer good traction even when wet.

Terraced patios can be a good solution for steeper slopes. Each terrace can serve a different function—one could house a dining area, another a fire pit, and another a lounging area.

Don’t forget about access. Incorporate steps or a gently sloping path to easily move between the patio and the rest of the garden.

Lastly, consider the orientation of your patio. If possible, position it to take advantage of the best views and the most desirable sunlight.

Considerations for Lawn Establishment on Slopes

Establishing a lawn on a slope can be challenging, but with the right approach, you can create a lush, green space. The key lies in soil preparation, choosing the right type of grass, and managing erosion.

Lawn Establishment on Slopes

Soil Preparation is the first step. Begin by adding organic matter like compost to improve the soil structure and nutrient content. Next, level the area as much as possible, removing any rocks or debris. For very steep slopes, consider creating terraces for a more level surface.

Choosing the Right Grass is crucial. Select a variety of grass that is hardy, drought-tolerant, and can establish a deep root system to prevent erosion. Grasses like Bermuda or buffalo grass are excellent choices.

Erosion Control can be a challenge with sloping lawns. One effective method is to install erosion control blankets or geotextiles, which hold the soil in place while the grass roots establish. Alternatively, hydroseeding, where seed, mulch, and a binder are sprayed onto the slope, can be a successful technique.

Watering a sloping lawn requires a careful approach. Too much water will run off the slope, depriving the grass of moisture. Irrigate slowly and frequently to ensure the water has time to penetrate the soil.

Lastly, maintaining a slightly higher mowing height will encourage a deeper root system, helping to stabilize the soil and retain moisture.

Designing a Water Feature for a Sloping Garden

The natural gradient of a sloping garden provides a fantastic opportunity for a water feature. Whether it’s a cascading waterfall, a bubbling brook, or a tranquil pond, water can add movement, sound, and wildlife interest to your garden.

Waterfalls and Streams are particularly effective in sloping gardens. By using the natural gradient, you can create a series of cascades or a meandering stream that mimics a natural landscape. Consider incorporating larger rocks and boulders to create the most natural effect.

Ponds can also work well on a slope. The lower part of the garden can be used to collect and store water. This could be the end point for a stream or waterfall, or stand as a feature on its own. When designing the pond, ensure it has a stable base and good edge support to prevent water from leaking out.

Remember to consider the pump and filtration system. The pump needs to be strong enough to push the water up the slope, and a good filter will help keep the water clean and clear.

Finally, consider the plantings around your water feature. Moisture-loving plants can be placed near the water, while drier-tolerant plants can go higher up the slope.

Beautiful Flower Bed Ideas for Hillside Gardens

A hillside garden provides the perfect canvas for a vibrant and varied flower bed. With careful design and the right plant selection, a sloping garden can be transformed into a cascading display of color and texture.

Terracing can provide level areas for traditional flower beds. The raised soil beds can accommodate a wide variety of flowering plants, and the stepped design can create a beautiful tiered effect when viewed from below.

Mixed Planting is another approach. Combining trees, shrubs, perennials, and ground cover can create a dynamic landscape. Select plants with varying heights, colors, and blooming seasons for year-round interest.

Color Planning is an effective technique. Cooler colors like blues and purples can be placed at the top of the slope to create a sense of distance, while warmer colors like reds and yellows can be placed at the bottom to draw attention.

Remember, plants on a slope may require more frequent watering as water tends to run off. Use drought-tolerant plants or install an efficient irrigation system to ensure your flower beds flourish.

The Role of Lighting in a Sloping Garden

Lighting is an essential element in any garden design, but it plays a particularly important role in sloping gardens. It can highlight the garden’s unique structure, provide safety along paths and steps, and create a beautiful nighttime landscape.

Uplighting can be used to emphasize certain elements in the garden. Aim lights upwards to highlight the unique texture of a tree’s bark or to illuminate a striking rock formation.

Pathway lights are important for safety, making it easy to navigate the garden after dark. Solar or low-voltage LED lights can be a cost-effective and sustainable choice.

Consider downlighting for higher areas of your garden. Installing lights high up in trees or on the sides of your house can mimic natural moonlight, creating a serene and magical effect.

Don’t forget about the water feature. Illuminating a pond or waterfall can create a stunning focal point. Use submersible lights for a glowing water effect.

Hillside Garden Maintenance Tips

Maintaining a hillside garden can require a bit more effort compared to a flat garden. However, with some proactive measures and regular care, you can keep your sloping garden in peak condition.

One of the main challenges is watering. As water tends to run off, regular watering is necessary. An irrigation system, such as a soaker hose or drip system, can provide slow, steady watering.

Weeding is another important task. Removing weeds promptly can prevent them from taking over your garden. Consider using ground cover plants, which can suppress weed growth while stabilizing the soil.

Mulching is especially crucial on slopes to retain soil moisture, suppress weeds, and prevent soil erosion. Choose a heavier mulch that won’t wash away easily.

Pruning is also important. Regularly trim back plants, especially those near pathways, to ensure they don’t become overgrown and obstruct access.

Remember, working on a slope can be more physically demanding. Always ensure your safety when gardening on steep terrain. Use suitable footwear, and consider using gardening tools with extended handles to make tasks easier and safer.

Choosing the Right Garden Furniture for Slopes

Selecting the right garden furniture for a sloping garden can transform it into a beautiful and functional outdoor living space. Consideration should be given to the terrain, stability, and overall aesthetics of your garden.

Choosing the Right Garden Furniture

  • Consider the Terrain – Sloping gardens may have uneven surfaces, making it challenging to place traditional furniture. Look for pieces designed for uneven terrain. Some outdoor furniture sets come with adjustable legs for better stability.
  • Material Selection – The material of your furniture plays a crucial role. Choose robust, weather-resistant materials like teak, wrought iron, or all-weather rattan. They can withstand the elements and the possible increased exposure to sunlight on a slope.
  • Size and Proportions – Ensure your furniture fits comfortably within your garden layout without overwhelming it. Sleek, low-profile pieces might be preferable for smaller or steeper slopes.
  • Functional Furnishings – Consider multi-functional pieces. For instance, a garden bench that doubles as storage can help manage clutter.
  • Seating Arrangements – Arrange your seating to take advantage of the unique perspectives offered by a sloping garden. A well-placed bench or lounge chair can provide a perfect spot to enjoy the view.

Lastly, always secure your furniture to prevent it from sliding or tipping over. Safety should always be a priority.

Installing a Vegetable Garden on a Hill

Hillside vegetable gardens can be incredibly productive with the right planning and preparation. From terracing to choosing suitable crops, here’s how to get started:

Vegetable Garden on a Hill

  • Terracing – By far, one of the most effective ways to create a vegetable garden on a hill is to build terraces. This not only creates flat beds for your plants but also improves water absorption and reduces soil erosion.
  • Crop Selection – Choose crops that are well-suited to hillside gardening. Deep-rooted vegetables such as tomatoes, squash, and beans can help stabilize the soil while providing a tasty return.
  • Planting Strategy – Consider planting in rows across the slope. This can help slow water runoff, giving plants more time to absorb the water they need.
  • Irrigation – Depending on the steepness and size of the slope, you may want to consider drip irrigation or soaker hoses for efficient watering.
  • Pathways – Don’t forget to leave space for pathways. This will not only make it easier to tend your garden but also prevent compacting the soil next to your plants.

How to Improve Soil on a Slope

Improving soil on a slope can be a challenge, but it’s essential for the health of your plants. Here are some steps to enhance the quality of your hillside soil:

  • Adding Organic Matter – Incorporating organic materials like compost or well-rotted manure can improve the soil structure, nutrient content, and water-holding capacity of the soil.
  • Mulching – Applying a thick layer of mulch can help retain moisture, suppress weeds, and reduce erosion. It also breaks down over time, further improving your soil’s fertility.
  • Cover Crops – Consider planting cover crops, such as clover or vetch. These can help prevent erosion and improve soil fertility, especially when turned back into the soil.
  • Avoid Compaction – Try to limit foot traffic on the slope to prevent soil compaction. Compact soil can hinder root growth and limit water absorption.
  • Soil Testing – Consider getting your soil tested. This will let you know what nutrients your soil lacks and allow you to make specific amendments.

Innovative Ideas for Sloping Garden Transformation

There are numerous innovative ways to transform a sloping garden into an enchanting outdoor space. Here are a few inspired ideas:

  • Create Dynamic Levels – Use the natural incline of your garden to create dynamic, multi-level areas. You could have a sun-soaked patio on the top level, a cozy seating area in the middle, and a serene water feature at the bottom.
  • Install a Viewing Platform – Make the most of the elevation by installing a viewing platform or gazebo. This can provide panoramic views of the landscape beyond your garden.
  • Make a Feature of Steps – Rather than just a functional way to navigate the slope, make your steps a feature. Use attractive materials like stone or wood and line the steps with vibrant plants or lighting.
  • Plant a Wildflower Meadow – Embrace the incline and sow a mix of wildflowers for a low maintenance, wildlife-friendly garden. The slope will provide the perfect backdrop to a riot of color.
  • Install a Slide – If you have children, why not install a slide on the steeper parts of your garden? It’s a fun way to interact with the space and certainly brings a unique element to the garden design.

Conclusion

Creating an inviting, functional, and beautiful garden on a slope requires a bit more consideration than flat landscapes. However, it provides an exciting opportunity to turn a potentially challenging terrain into an aesthetically pleasing and unique space. With careful planning and design, coupled with the right plant selection and maintenance practices, a sloping garden can become the highlight of your home.

From effective drainage solutions to terrace designs and innovative landscaping strategies, we’ve covered a wide range of topics to help you transform your sloping garden. Remember to consider practical aspects like the right garden furniture, pathways, and soil improvement. Furthermore, incorporate fun and creative elements like a rock garden, a vegetable garden on a hill, a water feature, and perhaps even a slide.

Every garden, regardless of its slope, can be turned into a sanctuary. It’s about understanding and working with the slope, not against it. Embrace the unique opportunities it presents and use it to bring a new dimension to your garden design. It may take a bit of effort initially, but the end result will be well worth it.

Let your creativity take the lead and see how your sloping garden transforms into a captivating and inviting outdoor space for you and your loved ones to enjoy. With all the tips and strategies provided in this comprehensive guide, your sloping garden journey is poised to be an exciting and rewarding one.

24 Recycled Garden Ideas Eco-Friendly and Creative Tips

Creating a beautiful and productive garden doesn’t need to be an expensive undertaking. With creativity and a keen eye for potential, you can transform recyclable materials into eco-friendly garden additions. This comprehensive guide offers 24 recycled garden ideas to help you create a sustainable garden with flair. We will delve into creative containers, upcycled items, old pallets, broken ceramics, and much more. Not only will these ideas lead to cost savings, but they can also increase biodiversity, create educational activities, and be used in your recycling programs. By the end, you’ll have a complete understanding of how recycled materials can revolutionize your garden care.

From transforming old furniture to creating garden decorations, there are endless possibilities. You might also consider recycled pathways, compost bins, and recycled fencing. The article will also explore innovative uses of old tires, the benefits of rainwater harvesting, and real-life case studies. All these can inspire your DIY recycling projects. Let’s dive into this world of sustainable gardening, exploring how these eco-friendly, creative, and cost-effective solutions can turn your garden into an art piece and a haven for local wildlife.

This guide aims to spark creativity, provide practical advice, and demonstrate how recycling can have a significant positive impact on your garden and the environment. Whether you’re a seasoned gardener or a beginner, these tips are sure to inspire.

Benefits of Recycling in Gardening

Using recycled materials in your garden comes with a multitude of benefits. It not only allows you to be creative and unique with your garden design, but also has a positive impact on the environment and your wallet.

Recycling in Gardening

Eco-Friendly

By reusing materials that would otherwise end up in landfills, you reduce waste, decreasing your carbon footprint. Your garden becomes a testament to sustainable living, educating visitors, and inspiring them to take similar steps.

Sustainable Gardening

Recycling promotes sustainable gardening. The use of recycled materials reduces the need for new resources, conserving the environment. For example, repurposing old pallets into compost bins cuts down the demand for timber, a resource that takes decades to replenish.

Cost Savings

Recycled garden ideas often lead to significant cost savings. Instead of buying new garden decorations or furniture, you can make them from items you already have. This creative endeavor not only saves you money but also adds a personal touch to your garden.

Biodiversity

Using recycled materials can boost biodiversity in your garden. Old logs, for instance, can serve as habitats for insects, while old sinks can be transformed into mini-ponds, attracting frogs and newts. A diverse garden is a healthy garden, beneficial for the wider ecosystem.

Planning Your Eco-Friendly Garden

Planning an eco-friendly garden is not just about planting. It’s a holistic approach that combines sustainable gardening techniques, recycling, and creativity to foster a healthier environment. This planning stage is critical as it helps align your ideas, resources, and end goals into a realistic and executable blueprint.

Eco-Friendly Garden

Firstly, consider the space you have and how you’d like to use it. Do you want a vegetable garden, a flower garden, or perhaps a combination of both? Understanding the purpose of your garden helps determine what type of recyclable materials you’ll need.

Next, assess the climate, soil type, and amount of sunlight your garden receives. This will help you decide what kind of plants to grow and where to place your recycled plant containers or decorations. For instance, a shade-loving plant may thrive under the dappled sunlight through an upcycled trellis.

Remember to incorporate composting and rainwater harvesting systems into your plan. Composting your kitchen scraps reduces waste and enriches your soil, while harvesting rainwater reduces water bills and is better for your plants.

Lastly, think about the future growth of your plants and how it affects the placement of your recycled items. Leave enough room for plants to grow and ensure that heavier items have a strong base to prevent toppling.

Choosing Recyclable Materials

Choosing the right recyclable materials for your garden can be a fun scavenger hunt. It’s about seeing the potential in everyday items and utilizing them creatively.

Consider items made from materials like wood, metal, ceramics, or plastic. These materials are durable and can withstand the outdoor conditions. Old furniture, containers, kitchen items, and construction leftovers like bricks or tiles can be transformed into something useful in your garden.

Remember, it’s not about finding perfect items. Charm often lies in the flaws and gives your garden a unique character. A worn-out wooden ladder can turn into a rustic plant stand, or a chipped teapot can become an interesting planter.

Also, keep safety in mind. Avoid materials that can leach harmful chemicals into the soil, like treated wood or certain plastics. If you’re unsure, do a quick research to see if the material is safe for gardening use.

Creative Plant Containers

Plant containers are an essential component of a garden, and they don’t have to be the standard pots from a store. Just about any item that can hold soil and allow water to drain can be a potential plant container.

One classic example is tin cans. They are easy to find and can be painted to match your garden’s color scheme. Simply drill a few holes in the bottom for drainage, add some gravel and soil, and you’re ready to plant.

Creative Plant Containers

Ceramic ware like bowls, mugs, or even baking dishes can make eye-catching plant containers. If they have cracks or chips, all the better. These ‘flaws’ add a touch of rustic charm.

Another idea is to use old baskets as plant containers. Lining them with a layer of moss can help retain moisture and provide a beautiful, natural look. The weave of the basket also allows excellent breathability for your plant’s roots.

Upcycling Household Items For The Garden

Upcycling is the process of transforming old, unused items into something useful. It’s an excellent way to reduce waste and add unique, personal touches to your garden.

Old furniture, for instance, can be turned into impressive planters. An old dresser can be refurbished into a vertical garden, with each drawer holding different plants. A wooden chair can be repurposed into a quirky planter by placing a pot where the seat used to be.

Kitchen items can also be upcycled. Old teapots, colanders, and even bread bins can be repurposed into planters. An old baking tray can serve as a shallow planter for succulents or be used as a bird feeder.

Children’s toys, especially large plastic ones like trucks or dollhouses, can make whimsical plant containers. It’s a fun way to hold onto these items when your kids have outgrown them.

Innovative Uses for Old Pallets

Wooden pallets are a popular material in the world of DIY and for good reasons. They’re sturdy, versatile, and easy to work with. With a bit of creativity, they can be transformed into functional garden items.

One of the simplest uses for old pallets is to make a compost bin. Just stand a few pallets together to form a square or rectangle, secure the corners, and you have a large, airy bin that’s perfect for composting.

Pallets can also be used to build raised garden beds. This not only saves your back from bending over but also allows you to have control over the soil in the bed. It’s ideal for growing vegetables, herbs, or flowers.

Another great idea is to use pallets to create vertical gardens. Attach some landscape fabric to one side, fill it with soil, and plant succulents or other low-maintenance plants. It’s an excellent solution for small spaces as it takes advantage of vertical space.

Repurposing Broken Ceramics

Broken ceramics have an enduring, timeless quality that makes them ideal for garden reuse. Their shapes, sizes, and patterns bring visual interest, adding a touch of whimsy to any outdoor space.

Chipped plates, broken pots, or cracked tiles can all be repurposed as plant pot saucers. Not only are they functional, preventing water run-off and soil from staining your surfaces, but they also enhance the visual appeal of your plant pots.

Repurposing Broken Ceramics

Smaller ceramic shards can be used as drainage stones at the bottom of plant pots. They allow water to flow freely and prevent soil from clogging the drainage holes, ensuring healthier roots and plants.

For the creative souls, broken ceramics can be assembled into beautiful mosaic art. They can adorn stepping stones, decorate garden walls, or transform a plain table top. Creating a mosaic is not only a creative endeavor but also a mindful, therapeutic activity.

Large broken ceramic pots can also be turned into fairy gardens or miniature landscapes. Half a pot could represent a rocky cave, or a series of stacked shards could simulate mountain terrains. With some small plants and miniature figurines, you can create enchanting, magical scenes.

Recycling Plastic Bottles in Garden

Plastic bottles are one of the most common household waste. Recycling them in the garden is a fantastic way to minimize their environmental impact while creating functional garden elements.

Plastic bottles make excellent mini greenhouses or cloches for your plants. Simply cut off the bottom of the bottle, place it over the plant, and you have a protective environment that traps moisture and warmth, promoting growth.

Plastic Bottles in Garden

Turn your plastic bottles into hanging planters. Cut them in half, fill the bottom with soil and plants, then hang them upside down. The bottle’s neck allows excess water to drain and can be stopped with a cork when needed.

For those interested in vertical gardening, a plastic bottle tower can be a space-saving solution. Stack several bottles with the bottoms cut off, fill them with soil, and plant your herbs or small vegetables. Ensure each level gets enough sunlight for optimal growth.

Plastic bottles can also be converted into DIY drip irrigation systems. Puncture some holes into the bottle, bury it next to the plant with the top exposed, and fill it with water. The water will slowly seep out, keeping the soil moist.

Transforming Old Furniture For The Garden

Transforming old furniture for the garden is a creative, sustainable way to repurpose items that would otherwise end up in a landfill. Besides, it adds a unique charm and character to your outdoor space.

An old wooden ladder can be a beautiful vertical garden stand. Each step serves as a shelf where you can place pots of flowers, herbs, or succulents. It’s a wonderful way to create visual height and interest in your garden.

Furniture For The Garden

Chests of drawers can be converted into a ‘garden of drawers.’ Remove some drawers to create space for larger plants, while others can be partially pulled out and used as planters. Over time, the weathered look will give it a beautiful rustic appearance.

Consider turning an old bed frame into a raised garden bed. Fill it with good quality soil and compost, and you have a spacious bed ready for planting.

An old table can also serve a new life as a potting bench. It provides a handy workspace for your gardening chores, with plenty of space to store pots, tools, and soil underneath.

Garden Art from Recycled Materials

Creating garden art from recycled materials is an eco-friendly and budget-friendly way to add personality and charm to your outdoor space.

Old tools, for example, can be welded together to create unique sculptures. Paint them in vibrant colors to make them stand out or leave them to naturally rust for a more rustic look.

Bottle caps, old keys, or worn-out cutlery can be strung together to create wind chimes. Their clinks and clatters add an auditory dimension to your garden, enhancing its sensory appeal.

Glass marbles can be used to make garden gazing balls. Attach them to an old bowling ball or a round light fixture to create a stunning, shiny sphere that reflects your garden’s beauty.

Even something as simple as painting stones or bricks can create interesting garden art. Use them to mark your vegetable rows, create a colorful border, or as stepping stones on a path.

DIY Recycled Bird Feeders

Bird feeders made from recycled materials are not only eco-friendly but also a delightful way to attract birds to your garden.

An old teacup and saucer can be glued together to form a quaint bird feeder. Hang it from a tree or place it on a table, and it becomes a lovely, functional ornament.

Plastic bottles can also be converted into bird feeders. Cut holes in the sides large enough for a bird to access, attach wooden spoons as perches under the holes, and fill the bottle with birdseed.

Recycled Bird Feeders

Another simple idea is to use a tin can. Cover it in a bright, weather-resistant paint, punch holes to attach a hanging wire, and you have a simple, efficient bird feeder.

An old wooden birdhouse can be transformed into a feeder by adding edges to the openings to hold birdseed. This not only feeds the birds but also gives them a place to take shelter.

Homemade Garden Decorations

Creating homemade garden decorations from recycled materials is a fun, fulfilling project that enhances your garden’s aesthetics while reducing waste.

Wine bottles can be turned into beautiful garden edging. Simply bury them neck down in the ground along your garden path or flower bed. They will sparkle in the sunlight, adding a pop of color and intrigue.

Garden Decorations

Old picture frames can be turned into decorative garden signs. Paint or stencil them with welcome messages, plant names, or fun quotes.

An old chandelier can be transformed into a multi-tiered planter. Remove the wiring and light fittings, paint the frame, and attach small pots or coco liners. Fill them with soil and trailing plants to create a stunning hanging planter.

You can even use old tires as a garden decoration. Paint them in bright colors and stack them to form planters, or fill them with soil and plant flowers directly inside. They can also be hung on a wall or tree to create a vertical garden.

Creating Recycled Pathways

Recycled pathways are an effective, cost-efficient, and aesthetic way of utilizing recycled materials in your garden. They provide structure, direction, and add character to your garden landscape.

Bricks from old construction projects can be repurposed to create an enticing garden path. Whether laid in a herringbone, straight, or circular pattern, they offer a charming, rustic appeal.

Broken ceramics and tiles can be creatively used to design mosaic paths. Their varying shapes, colors, and sizes offer endless design possibilities. Plus, they are incredibly resilient to weather conditions and heavy foot traffic.

Old wooden pallets can be dismantled, and the planks can be used to create a walkway. It’s advisable to treat the wood to prolong its lifespan and to prevent rotting.

Bottle caps, collected over time, can be embedded into a pathway to create a truly unique, colorful, and textured walkway.

Building Compost Bins from Scraps

Building your own compost bin from scraps not only reduces waste but also enriches your garden soil. It’s a significant step towards sustainable gardening.

Old wooden pallets are ideal for creating a compost bin. Four pallets can be tied or nailed together to form a box. It provides ample space for composting materials and facilitates aeration, which is crucial in the composting process.

A large, unused plastic bin can also be converted into a compost bin. Drill multiple holes on the sides, bottom, and lid to ensure proper ventilation and drainage. It’s lightweight, easy to handle, and perfect for small gardens or patios.

If you have access to wire mesh or chicken wire, it can be fashioned into a cylindrical compost bin. Secure the ends with wire or cable ties. This design allows for good airflow and easy turning of the compost.

Recycled Fencing Ideas

Fencing serves not only a practical purpose but also plays a pivotal role in the aesthetics of a garden. Using recycled materials for fencing is an eco-friendly and creative option.

Old pallets can be repurposed into charming rustic fences. They can be left with their natural weathered look or be painted for a more vibrant, unique appearance.

Fencing Ideas

Repurposing old metal bed frames can lead to the creation of truly unique and durable garden fences. Their intricate designs often lend a touch of vintage appeal to the garden.

Bamboo poles from old blinds or mats can be reused as fencing materials. They’re lightweight, flexible, and bring an Asian, zen-like feel to the garden.

Old doors can be connected to form a quirky, unusual garden fence. It’s a great conversation starter and a way to bring a touch of whimsical charm to your outdoor space.

Utilizing Recycled Materials for Trellises

Trellises are essential structures in the garden for climbing plants. Creating them from recycled materials is not only eco-friendly but also allows for immense creativity.

Old ladders can be leaned against a wall or fence to act as a trellis. They offer an attractive vertical element and plenty of space for plants like roses, ivy, or climbing hydrangeas to grow.

Wooden pallets can also be used as trellises. Remove some slats to make room for plant growth, and you’ve got a ready-made trellis.

Bamboo stakes, leftover from other projects, can be tied together to form a variety of trellis shapes. A fan, grid, or tepee trellis, for example, are all easily achievable with bamboo.

Old Tires in Garden Design

Old tires, often hard to dispose of, can be creatively repurposed in garden design. Their longevity, versatility, and easy availability make them a perfect candidate for recycling.

One common use is turning tires into planters. Paint them in vibrant colors, fill them with soil and plants, and you have an attractive, resilient planter. They can be stacked, hanged, or laid on the ground for different visual effects.

Another innovative idea is to use tires to create a garden pond. Bury a large tire, line it with pond liner, fill it with water, and surround it with rocks, plants, and even fish.

Tires can also be used to create a fun and safe swing for kids. All you need is a sturdy rope and a strong tree branch.

A more complex, but rewarding project, is to use tires to build a garden wall or a retaining wall. It’s durable, flexible, and can adapt to various garden terrains.

Rainwater Harvesting Systems

Rainwater harvesting is a sustainable and eco-friendly practice that can significantly reduce your dependence on public or well water. In the context of a recycled garden, it fits right in, highlighting the ethos of reuse and recycle.

Rainwater Harvesting Systems

One simple way to set up a rainwater harvesting system is by using old barrels or buckets. Positioned under your roof’s downspouts, they collect rainwater runoff which can be used later for watering plants.

An old bathtub or sink can be repurposed as a rainwater harvesting system. These items are usually designed to hold and drain water, making them ideal for this purpose. Just remember to cover them with a screen to prevent mosquitoes and other insects from breeding.

For those with larger gardens, consider converting an unused swimming pool or hot tub into a rainwater storage system. These can hold a large volume of water, which is especially useful during dry seasons.

Recycled PVC pipes can also be used to create an effective rainwater harvesting system. They can be installed to direct the flow of rainwater from rooftops to storage containers or directly to areas in your garden that require the most water.

Sustainable Gardening Practices

Sustainable gardening practices aim to reduce the environmental impact of gardening. When you opt for recycled garden ideas, you’re already contributing to sustainability. However, there are other practices that you can adopt to make your gardening efforts even more eco-friendly.

Composting is a fundamental sustainable practice. It involves recycling kitchen and garden waste into rich, nutritious compost for your plants. It significantly reduces the amount of waste that goes into landfills while improving the health of your garden.

Another practice is the use of native plants. These plants are adapted to local conditions and require less water, fertilizers, and pesticides, thus reducing your garden’s environmental footprint.

Mulching is another sustainable practice. It reduces the rate of evaporation, keeping your soil moist for longer periods. This means less watering is required. You can use recycled materials like shredded newspapers, broken down cardboard, or wood chips from pruned branches for mulching.

Crop rotation is a technique mostly used in vegetable gardens. By changing the type of plants grown in each area every season, you can prevent the build-up of pests and diseases, and improve soil fertility, reducing the need for chemical fertilizers and pesticides.

Caring for Your Recycled Garden

A recycled garden requires special care to thrive. Since most of the elements in this garden are repurposed, it’s crucial to ensure that they are safe and suitable for your plants.

If you’re using repurposed containers, ensure they have good drainage. Stagnant water can cause root rot and other diseases. You can drill holes at the bottom if they aren’t already present.

Old pallets, furniture, or other wooden items should be checked for preservatives or paints that could leach into the soil and harm your plants. If possible, use a liner or a coat of safe paint to prevent this.

Maintenance is crucial for structures made from recycled materials. Regularly check for signs of wear and tear. For instance, wooden structures may need a fresh coat of paint or sealant, while metal ones should be checked for rust.

When using recycled items, it’s essential to clean them thoroughly to avoid introducing diseases or pests into your garden. A simple solution of water and vinegar can be used to clean most materials.

Cost Savings of Recycled Gardens

One of the most significant advantages of a recycled garden is the cost savings. With the use of recycled and repurposed materials, you can drastically reduce the amount of money spent on garden supplies.

Containers are a primary example. Old buckets, tires, furniture, and even shoes can be used as planters, eliminating the need to purchase new ones.

Creating compost bins from scraps not only reduces waste but also eliminates the need to buy compost or fertilizers. The compost created is rich in nutrients and excellent for improving soil health.

Pathways and fences made from recycled materials like broken ceramics, old pallets, or doors can save significant costs in comparison to buying new bricks or fence panels.

By setting up rainwater harvesting systems, you reduce the reliance on tap water, saving on your water bills. Furthermore, rainwater is better for your plants as it is free from the chemicals found in treated water.

Recycled garden ideas aren’t just good for the environment. They’re good for your wallet, too.

Promoting Biodiversity with Recycled Materials

Recycled materials can be utilized effectively to promote biodiversity in your garden. A diverse ecosystem not only adds aesthetic value but also improves the overall health of the garden. Biodiversity in a garden attracts various beneficial insects and birds which contribute to a healthy ecosystem.

One of the simplest ways to promote biodiversity is by creating habitats for different organisms. An old pile of wood can be a safe haven for a myriad of insects and small mammals. By just leaving it in a quiet corner of your garden, you’re providing a home for these creatures. Similarly, a stack of old bricks or tiles can serve as a refuge for frogs, toads, and other small creatures.

Bird feeders and bird baths made from upcycled items not only attract a variety of birds but also provide them with much-needed resources. An old plate or shallow bowl can be converted into a bird bath, and a plastic bottle can be used to make a bird feeder.

Additionally, consider creating a bug hotel with hollow stems, pine cones, and other garden debris placed in an old wooden box or pallet. This will invite beneficial insects that aid in pest control and pollination.

Flower beds made from recycled materials and planted with native species are also a great way to attract local pollinators such as bees, butterflies, and hummingbirds. A rich diversity of native plants can provide nectar and pollen throughout different seasons, ensuring a constant supply of food for these helpful creatures.

Community Recycling Programs

Community recycling programs play an essential role in managing waste and promoting the use of recycled materials. They offer numerous benefits, from conserving natural resources and reducing landfill waste to creating job opportunities and fostering a sense of community.

These programs often facilitate the collection of recyclable materials like glass, metal, paper, and plastic. Some also have special programs for compostable waste, batteries, and electronic devices.

Participating in these programs can provide a steady stream of materials for your recycled garden. For instance, you could get compost from a community composting program, or old pallets from a local business.

Additionally, getting involved in a community recycling program is a great way to learn more about recycling and meet like-minded people in your area. It can also inspire others in your community to start their own recycled gardens.

Moreover, communities often host events like swap meets or garage sales, which are excellent opportunities to find items that can be repurposed for your garden. They also sometimes organize workshops or classes about recycling, composting, and other sustainable practices.

Teaching Kids About Recycling

Incorporating recycled materials into your garden is a fantastic opportunity to teach kids about recycling. It provides them with a hands-on experience of the recycling process and its benefits.

Start by involving them in the process of collecting and sorting recyclable materials. Explain the different types of materials that can be recycled and why it’s important to keep them separate. Show them how to rinse out containers and remove labels.

Once you’ve gathered some materials, engage them in a DIY recycling project. It could be as simple as painting an old can to use as a planter or as involved as building a compost bin from old pallets. These activities not only teach kids about recycling but also allow them to develop practical skills and stimulate their creativity.

Use your recycled garden to explain the concept of the lifecycle of materials and how recycling helps to reduce waste. Show them how composting turns kitchen scraps into nutrient-rich soil, or how a used plastic bottle can become a bird feeder.

You can also use this as an opportunity to teach them about the broader aspects of sustainability. Discuss topics like conservation, waste reduction, and the importance of biodiversity. The aim is to foster a sense of environmental responsibility and a love for nature.

By teaching kids about recycling in a fun and practical way, you are not just creating an eco-friendly garden. You’re helping to shape the environmental stewards of tomorrow.

Conclusion

In summary, implementing recycled garden ideas is an exciting and eco-friendly way to transform your outdoor space. This approach to sustainable gardening is not just cost-effective, but it also allows us to significantly reduce waste that would otherwise end up in landfills. From upcycling household items to transforming old furniture into unique garden decorations, the possibilities are endless.

By consciously choosing recyclable materials and creatively repurposing them, we not only enhance our gardens but also contribute to a healthier planet. As we build compost bins from scraps, design rainwater harvesting systems, or employ old tires in garden design, we are making mindful choices that echo the principles of sustainability.

Moreover, these practices are excellent educational activities for kids, helping to instill in them a deep respect for nature and an understanding of the importance of recycling and sustainability. Simultaneously, promoting biodiversity and participating in community recycling programs extends the benefits beyond our garden boundaries, contributing to broader environmental conservation efforts.

Our gardens can become a testament to our dedication towards eco-friendly practices, a hub of biodiversity, and an inspiring, tangible example of the potential of recycled materials. In this way, the concept of a recycled garden goes beyond merely being a trend. Instead, it becomes a meaningful expression of our commitment to the environment and our creativity. The shift to recycled gardening is not just a step but a giant leap towards a sustainable future.

Shade Garden Layout Designing an Oasis for Shady Spaces

Designing an effective shade garden layout is more than just arranging plants in dim corners of your yard. It’s about understanding the varying shade levels, the principles of design, the use of shade-tolerant plants, and the interaction of textures, colors, and structures. In this comprehensive guide, we delve into creating a garden oasis even in the shadiest of spaces. We explore garden paths, seasonal interests, water features, attracting wildlife, and much more.

From small urban gardens to the calming retreats of garden benches in secluded corners, we will look at how to maximize the benefits of shade and create an inviting and engaging environment. This guide is more than just a collection of design tips; it is an exploration of the potential of shade and the aesthetics and ecological benefits it can bring.

With a strategic approach to design and maintenance, a shade garden can be a vibrant and diverse ecosystem, bringing enjoyment throughout the seasons. Our comprehensive guide will provide you with the knowledge and tools to transform your shaded areas into a tranquil garden oasis.

Understanding Shade in the Garden

Shade in the garden can be both a challenge and an opportunity. There are various levels of shade, ranging from full sun exposure to dense shade. Light conditions can change dramatically throughout the day and season, with areas under full sun in the morning transitioning to deep shade by afternoon, or vice versa.

Shade in the Garden

For example, morning shade often provides a cool respite during the hot summer months, protecting delicate plants from the intense sun. Afternoon shade, on the other hand, can be a bit trickier, as the heat of the day has built up, making these areas hotter and drier than you might expect. Understanding the type of shade in your garden is a crucial aspect of garden design, as it determines which plants will thrive and how they should be cared for.

It’s also essential to understand the quality of your shade. Dappled shade, created by the shifting sunlight through overhead tree branches, is different from deep, dense shade, such as that found under a porch or against a north-facing wall. Each type of shade requires different plants and different care strategies, making it an essential part of garden design.

Assessing Your Garden’s Shade Levels

Assessing the shade levels in your garden is the first step to a successful shade garden layout. Start by observing your garden at different times of the day and year. The angle of the sun changes with the seasons, affecting the amount and intensity of light reaching different parts of your garden.

Garden's Shade Levels

Take note of the changes in shadow patterns throughout the day. Does your garden receive morning sunlight and then afternoon shade, or vice versa? Are there areas that are always shaded? Are there areas of dappled shade, where light filters through overhead leaves?

To accurately assess your garden’s shade levels, you may want to create a shade map. This can be as simple as sketching your garden layout on a piece of paper and using different colors or patterns to represent different shade levels. Revisit your map at various times throughout the year to capture seasonal variations in sunlight and shade.

Understanding the shade levels in your garden will help you select suitable plants, design effective garden layouts, and make informed decisions about garden maintenance, such as watering and fertilizing.

Shade Garden Design Principles

Designing a shade garden is much more than merely putting shade-loving plants in the darkest corners of your garden. The principles of good garden design apply equally to shade gardens, though they may need to be applied with more subtlety and creativity.

One fundamental design principle is that of creating a sense of unity and coherence. This can be achieved by repeating certain plants or elements throughout the garden or using consistent colors or textures. In a shade garden, a unifying theme could be the lush, green foliage of ferns or the delicate, white flowers of shade-loving perennials.

Shade Garden Design

Another important design principle is balance. This doesn’t necessarily mean symmetry, but rather a sense of equilibrium and harmony. In a shade garden, balance could be achieved through careful placement of dark and light plants, or by juxtaposing bold, architectural plants with softer, more delicate ones.

A well-designed shade garden should also have rhythm and flow, guiding the viewer’s eye and the visitor’s steps through the garden. This can be achieved through repetition, alignment, or the strategic placement of focal points, such as a garden bench or a striking plant.

Finally, the principle of proportion is especially important in a shade garden. Because light levels are lower, everything in a shade garden can seem smaller and less prominent. Therefore, it’s crucial to select plants and elements that are appropriately sized for your garden and to arrange them in a way that emphasizes their form and texture.

Choosing Shade Tolerant Plants

While shade can limit the variety of plants that can be grown, there is still a wide range of shade-tolerant plants available, offering a plethora of colors, shapes, and sizes. These plants have adapted to survive in lower light levels, making them perfect for your shade garden layout.

When choosing shade-tolerant plants, consider both their aesthetic characteristics and their growing requirements. Do they prefer moist or dry soil? Are they hardy in your climate zone? Will they grow into a large shrub or remain a small perennial?

Hostas are a popular choice for shade gardens, with their wide range of sizes and leaf colors. Ferns, with their feathery fronds, can provide a touch of elegance and a beautiful texture. Other shade-loving plants include astilbes, which produce feathery, plume-like flowers in a range of colors, and bleeding hearts, which have delicate, heart-shaped flowers.

Remember, not all plants labeled as shade-tolerant are the same. Some can tolerate deep shade, while others need dappled light. Always check the plant’s specific requirements before choosing it for your garden.

Creating a Layered Shade Loving Planting Scheme

In nature, plants grow in layers, from the tall trees in the canopy to the low-growing plants on the forest floor. Mimicking this layered structure can create a more natural, dynamic, and visually interesting shade garden layout.

Start with the tallest layer. This might be existing trees or shrubs, or you might want to add some for height. Remember, even in a shade garden, some plants can provide more shade for others, creating a range of light conditions.

The middle layer is often made up of smaller shrubs and tall perennials. This layer adds a sense of depth and interest to your garden, with plants that can add color and texture.

The ground layer includes low-growing perennials and groundcovers. These plants can fill in the gaps between taller plants, cover the soil to reduce weed growth and soil erosion, and add color and texture at the viewer’s feet.

Remember, a layered planting scheme doesn’t have to be rigid or formal. Play around with heights, mix different plants together, and create a garden that feels lush and full, just like a natural forest.

Incorporating Foliage Textures

One of the greatest aspects of shade gardens is their emphasis on foliage textures. Many shade-loving plants have stunningly intricate leaves, and using these textures strategically can create interest and depth in your garden.

Begin with the large-leafed plants. Hostas, for instance, provide a fantastic backdrop with their broad, green leaves. The foliage is so lush that it creates a striking contrast against more delicate textures, serving as a dramatic foundation for your shade garden.

Next, consider the ferns. These plants bring a delicate, feathery texture to the garden. With their intricate fronds and delicate leaflets, ferns can break up the boldness of large-leafed plants and add intricacy and detail to your garden’s aesthetic.

Lastly, consider plants with intricate or unusual leaves. Coral bells, for example, can provide both texture and color with their ruffled leaves, while the unique leaf structure of plants like the maidenhair fern can create an unexpected visual twist.

Remember to not only consider the texture but also how the leaves will move with the wind. The fluttering of fern fronds or the rustling of large hosta leaves can add a dynamic element to your shade garden layout.

Playing with Colors

While shade gardens may not have the vibrant, sun-loving blooms that typify some gardens, they are by no means restricted to a monotonous green palette. In fact, playing with color is one of the most effective ways to inject life and personality into your shade garden.

Consider, for example, the various shades of green that exist, from the pale, almost yellow greens of some ferns to the deep, rich greens of rhododendrons or yews. These can provide a rich tapestry of color and create a sense of depth and dimension in your garden.

Beyond green, there are numerous shade-tolerant plants that offer a pop of color. For instance, hostas come in a variety of shades, including blues, yellows, and variegated varieties. Flowers like astilbe, bleeding heart, and lily-of-the-valley can provide seasonal splashes of color.

Also, don’t overlook the potential of foliage that changes color throughout the seasons. Many plants, like Japanese maples, have leaves that transition from one color to another as the seasons change, offering a dynamic and ever-changing color palette for your garden.

Adding Interest with Garden Structures

Garden structures can offer a practical solution for certain gardening challenges, provide a focal point, or simply add visual interest to your shade garden layout. When appropriately integrated into your design, they can turn a simple garden into a garden oasis.

Garden Structures

Trellises, for example, are a practical solution for climbing plants. They not only provide support for vines but also create vertical interest. Some shade-loving climbers, like climbing hydrangea, can turn an ordinary trellis into a living wall of foliage and flowers.

Pergolas and gazebos can be a focal point in your garden. These structures provide a sense of enclosure and can create a cozy, secluded corner in your garden. Climbing plants can also be trained over these structures, providing dappled shade and a feeling of being enveloped by the garden.

Even smaller structures, like bird baths or garden statues, can serve as focal points. They can catch the eye, draw attention to a particular part of the garden, and provide a sense of surprise and delight.

Creating Garden Paths

Garden paths are more than just practical ways to get from one part of your garden to another. They guide the viewer’s eye and the visitor’s steps, encouraging exploration and discovery. They can add structure and form to your garden, contrasting with the softness of the plants.

Creating Garden Paths

For a natural look, consider a path made from stepping stones or a mulch path edged with ferns or other shade-loving groundcovers. These paths blend in with the surrounding plants, encouraging a slow and leisurely exploration of the garden.

For a more formal look, a brick or gravel path might be appropriate. These paths provide a crisp edge and a clear direction, ideal for a more structured garden. They can be straight and direct, or meandering and winding, depending on the desired effect.

Remember, a path doesn’t have to lead somewhere specific. Sometimes, a path that leads to a hidden corner or a surprising garden feature can create a sense of intrigue and encourage exploration.

Planning for Seasonal Interest

While planning your shade garden layout, consider how your garden will look not just in one season, but throughout the year. Planning for seasonal interest ensures that your garden remains vibrant and engaging, regardless of the time of year.

In the spring, shade gardens can come alive with bulbs like snowdrops and early-blooming perennials like hellebores. As the season progresses, other plants, like bleeding hearts and astilbes, take over the show.

Summer is the time for hostas and ferns to shine, with their lush foliage filling the garden. Some shade-loving perennials, like lungwort and Solomon’s seal, continue to provide color with their flowers.

In the fall, while most of the flowers have faded, many plants continue to provide interest with their foliage. Japanese maples, for instance, are famous for their brilliant autumn colors. Even ferns, with their feathery fronds, can add texture and interest to the fall garden.

Lastly, don’t overlook the beauty of winter. The architectural forms of bare trees, the evergreen foliage of rhododendrons or yews, and the delicate, frost-covered fronds of ferns can all create a striking winter scene.

Water Features for Shade Gardens

Water features have a magical ability to transform any garden into an oasis of tranquility, and shade gardens are no exception. They introduce a dynamic element to the garden, attracting wildlife and creating soothing sounds that complement the quiet serenity of the shade.

Ponds, for instance, provide a habitat for shade-loving aquatic plants like water lilies. Even in the shade, water lilies can provide beautiful blooms and lily pads that add a unique texture to the garden. Ponds also attract frogs, birds, and beneficial insects, adding a layer of biodiversity to your garden.

Water Features

Streams or waterfalls, on the other hand, introduce movement and sound. The gentle babble of water over rocks can drown out city noise, creating an oasis of calm. Ferns, hostas, and other moisture-loving plants can be planted along the edges to integrate the water feature into the rest of the garden.

If space is limited, consider smaller water features like birdbaths or water bowls. These can provide the soothing sound of water and a place for birds to drink and bathe. They also require less maintenance than larger water features.

Placement of Garden Benches

Garden benches are more than just a place to sit; they provide an invitation to pause, to observe, and to immerse yourself in the garden. Their placement is key in creating the right atmosphere and maximizing their use.

In a larger garden, you might want to place a bench at the end of a path, providing a destination for visitors. This can be a quiet corner where the bench sits under the canopy of a large tree, offering a shaded retreat from the world.

Garden Benches

For smaller gardens, consider a bench as part of the main view. It can be a central feature that draws the eye, providing a sense of depth and perspective. You could place it against a backdrop of lush hostas or colorful ferns, creating a perfect picture frame for your shade plants.

If your garden is for relaxation, consider placing a bench near the sound of water. The soothing sounds of a water feature can add to the sense of peace and tranquility in the garden.

Container Gardening in the Shade

For those with limited space or less-than-ideal soil, container gardening provides a way to enjoy the beauty of shade plants. It allows you to curate a mini garden on your patio, balcony, or even indoors.

Start with choosing the right containers. These could range from traditional terracotta pots to repurposed items like crates or old watering cans. Keep in mind that the container should have adequate drainage to prevent waterlogging.

Container Gardening

Choosing plants for your containers should be based on their shade tolerance and their compatibility. Hostas, ferns, and impatiens all make excellent container plants. For added interest, combine plants of different heights, colors, and textures.

Remember that containers can dry out quickly, so they’ll need regular watering. Consider adding a layer of mulch to the top of the soil to retain moisture. A slow-release fertilizer can also be beneficial to keep your plants healthy throughout the growing season.

Attracting Wildlife to Your Shade Garden

One of the joys of gardening is creating a habitat for wildlife. A well-planned shade garden can attract a variety of birds, insects, and small mammals, providing them with food, water, and shelter.

Flowering plants like astilbes and foxgloves provide nectar for bees, butterflies, and other beneficial insects. The dense foliage of hostas and ferns provides shelter for small creatures, while the flowers of plants like Jack-in-the-pulpit can attract a variety of insects.

Water features, from ponds to birdbaths, attract birds for drinking and bathing. They also serve as a habitat for amphibians like frogs and toads. If you choose to have a pond, including some fish can help keep mosquitoes at bay.

Lastly, consider leaving a patch of your garden “wild.” A pile of logs or a heap of leaves can provide habitat for a variety of creatures from beneficial insects to small mammals.

Companion Planting for Shade

Companion planting is a method of growing plants together for mutual benefit. In a shade garden, companion planting can help maximize space, enhance the soil, and create a more visually interesting garden layout.

One of the keys to successful companion planting is understanding the needs and growth habits of your plants. For instance, planting a taller plant like a rhododendron with understory plants like hostas or astilbes can create a layered look and maximize vertical space.

Plants can also be paired based on their soil needs. Acid-loving plants like azaleas or camellias can be planted together. If a plant requires a rich, well-drained soil, it might be paired with other plants with similar needs.

Remember that some plants can be aggressive spreaders, so they should be paired with plants that can hold their own. For instance, a robust hosta might be a good match for a spreading plant like sweet woodruff.

Shade Garden Maintenance Tips

Maintaining a shade garden, while similar to other gardens in many ways, does have its unique challenges. A combination of thoughtful planning, regular care, and periodic adjustments can help your shade garden stay healthy and beautiful throughout the year.

Starting with good soil health is essential. In many shaded areas, particularly under trees, the soil can be nutrient-depleted. Regular additions of organic matter like compost can help improve soil fertility. Mulching around your plants can conserve moisture, suppress weeds, and eventually break down into nutrients for your plants.

Watering requires special attention in a shade garden. Even though evaporation is slower in shaded areas, roots of trees and large shrubs can compete with your shade plants for water. Water your shade garden thoroughly but less frequently, promoting deep root growth.

Regular pruning of overhead trees can help control the level of shade and ensure that your plants receive the necessary light. It also helps maintain the health of the trees. However, pruning should be done judiciously, ensuring it does not harm the tree or drastically change the quality of shade.

Keeping an eye on the spread of your plants is also important. Some shade-loving plants can become quite aggressive in their growth and may need to be divided or pruned to prevent them from overtaking the garden.

Improving Soil for Shaded Areas

Improving the soil is an essential part of creating a thriving shade garden. In many shaded areas, the soil can be depleted of nutrients due to the extensive root system of large trees or simply the lack of sunlight.

Start with a soil test to understand your soil’s current status. This will give you information about the pH and nutrient levels, helping guide your soil improvement plan.

Adding organic matter is one of the best ways to improve soil fertility and structure. Compost, well-rotted manure, or leaf mold can add essential nutrients back into the soil, improve its capacity to hold moisture, and make it easier for plant roots to penetrate.

Adding a layer of mulch can also improve soil over time. As it slowly decomposes, it provides a steady supply of nutrients to the soil. It also helps retain moisture and suppress weeds.

In some cases, you might need to adjust the pH of your soil. If your soil is too alkaline, adding sulfur or a fertilizer designed for acid-loving plants can help lower the pH. If it’s too acidic, adding lime can raise the pH. However, these adjustments should be based on a soil test and done gradually.

Dealing with Common Shade Loving Garden Pests

Just like any other garden, shade gardens can attract a variety of pests. Slugs and snails are particularly fond of the cool, damp conditions of a shade garden, and can be a nuisance. They can be controlled by natural predators like birds and frogs, or through manual removal. Beer traps are also an effective home remedy.

Aphids and whiteflies can also pose a problem in a shade garden, attracted to the tender new growth of many shade plants. They can be controlled by introducing beneficial insects like ladybugs or lacewings that are natural predators. In severe cases, use of an insecticidal soap might be necessary.

Disease can also be a concern in shade gardens, where the damp conditions can promote the spread of fungal diseases. Ensuring good air circulation through proper plant spacing and pruning can help mitigate this issue. If you notice diseased leaves, remove them promptly to prevent the disease from spreading.

Garden Lighting

Adding lighting to your shade garden can transform it into a magical space during the evening hours. Not only does it extend the hours you can enjoy your garden, but it also highlights features you might not notice during the day.

Garden Lighting

Path lights can provide a safe way to navigate your garden while highlighting the path’s features. Spotlights can be used to highlight particular plants or features like a water fountain or a beautiful tree.

For a softer glow, consider using lanterns or string lights. They can provide a more diffused light and create a cozy atmosphere. Solar lights are a great eco-friendly option as they harness the sun’s power during the day to provide light at night.

Remember, the goal is to enhance the natural beauty of the garden, not to turn night into day. Subtle, indirect lighting often works best, casting interesting shadows and creating a sense of depth and mystery.

Ideas For Small Shady Gardens

Small shady gardens can be a sanctuary if designed mindfully. Even with limited sunlight, they can be filled with interesting textures, colors, and lush foliage.

Firstly, consider incorporating various levels of planting to create a sense of depth and interest. Use ground cover plants like Lamium or Pachysandra at the lowest level, shade-tolerant shrubs like Hydrangeas or Azaleas in the middle, and small trees like Japanese Maples at the top.

Use containers to add flexibility. They can be moved around as needed to adjust to the changing sun patterns. Containers also allow you to grow plants that may not be suitable for your soil type. Grouping pots together can create a dramatic effect, while singular, larger pots can be used as focal points.

To make the space seem larger, use mirrors. They reflect light and create an illusion of depth. Place them strategically to reflect a beautiful plant or a garden sculpture.

Lastly, don’t forget to add a place for you to sit and enjoy your small shady garden. A small bench or a bistro set can be a perfect addition.

Ideas For Urban Shady Gardens

Urban gardens often face unique challenges – limited space, nearby buildings blocking the sun, or poor soil quality. However, even with these constraints, an urban shady garden can be a tranquil oasis.

Vertical gardening is a smart way to make use of limited space. Wall-mounted planters, trellises, or climbing plants can all add greenery without taking up floor space. Ferns, Ivy, and Climbing Hydrangeas can all thrive in shade and are great for vertical gardening.

Urban gardens can also benefit from container gardening, allowing you to add greenery to patios, balconies, or even windowsills. Containers can be filled with shade-loving plants like Hostas, Begonias, or Impatiens.

Adding a water feature can bring a sense of calm to an urban garden. It can be as simple as a small tabletop fountain or as elaborate as a small pond with a waterfall. Not only does it add a visual interest, but the sound of water can mask city noise.

Ideas For Shady Balconies

Shady balconies can be turned into a lush, relaxing retreat with the right design and plant selection.

Consider using tall plants like Bamboo or Ferns to create a sense of privacy and block any unsightly views. Use hanging baskets or wall planters to take advantage of vertical space. They can be filled with trailing plants like English Ivy or Creeping Jenny that will cascade down and create a waterfall effect.

For your pots, choose plants that not only tolerate shade but also have interesting foliage since flowers may be scarce in low light conditions. Hostas, Heucheras, or Ferns are excellent choices.

Include some furniture so you can enjoy your balcony garden. Depending on the size of the balcony, it could be a full outdoor dining set or a simple chair and a side table. Make it comfortable and inviting with outdoor cushions and rugs.

Creating a Beautiful Shade Oasis

Creating a beautiful shade oasis involves a balance of plant selection, design elements, and personal touches. The aim is to create a garden that is not only visually pleasing but also serves as a place of relaxation and rejuvenation.

Start with a comprehensive shade assessment. Understanding the type and intensity of shade you have will guide your plant selection and garden layout.

Next, choose a variety of plants with different heights, textures, and colors to create a layered effect. Focus on foliage interest to ensure year-round beauty.

Incorporate hard elements like garden paths, benches, or a gazebo to add structure and function to your garden. A water feature can add a soothing element, while a fire pit can provide warmth and a gathering place.

Add personal touches like garden art, wind chimes, or bird feeders to reflect your personality.

Lastly, consider the maintenance requirements and design your garden to match your lifestyle. Your shade garden should be a source of joy, not stress.

Conclusion

Designing a shade garden requires a thoughtful approach and an appreciation for the unique beauty that shade-loving plants can bring. From the initial assessment of shade levels to the selection of tolerant plants, every step plays a crucial role in shaping the ambiance of your garden. Incorporating different foliage textures and colors can transform your garden into an intricate tapestry, brimming with life and visual interest.

Remember that garden structures and paths can lend a sense of order, while seasonal interest and water features infuse dynamism into your shady retreat. The addition of garden benches and strategic container gardening can create inviting pockets of rest and color. By attracting wildlife and adopting companion planting, your garden will not only be a sanctuary for you but also for the myriad of creatures that form an essential part of our ecosystem.

Maintaining your shade garden is just as important as designing it. Being aware of the common pests, understanding how to improve your soil, and adopting effective watering techniques are integral to the health of your garden. Enhancing your space with suitable garden lighting can help your garden transition smoothly from day to night.

Regardless of the size of your space, whether it’s a small shady garden, an urban shady garden, or a shady balcony, careful planning and creative ideas can help you make the most of it. Ultimately, the aim is to create a beautiful shade oasis that resonates with tranquility, lush greenery, and a profound appreciation for nature’s quieter, yet equally enchanting, side.

So venture out, enjoy the process of creation, and immerse yourself in the peaceful realm of shade gardening. After all, in the heart of every shade garden lies the promise of an oasis—a haven where serenity flourishes, and the flurry of life slows to a languid pace, allowing us to savor each moment fully.

24 Garden Pond Design Tips A Comprehensive Guide

Creating a garden pond can transform a mundane backyard into an exotic, living oasis. This comprehensive guide will delve into a plethora of tips to ensure that your new water feature is not only a pleasing aesthetic addition but also an efficient and sustainable pond ecosystem. We will explore everything from the importance of pond location and size, to selecting the right fish and plants, maintenance strategies, eco-friendly approaches, current design trends and much more. This guide promises to provide value whether you’re a novice pond builder or a seasoned veteran in the field.

Whether you’re contemplating a DIY project or plan on hiring a design professional, understanding the different facets of pond design will go a long way in creating a beautiful, functional, and sustainable feature that will not only enhance your property’s appeal but also provide an oasis for local wildlife.

Let’s delve in, and uncover the top 24 tips that will help you master the art of garden pond design.

Planning Your Back Garden Pond

The process of planning your back garden pond is a thoughtful journey that requires a blend of creative imagination, practical considerations, and a deep understanding of your garden’s microclimate. Before embarking on your pond design, spend time observing your garden’s characteristics. Identify the path of the sun across your yard, note any significant slopes, and pinpoint areas of deep shade or bright sun.

Back Garden Pond

Next, consider how you would like to interact with your pond. Are you a nature enthusiast who wants to attract wildlife? Are you a gardening lover with a penchant for exotic aquatic plants? Or perhaps you’re seeking the calming ambiance of a water feature to enhance your outdoor living space? Knowing the primary purpose of your pond will guide many of your design decisions.

Remember, the pond you create will be an integral part of your garden ecosystem. Any decisions made should take into account the impact on existing plants, trees, and wildlife. Equally important is the consideration of how the pond will change the aesthetics of your garden. Reflect on the views from various parts of the garden and from inside your home; an well-placed pond can provide a breathtaking focal point.

Choosing the Right Pond Size

When deciding on the size of your garden pond, it’s important to take several factors into consideration. A key aspect is proportionality; the pond should complement the existing landscape and structures rather than overwhelm them. On the other hand, a pond that is too small may become easily unbalanced, leading to poor water quality and difficulty in maintaining healthy plants and fish.

Choosing the Right Pond Size

Consider the practical aspects as well. Larger ponds will require more materials and labor to construct, resulting in higher costs. They will also need more water to fill and may require more maintenance in terms of cleaning and the care of aquatic inhabitants. If you are planning to keep fish, particularly koi, the pond will need to be sufficiently deep to provide protection from predators and harsh weather conditions.

It’s also vital to think long-term. Your pond is not a static feature; plants will grow, fish will breed, and seasonal changes may impact the water level. Planning for these eventualities in your initial size determination can save a lot of time, effort, and expense in the future.

Deciding on Pond Location

Choosing the right location for your pond is a complex balancing act that requires consideration of both practical and aesthetic factors. Sunlight exposure is a crucial factor; while pond plants often need plenty of light to flourish, too much direct sunlight can lead to excessive algae growth. A location that enjoys morning sun followed by afternoon shade often works well.

Pond Location

Be wary of situating your pond beneath trees, as falling leaves can lead to clogged filters and poor water quality. Similarly, avoid low-lying areas where rainwater runoff could flood the pond and disrupt its delicate balance.

Accessibility is another crucial factor. The pond should be within easy reach for maintenance tasks, and if you’re planning to enjoy the pond up close (for example, feeding fish or tending to plants), ensure there’s a comfortable access point.

Understanding the Ecosystems

A garden pond is a dynamic ecosystem, teeming with life from the microscopic to the more visible inhabitants like fish and amphibians. Understanding this ecosystem is essential to creating a thriving, low-maintenance pond.

A healthy pond ecosystem is all about balance. At the heart of this is the nitrogen cycle, where beneficial bacteria break down fish waste and decaying plant matter into less harmful substances. Overstocking fish or overfeeding can disrupt this balance, leading to poor water quality.

Understanding the Ecosystems

Plants play a crucial role, too. Submerged plants provide oxygenation, vital for fish and beneficial bacteria. Floating plants offer shade, reducing algae blooms by limiting sunlight penetration. Marginal plants, growing around the pond edges, provide cover for wildlife and help to integrate the pond into the wider garden.

Essential Pond Elements

Creating a well-balanced pond environment requires several essential elements. The first is a filtration system. Biological filters use beneficial bacteria to break down harmful waste products, while mechanical filters remove larger debris. Both are crucial for maintaining water clarity and quality.

Pumps are necessary to move water through the filter and keep it oxygenated, crucial for fish and bacteria. They can also be used to create waterfalls or streams, adding visual and auditory appeal to your pond.

Pond plants are another essential element, providing a host of benefits from oxygenation and filtration to providing habitat for wildlife. When selecting pond plants, consider a mix of submerged, floating, and marginal varieties to create a diverse and balanced ecosystem.

Fish, while not strictly essential, add life and color to a pond. They also play a part in the pond ecosystem, grazing on algae and providing nutrients through their waste. However, careful management is needed to prevent overpopulation and maintain water quality.

Finally, think about the aesthetics. Lighting can highlight key features, while decorative elements such as statues or water stones can enhance the visual appeal of the pond.

Types of Garden Ponds

There are numerous types of garden ponds, each with its unique aesthetic appeal and requirements. The most common types include wildlife ponds, fish ponds, and water gardens.

Wildlife ponds are designed with the local fauna in mind. They often have sloping sides to allow creatures like frogs, newts, and hedgehogs to access the water easily. Planting native plants around and within these ponds can attract a variety of insects and birds, creating a lively hub of biodiversity in your backyard.

Types of Garden Ponds

Fish ponds, on the other hand, are designed primarily to house fish. They require deeper waters (particularly for koi) and need an efficient filtration system to maintain the health of the fish. These ponds often include features like waterfalls or fountains for oxygenation and visual interest.

Water gardens focus primarily on the aesthetic display of water plants. These can range from lily-covered ponds to contemporary water bowls featuring architectural plants like papyrus. While smaller water gardens may be purely ornamental, larger ones can still support a range of wildlife.

Naturalistic Vs. Formal Ponds

The decision between a naturalistic and a formal pond largely hinges on the style of your garden and personal preference.

Naturalistic ponds aim to recreate a slice of nature. They typically have irregular shapes, with edges softened by planting and perhaps a pebble beach. The planting is often lush and diverse, mimicking the way plants colonize natural bodies of water. The result is a pond that blends seamlessly into the garden, providing a habitat for a range of creatures.

Formal Ponds

Formal ponds, in contrast, have a more structured design. They might be round, square, or rectangular, often with hard edges. While formal ponds can still support fish and a range of plants, the emphasis is often more on aesthetics and the interplay of architectural features, water, and carefully chosen plant specimens.

Selecting Pond Plants

The selection of plants for your pond is an essential step in the design process. Pond plants not only add aesthetic value but also contribute to the pond ecosystem by providing oxygen, filtering the water, and offering habitats for pond creatures.

For a balanced ecosystem, you should consider a mix of submerged plants, marginal plants, and floating plants. Submerged plants like hornwort and waterweed provide oxygen and keep the water clear by absorbing excess nutrients. Marginal plants such as cattails, iris, and pickerelweed grow around the edges of the pond, adding vertical interest and providing shelter for wildlife. Floating plants like water lilies and water hyacinth offer shade, reducing the sunlight available for algae growth.

When selecting plants, consider their growth habit, color, blooming time, and the maintenance they require. It’s also crucial to choose plants that are suitable for your climate zone.

Selecting Fish

Adding fish to your pond can bring an extra layer of life and color. However, not all fish are suitable for all ponds. When selecting fish, consider the size of your pond, the depth, water temperature, and the compatibility of different species.

Goldfish and koi are popular choices for outdoor ponds due to their hardiness and vibrant colors. Koi, in particular, are treasured for their large size and variety of patterns, but they require a deep pond and excellent water quality to thrive.

Smaller fish species like guppies, mollies, and platies can be suitable for smaller or shallower ponds. They’re also prolific breeders, which can be an advantage if you enjoy watching fish behaviors but could become a problem if not controlled.

Incorporating Water Features

Water features can add a dynamic element to your pond design. The sound of running water can be soothing, helping to mask the noise of traffic or neighbors. Water features also oxygenate the water, beneficial for both fish and bacteria.

Waterfalls are a popular choice and can range from a gentle, babbling brook style to a dramatic multi-tiered cascade. Strategically placed stones and plants can help to integrate the waterfall into the surrounding landscape.

Fountains are another common water feature. They can be as simple as a jet of water or as ornate as a statue that spills water into the pond. When choosing a fountain, consider the style of your pond and garden, as well as the potential impact of spray on surrounding areas.

Using Stones in a Pond Design

Stones are a versatile element in pond design. They can be used to edge the pond, line waterfalls, create interesting underwater structures, or even form the base of a pebble beach.

When choosing stones, consider their color, texture, size, and how these aspects fit with your overall design. For example, large, rugged boulders can create a dramatic, naturalistic look, while smooth, dark pebbles can lend a contemporary feel to your pond.

Using Stones

Using local stones can help to tie the pond into the broader landscape, creating a sense of place. However, the local stone isn’t the only option. Imported stones can introduce unique colors and textures, becoming features in their own right.

When using stones, remember to ensure they are safe for your pond. Some types of stone can alter the water’s pH, which could be harmful to fish and plants. It’s also crucial to ensure any stones used for edging or underwater structures are stable, so they won’t shift and cause damage.

Pond Lighting Ideas

Pond lighting brings a magical quality to your garden, extending the enjoyment of your pond into the evening hours. Beyond aesthetic appeal, it also adds safety, guiding paths around the pond, and highlighting key features.

Underwater lighting is an excellent way to illuminate your pond from within. LED lights can be placed at strategic locations to highlight fish, water features, or specific plants. Submersible lights come in various colors, adding another layer to your design palette.

Path and landscape lighting around the pond can create a safer and more inviting environment. Consider using solar-powered or low-voltage LED lights to mark paths or highlight interesting plants or other features. Spotlights can also be used to accentuate a particular tree, shrub, or statue near the pond.

Pond Lighting

Floating lights, whether solar or battery-powered, can create a beautiful effect on the water surface. They are also portable and can be moved around to suit different occasions or moods.

Pond Edge Treatments

The edge of your pond plays a crucial role in blending the water feature into the surrounding landscape. It also provides habitat for certain animals and plants. Several approaches can be used for pond edges.

One common treatment is the use of stones or pebbles. This provides a natural look and can be combined with planting pockets for marginal plants. It’s crucial to ensure that the stones are stable and won’t topple into the pond.

Planting is another excellent way to soften the pond edges. This can range from lush, informal planting for a naturalistic pond to more structured and perhaps clipped plantings for a formal pond.

A lawn edge can create a clean, classic look, particularly for formal ponds. However, it requires precise maintenance to keep the edge sharp. Consider using a metal or plastic lawn edging to create a barrier between the pond liner and the soil.

Creating Pond Zones

Designing your pond with different zones can improve its ecological health and aesthetic appeal. These zones typically include the deep-water zone, the shallow water or littoral zone, the marginal zone, and the terrestrial zone.

Creating Pond Zones

The deep-water zone is where your pond is at its deepest, typically the center. This zone is crucial for fish, offering a cool retreat during hot summer months and a place to overwinter.

The shallow water or littoral zone is the transition area between the deep water and the pond edge. It’s the perfect spot for a variety of aquatic plants that provide food and shelter for pond life.

The marginal zone is the water’s edge and the immediate land surrounding the pond. It often includes rocks, gravel, or marshy plants. This area provides habitats for amphibians and insects.

Lastly, the terrestrial zone is the area around the pond. Planting this area with native plants can attract beneficial insects and birds, improving the overall health of your pond ecosystem.

Maintenance Tips

While a well-designed pond should require minimal maintenance, some regular tasks are necessary to keep it looking good and functioning well.

Regular checks on your pond’s water quality are vital, particularly if you have fish. Testing kits are available to monitor levels of pH, ammonia, nitrite, and nitrate.

Keep an eye on plant growth, especially if you have vigorous species. Overgrown plants can upset the balance of the pond and might need regular thinning.

Pond filters and pumps should be cleaned regularly according to the manufacturer’s instructions to ensure they’re working efficiently.

Skimming leaves and other debris from the water surface can prevent the accumulation of organic matter on the pond floor. A pond vacuum or net can be helpful for this task.

Pond Safety Measures

Safety should always be a priority when it comes to designing and maintaining a garden pond.

Ensure your pond has shallow areas or steps where children or animals can climb out if they fall in. Safety grids or nets can also provide a level of protection, particularly for new ponds where plants haven’t fully established yet.

A fence or dense planting around the pond can deter small children and pets from approaching the water.

Lighting around the pond edge can prevent people from accidentally stepping into the water at night.

Seasonal Pond Care

Seasonal care for your pond ensures it remains a thriving part of your garden all year round.

In spring, as temperatures rise, start feeding fish again and divide overgrown aquatic plants. This is also a good time to install new plants.

Summer is a time to enjoy the pond but keep an eye on water levels during hot weather. Top up if necessary. Regularly remove any algae or blanket weed.

Autumn is the time to prepare your pond for winter. Install a net to catch falling leaves, and cut back pond plants after they have died back.

During winter, ensure the pond doesn’t freeze over entirely. This can be achieved by using a pond heater or simply by placing a ball on the water surface.

Dealing with Pests

Just like any other garden space, your pond will likely attract some pests. While some of these visitors may be welcome, others can cause considerable damage to your aquatic ecosystem. However, managing pests is achievable with the right techniques and knowledge.

Common pond pests include herons, raccoons, and other predators, attracted by fish. Installing netting or other physical barriers can deter these unwanted visitors. Other strategies include the use of scare devices, such as decoys, or floating plants to provide cover for fish.

Aquatic pests such as snails, leeches, and certain insects can also be a nuisance. Regular inspection and manual removal where necessary can control these pests. In extreme cases, biological controls, such as introducing natural predators, can be a solution.

Algae, although not a pest in the traditional sense, can be problematic. The solution to excessive algae often lies in improving the pond’s overall balance. This could include reducing nutrient levels, increasing shade, or introducing algae-eating fish or bacteria.

Eco-friendly Pond Solutions

Creating an eco-friendly pond goes beyond aesthetics; it involves the creation of a sustainable and balanced ecosystem. Several design choices and practices can contribute to this.

Choosing native plants and fish helps support local wildlife, as they provide familiar habitats and food. They are also often more resilient and adapted to the local climate, reducing the need for additional care and resources.

Installing a solar-powered pump or lighting system reduces your pond’s carbon footprint and can save on energy costs in the long run.

Creating a balanced ecosystem can reduce the need for chemicals. Encourage a variety of organisms, from beneficial bacteria to a range of insects and amphibians, which can help keep potential pest problems in check.

Rainwater is often preferable for filling your pond, as it’s soft and free of chemicals found in tap water. Collecting rainwater in barrels or directly routing downspouts into your pond can be an excellent eco-friendly solution.

Pond Aesthetic Enhancements

Ponds naturally serve as focal points in a garden, but there are ways to further enhance their aesthetic appeal.

Bridges, whether functional or purely ornamental, can add an element of charm and interest to your pond. They provide a unique perspective and an opportunity to interact with the pond in a different way.

Waterfalls or fountains can add a dynamic and sensory element to your pond. The sound of running water is relaxing, and the movement can catch and reflect light in beautiful ways.

Artistic elements like sculptures or ornamental fish can serve as focal points. These can be incorporated into the overall design or added as accents.

Mirroring surrounding landscapes or elements in your pond design can create a harmonious aesthetic. This might include matching the color palette of aquatic plants to your terrestrial plants or echoing shapes and lines.

Innovative Pond Design Trends

Like all aspects of design, pond trends evolve over time, reflecting changes in technology, lifestyle, and values.

Naturalistic ponds, mimicking nature as closely as possible, continue to grow in popularity. These can include wetland areas, bog gardens, and wildlife ponds. They often require less maintenance than traditional ponds and offer benefits for local wildlife.

Pond Design Trends

Smart ponds are on the rise, incorporating technology for maintenance, monitoring, and aesthetic effects. This could include automated cleaning systems, lighting effects controlled by an app, or sensors for monitoring water quality.

As water conservation becomes more important, ponds that collect and use rainwater efficiently are becoming more popular. These designs incorporate overflow areas, rain gardens, and efficient water circulation systems.

Hiring a Design Professional

While creating a pond can be a rewarding DIY project, there are situations where hiring a design professional is beneficial.

A design professional can bring expertise and experience to your project, which can save time and potentially avoid costly mistakes. They can help with site assessment, design, material selection, construction techniques, and even sourcing plants and fish.

Professionals can also bring fresh ideas to your project. They’re likely to be up-to-date with the latest design trends, materials, and technologies, and can suggest solutions you might not have considered.

If your project is large, complex, or involves significant changes to the landscape, a professional can help manage the project, coordinate with other contractors, and ensure compliance with any regulations or permits.

DIY Vs. Professional Pond Building

The decision to build your pond DIY or hire a professional depends on several factors. DIY can be rewarding, cost-effective, and allows complete control over the project. However, it also requires a significant time commitment, physical labor, and a degree of knowledge and skill.

Professionals bring experience and expertise, which can result in a higher-quality result with less effort on your part. However, this comes at a cost and means giving up some control over the project.

If you’re considering the DIY route, do your research, start with a clear plan, and be realistic about what you can achieve. Consider calling in a professional for more complex tasks, such as electrical work for pumps or lighting.

Cost Factors in Pond Design

The cost of your pond project can vary widely depending on the size, complexity, and the materials used. It’s important to consider all potential costs before starting.

Excavation is typically a major part of the cost, whether you do it yourself or hire a professional. The cost will depend on the size and depth of the pond, as well as the type of soil and accessibility of the site.

The cost of the liner, underlay, and any protective layers will depend on the size of your pond and the materials used. Preformed liners can be more expensive but quicker and easier to install.

Pumps, filters, and lighting will also add to the cost. Consider not only the initial purchase price but also the ongoing running costs.

Plants and fish can be another significant cost, particularly if you choose more exotic or specialty species. Regular maintenance and care, whether DIY or hired out, should also be factored into the budget.

Finally, any additional features, such as water features, bridges, or decorative elements, will add to the cost.

Conclusion

Creating a garden pond is an endeavor that not only adds an aesthetic appeal to your space but also provides a habitat for a myriad of creatures, contributing to the local ecosystem. From planning the size and location of your pond, understanding the integral aspects of pond ecosystems, and selecting the appropriate elements such as plants, fish, and water features, the creation of a garden pond is a gratifying project filled with endless possibilities.

As with any significant project, it is essential to consider the cost, effort, and ongoing maintenance involved. Options range from DIY projects, for those looking for a hands-on experience, to hiring design professionals, who bring in-depth knowledge and expertise. The end goal is to have a pond that complements the existing landscape, adheres to safety standards, and is easy to maintain.

Future-focused considerations such as incorporating eco-friendly elements, and keeping up with innovative design trends, can further enhance the value and enjoyment of your pond. It’s also worth considering the benefits of both naturalistic and formal ponds, depending on your aesthetic preferences and the environment you wish to create.

The journey of creating a garden pond is as satisfying as the end result. Whether you want a peaceful backyard oasis, a vibrant hub for local wildlife, or a dynamic water feature that adds a unique character to your garden, the design process allows for personal expression and creativity. It’s about creating a water world that mirrors your love for nature and your desire for a tranquil space. Every decision made during the design process reflects the personality and vision of the owner, making each garden pond unique and special.

24 Ornamental Grass Garden Layout Ideas And Tips

Ornamental grasses have surged in popularity, appreciated for their unique textures, colors, and ease of care. They can create a vibrant spectacle in a garden, whether they stand as impressive focal points or subtly blend into the landscape. This article will explore how you can integrate these beautiful plants into your garden, understanding their needs, growth habits, and tips for maintenance. From small urban spaces to large prairie-style expanses, we’ll delve into the possibilities that ornamental grasses offer.

We’ll cover how to assess your garden conditions and select the right ornamental grasses, as well as design principles for creating a harmonious layout. We’ll also delve into the practical aspects of planting, care, and maintenance. Whether you’re a seasoned gardener or just starting your ornamental grass journey, you’ll find inspiration and valuable insights here.

Let’s embark on the journey of transforming your garden with the beauty of ornamental grasses.

The Beauty of Ornamental Grasses

Ornamental grasses are a remarkable addition to any garden, offering a blend of aesthetics that include an array of colors, distinct textures, and striking forms. They are cherished for their dynamism and elegance, subtly enhancing the beauty of a garden. Whether you opt for a delicate Japanese Forest Grass or a robust Fountain Grass, these plants can dramatically transform your outdoor space.

The true allure of ornamental grasses lies in their versatility. They can command attention when used as a centerpiece, or they can elegantly blend into the landscape, adding layers of complexity to the overall garden design. Their textures, ranging from the soft feathery plumes of Maiden Grass to the spike-like foliage of Blue Lyme Grass, introduce an element of variety, creating an intricate dance of light and shadow in your garden.

Beauty of Ornamental Grasses

Moreover, ornamental grasses have a unique way of changing their persona across different seasons. They sprout fresh green shoots in the spring, display vibrant flowers and seed heads in the summer, transform into warm tones of bronze and gold in the fall, and showcase architectural beauty in the winter. They are a year-round delight, delivering a dynamic visual experience that never ceases to enchant.

Another aspect of their beauty is the movement they introduce into a garden. Watching them sway gently with the breeze can be calming, creating a sense of peace and tranquility. This attribute can be particularly effective near patios or windows where their gentle motion can be enjoyed up close.

Assessing The Suitability Of Your Garden’s Conditions

To create an ornamental grass garden that thrives, it is essential first to assess your garden conditions. Like all plants, ornamental grasses have specific needs and grow best under certain conditions. The process involves an understanding of the available sunlight, soil type, and moisture levels in your garden.

Firstly, sunlight plays a critical role in the growth of ornamental grasses. Some varieties need ample sunlight to flourish and achieve their full potential, while others can thrive in partial or even full shade. Thus, you need to determine how much sunlight each part of your garden receives throughout the day.

Soil type is another crucial factor. The soil in your garden can range from clayey to sandy, loamy, or chalky, each with its unique set of properties. Some grasses grow well in rich, loamy soil, while others prefer poor, sandy conditions. Conducting a simple soil test can provide valuable information about your garden’s soil type and nutrient content.

Lastly, consider the water availability in your garden. While many ornamental grasses are drought-tolerant, others need regular watering. Understanding your garden’s watering regime, along with the typical rainfall patterns in your area, can significantly influence your choice of grasses and their placement.

Choosing the Right Ornamental Grasses

With your garden conditions assessed, the next step is to choose the right ornamental grasses that will thrive in your specific environment. It involves not only finding grasses that can withstand your garden’s conditions but also ones that align with your aesthetic preferences.

Start by researching various species and cultivars of ornamental grasses. There’s a wide range of options available, from low-growing Blue Fescue that stays under a foot to Giant Reed grass that can reach heights of over 15 feet. Look for details about their preferred light conditions, water needs, soil type, mature size, and growth habits.

Consider, too, the visual aspects of the grasses. Think about their color during different seasons, the texture and shape of their foliage, their flowering time, and the appearance of their flowers or seed heads. These elements will significantly influence their impact on your garden design.

Also, consider the maintenance requirements of the chosen grasses. Some might need regular pruning or division, while others are more carefree. Your choice should align with the amount of time and effort you’re willing to invest in your garden’s upkeep.

Understanding Growth Habits of Grasses

Ornamental grasses showcase a variety of growth habits, each offering a unique contribution to your garden design. Some grasses grow in tight clumps, standing tall and maintaining their tidy form throughout the year. Others have a spreading habit, creating a cascading effect or filling in gaps in the garden with their rhizomes or seeds.

Growth Habits of Grasses

Clump-forming grasses like Tufted Hair Grass or Fountain Grass create well-defined patches of texture and color in the garden. They can be used as focal points, planted in groups for a visual impact, or used to create a rhythm in the garden layout.

On the other hand, spreading grasses like Ribbon Grass or Northern Sea Oats can cover large areas, making them excellent as ground covers or to fill in empty spaces. However, care should be taken with some of these grasses as they can become invasive in certain conditions.

Grasses also differ in their lifecycle. Some are annual, completing their lifecycle in one year, while others are perennial, living for many years. Annual grasses can provide quick color and texture but will need to be replanted each year. Perennials require more time to establish but provide long-term structure in the garden.

Incorporating Grasses into Existing Gardens

Incorporating ornamental grasses into an existing garden can add a new dimension of texture, color, and form. They can integrate seamlessly with other plants, offering contrast or harmony as needed, and enhancing the overall garden design. Whether your existing garden is a traditional flower garden, a succulent garden, or even a vegetable garden, there’s an ornamental grass that can fit in beautifully.

Incorporating Grasses into Existing Gardens

When integrating grasses, consider their visual characteristics and how they can complement or contrast with existing plants. For example, the bold, vertical lines of a tall grass like Switchgrass can create an exciting contrast with the rounded forms of Hydrangeas or Roses. Similarly, the soft, fine texture of a grass like Prairie Dropseed can complement the coarse texture of a plant like Hosta.

Consider also the cultural requirements of the grasses. Ensure that their light, water, and soil needs are compatible with the conditions in the existing garden. And remember, the integration should not only be about aesthetics, but also about maintaining the health and balance of the garden ecosystem.

Ornamental grasses can also be used to address specific garden challenges. For example, if you have a slope that’s difficult to mow, consider planting it with a spreading grass that can control erosion while providing beauty. If your garden lacks winter interest, add some grasses that retain their form and color in the winter. The possibilities are endless, limited only by your creativity.

Creating Focal Points with Grasses

Ornamental grasses offer an array of unique characteristics that make them ideal for creating focal points in your garden. The tall, architectural forms of some grasses, their vibrant colors, or the way they catch the light can all draw the eye, creating interest and allure.

Grasses like Miscanthus or Pampas grass, which can reach substantial heights and produce striking plumes of flowers, can serve as fantastic focal points. Their towering presence adds vertical interest, drawing the eye upwards and making the garden feel larger.

Smaller grasses, too, can serve as focal points when planted in groups. A mass of Fountain Grass, for example, with its arching stems and feathery flowers, can create a stunning spectacle, particularly when backlit by the sun. The repetition of the same grass also leads the eye through the garden, creating a sense of rhythm and cohesion.

Focal points are not just about size or quantity. Unusual colors or textures can also draw attention. For instance, the metallic blue leaves of Blue Fescue or the bright gold foliage of Golden Hakone Grass can stand out in a sea of green, becoming instant focal points.

Additionally, consider placing grasses where their movement can be appreciated. The sway of Tall Reed Grass in the breeze or the rustle of Feather Reed Grass can create dynamic focal points, adding an element of sound and movement to the garden.

Planning for Seasonal Interest

One of the great benefits of using ornamental grasses in your garden is the extended seasonal interest they provide. While most flowers have a relatively short bloom time, grasses offer visual interest throughout the growing season and even into winter.

In spring, fresh shoots of grasses like Japanese Forest Grass or Switchgrass emerge, their bright greens providing a welcome sign of the season’s renewal. As they grow, these grasses create an ever-changing display, their colors intensifying and their form becoming more defined.

Summer brings the show of flowers or seed heads. Whether it’s the pinkish-purple plumes of Purple Fountain Grass, the fluffy white flowers of Pampas Grass, or the delicate, airy panicles of Feather Grass, each contributes a unique texture and color to the garden.

As the season transitions into fall, many grasses take on warm hues of red, orange, gold, or bronze. The glowing foliage of Little Bluestem or the golden leaves of Golden Hakone Grass can create a spectacular autumn display.

Even in winter, when most plants have retreated, grasses like Switchgrass or Maiden Grass continue to shine. Their dried stalks and seed heads stand tall, creating interesting forms and textures in the snowy landscape. They also provide shelter for overwintering insects and birds, adding life to the winter garden.

Designing with Colour and Texture

Ornamental grasses bring a palette of colors and a variety of textures to the garden, offering endless possibilities for design. When designing with grasses, it’s important to consider not only the plants themselves but how they interact with each other and with the overall garden scheme.

Color can be used to create mood, highlight certain areas, or tie together disparate parts of the garden. Cool blues of Blue Oat Grass or Blue Lyme Grass can create a sense of calm and make spaces seem larger. Warm tones of Red Fountain Grass or Orange New Zealand Sedge can energize a space and draw attention.

The texture of grasses can also play a significant role in garden design. Fine-textured grasses like Blue Fescue or Feather Grass can soften the look of bold-leaved plants, create a sense of depth when used in layers, or add delicacy when used as a foreground plant. Coarse-textured grasses like Giant Reed or Japanese Silver Grass can create bold statements, standing out against fine-textured plants or architectural features.

Grasses for Edging and Borders

Ornamental grasses can be an effective solution for edging and borders in the garden. They provide a natural and dynamic alternative to traditional hardscape edging materials like brick or stone.

Grasses for Edging

Low-growing grasses like Blue Fescue, Black Mondo Grass, or Japanese Sedge are excellent choices for edging paths or defining the boundaries of a garden bed. Their compact size and neat habit provide a tidy border, guiding the eye along the desired route.

For a taller border, consider using grasses like Fountain Grass, Feather Reed Grass, or Maiden Grass. These can create a sense of enclosure, add a layer of privacy, or provide a backdrop for other plants.

When using grasses for edging or borders, repetition is key. The repeated use of the same grass creates a sense of cohesion and rhythm, leading the eye through the garden. Also, consider how the grass will look in all seasons to ensure the border remains attractive throughout the year.

Companion Planting with Grasses

Grasses can be wonderful companions for other plants in the garden. Their various forms, textures, and colors can enhance the beauty of flowers, shrubs, and trees.

When choosing companions for grasses, consider contrasting forms. The vertical lines of tall grasses like Switchgrass or Big Bluestem can beautifully offset the rounded or spreading forms of many flowers and shrubs.

Contrasting or complementary colors can also create striking combinations. The blue foliage of Blue Fescue, for example, can beautifully contrast with the red flowers of Daylilies or the orange leaves of Heucheras.

The fine texture of grasses like Prairie Dropseed or Feather Grass can provide a wonderful contrast to the bold leaves of Hostas or Cannas. Alternatively, the coarse texture of grasses like Giant Reed or Japanese Silver Grass can stand out against fine-textured plants like Ferns or Baby’s Breath.

Moreover, grasses can support pollinators and beneficial insects, making them great companions in a wildlife-friendly garden. Many grasses are host plants for certain types of butterflies and provide seeds for birds.

Arranging Grasses for Maximum Impact

Ornamental grasses bring structure, movement, and year-round interest to gardens. Arranging these grasses thoughtfully can maximize their visual impact and overall contribution to your garden design.

Consider height as a fundamental factor when arranging grasses. In a mixed border, tall grasses like Miscanthus or Pampas Grass can create a dramatic backdrop for shorter perennials. Conversely, low-growing grasses such as Blue Fescue or Sedge can be effective as edging plants or in the front of the border.

Grouping multiple specimens of the same species together can create a stronger visual impact than individual plants. This mass planting emphasizes the shape, color, and texture of the grass and helps create a sense of unity in the garden.

Integrating grasses with other plant forms can also increase visual interest. The upright forms of many grasses provide a beautiful contrast to the round or mounding shapes of many flowering perennials. Similarly, the fine textures of grass foliage or flowers can provide a lovely counterpoint to the bolder textures of other garden plants.

Additionally, consider the movement that grasses bring to the garden. Locating them where their swaying in the wind can be appreciated, such as along a pathway or near a patio, can add a dynamic element to your garden.

Planting and Spacing of Grasses

Proper planting and spacing are crucial to the success of your ornamental grass garden. This ensures that each grass has enough room to grow and develop into its natural shape, contributing to the overall aesthetics and health of your garden.

When planting, prepare a hole that is twice as wide and just as deep as the grass’s root ball. This allows the roots to spread out easily. Backfill the hole with a mix of garden soil and compost to provide initial nutrients.

Spacing between grasses depends on their mature size and growth habit. Large grasses like Maiden Grass or Pampas Grass need more space (up to 6 feet or more) than smaller grasses like Blue Fescue or Fountain Grass (1-2 feet). However, if you’re looking for a mass planting effect, you might plant grasses closer together.

Remember that grasses will take some time to reach their full size. In the meantime, you could fill gaps with annuals or perennials that can be removed or relocated once the grasses fill in.

Integrating Hardscapes with Grasses

Ornamental grasses can work wonderfully with hardscape elements to create a cohesive and balanced garden design. Whether it’s a stone pathway, a wooden deck, or a metal sculpture, grasses can enhance these features with their varied textures, forms, and colors.

Taller grasses like Feather Reed Grass or Miscanthus can provide a softening effect to vertical hardscape elements such as walls, fences, or buildings. Their height, movement, and sound can also create a sense of enclosure and privacy around patios or seating areas.

Low-growing grasses can be used to edge pathways, their arching leaves gently spilling over the hardscape and softening its edges. Some, like Mondo Grass, can even be used as a ground cover in between stepping stones, adding an element of green to the hardscape.

Grasses also work well in conjunction with water features. The reflection of grasses in water can double their visual impact, and the sound of rustling leaves can complement the sound of running or dripping water.

Care And Maintaining Tips

Ornamental grasses are generally low-maintenance plants, but they do benefit from some care to keep them looking their best.

Watering needs depend on the type of grass and your climate. Most ornamental grasses are drought-tolerant once established, but they’ll appreciate regular watering during their first growing season and during extended dry periods.

Most grasses don’t need much fertilization. In fact, too much fertilizer can lead to floppy growth in some grasses. A layer of compost applied in the spring can provide a slow-release source of nutrients.

Monitor for pests and diseases, but know that these are generally not significant problems for ornamental grasses. Some grasses may suffer from rust, leaf spot, or blight, but these are usually cosmetic issues that don’t affect the overall health of the plant.

Pruning and Dividing

Pruning and dividing are two important tasks for maintaining the health and aesthetics of your ornamental grasses.

Pruning is done primarily in late winter or early spring, before new growth starts. Cut back deciduous grasses to a few inches above the ground. This makes way for fresh new growth and prevents the center of the grass from becoming too woody. Evergreen grasses usually just need a tidy up, removing dead or brown leaves.

Pruning and Dividing

Dividing is a task for spring, just as the grasses start to grow. Not all grasses need to be divided, but for those that do, this helps prevent the center of the plant from dying out and encourages more vigorous growth. To divide, simply dig up the whole clump, cut it into sections, and replant. Make sure each division has a good amount of roots and a few shoots.

Watering and Feeding

Ornamental grasses are generally low maintenance, but proper watering and feeding can promote their health and vigor.

In terms of watering, many grasses are drought-tolerant, but they will appreciate consistent moisture, especially during their first year or two as they establish. Deep, infrequent watering is better than frequent shallow watering as it encourages the development of deep root systems, making the grasses more resilient during dry periods. The top inch of soil should be allowed to dry out between watering sessions to prevent waterlogging.

Watering and Feeding

Feeding ornamental grasses can boost their growth, but over-fertilizing can lead to floppy or excessive growth. A slow-release fertilizer applied once a year in early spring is usually sufficient. Organic options like compost or well-rotted manure are excellent choices, providing a wide range of nutrients while improving soil health.

Keep in mind that different grass species may have different watering and feeding requirements. Always check the specific needs of your chosen grasses and adjust your care regimen accordingly.

Dealing with Pests and Diseases

While ornamental grasses are generally robust and resistant to many pests and diseases, they are not entirely immune. Regular monitoring and prompt action can help keep these issues at bay.

Some common pests that may affect ornamental grasses include aphids, scale insects, and caterpillars. Most of these can be controlled with regular monitoring and organic pest control methods such as insecticidal soaps or oils, or by encouraging beneficial insects into your garden.

Fungal diseases like rust and leaf spots can also affect ornamental grasses, particularly in damp conditions or if the plants are overcrowded. Good planting practices like proper spacing and avoiding overhead watering can help prevent these issues.

In all cases, maintaining healthy plants is the best defense against pests and diseases. Proper watering, feeding, and pruning practices will keep your grasses strong and less susceptible to problems.

Creating Wildlife Habitats with Grasses

Ornamental grasses are not only visually striking but also create essential habitats for a variety of wildlife. Their diverse structures and growth habits provide shelter, food, and breeding grounds for insects, birds, and small mammals.

Creating Wildlife

The thick clumps formed by many grasses offer shelter to small mammals and insects. These habitats can be particularly valuable in winter when other shelter options may be scarce.

Many grasses produce seed heads that can be a food source for birds. Leaving these in place over winter rather than pruning them back can provide a valuable food source during a challenging time of year.

Moreover, certain grass species, like the Purple Moor Grass (Molinia caerulea), are known for attracting butterflies and other pollinators, thus supporting biodiversity in your garden.

Ornamental Grasses For Small Gardens

Small gardens need not miss out on the benefits of ornamental grasses. A well-chosen grass can bring movement, texture, and year-round interest to even the smallest of spaces.

For small gardens, consider compact grasses like Blue Fescue (Festuca glauca), which forms neat, dome-shaped mounds, or Japanese Forest Grass (Hakonechloa macra), known for its cascading foliage. These grasses have a compact growth habit, allowing them to fit comfortably in restricted spaces.

If you have a small but tall space, such as a narrow side yard, consider vertical grasses like Feather Reed Grass (Calamagrostis x acutiflora) or Switch Grass (Panicum virgatum). These can add a sense of height and drama without taking up much ground space.

Container Gardening with Grasses

Ornamental grasses are an excellent choice for container gardening. They bring height, structure, and an element of surprise to container arrangements, and their varied textures and colors can be enjoyed up close.

Container Gardening with Grasses

When choosing grasses for containers, consider their mature size and growth habit. Some, like Fountain Grass (Pennisetum setaceum) or New Zealand Flax (Phormium tenax), can make striking solo statements in a container.

Others, like Sedge (Carex spp.) or Blue Fescue, can be combined with flowering perennials or trailing plants for a mixed container. The grass can act as the ‘thriller’ or focal point of the arrangement, with the other plants playing supporting or contrasting roles.

Container-grown grasses will need regular watering, especially in hot weather, as containers dry out faster than garden soil. They may also benefit from occasional feeding with a balanced fertilizer.

Ornamental Grass Ideas For Urban Spaces

In urban settings where space is a luxury, ornamental grasses are valuable assets. Their resilience, low maintenance, and aesthetic appeal make them perfect for city gardens, balconies, and patios.

Vertical gardens or green walls are popular in urban spaces. Here, grasses such as Feather Reed Grass or Switch Grass can create an impressive effect. These grasses grow tall and upright, bringing a touch of the wilderness into a city setting.

In tight spaces, grasses can function as dividers or screens. Larger species such as Miscanthus or Maiden Grass can provide privacy while adding a lush, green backdrop. Remember to consider their growth habits and whether they are clumping or spreading varieties to ensure they fit well within the allocated space.

Container gardening, as mentioned earlier, is also a popular approach in urban spaces. Ornamental grasses, either alone or paired with complementary plants, add height and interest to container arrangements and can be easily rearranged as needed.

Finally, ornamental grasses can soften hardscapes. Their natural look and flowing movement provide a soothing counterpoint to concrete, metal, and glass common in urban environments.

Creating a Prairie-Style Garden

Prairie-style gardens, inspired by the native grasslands of North America, are becoming popular for their naturalistic look and ecological benefits. This style of gardening pairs grasses with native wildflowers, creating a habitat that supports local wildlife.

In creating a prairie-style garden, it’s important to choose grasses and flowering perennials that would naturally occur together. Popular grass choices include Big Bluestem, Indian Grass, and Switch Grass. These grasses can be complemented with flowers like Coneflowers, Black-eyed Susans, and Prairie Clover.

Prairie-Style Garden

This style of gardening is characterized by a relaxed, free-flowing design. Instead of neat rows or distinct borders, plants are allowed to intermingle, reflecting the dynamic nature of natural grasslands. Planting in large drifts can enhance this effect.

Prairie gardens are low-maintenance once established. They are drought-tolerant and generally don’t require supplemental watering or feeding. However, they do require some planning, and ideally, they should be located in a sunny area with well-drained soil.

Designing a Zen Garden with Grasses

The Zen garden, with its focus on simplicity, balance, and tranquility, provides an interesting context for the use of ornamental grasses. While traditional Zen gardens may not typically include grasses, they can be incorporated thoughtfully into modern interpretations.

In a Zen garden, each element is symbolic, and its placement is considered carefully. Grasses can represent several elements in this setting. For instance, tall, upright grasses could symbolize strength or resilience, while a sea of low-growing grasses might symbolize water or the flow of life.

Carex or Sedge, with their neat growth habit and fine texture, can provide a soft, green carpet effect, which adds a sense of calm and harmony. On the other hand, Miscanthus, with its graceful arching habit and attractive seed heads, can create a focal point or add an element of surprise in a Zen garden.

It’s important to remember that Zen gardens should evoke a sense of peace and balance. Therefore, the choice and arrangement of grasses should contribute to this overall effect.

Grasses for Shade and Sun

One of the key aspects of creating a successful ornamental grass garden layout is understanding the light requirements of your chosen grasses. Some grasses thrive in the full sun, while others prefer shaded areas. This knowledge will allow you to create a garden that thrives in all conditions.

Grasses for Shade and Sun

Sun-loving grasses include Blue Fescue, Feather Reed Grass, and Miscanthus. These grasses are ideal for sunny borders, slopes, and containers. They generally appreciate at least six hours of direct sun per day and produce the most vibrant colors and strongest growth in these conditions.

Shade-tolerant grasses include Sedge, Northern Sea Oats, and Japanese Forest Grass. These grasses can bring light and movement to shaded areas of the garden. They can be particularly effective when planted in mass as a groundcover, or as accents in a woodland garden.

Remember that light conditions can change throughout the day and across seasons. Keep an eye on how the sun and shade move across your garden, and adjust your planting plan as necessary.

Conclusion

Ornamental grasses, with their diverse range of colors, textures, and growth habits, offer limitless possibilities for garden design. From creating a serene, Zen-inspired garden to emulating the natural beauty of a prairie landscape, there are countless ways to incorporate these versatile plants into your outdoor space.

Assessing the conditions of your garden is the first step towards a successful ornamental grass garden layout. Factors such as sunlight, soil type, and moisture levels will play a critical role in choosing the right grasses for your landscape.

Planning for seasonal interest, creating focal points, and considering color and texture are all integral parts of the design process. Grasses can also be used effectively in borders, as companions for other plants, or arranged for maximum visual impact.

Care and maintenance, including planting, spacing, watering, feeding, and pruning, ensure the health and longevity of your grasses. Remember that some grasses may be prone to certain pests and diseases, and plan accordingly.

Ornamental grasses aren’t just for large landscapes. They can be integrated into urban spaces, container gardens, and even small garden spaces. They can also play a significant role in creating wildlife habitats, contributing to local biodiversity.

Designing a garden with ornamental grasses is as much an art as it is a science. It requires a balance of aesthetics, understanding of plant growth habits, and consideration of the specific conditions of your garden. But, the end result – a living, breathing tapestry of color, texture, and movement – is well worth the effort. Whether you have a sprawling garden or a small urban balcony, the magic of ornamental grasses can transform your outdoor space into a haven of tranquility and beauty.

Bee Garden Design A Haven for Our Pollinator Heroes

In a world grappling with rapid biodiversity loss, the humble bee stands as an unsung hero, critical to our ecosystems and agriculture. As we delve into the realm of Bee Garden Design, this article explores how you can create sanctuaries for these industrious pollinators, right in your backyard. Through a mindful selection of plants, optimizing seasonal blooms, creating safe nesting sites, and avoiding pesticides, we can fashion a haven that supports a diverse array of bee species.

Bee-friendly gardens not only aid in bee conservation but also create an ecosystem bustling with life, offering an educational platform for children and adults alike. This article lays down a roadmap to create such a garden, catering to urban green spaces, vertical gardens, and large landscapes, with a special emphasis on native bees and plants. Using case studies to illustrate these concepts, this comprehensive guide will serve as your primer for designing and maintaining a successful bee garden.

Whether you’re a seasoned gardener or a beginner, let’s embark on this journey to forge spaces that foster our pollinator heroes, and in turn, contribute to the health of our planet.

Understanding the Importance of Bees

Bees are integral to our planet’s biodiversity and functioning ecosystems, acting as key pollinators for a vast range of plants, including many of our most loved fruits and vegetables. Bees visit flowers to collect nectar and pollen for food, transferring pollen from the male parts of a flower to the female parts in the process. This fertilization allows the plants to produce fruit and seeds, contributing significantly to global food production. In fact, the UN Food and Agricultural Organization estimates that pollinators, such as bees, are directly responsible for between 5-8% of global agricultural production.

Importance of Bees

Beyond this, their activity promotes genetic diversity within plant populations. By moving from flower to flower, bees transport pollen from different plants, encouraging cross-pollination. This genetic mixing leads to stronger, healthier plant populations that are more resistant to diseases and pests.

However, bees are under threat. Their populations are dwindling due to habitat loss, use of pesticides, disease, and climate change. Creating an environment that supports their survival is not just beneficial for them, but also crucial for us and the broader ecosystem.

Case Studies on the Impact of Bees

There is a wealth of studies demonstrating the importance of bees. A research by Potts et al. in 2016 illustrated the importance of wild bees in enhancing the pollination of fruit sets, a service worth billions annually. The University of Reading conducted a study concluding that bees and other pollinators contribute a staggering £690 million per year to the UK economy, solely based on their role in pollinating crops.

Creating a Bee-Friendly Environment

Designing a garden that encourages bees involves conscious choices about a range of elements including plant selection, provision of water, sun and shade planning, and avoiding harmful pesticides. Here we’ll discuss some of the key elements to consider while creating a Bee-Friendly Environment.

Bee Sanctuary Design

A bee sanctuary is a space within your garden specifically designed to support bees. It can include a variety of flowering plants that provide a continual source of nectar and pollen, safe nesting sites such as undisturbed ground or bee hotels, and water sources such as shallow dishes filled with stones. Providing diverse habitats can attract a range of bee species, both native and migratory, enriching your garden’s ecosystem.

Bee-Friendly Environment

Urban Bee Gardens

City living doesn’t mean you can’t have a thriving bee garden. Urban Bee Gardens can be cultivated in a variety of spaces – balconies, rooftops, or small yards. Even a windowsill can host a selection of bee-friendly plants. Using containers, you can grow a variety of native flowering plants that suit your space and local bee species. Urban gardens can serve as vital refuges for bees in an otherwise concrete environment.

Vertical Gardening for Bees

When space is limited, vertical gardening can be an effective solution. Also known as “green walls”, vertical gardens can house a range of nectar-rich flowers and bee-friendly plants. Climbing plants like honeysuckle or clematis not only create a visually stunning display but are also enticing for bees. Incorporating vertical elements increases the foraging area without taking up additional ground space, making them ideal for small patios, balconies, or urban gardens.

Choosing the Right Plants for Bees

When choosing plants for your bee garden, it’s important to prioritize diversity and suitability for your local bee species. As a rule of thumb, native plants are often the best choice. They have evolved with local bee species, and therefore provide the right kind of nectar and pollen, at the right time.

Native Bees and Plant Selection

Native bees have a unique relationship with native plants. This symbiotic relationship has developed over thousands of years and is critical for the survival of both. Including native plants in your garden not only supports local pollinators but also contributes to local biodiversity, offering additional benefits such as improved resistance to local pests and diseases, and lower water and maintenance needs compared to non-native species.

Right Plants for Bees

Group Planting for Bee Attraction

Planting in groups, or ‘clumps’, can make it easier for bees to find and collect pollen and nectar. A cluster of the same plants will be more noticeable to passing bees than a single plant. Also, once a bee has found a type of flower that it knows and likes, it prefers to visit the same type of flower, as this is a more efficient way to collect food. Therefore, having a group of the same plants together can improve your garden’s attractiveness to bees, enhancing pollination and the overall success of your garden.

Seasonal Blooms for Year-Round Forage

Ensuring a year-round supply of food for bees is another important aspect of bee garden design. By carefully selecting a variety of plants that bloom at different times of the year, you can provide a continual source of nectar and pollen. This not only supports a wider range of bee species, which have different active periods and preferences, but also helps bees survive throughout the year, particularly in early spring and late fall when other food sources can be scarce.

Early spring bloomers like crocus, hyacinth, and borage can provide much-needed food for bees emerging from winter hibernation. Summer-blooming plants like lavender, salvia, and echinacea support bees during their most active period, while late bloomers like asters and sunflowers offer sustenance in the autumn months.

By integrating these concepts of bee garden design, we can create vibrant, resilient spaces that support our important pollinator heroes, contribute to biodiversity, and bring us joy and fulfillment as gardeners.

Designing a Pollinator Garden

A pollinator garden is a garden that is designed with the specific intent of attracting and supporting pollinators, like bees. It can be a beautiful and practical addition to any garden, whether it’s a small urban space or a sprawling countryside plot. To effectively design a pollinator garden, understanding the needs and habits of your local pollinators is critical.

Firstly, diversity is key. A mix of different flower shapes, sizes, and types will attract a variety of pollinators and offer a wider range of nectar and pollen sources. Arrange your plants so that they are easy for bees to navigate, with shorter plants at the front and taller ones at the back.

Designing a Pollinator Garden

Secondly, incorporate elements of shelter and nesting sites. Bees need places to rest, seek protection from weather, and reproduce. This can be achieved by leaving some ground undisturbed, incorporating features like bee hotels, and providing vegetation cover.

Thirdly, careful planning for sun and shade is crucial. Most bees are active during the day and prefer sunny areas. Position your pollinator garden in a place that receives plenty of sunlight, but also includes some shaded areas for bees to cool down.

Lastly, be mindful of your garden maintenance practices. Avoiding the use of pesticides, regularly providing fresh water, and leaving some areas of the garden a little wild can create a more supportive environment for bees.

Color Schemes for Pollinator Gardens

When designing a pollinator garden, remember that bees are attracted to certain colors. Research has shown that they seem to prefer purple, blue, and yellow flowers. Incorporating these hues into your garden can help attract more bees.

Year-Round Care of Pollinator Gardens

Maintaining a pollinator garden requires attention throughout the year. Pruning, deadheading, and planting should be timed to avoid disturbing active bees and their potential nesting sites.

Integrating Nectar-Rich Flowers

A primary goal when designing a bee garden is to provide ample sources of nectar and pollen, the main food sources for bees. Bees get their carbohydrates from nectar and protein from pollen, so a variety of nectar-rich flowers will ensure they have a balanced diet.

Nectar-rich plants typically have flowers with a tubular structure, like foxgloves, penstemons, and salvia. Bees are particularly drawn to these types of flowers. Plants like lavender and buddleia not only offer a high nectar yield but also have a long flowering period, providing food over an extended timeframe.

Nectar-Rich Flowers

Different bee species have different tongue lengths and preferences, so a range of flower shapes and sizes will cater to a wider diversity of bees. For example, bumblebees have long tongues and can access flowers with deep corollas like foxgloves, while honey bees prefer open flowers like daisies.

The flower’s color can also influence its attractiveness to bees. They can see the color spectrum from ultraviolet to orange, but not red, which is why they are often attracted to blue, purple, white, and yellow flowers.

Creating Bee Habitats

A crucial aspect of a bee-friendly garden is creating habitats that can support a range of bee species. Different bees require different habitat conditions for nesting and overwintering. Some species nest in the ground, while others use cavities or hollow stems.

For ground-nesting bees, leave some patches of bare soil in a sunny spot. Avoid mulching or planting densely in these areas, as bees need easy access to the ground.

For bees that nest in cavities or hollow stems, consider creating a bee hotel. This can be as simple as a bundle of hollow bamboo canes or as elaborate as a multi-story insect hotel. Place your bee hotel in a sheltered spot, ideally with a south-facing aspect.

Creating Bee Habitats

Bee habitats should also include shelter from the elements and potential predators. Dense shrubs, tall grasses, or even piles of leaves or rocks can provide the necessary cover.

Safe Nesting Sites for Bees

Safe nesting sites are crucial for bees’ reproduction. Providing different materials and structures can accommodate various species. For solitary bees, a bee hotel filled with tubes or drilled holes can be an excellent nesting site.

Incorporating Water Sources for Bees

Like all living creatures, bees need water to survive. However, they can’t swim, so providing water in a bee-friendly way requires some consideration. A bee waterer or a shallow dish filled with pebbles or marbles, topped with water, can provide a safe place for bees to land and drink.

Water also plays a crucial role in honey production. Honey bees need water to regulate the temperature of their hive and to help process the honey. During hot weather, they may collect water and distribute it around the hive, fanning their wings to evaporate it and cool down their home.

Bees may also use water for personal grooming, helping them to keep their wings and body clean so they can fly more efficiently. By adding a water source to your bee garden, you are improving its attractiveness and utility for bees.

Safe Nesting Sites for Bees

Creating safe and inviting nesting sites is a critical component of any bee-friendly garden. To establish these spaces, it’s vital to understand that bees have diverse nesting requirements. For instance, honey bees typically live in large colonies in beehives or hollow trees, while many solitary bees nest in individual burrows in the ground or cavities in dead wood.

Ground-nesting bees, which make up approximately 70% of bee species, need patches of bare or sparsely vegetated soil in sunny areas. Avoid disturbing these areas once nests are established. This means no digging or walking over these spots, and be mindful of flooding during watering.

Safe Nesting Sites for Bees

Cavity-nesting bees, on the other hand, require different accommodations. A DIY “bee hotel” can provide much-needed nesting sites. You can build one from untreated wood with various-sized holes drilled into it or bundle together hollow stems or bamboo canes.

Remember that these sites also need to be safe from predators and harsh weather. Providing adequate coverage with plants or man-made structures is important, as is considering the orientation of the nesting site – south or southeast-facing sites often work best.

Maintaining Clean Nesting Sites

Keep in mind that cleanliness is vital in preventing disease spread among bee populations. If you are providing man-made nesting sites, they should be cleaned or replaced regularly.

Avoiding Pesticides in Your Garden

Pesticides can pose a significant threat to bees, causing immediate harm or leading to long-term health problems such as impaired reproduction, reduced immunity, or disorientation. Therefore, eliminating or drastically reducing the use of these chemicals in your garden is a significant step towards protecting bees.

Instead of chemical pesticides, consider natural pest management strategies. Companion planting, for example, is an approach where certain plants are grown together because they are beneficial to each other. Some plants repel pests that other plants attract, reducing the need for chemical intervention.

If a pest problem becomes severe and intervention is needed, opt for organic or bee-safe pesticides. However, these should be used sparingly and as a last resort. Always apply them in the evening when bees are less active, and avoid spraying open flowers.

Attracting Diverse Bee Species

While many people are familiar with the European honey bee, there are actually over 20,000 known species of bees worldwide, each with unique behaviors and preferences. A healthy garden can support many different species, contributing to both local and global biodiversity.

To attract a diverse range of bees, you’ll need to provide a variety of food sources throughout the year. Different species of bees emerge at various times, and their active periods also differ. Therefore, it’s beneficial to select plants that bloom in different seasons.

Moreover, since different species have different tongue lengths and consequently prefer different flowers, diversifying the types of flowers in your garden can attract a wider range of bees. For instance, flat or shallow blossoms, like daisies or sunflowers, attract a broad range of bees, while tubular flowers like foxgloves or snapdragons may attract bees with longer tongues.

Native Bees and Plant Selection

Native bees have co-evolved with the local flora and are often the most efficient pollinators of native plants. When selecting plants for your garden, prioritizing native species can support the local bee population and maintain the health of the local ecosystem.

Research the native plants in your area, considering their bloom times and the types of bees they attract. Native flowering plants tend to be more resilient and require less maintenance than non-native species, and they can also provide habitat for other wildlife.

One example of a beneficial native plant is the purple coneflower, which is native to much of North America. It’s drought-resistant, attracts a variety of pollinators, and has a long bloom period. Other examples could include sunflowers, wild roses, or black-eyed Susans, depending on your location.

Remember that while native plants are often best, non-native plants can also play an important role in providing forage, especially in urban environments or at times of the year when fewer native plants may be in bloom.

Planning for Sun and Shade

An important aspect of bee garden design is the strategic planning for sun and shade. Most bee species prefer sunny spots to forage and nest, so try to choose a site for your bee garden that receives plenty of sunlight, especially in the morning. This can stimulate bees to become active earlier in the day. South or southeast-facing gardens often work best.

At the same time, some degree of shade is necessary, especially during the peak heat of the day or in particularly hot climates. Certain plants and flowers that are attractive to bees also require some shade. Furthermore, shade can be beneficial for certain bee species that prefer cooler temperatures or lower light conditions. You can provide shade with the use of taller plants, trees, or even garden structures like pergolas or arbors.

It’s also important to remember that the sun’s path changes throughout the year, so a spot that’s sunny in the summer might be shaded in the winter. Observe your garden throughout the year to understand its patterns of sunlight and shade, and plan accordingly.

Bee Garden Maintenance Tips

Maintaining a bee garden involves a balance of providing for the bees and ensuring the overall health and aesthetics of the garden. One crucial part of bee garden maintenance is watering. Bees need water, but heavy watering can flood ground-nesting bees and wash away pollen and nectar. A gentle rain-like watering early in the morning is often best.

Mulching can also be a tricky issue in a bee garden. While it’s beneficial for suppressing weeds and maintaining soil moisture, it can inhibit ground-nesting bees. If you want to encourage these species, leave some areas of your garden mulch-free.

Pruning and deadheading spent flowers can encourage more blooms, but consider leaving some dead stems or plants in place. They can provide nesting sites for certain bee species. For example, many species of solitary bees nest in the hollow stems of dead plants.

Finally, it’s important to maintain a year-round food source for bees. Plan your garden so that something is always in bloom, and resist the temptation to tidy up too much in the winter. Many plants provide valuable winter forage for bees.

Encouraging Bees with Fruit Trees

Fruit trees are an excellent addition to any bee garden. They provide abundant blooms in the spring and can attract a multitude of pollinators. Apple, pear, plum, and cherry trees are all excellent choices. However, even smaller fruiting plants like blueberries, raspberries, or currants can be beneficial.

When choosing fruit trees, consider their bloom times to ensure that you’re providing food for bees throughout the spring and into the summer. Also, consider planting multiple trees of the same species or variety nearby each other. This makes them more attractive to bees and can increase pollination rates, leading to better fruit yields.

Bees with Fruit Trees

Another benefit of fruit trees is that they provide habitat and nesting opportunities for bees. Some bees build nests in old wood, so leaving dead branches on your fruit trees (as long as they don’t cause a disease risk) can provide valuable nesting sites.

Planting in Groups for Bee Attraction

Bees are attracted to mass plantings, which are essentially large groups of the same type of plant or flower. There are a few reasons for this. First, group plantings are more visible to bees. They stand out more in the landscape, attracting bees from a greater distance.

Second, group plantings are more efficient for bees to forage. They can collect more nectar and pollen in less time because they don’t have to fly as far between flowers. This is particularly important for bees, which expend a lot of energy in flight.

When planning your garden, aim to plant in groups of at least three to five of the same plant, and more if possible. Remember to choose a variety of plants that bloom at different times to ensure a continuous food source. And consider the height and growth habit of your plants to ensure they fit well together and provide a visually pleasing arrangement.

Bee Garden Colour Schemes

Colour plays a crucial role in a bee-friendly garden. Bees have good colour vision, which they use to locate flowers and remember the locations of good food sources. They primarily see in the ultraviolet spectrum, which means they perceive colours differently than we do. For example, red flowers appear green to them.

In general, bees are attracted to purple, blue, yellow, and white flowers. They find these hues particularly appealing because these colours often signal a rich source of nectar and pollen. Using these colours prominently in your bee garden can help to attract a wide range of bee species.

Try to create a vibrant tapestry of colour in your bee garden to offer visual cues for the bees. Combine plants with different flower shapes, sizes, and colours for maximum bee appeal.

Remember, it’s not just about the colour of individual plants, but also about how you combine them. The colour scheme of your garden can either create harmony or a striking contrast. For instance, pairing purple and yellow flowers can provide a visually striking contrast that is attractive to both bees and humans.

It’s also important to plan for continuous colour throughout the growing season. By carefully selecting a variety of plants that bloom at different times, you can ensure that your garden is always colourful and attractive to bees.

Year-Round Bee Garden Care

Bee garden care is not a one-season job but requires year-round commitment. However, the work can be immensely rewarding as you witness your garden teeming with life and contributing positively to the local ecosystem.

Spring is the season of growth and renewal. Begin the season by clearing away any dead plant material and debris that may harbour pests or diseases. Prepare your soil for the planting season by adding compost or other organic matter.

In the summer, keep a close eye on watering needs. Remember, bees need water too, so consider installing a bee-friendly water source. Monitor your plants for any signs of pests or diseases and manage them using bee-safe methods.

Autumn is the time to prepare your garden for winter. Avoid heavy pruning or tidy-up that may destroy overwintering sites for bees. Plant fall-blooming flowers and consider adding a few native shrubs or trees to your garden that provide late-season blooms.

During the winter, it’s vital to provide food for bees. Leave seed heads, late-blooming flowers, and other sources of food in place. Plan and prepare for the next growing season by sourcing seeds of bee-friendly plants and starting them indoors.

Urban Bee Gardens

Creating a bee-friendly garden is not just limited to those with spacious yards or countryside homes. Urban bee gardens, though smaller in size, can make a significant impact on local bee populations.

Even the smallest spaces can be transformed into a buzzing haven for bees. Balcony gardens, rooftop gardens, or tiny patios can be designed with bees in mind. Using containers filled with a variety of nectar-rich flowering plants, you can attract and nourish a variety of bee species.

Remember to consider the unique challenges of urban gardening. These might include limited space, more shade, and the heat island effect that makes cities hotter than rural areas. Choose plants that are adapted to these conditions and remember to provide water for the bees, especially in hot weather.

It’s also important to consider how to make your urban bee garden a peaceful and attractive space for humans. Choose plants that offer multi-season interest, and consider adding features like a small water feature, a comfortable seating area, or attractive outdoor lighting.

Educational Aspects of Bee Gardens

Beyond their environmental benefits, bee gardens can also serve as powerful educational tools. They can help to raise awareness about the importance of bees and other pollinators and demonstrate the practical steps we can take to support them.

Bee gardens provide a hands-on opportunity to learn about botany, ecology, and environmental science. Observing a garden over time can teach about the life cycles of plants and bees, the relationships between different species, and the effects of weather and climate.

Moreover, bee gardens can foster a sense of stewardship for the environment. They can inspire people to make positive changes in their own gardens or communities. They also provide a space for people to connect with nature, even in urban settings.

Lastly, consider adding educational signage or information boards to your bee garden. This could include information about the plants you’ve chosen and why they’re beneficial for bees, the life cycle of bees, and the challenges that bees face in the modern world. By doing so, you’re not just creating a haven for bees, but also an educational resource for your community.

Designing a Honey Bee Garden

Designing a garden specifically for honey bees can be a fulfilling project that brings life, beauty, and honey to your backyard. However, it involves more than just planting flowers. It necessitates an understanding of honey bees’ preferences, their foraging behavior, and the types of plants they favor.

Honey Bee Garden

Honey bees have a strong preference for certain plant families. They are particularly drawn to flowers from the mint family (Lamiaceae), the daisy family (Asteraceae), and the pea family (Fabaceae). Including a good variety of plants from these families in your garden can create a nectar-rich haven for honey bees.

Honey bees are social insects that live in colonies. Unlike solitary bees, honey bees will return to the same food source repeatedly, making it important to have large patches of each plant type in your garden. It’s also important to remember that honey bees need flowers throughout their active season. So, ensure a steady supply of nectar by choosing a variety of plants that bloom at different times.

Consider setting up a bee house or hive in your garden if local laws permit it. This can be an exciting way to learn about the intricate world of honey bees while contributing to their conservation. However, beekeeping is a responsibility that should not be taken lightly and requires education and preparation.

Making Your Garden a Bee Sanctuary

Making your garden a bee sanctuary involves creating a safe, nourishing, and welcoming environment for bees of all kinds. It is about consciously designing a garden that meets bees’ needs throughout their life cycle and throughout the year.

Bees need food, water, and shelter to survive. Provide food by planting a wide variety of native, nectar-rich flowers that bloom at different times of the year. Water can be supplied via a shallow dish or a small pond with landing spots for bees. Shelters can range from undisturbed patches of bare ground for ground-nesting bees to bee houses for cavity-nesting species.

A bee sanctuary should be pesticide-free. Chemical pesticides can be lethal to bees and other beneficial insects. Instead, embrace organic gardening methods and learn to live with a certain level of pest damage. If necessary, opt for organic or bee-safe pest control methods.

Promoting biodiversity is another important aspect of a bee sanctuary. A diverse garden with a mix of trees, shrubs, flowers, herbs, and grasses will attract and support a wide range of bee species. Include plants that are native to your region, as these are most likely to be beneficial for local bees.

Creating a Wildflower Meadow for Bees

A wildflower meadow is an enchanting and practical way to attract bees and other pollinators to your garden. It can be created in a backyard, a large garden, or even in a community space. The informal, naturalistic style of a wildflower meadow can add beauty and interest to any space, and the maintenance is often lower than for traditional gardens.

Start by selecting a suitable site for your meadow. This could be an unused corner of your garden, a sunny border, or a former lawn area. The ideal site will get plenty of sunlight and have well-draining soil.

Next, choose a mix of wildflower seeds that are native to your region. Native wildflowers are best adapted to local conditions and will attract local bee species. Your seed mix should include a variety of flowers that bloom at different times to ensure a continuous supply of nectar.

Sowing the seeds can be done in spring or fall, depending on your climate and the specific plants you’ve chosen. In general, wildflower meadows require little maintenance once established, but you may need to water them during dry periods and mow or cut back the meadow in late winter.

Vertical Gardening for Bees

Vertical gardening can be a game-changer for those with limited space or urban settings. With a bit of creativity, any vertical surface can be transformed into a vibrant, living canvas that provides food and habitat for bees.

One simple way to create a vertical bee garden is by using hanging baskets or wall-mounted planters filled with bee-friendly flowers. Consider plants like trailing petunias, lobelias, or nasturtiums that spill over the edges of containers and provide a cascade of color.

Green walls or living walls are another exciting option. These structures can accommodate a variety of flowering plants and offer a dramatic visual impact. When choosing plants for a green wall, consider their water and light requirements, as well as their attractiveness to bees.

Climbing plants are also excellent for vertical gardening. Many climbers, such as honeysuckle or clematis, produce nectar-rich flowers that bees love. These can be grown on trellises, pergolas, or fences to add height and interest to your bee garden.

Remember, vertical gardening requires careful watering as the elevated position and limited soil can dry out quickly. Regular feeding is also important to keep your vertical garden healthy and blooming.

Conclusion

In conclusion, the mission of crafting a flourishing, bee-friendly environment right in your backyard is a fulfilling pursuit with benefits that extend beyond the boundaries of your garden. From the intimate understanding of the importance of bees in our ecosystems, to the meticulous selection of appropriate plants and the conscious creation of safe habitats, every aspect of a bee garden contributes to a larger, global effort towards biodiversity conservation.

Through the year-round attention and care given to the bee garden, we can cater to the needs of various bee species, promoting diversity and health within the bee community. This article has shown that even urban spaces can be transformed into thriving bee habitats, and that these endeavors have a strong educational component, raising awareness about the critical role bees play in our lives.

Designing specialized garden zones, such as honey bee gardens, bee sanctuaries, wildflower meadows, and vertical gardens, are all compelling ways of maximizing the potential of our living spaces to support these vital pollinators. Each of these unique garden types provides opportunities for learning, engagement, and the cultivation of beauty in our everyday environments.

In sum, the effort put into creating and maintaining a bee garden is a testament to our capacity to coexist with, learn from, and support the natural world. With every plant chosen, every pesticide avoided, and every water source provided, we contribute to a more sustainable, vibrant, and interconnected world. Embracing bee garden design is not just about gardening, but about fostering a deeper appreciation of nature, promoting biodiversity, and securing the future of our pollinator heroes.

29 Garden Boundary Ideas: A Complete Guide

Introduction: Rethinking Garden Boundaries

Gardens are dynamic spaces, a canvas of creativity, and a personal sanctuary. Among the essential elements that contribute to their aesthetics and functionality are garden boundaries. This article explores the different ways you can transform your garden’s perimeters into an integral part of your outdoor haven, emphasizing the key phrase ‘Garden Boundary Ideas.’

We will delve into a variety of boundary designs, ranging from the traditional fencing options to the innovative vertical gardens, and the serene water feature boundaries. Whether you’re looking to bolster your garden’s privacy, create picturesque views, or cultivate an ecological niche, we’ve got your needs covered.

So, fasten your seatbelt as we take you on this comprehensive tour of the best and trendiest garden boundary ideas, from raised beds to boundary lighting, patio and decking boundaries, wildlife-friendly boundaries, and more.

Choosing the Right Fence for Your Garden

Fencing is a classic way of defining your garden boundary. It provides privacy, security, and can also be a decorative feature. With the multitude of fencing options available, it’s essential to choose one that aligns with your garden’s style, local climate, and your maintenance preference.

Fence for Your Garden

Traditional Wooden Fences

Wooden fences are a popular choice due to their natural look, affordability, and ease of installation. They come in various designs, from picket fences to horizontal slats, offering an array of decorative fences to choose from. However, wooden fences require regular maintenance to prevent rotting and damage from pests.

Metal Fences

For a more modern look, metal fences, especially those made of wrought iron or aluminum, are a great option. They are sturdy, long-lasting, and need minimal maintenance. With a range of designs available, you can opt for minimalist lines for a sleek look, or intricate designs for a more ornamental feel.

Bamboo Barriers

For an Asian-inspired garden or for those who prefer eco-friendly options, bamboo barriers are an excellent choice. They are lightweight, strong, and can provide a thick screen for privacy. They also blend seamlessly with plants and flowers, creating a natural look.

Designing a Living Garden Boundary with Hedging

Living boundaries are perfect for those who want to create a green, lush garden. They serve multiple purposes: providing privacy, attracting wildlife, and enhancing your garden’s aesthetics.

Garden Boundary with Hedging

Hedge Boundaries

Hedge boundaries are a timeless classic. From the neatly clipped boxwood hedges to the flowering hawthorn hedges, they can be shaped and maintained to any height and thickness you desire. However, they require regular pruning to keep them in check.

Vertical Garden Boundaries

Vertical gardens offer a unique and space-saving solution for small gardens or urban spaces. They involve growing plants on vertically suspended panels or pots, which can be attached to walls or fences. You can grow a variety of plants, from succulents to edible herbs and vegetables, creating a living artwork that changes with the seasons.

Wildlife-Friendly Boundaries

For the nature-lovers, wildlife-friendly boundaries can transform your garden into a local biodiversity hotspot. This could include mixed hedges of native species, which provide food and habitat for local birds and insects, or incorporating elements like bug hotels or bird feeders into your boundary design.

Using Trellises to Define Your Garden Space

Trellises are versatile structures that serve as excellent garden dividers or boundary markers. They provide a framework for climbing plants and can be used to create a ‘green wall’ or partition within your garden.

Trellises to Define Your Garden Space

Trellises with Climbing Plants

The magic of trellises comes alive when paired with the right climbing plants. Some good choices include clematis, roses, honeysuckle, and ivy, depending on the amount of sun and the color scheme of your garden.

Trellises as Privacy Screens

Trellises can also function as privacy screens when placed strategically in your garden. They can shield certain areas from view, or provide a backdrop for seating areas or patios.

Creating Boundaries with Raised Beds and Planters

Raised beds and planters are an effective, versatile, and aesthetic means to create garden boundaries. They offer a neat and organized appearance to your garden, while also providing a functional space for cultivating a variety of plants.

Raised Beds as Boundaries

Raised beds serve as excellent garden dividers. Their solid structure and elevated design make them an ideal choice for delineating different areas in your garden, such as vegetable patches, flower beds, or herb gardens. Moreover, their raised profile allows better soil control and drainage, making them suitable for growing a wide range of plants.

Planters as Boundaries

Planters, on the other hand, offer a more flexible and decorative approach to setting boundaries. They come in various shapes, sizes, and materials, from traditional clay pots to modern concrete or metal containers. Arranging planters in a line or clusters can help define pathways, entrances, or seating areas in your garden. Filled with a riot of colorful annuals, evergreens, or aromatic herbs, they can add a splash of color and scent to your garden boundaries.

Boundary Planters

Boundary planters are an innovative mix of a boundary wall and planters. They are typically tall, narrow containers that can be lined along your garden’s edge. Filled with climbing plants, they can form a living wall that provides privacy while saving space. The key is to choose plant varieties that are well-suited to the local climate, soil type, and sunlight exposure in your garden.

Incorporating Stone Walls as Garden Boundaries

Stone walls bring a touch of rustic charm and timeless elegance to your garden boundaries. They are durable, weather-resistant, and require little maintenance. Depending on the design and type of stones used, they can create a variety of looks, from a country cottage feel to a modern minimalist vibe.

Stone Walls as Garden Boundaries

Dry Stone Walls

Dry stone walls, built without mortar, are a traditional form of garden boundary. They can be a labor of love to build, but their natural look and durability make them a worthwhile investment. Dry stone walls also provide nooks and crannies for insects and small animals, contributing to your garden’s biodiversity.

Gabion Walls

Gabion walls, made of wire cages filled with rocks, are a modern twist on the stone wall concept. They are sturdy, easy to build, and provide excellent drainage. The gaps between the rocks can be filled with soil and planted with trailing plants or flowers, adding a green touch to the robust structure.

Stone Wall Planters

Another interesting idea is to incorporate planters into the stone wall. The planters can be built into the wall during construction, or pots can be hung onto the wall. They provide pockets of greenery on the wall, adding visual interest and softening the hard appearance of the stones.

Natural Boundary Ideas: Using Trees and Shrubs

Creating a natural boundary using trees and shrubs can transform your garden into a tranquil, lush oasis. Not only do they provide privacy and shade, but they also offer food and shelter for birds and insects, enhancing your garden’s ecological value.

Tree-Lined Boundaries

Planting a row of trees along the boundary can create a beautiful and robust barrier. Fast-growing species like poplar or willow can quickly provide a high canopy, while smaller species like cherry or apple trees can offer stunning spring blossoms and autumn fruits.

Shrub Borders

Shrub borders are a lower, denser alternative to tree-lined boundaries. Evergreen shrubs like boxwood or yew can be pruned to desired shapes and sizes, offering year-round privacy. Flowering shrubs like hydrangea or rhododendron can turn your boundary into a riot of color during blooming season.

Mixed Hedge Boundaries

For the best of both worlds, consider a mixed hedge boundary. This involves planting a variety of trees, shrubs, and flowering plants together, creating a diverse, multi-layered boundary. It’s a visual treat, a haven for wildlife, and a pleasure to maintain for the keen gardener.

Creating a Vertical Garden for an Innovative Boundary Solution

If space is a constraint, or if you’re simply looking for a unique garden boundary idea, consider a vertical garden. It involves growing plants on vertically suspended panels, frames, or containers, offering a living wall of greenery.

Creating a Vertical Garden

Vertical Planters

Vertical planters, or green walls, are an excellent way to maximize your boundary space. You can use modular planting systems, or get creative with upcycled materials like pallets or old ladders. From herbs and vegetables to ferns and flowers, you can create a lush, vibrant display of plants that changes with the seasons.

Trellises and Climbing Plants

Trellises offer a lightweight, flexible frame for climbing plants. They can be attached to walls, fences, or standalone frames. With the right choice of climbing plants, you can have a trellis bursting with flowers, foliage, or even fruits. It’s a stunning, space-saving solution for any garden boundary.

Hanging Baskets and Containers

Hanging baskets and containers add another layer to your vertical garden. Suspended at various heights, they can provide a cascade of color and greenery. It’s a great way to showcase a variety of plant species, and makes for an eye-catching garden boundary.

Using Water Features to Delineate Garden Zones

Water features can provide a serene, aesthetic means to mark boundaries within your garden. They add a unique charm to your outdoor space, providing the calming sound of water and attracting a variety of wildlife.

Fountains and Birdbaths

Ponds and Streams

A pond or a meandering stream can act as a natural, fluid boundary in your garden. They can be designed in various sizes and shapes, lined with stones, planted around with aquatic plants, and even stocked with fish.

Water Walls

A water wall is a modern, stylish feature that can serve as a focal point and a boundary. It involves a vertical panel from which water flows down, often lit with LED lights for a stunning visual effect.

Fountains and Birdbaths

Smaller water features like fountains or birdbaths can also help define garden zones. They can mark the entrance to a pathway, signal the transition between different garden areas, or simply serve as decorative elements within your garden.

Attractive and Functional Gabion Wall Ideas

Gabion walls, made from sturdy wire cages filled with rocks or rubble, are an attractive, modern, and practical choice for garden boundaries.

Gabion Walls for Privacy

A tall gabion wall can offer excellent privacy, blocking views from neighboring properties. The texture and color of the stones can add visual interest, and with strategic planting, it can blend seamlessly into the garden.

Decorative Gabion Walls

For a decorative twist, you can fill the gabions with a mix of materials, such as different types of stones, colored glass, or even logs. This can create a unique, eye-catching boundary that reflects your personal style.

Gabion Benches and Planters

To enhance the functionality of your gabion wall, consider incorporating benches or planters into the design. The sturdy structure of the gabion can support a wooden bench, offering a comfortable seating area. Similarly, a gabion planter can provide a raised bed for plants, adding a green touch to the wall.

Designing a Garden Path as a Boundary

A well-placed garden path can serve not only as a guide through the garden but also as a subtle boundary, defining different garden zones without blocking the view or the flow of the garden.

Garden Path as a Boundary

Choosing the Right Material

The material of your garden path can greatly influence the feel and functionality of your garden. Gravel paths create a rustic, informal feel, perfect for cottage-style gardens, whereas paving stones or bricks provide a more formal, organized look. Materials like bark chips or grass paths can blend seamlessly into a naturalistic or woodland garden.

Curves and Straight Lines

Curved paths can add an element of mystery and encourage exploration, gently guiding visitors through the garden. On the other hand, straight paths can create a sense of order and symmetry, ideal for formal garden designs. Combining curves and straight lines can create dynamic, interesting pathways that double as effective garden boundaries.

Plant Borders Along Paths

Adding plant borders along your garden paths can accentuate the boundary effect. Low-growing plants, flowers, or ornamental grasses can line the edges of the path, adding color, texture, and fragrance. They subtly signal the transition between different garden zones, enhancing the boundary function of the garden path.

Using Pergolas and Arches for Soft Boundaries

Pergolas and arches can create soft, attractive boundaries in your garden. They offer a semi-open structure that provides shade and support for climbing plants, integrating seamlessly into the greenery of the garden.

Pergolas and Arches

Pergola Boundaries

A pergola, with its sturdy pillars and latticed roof, creates a defined space within the garden, making it an effective boundary element. It can delineate a seating or dining area, a patio, or a transition point in the garden. Covered with climbing plants, it provides a cool, shady retreat, blending beauty and function.

Garden Arches

Garden arches can serve as entry points to different sections of your garden, making them natural boundary markers. An arch covered with roses or clematis can create a stunning visual feature and a sense of anticipation as you move through the garden.

Pergolas and Arches: Wildlife-Friendly Boundaries

Besides their aesthetic function, pergolas and arches provide valuable habitat for wildlife. They offer shelter and food for birds, bees, and butterflies, making your garden a wildlife-friendly space.

Combining Function and Aesthetics: A Garden Gate

A garden gate can be a functional, attractive boundary element in your garden. It marks the entrance to your garden, providing a sense of security and privacy while adding to the overall aesthetic appeal of your garden.

A Garden Gate

Choosing a Gate Style

The style of your gate should complement the overall design of your garden. A picket fence gate suits a cottage-style garden, while a wrought-iron gate fits well in a formal or historical garden. A wooden gate with a natural finish can blend well into a woodland or rustic garden.

Decorative Garden Gates

Beyond their functional role, garden gates can be highly decorative. They can be adorned with intricate ironwork, carved wood details, or even stained glass. A well-chosen gate can become a focal point in your garden, enhancing its aesthetic appeal.

Garden Gates as Wildlife Habitats

Like pergolas and arches, garden gates can provide habitat for wildlife. A gate covered with climbing plants can provide food and shelter for a variety of insects and birds, contributing to the ecological value of your garden.

Creating Boundaries with Garden Lighting

Lighting can create stunning and subtle boundaries in your garden. It highlights key features, creates ambiance, and provides safety and security.

Boundaries with Garden Lighting

Path Lighting

Lighting along garden paths serves a dual purpose: it guides the way and delineates the boundary of the path. Solar-powered stake lights or low-voltage LED lights can be installed along the edges of the path, casting a gentle glow that outlines the path.

Accent Lighting

Accent lighting can be used to highlight boundary elements like walls, fences, or trees. Uplights, downlights, or spotlighting can create dramatic effects, enhancing the texture and form of the boundary elements. This draws the eye, strengthening the sense of boundary.

Ambient Lighting

Ambient lighting creates a gentle overall glow in your garden, subtly defining the boundaries. Hanging lanterns, string lights, or in-ground lights can create a soft, inviting ambiance, allowing you to enjoy your garden into the evening hours.

Incorporating Art and Sculptures for Creative Boundaries

Art and sculptures can provide a unique, personal touch to your garden boundaries. They offer an opportunity to express your creativity and make a statement.

Garden Sculptures

Garden sculptures can serve as boundary markers, visually dividing different areas of your garden. They can be abstract or realistic, large or small, traditional or modern. Placed strategically, they can draw the eye, create points of interest, and enhance the overall aesthetic appeal of the garden.

Mosaic Art

Mosaic art, with its vibrant colors and intricate patterns, can be incorporated into walls, floors, or standalone pieces to create artistic garden boundaries. They can reflect light, adding a touch of sparkle and color to your garden.

Wind Chimes and Garden Bells

Sound can also be a part of your garden boundary. Wind chimes or garden bells hung from trees or arches can create a sonic boundary, their gentle sounds delineating different garden zones. They add an auditory dimension to the garden experience, enhancing its sensory appeal.

Creating a Multi-Layered Garden Boundary

A multi-layered garden boundary can create depth, interest, and a sense of abundance in your garden. It involves combining different elements – plants, structures, materials – to create a rich, diverse boundary.

Layering Plants

Planting in layers – trees, shrubs, perennials, and ground covers – can create a lush, dynamic garden boundary. It offers year-round interest, with different plants coming into bloom or changing color at different times. It also provides diverse habitats for wildlife, enhancing the ecological value of your garden.

Combining Structures and Plants

Combining built structures like walls, fences, or trellises with plants can create a multi-layered boundary. For instance, a fence covered with climbing plants or a wall with planters creates a green, living boundary that combines the solidity of the structure with the softness of the plants.

Mixing Materials

Using a mix of materials can add variety and contrast to your garden boundary. For instance, a stone wall topped with a wooden trellis, or a metal gate set into a hedge, creates a visually interesting, multi-layered boundary.

Boundary Ideas for Patio and Decking Areas

Creating clear boundaries for patio and decking areas can enhance their functionality and aesthetic appeal. It can provide privacy, create shade, and define the space.

Fencing and Screens

Fencing or screens can create a solid, private boundary around your patio or decking area. They can be made from wood, metal, or even bamboo for a natural look. For a softer effect, screens can be covered with climbing plants or hanging baskets.

Plant Borders

Creating a border of plants around your patio or decking area can provide a soft, lush boundary. It can create a sense of enclosure while blending the built area into the surrounding garden. The plants can be chosen for their color, texture, fragrance, or even their ability to attract wildlife.

Pergolas and Gazebos

Pergolas and gazebos can create a shaded, semi-open boundary for your patio or decking area. Covered with climbing plants or fitted with shades or curtains, they can offer protection from sun and wind, while adding a beautiful architectural element to your garden.

How to Make Boundaries Wildlife-Friendly

Creating a wildlife-friendly garden is not only beneficial for biodiversity but can also transform your garden into a dynamic, vibrant space. Your garden boundary can play a crucial role in welcoming a variety of species.

Incorporating Native Plants

Integrating native plants into your boundary design can provide food and shelter for local wildlife. Native shrubs, trees, and climbers are likely to support more species than exotic varieties and are often more resilient to local weather conditions.

Creating Habitats with Boundary Features

Different boundary features can provide a range of habitats for wildlife. Hedge boundaries can shelter birds and small mammals, while a stone wall may house a variety of insects. Even the smallest features, like cracks between paving stones, can become a home for wildlife.

Avoiding Harmful Materials

When creating your garden boundary, avoid using materials that can harm wildlife. Pressure-treated wood can leach chemicals, and certain types of metal fencing can pose hazards to birds and mammals. Opt for untreated, sustainable materials where possible.

Incorporating a Greenhouse as a Garden Boundary

A greenhouse can serve as an efficient garden boundary while also offering a controlled environment for your plants.

Choosing the Right Location

Positioning your greenhouse along the edge of your garden not only saves space but also establishes a distinct boundary. Consider sunlight exposure, accessibility, and the overall layout of your garden when choosing a location.

Greenhouse Styles

Greenhouses come in a variety of styles, from traditional Victorian designs to modern geodesic domes. Choose a style that complements your garden’s aesthetics. Remember, the greenhouse should blend seamlessly into your garden, adding both functionality and visual appeal.

Planting Around Your Greenhouse

Adding plant borders or climbing plants around your greenhouse can soften its appearance and help it merge with the garden. This strategy can make your greenhouse an even more attractive boundary feature.

Creative Ways to Use Vines in Your Garden Boundary

Vines can bring a lush, vertical dimension to your garden boundary. They can cover fences, walls, trellises, or pergolas, adding greenery, flowers, and even fruit.

Climbing Vines

Climbing vines like clematis, jasmine, or honeysuckle can create a living curtain on your garden boundary. They can be trained up trellises, wires, or fences, and their abundant flowers add color and fragrance.

Creeping Vines

Creeping vines like ivy or Virginia creeper can cover walls or fences, creating a lush, green boundary. They can also provide habitats for a variety of insects and birds, enhancing your garden’s ecological value.

Edible Vines

Edible vines, such as grapevines or kiwi vines, can be trained along fences or pergolas, providing a harvest as well as an attractive boundary feature. They require a sunny location and regular pruning to stay healthy and productive.

Maximizing Small Spaces: Boundary Solutions for Small Gardens

In small gardens, the boundary plays a crucial role in creating a sense of space and depth. Here are some boundary solutions for small gardens.

Vertical Gardens

Vertical gardens make use of the vertical space, freeing up ground space. They can be created on walls, fences, or freestanding structures, hosting a variety of plants.

Mirrors

Mirrors can create an illusion of space in small gardens. Placed strategically on a garden boundary, they can reflect light and images of plants, making the garden appear larger.

Multi-Function Boundaries

In a small garden, the boundary can serve multiple functions. A fence can double as a trellis for climbers, a wall can feature built-in seating, and a hedge can produce fruits or herbs.

Privacy Plants: Creating a Living Fence

Using plants to create a living fence is an attractive, eco-friendly option for a garden boundary. It provides privacy, reduces noise, and can support wildlife.

Hedge Plants

Hedge plants like privet, boxwood, or yew can create a dense, evergreen boundary. They require regular pruning to maintain their shape and density.

Bamboo Barriers

Bamboo can create a tall, fast-growing boundary. It can be an excellent choice for a privacy screen but beware of invasive species. Opt for clumping varieties over running types.

Tall Grasses

Tall ornamental grasses can create a soft, flowing boundary that adds movement and texture to your garden. They provide privacy during the summer and can be cut back in the winter.

Creating a Rustic Boundary with a Log Wall

A log wall can add a rustic charm to your garden boundary. It provides a strong visual element, a habitat for wildlife, and a sustainable option if sourced responsibly.

Building a Log Wall

Building a Log Wall

Building a log wall requires a bit of DIY skill. The logs, either cut to the same length or varied for a more natural look, are stacked and secured together. It’s important to ensure the stability of the wall and consider its impact on local wildlife.

Planting Around a Log Wall

Planting around a log wall can enhance its appearance and help it blend into the garden. Climbers can soften the wall’s appearance, while wildflowers can create a colorful display at its base.

Log Wall Maintenance

A log wall will age over time, changing color and perhaps developing moss or lichen. This natural aging process can add to its rustic charm. However, it’s important to check the wall regularly for signs of decay or instability.

Using Mirrors to Create Illusion of Space in Garden Boundaries

Mirrors are a creative and stylish way to give an illusion of space in your garden, especially in smaller outdoor areas. When utilized effectively, they can make your garden boundary appear further away or larger than it actually is.

Using Mirrors In Garden

Selection and Placement of Mirrors

Choosing the right mirror and its placement is critical for achieving the desired effect. Go for outdoor mirrors designed to withstand weather conditions. Place them at an angle to reflect the greenery and avoid direct sunlight that can cause glare or even start a fire.

Mirror Styles

From vintage mirrors with distressed wooden frames to sleek, modern designs, select a mirror that complements the style of your garden. A well-chosen mirror can become a focal point, contributing to your garden’s aesthetics.

Safety Considerations

Mirrors should be securely mounted to avoid accidents. Be aware that birds may not perceive the mirror as a solid surface and could potentially fly into it, so considering the placement from a wildlife perspective is also important.

Creating a Garden Border with Decorative Gravel

Decorative gravel can provide a low-maintenance, durable, and versatile garden boundary. It comes in a variety of colors, sizes, and textures, offering endless design possibilities.

Types of Decorative Gravel

From pebbles and river rocks to crushed granite and marble chips, each type of gravel creates a different visual effect. Consider the style of your garden and the surrounding architecture when choosing your gravel.

Installing a Gravel Border

Before laying the gravel, prepare the ground by removing any weeds and installing a weed barrier fabric. Then spread the gravel at least 2 inches deep for full coverage. You might also consider adding a metal or plastic edging to keep the gravel in place.

Maintaining a Gravel Border

While gravel borders are low maintenance, they may require occasional weeding and raking to keep them looking their best. Over time, you might need to add more gravel to replace any that has been displaced.

Using Bamboo Screens for a Natural Garden Boundary

Bamboo screens are a natural, fast-growing, and aesthetically pleasing option for garden boundaries. They can provide privacy, reduce noise, and even act as windbreaks.

Bamboo Screens for a Natural Garden Boundary

Choosing the Right Bamboo

The two main types of bamboo, running and clumping, have different growth habits. Running bamboo spreads quickly and can become invasive, while clumping bamboo grows more slowly and stays contained. Choose a species that suits your space and climate.

Installing a Bamboo Screen

Bamboo can be planted directly into the ground or grown in containers for more control. If planting in the ground, consider installing a bamboo barrier to prevent it from spreading uncontrollably.

Caring for Bamboo

While bamboo is generally low maintenance, it will look its best with regular watering, especially during dry periods, and occasional fertilizing.

Eco-Friendly Garden Boundaries: Using Recycled Materials

Creating a garden boundary from recycled materials is not only environmentally friendly but can also add a unique, personal touch to your garden.

Using Pallets

Recycled pallets can be transformed into an attractive and sturdy garden fence. They can be painted, stained, or left natural for a rustic look. Pallets can also be used to create a vertical garden boundary.

Old Doors and Windows

Old doors and windows can be repurposed into a unique garden boundary. They can be painted in bright colors or decorated with plants and accessories to create a charming, whimsical look.

Reclaimed Bricks and Stones

Reclaimed bricks and stones can be used to build a sturdy, durable garden boundary. They add a sense of history and character, and their natural materials blend beautifully into the garden landscape.

Attractive and Practical Ideas for Garden Edging

Garden edging can create a neat, defined boundary between different areas of your garden, such as lawn and flower beds, paths and borders, or patio and plants.

Using Plants for Edging

Low-growing plants can create a soft, living garden edge. Some popular options include lavender, boxwood, and geranium. They can add color, texture, and even fragrance to your garden boundary.

Hardscaping Options

Bricks, stones, metal, or wood can be used to create a more structured edge. They can be arranged in various patterns to match your garden style and can create a strong visual delineation.

Creative Edging Ideas

For a more unique approach, consider using recycled items like glass bottles, old tiles, or even seashells for your garden edging. They can add color and personal style to your garden boundary.

Designing a Kid-Friendly Garden Boundary

When designing a kid-friendly garden boundary, the main goals are safety, functionality, and fun.

Safety First

Ensure the materials used for the boundary are safe for kids. Avoid sharp edges, toxic plants, or small decorations that could pose a choking hazard. Make sure the boundary is robust enough to withstand some rough play.

Integrating Play Features

Consider integrating play features into your boundary. For example, a fence could double up as a climbing wall, a hedge could incorporate a secret door, or a trellis could be designed for a beanstalk to grow up and create a natural playhouse.

Involving Kids in the Process

Get your kids involved in the design and creation of the garden boundary. It could become a fun family project, and they’ll likely appreciate a space they’ve helped create even more.

Conclusion

Garden boundaries are much more than mere separators; they are a palette for creativity, offering countless possibilities to enhance the beauty and functionality of your garden. From traditional fencing options to living boundaries, trellises, stone walls, and water feature boundaries, the sky’s the limit when it comes to defining your garden’s perimeter.

A harmonious blend of these ideas can create a multi-layered boundary, that is not only visually pleasing but also beneficial to local wildlife. Furthermore, including elements such as boundary lighting, art and sculptures, or a greenhouse can take your garden’s aesthetics to the next level.

Ultimately, the best garden boundary idea is the one that resonates with your personal style, meets your practical needs, and contributes positively to the local environment. So, get ready to roll up your sleeves and start reimagining your garden boundaries today!

39 Wildlife Garden Design Ideas That Nature Will Love

Creating a wildlife attracting garden is more than just about aesthetics. It’s about promoting biodiversity, supporting native flora and fauna, and giving back to nature. If you are someone with a green thumb and a love for wildlife, you might want to consider a wildlife attracting garden layout. With a bit of planning, you can convert your backyard or a portion of it into a mini wildlife sanctuary.

This comprehensive guide provides you with 39 garden layout ideas, with an emphasis on attracting wildlife, from birds to bees to squirrels, and even amphibians. This article details the choice of native plants, water features, and beneficial insects, to designing a bird-friendly garden or an urban wildlife habitat. It also includes the latest trends in wildlife gardening.

Whether you have a sprawling garden or a small balcony, these ideas can be adapted and implemented to suit your space and requirements. The result would be a dynamic, lively, and beautiful garden that will serve as a haven for wildlife, and a soothing, invigorating space for you.

Introduction: Creating a Wildlife-Friendly Garden Layout

Creating a wildlife-friendly garden layout is not merely an act of decoration, but rather, it is the deliberate composition of a living space that encourages the thriving of different species. The crux of such a layout is to provide four basic elements that all wildlife needs: food, water, shelter, and a place to breed.

The food can come from a variety of plants, feeders, or even a compost heap. The water source can be anything from a small bird bath to a full-scale wildlife pond. Shelters can take the form of a hedge, a pile of logs, or purpose-built wildlife houses. A breeding place could be a pond for amphibians, a nest box for birds, or a bee hotel for insects.

As for the layout, consider the space available and the type of wildlife you would like to attract. The placement of certain plants and features should be strategic, with a keen eye on the conditions each species prefers. Remember that a good wildlife garden caters to a variety of species, maintaining a healthy ecological balance.

Choosing Plants that Attract Wildlife

Plants are a cornerstone of wildlife attracting gardens. They provide food, shelter and even breeding places for various creatures. When choosing plants, it’s important to favor diversity. Aim for a variety of shapes, sizes, and types of plants, as this will attract a wider range of wildlife.

Native plants are typically the best choice as they are naturally suited to your local climate and soil conditions. They have co-evolved with local wildlife, making them a reliable source of food and habitat. In your garden, aim to provide year-round food and shelter. This means including a mix of plants that flower and bear fruit at different times of the year, keeping your garden bustling with wildlife throughout the seasons.

For example, berry-producing shrubs like hawthorn and rowan offer a feast for birds in autumn and winter, while foxglove and lavender are rich in nectar, attracting bees and butterflies in summer. Meanwhile, trees not only provide food but also valuable shelter and breeding spaces for birds, insects, and mammals.

Creating a Bird-Friendly Garden: Layout and Design Ideas

Designing a bird-friendly garden requires careful thought about both the provision of resources and the layout itself. Food, water, shelter, and nesting sites are critical, but their placement can significantly influence how safe and appealing your garden is to birds.

Bird Friendly Garden

To provide food, include plants that produce berries, seeds, and nectar, but also consider installing bird feeders. These should be placed near shrubs or trees that can provide cover from predators, yet still offer a clear sightline for the birds feeding.

Water is equally important. A bird bath or a wildlife pond can cater to their drinking and bathing needs. As with feeders, ensure they are close to cover but also give a clear view of the surrounding area.

Shelter comes in many forms. Hedges, dense shrubs, and trees provide good protection and roosting spots. Nesting boxes increase your garden’s appeal as a breeding site. They should be placed high up, facing between north and east to avoid strong sunlight and the wettest winds.

Lastly, always keep in mind that birds need peace and quiet, so create a corner of your garden that is free from too much human activity.

Incorporating a Wildlife Pond into Your Garden Layout

A wildlife pond can be the heart of your wildlife attracting garden, supporting a wide range of species. Insects, amphibians, birds, and mammals all need water, and many will use the pond as a breeding site.

Wildlife Pond into Your Garden Layout

The ideal location for your pond is a sunny spot, but part of it should be shaded to prevent it from overheating in summer. A variety of depths will cater to different species: a deeper zone (about 60cm) in the middle for overwintering creatures, and a shallow, gently-sloping edge for easy access to the water.

Adding native aquatic plants will help keep the water clean, provide shelter, and attract a multitude of creatures. Oxygenators like hornwort help maintain the water’s health, while marginal plants like yellow iris offer resting and breeding spots.

Remember to avoid introducing fish into your wildlife pond, as they tend to eat many of the creatures you’re trying to attract.

Creating Habitats for Beneficial Insects

Beneficial insects, such as ladybirds, hoverflies, and ground beetles, are your allies in pest control, helping to keep populations of pests like aphids in check. They also play a vital role in pollination.

Creating habitats for beneficial insects can be as simple as letting a patch of your garden grow a little wild. Long grass, nettles, and dandelions are all great for insects. A log pile or a heap of leaves can provide shelter and a place to breed.

In addition to these, you can also build insect hotels, which offer a range of nooks and crannies that different insects will love. These can be filled with various materials like straw, dead wood, and bamboo canes.

Bear in mind that beneficial insects need nectar and pollen, so include plenty of flowering plants in your garden. Avoid using pesticides and insecticides, which can harm these valuable creatures.

Building a Butterfly and Bee Garden: Layout Ideas

Butterflies and bees are some of the most effective pollinators. Attracting them requires careful plant selection and some thought about the layout.

When selecting plants, opt for those rich in nectar and pollen. Varieties like lavender, foxglove, and buddleia are excellent choices. It’s also a good idea to have plants that flower at different times of the year to provide a continuous food supply.

When planning the layout, group similar plants together to create larger, more visible targets for butterflies and bees. Including some flat stones or bare patches of soil provides places for butterflies to bask in the sun.

Remember, both bees and butterflies need water, so a shallow dish filled with water, with a few stones for them to land on, would be a great addition to your butterfly and bee garden.

Designing a Garden to Attract Native Wildlife

To design a garden that attracts and supports native wildlife, it’s crucial to understand the local ecosystem’s specific needs. This means investigating what types of animals are native to your area, what their food and shelter requirements are, and how you can integrate these needs into your garden layout.

Native Plants To Attract Native Wildlife

Start with the vegetation. Incorporating native plants is fundamental as they have evolved alongside the local wildlife, forming a symbiotic relationship. These plants provide familiar food sources for various creatures, from insects and birds to mammals. They’re also adapted to the local soil and climate, making them hardier and lower maintenance.

Design your garden with diversity and layers. Variety is essential for attracting an array of wildlife. Different heights of vegetation, from ground covers and medium shrubs to tall trees, mimic the layers found in nature, providing various niches for different wildlife.

Spaces for both sun and shade are important. Many animals require sunny spots for basking, while others need cooler, shaded areas during the hottest part of the day. Ensuring your garden has a balance of both can accommodate a greater diversity of wildlife.

Planting for Seasonal Wildlife Attraction

Attracting wildlife throughout the year means taking into account the seasonal needs of various creatures. This involves planting a mixture of vegetation that provides resources all year round.

In spring, many animals are emerging from their winter dormancy and starting to breed. Plants that flower early in the year, like crocuses and primroses, provide valuable nectar for insects waking from hibernation. Many birds are nesting during this time, so trees and shrubs that provide safe nesting sites are beneficial.

In summer, your garden should be buzzing with life. This is the time for plants that provide plenty of pollen and nectar, like lavender and honeysuckle, to support pollinators.

Autumn is the season of fruiting and seeding, and trees and shrubs like rowan and hawthorn provide much-needed food for birds preparing for winter. Meanwhile, insects appreciate late-flowering plants, such as sedum and goldenrod, as nectar sources.

In winter, food can be scarce, making berry-producing plants and seed heads left on perennials extremely important. Evergreens not only provide year-round cover but can also offer food resources, like pine seeds or holly berries.

Creating Safe Havens: Shelter and Hiding Spots for Wildlife

Shelter and hiding spots are critical to attracting wildlife. They provide protection from predators and the elements, places to rest, and sites for breeding. Incorporating these into your garden layout can significantly enhance its wildlife appeal.

Hedges and dense shrubs offer excellent shelter and nesting places for birds and small mammals. A log pile or rock pile can be a refuge for amphibians, insects, and small mammals, offering nooks and crannies for hiding and hibernation.

Creating more specific habitats can also be beneficial. Nest boxes for birds, bat boxes, or bee hotels cater to particular species’ needs. The important thing is to position these shelters in the right places – high and undisturbed for bird and bat boxes, sunny and sheltered for bee hotels.

The Importance of Water Features in a Wildlife Garden

Water is a crucial element in any wildlife garden, serving as a drinking source and breeding ground for many species. The most wildlife-friendly water feature is a pond, as it can support a vast range of species, from aquatic insects and amphibians to birds and mammals.

Water Features in a Wildlife Garden

If space allows, consider creating a pond with varied depths – deeper areas for overwintering wildlife and shallower, sloping sides for safe access to water. Aquatic and marginal plants will provide cover, food sources, and breeding sites.

Smaller gardens can still incorporate water with features like bird baths or mini-ponds in containers. These can be invaluable for birds, bees, and butterflies needing a drink. Always ensure that any water feature has safe spots for wildlife to enter and exit the water.

Maintaining a Balance: Encouraging Wildlife without Inviting Pests

While it’s great to attract wildlife to your garden, it’s crucial to maintain a balance to avoid inviting pests. One way is to ensure a diverse range of wildlife can thrive, as they can keep each other’s populations in check.

Avoid overuse of bird feeders, as they can attract rodents. Be careful with compost heaps – while they’re excellent for wildlife, they can also invite unwanted visitors. If you find your compost heap becoming a buffet for rodents, consider composting in a closed bin instead.

Also, try to avoid using pesticides or insecticides, which can harm both pests and beneficial insects. Instead, opt for natural pest control methods, like encouraging beneficial predators or manually removing pests.

Creating a Night Garden to Attract Nocturnal Wildlife

Nocturnal wildlife is often overlooked, but many species are most active at night. To attract these creatures, consider incorporating elements that cater to them.

Night-flowering plants like evening primrose or night-scented stock provide nectar for moths. Bat-friendly flowers, such as honeysuckle, also emit strong, sweet scents after sunset.

Water features can attract nocturnal wildlife like bats and hedgehogs. Consider adding a light near your pond to attract insects, which in turn can attract bats.

Provide shelters for nocturnal visitors. Hedgehog houses, placed in quiet corners, can offer a safe refuge. Bat boxes mounted on trees or buildings can provide roosting spots.

Incorporating Fruit Trees and Bushes for Bird Attraction

Fruit trees and bushes are fantastic for attracting birds. They provide food in the form of fruit, habitat in the structure of the plant itself, and often attract insects that birds can feed on.

Fruit trees like apple, cherry, or pear trees are great for larger gardens. They provide blossom in spring for pollinators, and their fruit in autumn can be a feast for birds. They also provide nesting opportunities and shelter.

For smaller gardens, consider fruiting shrubs like blackberry or elderberry. These provide food and cover but take up less space. Additionally, many fruiting shrubs are thorny, providing a safe haven for birds away from predators.

Planting these fruit producers close to a bird feeder or bird bath can create a mini-habitat, providing several resources close together to attract birds.

Attracting Amphibians: The Role of Damp and Shady Areas

Amphibians, like frogs, toads, and newts, play a vital role in the ecosystem, controlling pest populations and serving as prey for larger species. Attracting these fascinating creatures requires the creation of damp and shady areas within your garden layout.

Amphibians need moisture to survive, which is why they are often found in damp, shaded areas. If you have a pond, that’s great – but even without one, you can create damp habitats. One idea is to make a small ‘amphibian friendly’ area by burying a shallow dish and filling it with water, then placing rocks or logs nearby for hiding.

Planting shade-loving plants, like ferns and hostas, can create the cool, humid environment that amphibians prefer. Including a layer of leaf mulch or a log pile can provide both moisture and a hiding place for these creatures.

It’s also essential to avoid using pesticides in your garden, which can be harmful to amphibians. They are particularly sensitive to chemicals due to their permeable skin, which they use for respiration.

Planting a Wildflower Meadow: A Haven for Pollinators

A wildflower meadow, even a small one, can be a spectacular sight and a wildlife magnet. Such a patch can provide a diverse food source for various pollinators, including bees, butterflies, and hoverflies, while also offering habitats for other wildlife.

Planting a Wildflower Meadow

To start, choose a sunny spot in your garden and remove existing grass if necessary. Select a mix of native wildflower seeds that offer a variety of shapes and colors to attract different pollinators. Some options might include poppies, cornflowers, and ox-eye daisies.

You should aim for a succession of blooms from spring through to autumn to provide food sources throughout the growing season. Also, don’t forget about night-blooming flowers for moths!

Once established, a wildflower meadow requires minimal maintenance. Let the flowers bloom and seed, then cut back in late summer or early autumn. This strategy ensures a supply of seeds for birds and a chance for the flowers to self-seed for the next year.

Designing a Garden Layout for Urban Wildlife

Urban wildlife is incredibly adaptable, but we can do many things to make our city gardens more welcoming for these species. From small insects to birds and mammals, a thoughtfully designed urban garden can be a crucial sanctuary for wildlife.

One key aspect is maximizing space. In smaller urban gardens, every inch counts. Use vertical spaces by adding climbing plants, install green roofs or walls, and hang bird feeders or nest boxes.

Urban areas can often lack green spaces, making your garden a valuable corridor for wildlife. Hedgehog highways, gaps in your fences that allow hedgehogs to move freely between gardens, can be a great addition. Bird feeders and bird baths can provide much-needed resources, particularly during winter.

Even in the heart of a city, trees can thrive. Small, native trees like rowan or hawthorn can provide food and shelter for a variety of species. Where space is tight, consider growing them in large containers.

Including Nesting Boxes and Bird Feeders in Your Garden Layout

Nesting boxes and bird feeders can dramatically increase the avian activity in your garden. Different species have different preferences when it comes to feeders and nesting boxes, so it’s good to offer a variety.

Nesting Boxes and Bird Feeders in Your Garden

Nesting boxes should be situated out of reach of predators, ideally north or east facing to avoid strong sunlight and the wettest winds. Different box designs and sizes will attract different species – small boxes with small entrance holes for tits and larger open-fronted boxes for robins and wrens.

When it comes to feeders, variety is also key. Seed feeders, peanut feeders, and suet feeders will all attract different species. Place your feeders in a quiet, safe location, preferably near shrubs or trees which provide cover for the birds.

Remember to clean your bird feeders regularly to prevent the spread of diseases. And keep your cat indoors during peak feeding times, like dawn and dusk.

Creating a Squirrel-Friendly Garden: Tips and Ideas

While they can sometimes be seen as pests, squirrels are charming creatures that can bring life to a garden. To make your garden squirrel-friendly, focus on providing food, water, and shelter.

Squirrels are fond of a variety of foods, including nuts, seeds, fruits, and vegetables. Squirrel feeders filled with peanuts or sunflower seeds can be a great attraction. However, ensure to place them far from bird feeders to prevent competition.

A source of clean water, such as a shallow dish or a squirrel-proof bird bath, is essential, especially during dry periods.

Squirrels also require safe places to nest and rest. Trees, especially those with dense canopies or cavities, are ideal, but squirrel nesting boxes can be a good alternative if trees are not available.

Encouraging Hedgehogs: Creating Routes and Hiding Spots

Hedgehogs are a gardener’s friend, helping to control pests like slugs and snails. However, they’re in decline in the UK, and gardens can play a crucial role in their conservation.

Creating Routes For Hedgehogs

One significant way to help hedgehogs is by ensuring they can move freely between gardens. Creating a small hole in your fence or gate (about 13cm by 13cm) can create a hedgehog highway, enabling these animals to roam and find resources.

Like amphibians, hedgehogs appreciate damp, shady areas and a log pile or leaf pile can make an excellent daytime shelter. Hedgehog houses, available to buy or easy to make, can provide a safe place for hibernation.

Hedgehogs also benefit from a dish of fresh water, particularly in dry weather. And while they can be tempted with cat food or specific hedgehog food, never give them milk as it can make them ill.

The Future of Wildlife Gardening: Upcoming Trends and Ideas

As awareness of the environmental crisis grows, more and more gardeners are looking to support wildlife. This change is driving trends in wildlife gardening, which we can expect to continue and evolve.

One rising trend is rewilding, where gardeners let nature take over parts of their gardens. This strategy can involve leaving grass to grow long, letting weeds flourish, or allowing deadwood to accumulate. These techniques can create fantastic habitats for a variety of species.

Another future trend is citizen science. Gardeners are increasingly participating in wildlife surveys and monitoring, helping to track changes in wildlife populations. This data can be incredibly useful for scientists studying biodiversity.

Climate change is also influencing gardeners to choose drought-tolerant, native plants and to manage water more effectively, such as by installing rain gardens or using rain barrels.

As we continue to understand the importance of our gardens in supporting wildlife, we can expect to see more exciting innovations and trends in wildlife gardening.

Building a Bat-friendly Garden: Layout and Design Tips

Bats are not only fascinating creatures but also act as natural pest controllers. Attracting them to your garden involves providing food, water, shelter, and suitable roosting spaces.

Planting night-scented flowers, such as evening primrose or honeysuckle, can help attract the moths and insects that bats feed on. Additionally, installing a pond or water feature can also attract insects, subsequently providing a food source for bats.

A bat box, similar to a bird box but with a narrow slit instead of a hole, provides an excellent roosting spot. Place it high up, ideally 3-5m from the ground, on a tree or building, facing south to southeast to get the morning sun.

Try to limit light pollution in your garden as this can disturb bats. Avoid using pesticides too, as these can reduce the number of insects, which are the primary food source for most bat species.

How to Create a Wildlife Pond: Ideas and Considerations

Creating a wildlife pond is one of the best ways to attract a range of wildlife to your garden, from amphibians and insects to birds and mammals. It can also serve as a drinking and bathing spot.

Consider a location with both sun and shade throughout the day. Ensure there’s at least one shallow side for easy access in and out of the water for smaller creatures. It’s also beneficial to have a deeper part (around 60-90 cm deep) as a refuge for wildlife during frosty winters.

A mix of submerged, marginal, and floating plants can provide shelter and food for various wildlife. Native species such as frogbit, water mint, and water forget-me-not are ideal choices. Avoid invasive species, as these can disrupt local ecosystems.

Keep the pond filled with rainwater rather than tap water, which often contains chlorine and other chemicals. Consider using a pump or a small fountain to keep the water oxygenated and to prevent it from stagnating.

Incorporating Log Piles and Rockeries for Insects and Small Mammals

Creating habitats for insects and small mammals can be as simple as piling up logs or creating a rockery. These provide shelter, hibernation spots, and breeding places for a variety of wildlife.

A log pile, ideally placed in a shady part of the garden, can attract beetles, woodlice, and other insects, as well as provide shelter for hedgehogs, frogs, and toads. You can make one by simply stacking logs of different sizes and species, allowing them to decompose naturally.

Rockeries, on the other hand, can provide excellent habitats for various creatures. Be sure to create spaces and crevices for animals to burrow or hide. Some insects, such as solitary bees, may use the gaps between rocks for nesting.

Both log piles and rockeries are simple to create, require little maintenance, and can be an interesting feature in your garden while supporting local biodiversity.

Creating a Butterfly Feeding Station: Where and How

Butterflies bring color and movement to the garden, and a feeding station can help attract these lovely creatures. Butterflies feed on nectar, but when this is scarce, a feeding station can provide an alternative food source.

Butterfly Feeding Station

Choose a sunny, sheltered spot for your station, as butterflies prefer to feed in the sun. A flat dish or shallow bowl filled with a mixture of sugar and water can serve as a simple feeding station. Refresh it regularly to prevent fermentation.

Consider incorporating ripe fruits like bananas, oranges, and apples, which can be a valuable food source, particularly for late-season butterflies. Remember to place them off the ground, out of the reach of ants and other insects.

Surround your feeding station with nectar-rich plants to provide a natural food source and further attract butterflies.

Encouraging Wildlife in a Small Space: Balcony and Patio Ideas

Even with a small space like a balcony or patio, you can still encourage wildlife. Container gardening, vertical green walls, hanging feeders, and water dishes can all contribute to a mini wildlife haven.

Select native plants that attract pollinators to your containers. Plant varieties that bloom at different times to provide a consistent food source throughout the seasons. If possible, include a mix of herbs, wildflowers, and shrubs to provide a diverse habitat.

Bird feeders and bird baths can attract a variety of birds. Opt for different types of feeders to cater to different species. Remember to clean these regularly to prevent disease spread.

Even a small water feature can provide a drinking spot for birds and insects. Alternatively, a shallow dish of water can suffice, particularly during hot weather.

The Importance of Native Plants in a Wildlife Garden

Native plants play a crucial role in wildlife gardens. They have co-evolved with local wildlife and therefore tend to support more species than exotic plants. They provide food sources, including nectar, pollen, seeds, and fruits, and also offer shelter and nesting sites.

Native plants are also typically better adapted to local soil and climate conditions, meaning they usually require less maintenance and fewer resources like water and fertilizer.

Incorporate a variety of native plants to support a range of wildlife. Consider trees and shrubs, as well as herbaceous plants and grasses. Choose plants that flower and fruit at different times to provide year-round resources for wildlife.

Incorporating Edible Plants to Attract Wildlife

Including edible plants in your garden can serve dual purposes – providing food for you and attracting wildlife. Many fruit and vegetable plants can provide nectar and pollen for insects, while their fruits and seeds can be a food source for birds and mammals.

Berry-producing plants like raspberries and blackberries are loved by many bird species. Similarly, apple and pear trees can provide both nectar and fruit.

Vegetables like runner beans, peas, and tomatoes can attract bees and other pollinators, while their ripe or fallen fruit can provide food for wildlife.

Planting a mix of annual and perennial edible plants can help ensure a consistent supply of food throughout the year. Remember to avoid using pesticides, as these can harm the very wildlife you’re trying to attract.

Creating Safe Routes: Integrating Wildlife Corridors in Your Garden Layout

Wildlife corridors, also known as green corridors, are areas of habitat connecting wildlife populations separated by human activities or structures. In gardens, these routes allow animals to move freely, find food, and access breeding sites.

Firstly, aim for a mix of habitats in your garden – a blend of trees, shrubs, grassland, and a water feature can support a variety of species. Each of these components can serve as waypoints in the green corridor.

Consider installing permeable fences or gates at the boundaries of your garden. This step can facilitate the movement of small mammals like hedgehogs. If you have solid fences, create small openings at the bottom.

Plant dense shrubs or hedges to provide cover for birds and small mammals moving between feeding and nesting sites. Climbing plants on walls and fences can offer routes for insects and smaller creatures.

Remember to avoid using harmful chemicals in your garden that can affect the wildlife using these corridors. Your garden corridor should be a safe passage, not a dangerous one.

The Role of Composting in Attracting Wildlife

Composting is a key element of a wildlife-friendly garden. Not only does it recycle garden and kitchen waste into a rich soil improver, but it also creates an attractive environment for a host of wildlife.

Role of Composting in Attracting Wildlife

Many invertebrates, such as worms, beetles, and woodlice, are attracted to compost heaps as they offer a rich food source. These, in turn, attract predators such as frogs, toads, and hedgehogs. In fact, compost heaps can serve as an excellent hibernation spot for hedgehogs.

Compost heaps also generate heat, providing a warm habitat in colder weather. This makes them attractive to reptiles like slow worms, which are beneficial to gardeners due to their appetite for slugs.

Remember to position your compost heap in a part of the garden that is accessible to wildlife but does not become too dry or too wet. Partial shade is usually best.

Designing a Garden to Attract Beneficial Predators

Attracting beneficial predators to your garden can help keep pest populations in check. These predators include birds, hedgehogs, bats, frogs, toads, and beneficial insects such as ladybirds and hoverflies.

Provide a diverse range of habitats to support a wide range of predators. Trees and shrubs provide perches and nesting sites for birds, while log piles and compost heaps can offer homes for hedgehogs and amphibians.

Planting nectar-rich plants can attract beneficial insects. For example, ladybirds, lacewings, and hoverflies all feed on nectar in their adult stage and are effective predators of aphids in their larval stage.

Avoid using chemical pesticides, as these can harm beneficial predators as well as pests. Instead, focus on creating a balanced ecosystem where predators can keep pests under control naturally.

Incorporating Wildlife Observation Areas in Your Garden Layout

Wildlife observation areas can provide a place for you to watch and appreciate the wildlife in your garden. This can range from a comfortable seat by a window to a dedicated hide or screen.

Position your observation area so that it provides a good view of key features such as bird feeders, bird baths, a pond, or flowering plants. Remember to locate it at a sufficient distance to avoid disturbing the wildlife you’re watching.

Binoculars can enhance your viewing experience, particularly for bird watching. A camera or smartphone can allow you to record your observations and perhaps even capture some great wildlife photography.

Remember, observation should be passive. Avoid disturbing wildlife or their habitats, particularly during breeding seasons or hibernation periods.

Sustainable Practices for a Wildlife-Friendly Garden

Sustainability should be at the heart of a wildlife-friendly garden. This involves gardening practices that are not only good for wildlife but also have a low environmental impact.

Use peat-free compost to protect peatland habitats and the carbon they store. Collect rainwater for watering your plants, and use water-efficient irrigation systems like drip hoses.

Avoid using chemical fertilizers and pesticides. These can harm wildlife and can also have a high carbon footprint due to their manufacturing and transport processes. Instead, rely on compost to improve your soil, and encourage beneficial predators to control pests.

Plant native species that are adapted to your local climate and soil conditions. These typically require less water, fertilizer, and maintenance than exotic species.

Creating a Winter Haven: Supporting Wildlife in the Colder Months

As winter sets in, food and shelter can become scarce for wildlife. Your garden can provide a vital haven during these challenging times.

Keep a mix of evergreen plants and deciduous trees in your garden. While the former provide year-round cover, the latter can provide berries and seeds as food sources during winter.

Regularly refill bird feeders and provide a range of foods, such as seeds, suet balls, and apple pieces. Remember to break the ice on ponds and bird baths during freezing weather.

Leave dead plant material in place over winter. Seed heads can provide food for birds, while hollow stems and leaf piles can offer hibernation sites for insects. Similarly, avoid disturbing compost heaps and log piles, as these could be home to hibernating creatures.

Minimizing Disturbance: Tips for Co-existing with Your Garden’s Wildlife

Living harmoniously with your garden wildlife necessitates a degree of mutual respect and understanding. Minimizing disturbance is essential to providing a safe and secure environment for your garden’s diverse range of creatures.

One key aspect is creating areas where wildlife can retreat to undisturbed. Dense shrubs, log piles, and undisturbed corners of your garden can all serve as sanctuary spaces.

Resist the urge to over-tidy your garden. A certain amount of fallen leaves, deadwood, and overgrown areas are not only natural but also beneficial to a wide variety of wildlife. These areas can provide essential hiding spots, feeding grounds, and habitats.

When carrying out garden maintenance tasks, be mindful of potential wildlife. Check long grass before mowing, look for bird nests before pruning trees, and be aware of hedgehogs and other creatures that may be hiding in piles of leaves or compost.

Finally, try to limit the use of outdoor lighting, which can disorient nocturnal animals. When necessary, opt for low-intensity, warm-colored lights and aim them downwards to limit light pollution.

Creating a Bird Bathing and Drinking Area: Layout Ideas

Birds require water for drinking and bathing, and a bird bath can be a wonderful addition to your garden that attracts a wide variety of species.

Choose a location that is safe from predators, preferably with a tree or shrub nearby that birds can use as a lookout or escape route. However, ensure the bird bath is placed at least a couple of meters away from cover to deter lurking cats.

Opt for a bird bath with a shallow slope and rough surface to provide a secure footing for the birds. If the bath is too deep, place some flat stones in it to offer safe places for the birds to stand.

Remember to keep the bird bath clean to prevent the spread of diseases. Regularly changing the water can also ensure that it remains fresh and appealing to the birds.

During winter, ensure the bird bath doesn’t freeze over. A small floating object like a ping-pong ball can keep a small area ice-free.

Mimicking Natural Habitats: Biodiversity in a Wildlife Garden

A biodiverse garden is one that mimics natural habitats, encouraging a wide variety of species to thrive. Aim for a mosaic of mini-habitats to cater to different types of wildlife.

Start by incorporating a mixture of trees, shrubs, and ground cover plants. Different species prefer different levels of vegetation, so this vertical structure can provide habitats for a range of creatures.

Consider adding a pond or wetland area, which can attract frogs, toads, newts, dragonflies, and a variety of water-loving birds. Even a small pond can add an essential element of diversity to your garden.

Maintain a balance between manicured and wild areas. Keep some patches of long grass and wildflowers for insects, and let ivy or brambles grow to provide autumn and winter berries.

Finally, don’t forget about the invertebrates that form the foundation of the garden food chain. Log piles, leaf piles, and bare earth all provide essential habitats for these vital creatures.

Choosing Non-Invasive Plants for a Wildlife-Friendly Garden

Selecting plants that are non-invasive is essential to maintaining a healthy, wildlife-friendly garden. Non-invasive plants are typically native species that have evolved in balance with local wildlife, and won’t spread uncontrollably to the detriment of other plants.

Research native plants in your area and consider their roles in local ecosystems. Many provide food or habitat for specific species, and their inclusion can support a rich biodiversity in your garden.

Avoid exotic species known to be invasive. While they may be attractive, they can out-compete native plants and reduce the overall diversity of your garden.

Consider the conditions in your garden and choose appropriate plants. Native species adapted to your local soil and climate conditions will generally require less maintenance and be more beneficial to wildlife.

Wildlife Gardening for Kids: Creating a Learning Environment

Wildlife gardening can be a wonderful way for children to engage with nature and learn about ecology, biodiversity, and the importance of caring for our environment.

Wildlife Gardening for Kids

A child-friendly wildlife garden should be safe and engaging. Avoid poisonous plants and ensure water features are safe for young children. Consider incorporating interactive elements, such as bird feeders the children can fill, or a small vegetable patch they can tend to.

Encourage children to observe the wildlife in the garden, and maybe even keep a nature journal. This can foster an interest in natural history and a love of wildlife that may last a lifetime.

Educate children about the importance of not disturbing wildlife, especially during nesting or hibernation periods. Explain the concept of a balanced ecosystem and why all creatures, even the smallest insects, play a vital role.

The Ethics of Wildlife Gardening: Balancing Attraction and Protection

While the purpose of wildlife gardening is to attract a variety of species, it’s crucial to balance this with a respect for wildlife and an understanding of their needs. The ethics of wildlife gardening lie in encouraging wildlife without causing harm or disrupting natural processes.

Avoid interfering with natural behaviours or attempting to tame wildlife. Animals in your garden should remain wild, and any interaction should be minimal and respectful.

Do not overfeed animals, as this can disrupt natural feeding behaviors and diets. While bird feeders can provide supplementary food, especially during winter, they should not replace birds’ natural diet of insects, seeds, and berries.

Be aware of potential conflicts with neighbors or local regulations, especially if your wildlife-friendly practices, such as leaving areas of your garden wild, may appear untidy.

Finally, remember that the ultimate goal is to contribute to wider conservation efforts, fostering a healthy ecosystem and promoting biodiversity.

Conclusion

Creating a wildlife-friendly garden is a fulfilling endeavor that not only contributes to local biodiversity but also offers endless opportunities for learning, observation, and relaxation. It’s about striking a balance between maintaining an attractive outdoor space and providing a safe, welcoming habitat for wildlife. From building bird baths and wildlife corridors to planting native species and managing your garden sustainably, each choice impacts the complex web of life that will flourish in your garden.

The thoughtful choices we make in our garden layouts, plant selections, and maintenance routines can directly contribute to conservation efforts, and even small changes can have significant effects. With careful planning and commitment, every garden, regardless of its size, can become a sanctuary for wildlife.

By encouraging a diverse range of species, we not only contribute to the health of our local ecosystems but also have the unique opportunity to enjoy nature’s spectacle right on our doorsteps. It’s a continual learning journey that develops over time, shaped by observation, trial, and error. But most importantly, it’s a journey that deepens our connection with nature and fosters a greater appreciation for the incredible biodiversity that surrounds us.

21 Children’s Garden Layout Ideas: An Inspirational Guide

Creating a garden that is not only beautiful but also engaging for children can be a fun and rewarding project. It is about much more than simply laying out a patch of grass and a play structure. This guide will inspire you with 21 children’s garden layout ideas that focus on education, safety, and play. We will also delve into the specifics of certain garden layouts such as kid-friendly vegetable gardens, sensory herb gardens, and magical fairy gardens.

When designing a garden layout, one must consider interactive elements and seasonal planting for kids to keep the garden engaging throughout the year. Incorporating educational elements is also important to stimulate children’s curiosity about nature. In addition, safety is always a key concern, as is the integration of outdoor play areas and paths. Lastly, there’s the pure magic of creating special themed gardens that can capture a child’s imagination.

In this comprehensive and detailed guide, we’ll provide you with plenty of inspiration to create a children’s garden that combines beauty, fun, education, and safety. Each section below will delve into these concepts, offering design ideas, tips on suitable plants, and creative DIY projects for kids.

Introduction: Creating a Garden Space for Children

Creating a garden space for children involves thoughtful planning and an understanding of what stimulates children’s interest and creativity. A well-designed children’s garden is more than just a play area; it’s a place where children can connect with nature, learn about plants and animals, and let their imaginations run wild.

Garden Space for Children

The key aspects to consider in the design include interactive elements, sensory stimulation, safety, and opportunities for learning. For example, water features designed for kids can provide sensory play, while edible plants and vegetables allow children to learn about nature’s cycle. Pathways and play structures can encourage physical activity and navigation, while a sensory garden can introduce children to different textures, smells, and colors.

Designing a child-oriented garden layout also requires considering factors like the age of the children, their interests, and how the space will evolve as they grow. With careful planning, the garden can become a dynamic space that nurtures children’s love for nature and outdoors, enhancing their physical, cognitive, and sensory development.

Designing a Kid-Friendly Vegetable Garden

Creating a vegetable garden can be an excellent educational experience for children. It can teach them about the cycle of life, the importance of healthy eating, and the joy of seeing the fruits (or vegetables) of their labor.

Kid Friendly Vegetable Garden

  • Choosing the Right Plants: Opt for plants that are easy to grow and fast to harvest like radishes, lettuce, cherry tomatoes, and zucchini. These plants offer a quick reward for the children’s effort, encouraging them to continue gardening.
  • Involving Children in the Design: Let them choose where to plant their favorite veggies, and encourage them to create colorful labels for each plant.
  • Interactive Garden Elements: You could include stepping stones that lead to each vegetable patch or a scarecrow that the kids can help design.

Remember to ensure garden safety by avoiding plants that may be toxic if ingrown and by securing any gardening tools. It’s also essential to provide child-friendly tools for the kids to use, further engaging them in the gardening activities.

Building a Children’s Herb Garden: Sensory Exploration and Learning

A sensory herb garden is an exciting way to engage children’s senses of sight, touch, taste, and smell. Plant herbs like rosemary, mint, lavender, and basil that offer strong scents and different textures.

  • Design Ideas: Consider creating a spiral or circular herb garden, with each herb in a separate section. This layout allows children to explore each herb individually.
  • Learning Activities: Include educational activities like tasting and smelling sessions, or creating homemade herb-infused oils.
  • Safety: Ensure all plants are non-toxic and safe for children to touch and taste.

Creating a Fairy Garden: Igniting Imagination

A fairy garden is a magical, miniature garden that can inspire children’s creativity and imagination. It can be created in a small corner of the garden, or even in a large pot.

  • Design Ideas: Incorporate miniature houses, tiny furniture, small plants, and pebble paths. You could even create a miniature fairy village.
  • DIY Projects: Encourage children to create their own fairy figures or houses using clay, wood, or recycled materials.
  • Storytelling: Use the fairy garden as a setting for storytelling, further enhancing its enchantment.

Children’s gardens can be magical places where kids learn, play, and explore. By incorporating elements of education, safety, creativity, and fun, a garden can become a treasured space for any child. Whether you’re designing a vegetable patch, a sensory herb garden, or a magical fairy garden, remember the ultimate goal is to create a space that encourages children to connect with nature and enjoy the outdoors.

Incorporating Wildlife Habitats: A Layout for Learning Ecology

Incorporating wildlife habitats into your children’s garden layout can provide a fantastic opportunity for young minds to learn about the ecological web of life, right in their backyard. This aspect of design requires careful planning and insight into what type of flora and fauna you wish to attract and sustain.

In the initial planning stages, consider the types of local wildlife you wish to attract. Whether it’s birds, bees, butterflies, or even certain types of beneficial insects, your plant selections and layout will differ. For example, a butterfly garden would require nectar-rich flowers, while a habitat for birds would need a mix of flowering plants, shrubs, and trees for food and shelter.

One effective method for attracting wildlife is to create mini-habitats or zones. Each zone should have plant species that cater to specific types of wildlife. For instance, a zone with wildflowers and flowering shrubs can attract bees and butterflies, while a space with a bird feeder or bird bath can invite birds.

Creating a pond habitat is another wonderful idea. However, this requires attention to garden safety. The pond should be shallow, with sloping sides to prevent accidents. It can be a great habitat for frogs, newts, and other aquatic creatures.

Incorporating educational elements like information boards about the different creatures, their habitats, and their role in the ecosystem can turn the garden into an outdoor classroom. You can also involve children in the planning and creation of these habitats, enhancing their understanding and appreciation of nature.

Designing a Safe Water Feature for Children’s Gardens

Water features can be a delightful addition to any children’s garden. They not only provide an aesthetic appeal but also introduce children to the element of water in a natural environment. However, safety is a paramount concern when incorporating water features in a children’s garden layout.

Water Feature for Children's Gardens

Consider the depth and accessibility of any water feature. It is best to opt for shallow water features, such as a bubbling rock or a small cascading waterfall. These are both exciting for children and pose less risk than deeper water bodies.

The placement of the water feature should be in a clear, open area where adults can easily supervise. It should not be too close to play structures to prevent accidental falls into the water during playtime.

Interactive elements like water pumps or water tables can be included, allowing children to play and learn about water properties safely. These features can also be used for educational activities like floating and sinking experiments.

Finally, always ensure that the water feature is maintained regularly to prevent the growth of algae and mosquitoes. A clean, safe water feature can provide hours of entertainment and learning for children in a garden setting.

Creating a Kid-Friendly Flower Garden: Plant Choices and Design Ideas

Designing a flower garden for children is all about color, texture, and scent. The choice of flowers should be guided by the children’s preferences and the desire to introduce them to a variety of plant species.

Kid Friendly Flower Garden

In the selection process, choose plants with different blooming seasons to ensure that the garden remains colorful throughout the year. Include a mix of perennials, like coneflowers and asters, and annuals, such as marigolds and sunflowers, for a variety of colors and shapes.

Engage children in the planting process. Allow them to dig the holes, place the seeds or seedlings, and water them. This can be an empowering experience and can cultivate a sense of responsibility as they watch their plants grow and bloom.

Design elements can include paths that meander through the flower beds, inviting children to explore. Consider using stepping stones or creating a flower maze for added fun. Also, think about adding a small bench or a garden swing where children can sit and enjoy the colors and scents of the flower garden.

The Perfect Play Area: Combining Fun and Functionality in Garden Design

Creating the perfect play area in a children’s garden is about more than just installing a swing set or a slide. It’s about combining fun elements with functionality to promote play, exploration, and learning.

Start with the basic play structures like swings, slides, and sandboxes. These elements provide physical activity and promote motor skills. Then, add creative elements like a treehouse or a playhouse that can spark imaginative play.

Paths and trails can add an element of adventure and exploration to the play area. These can be designed with elements of surprise like a hidden nook, a tree stump bridge, or a secret garden gate. Ensure these pathways are safe and easily navigable for children.

Interactive garden elements like a weather station, a sundial, or a butterfly feeder can be integrated into the play area for educational engagement. These features can teach children about nature, weather, and time in a fun and interactive way.

Remember, the best play areas are those that offer a mix of active play, imaginative play, and educational elements. They should be safe, stimulating, and most of all, fun.

Garden Layout Ideas for Outdoor Art and Craft Spaces

Outdoor art and craft spaces can be an exciting addition to a children’s garden, providing opportunities for creativity, sensory development, and hands-on learning. With careful design, these areas can enhance children’s interaction with nature while cultivating their artistic abilities.

Garden Layout Ideas for Outdoor Art

In the initial stages of planning, consider dedicating a specific area for art and craft activities. This should ideally be a shaded spot, which can be achieved naturally through trees or artificially using canopies or umbrellas. The area should have ample space for children to move around freely and explore different activities.

Include a large table with seating for kids to sit, draw, paint or do crafts. Use of weather-resistant materials like plastic or wood is advisable for durability. Providing storage facilities for art and craft supplies is essential. This could be in the form of boxes, baskets or even a small shed, to keep the space organized and materials easily accessible.

Design elements like chalkboards, easels, or wall spaces for displaying artwork can make the space more interactive and appealing. Another idea is to install a simple outdoor weaving loom with different textured yarns, promoting motor skills and creativity.

A garden art space can also extend to the garden itself. Providing children with the tools and materials to create ‘nature art’—using leaves, twigs, flowers, stones—can be a wonderful way to stimulate their creativity while teaching them about the natural environment.

Creating a Butterfly Garden: A Fun and Educational Layout

A butterfly garden is a beautiful and educational feature that can be incorporated into a children’s garden. It provides an opportunity to learn about the life cycle of butterflies and observe their behaviors up-close, all while adding aesthetic beauty to the garden.

Creating a Butterfly Garden

When planning a butterfly garden, the selection of plants is crucial. Butterflies are attracted to nectar-rich flowers. Plant species like Milkweed, Butterfly Bush, Coneflowers, and Black-Eyed Susans are excellent choices. Aim to provide a continuous bloom throughout the growing season by choosing plants that flower at different times.

Remember to provide host plants for caterpillars too. These are specific plants on which butterflies lay their eggs and the caterpillars feed upon hatching. Some common host plants include Milkweed for Monarchs and Parsley for Black Swallowtails.

Creating a butterfly garden also calls for attention to other elements that butterflies need. A small water source, like a shallow dish filled with water, and sun-basking spots, like flat stones, are beneficial.

Incorporate educational elements into the garden such as information boards about the different types of butterflies and their life cycles. Children can keep a journal documenting the butterflies and caterpillars they see, nurturing their observation and recording skills.

Building a Garden Maze or Labyrinth: A Fun Layout Idea for Children

Creating a garden maze or labyrinth can transform a children’s garden into an adventure-filled space, stimulating exploration, problem-solving skills, and physical activity. The complexity of the maze or labyrinth would depend on the age of the children and the space available.

Garden Maze or Labyrinth

Start by choosing a suitable location for the maze. A flat, open area is preferable. The design can be simple for younger children or more complex for older kids. Use a garden hose or rope to outline the maze on the ground before planting.

The choice of plants for the maze is crucial. They should be dense enough to form walls but not too high to obstruct visibility for safety reasons. Shrubs like Boxwood or Privet are commonly used. For a more temporary or seasonal maze, consider using sunflowers or corn.

Adding fun elements within the maze like statues, gnome houses, or surprise corners can make the journey through it more exciting. Don’t forget to incorporate resting points, especially for larger mazes.

Children can be involved in the design and planting of the maze, adding an educational and interactive aspect to the process. Watching the maze grow and change with the seasons can provide a sense of accomplishment and ongoing interest.

Making Mud Pies: Incorporating a Mud Kitchen into Your Garden

A mud kitchen, an outdoor play kitchen where children can play with mud and natural materials, can be a delightful addition to your garden layout. It promotes sensory play, creativity, and an understanding of natural materials.

Mud Kitchen into Your Garden

The design of a mud kitchen can range from a simple setup with old pots and pans on a bench to a more elaborate construction with sinks, stovetops, and storage spaces. The layout should include a ‘cooking’ area and a mud and materials supply area. Choose a location that is slightly away from the main seating areas to manage mess but still within sight for supervision.

The ‘cooking’ area can be created using old furniture like a bench or a table. It should be at a height accessible to the children. Old pots, pans, spoons, and other utensils form the cooking tools. If possible, include a water source nearby, which can be a simple water jug or a more complex setup with a working tap.

The materials area is where children can gather the mud, sand, pebbles, leaves, and other ‘ingredients’ for their mud pies. This could be a dedicated sand or soil pit or just a corner of the garden.

Safety is crucial in designing a mud kitchen. All materials should be non-toxic, and the area should be checked regularly for any harmful objects or substances.

Digging Area: A Must-Have in a Children’s Garden

A digging area is a significant feature in a children’s garden, providing a safe space where children can interact directly with soil and nature, promoting both physical activity and a foundational understanding of natural processes.

The first consideration for setting up a digging area is the location. This area should be accessible and visible yet clearly defined and contained to prevent the spread of dirt to other areas of the garden. It could be a section of the garden with exposed soil, or it could be a larger pot or raised bed filled with safe, clean soil.

The soil in this area should be regularly checked for harmful objects or substances, and potentially dangerous tools should be kept away from this area. Instead, provide children with safe, child-friendly gardening tools such as small shovels or trowels and encourage them to explore, dig, and even plant their own seeds.

Educational opportunities abound in the digging area. Children can learn about soil composition, composting, and the creatures that live in the ground. They could be involved in planting and caring for plants, helping them understand plant growth and the life cycle of plants.

Creating Shaded Areas for Rest and Relaxation

Creating shaded areas in a children’s garden is crucial for safety, comfort, and providing a space for quieter activities or rest. These areas provide respite from the sun and heat, especially during the warmer months, and can add depth and interest to your garden layout.

Trees are a natural source of shade and can be utilized effectively in garden design. However, not all gardens have large trees, and in such cases, other structures can be used. These can include pergolas, gazebos, or umbrellas. Another interesting feature can be a ‘den’ or ‘fort’ created using bamboo poles and fabric, which can provide shade and a sense of adventure.

Within these shaded areas, consider placing comfortable seating like benches or hammocks. A picnic table can be a great addition for outdoor eating or craft activities. For a sensory experience, hang wind chimes or bird feeders from the overhead structure.

It’s important to ensure these areas are safe and comfortable. Regular maintenance is key – keep the area clean, check the integrity of any structures, and ensure there are no potential hazards.

Safe and Creative Garden Path Ideas for Children

Garden paths are more than just practical walkways; in a children’s garden, they can be creative, fun, and educational features. They direct flow, divide spaces, and can be designed to promote exploration and curiosity.

Safety is a priority when designing paths for children. They should be wide enough for easy movement, with non-slip surfaces. Rounded edges are preferable, and any steps should be shallow and clearly visible.

There are many creative design ideas for garden paths. One idea is to use different materials for different sections of the path – paving stones, gravel, bark chips, or stepping stones. This can create a sensory walk, engaging children’s senses of sight and sound, and teaching them about different materials and textures.

For a more interactive path, consider creating a ‘hopscotch’ or ‘game’ path, with painted or engraved games. A ‘nature’ path with information plaques about different plants or animals can make a walk educational.

Incorporating a Sandbox into Your Garden Layout

A sandbox is a classic addition to any children’s garden. It provides a safe, contained environment where children can engage in sensory play, building, and creative expression.

Incorporating a Sandbox into Your Garden

When designing a sandbox, consider its size, shape, and location in the garden. It should be large enough for multiple children to play but proportionate to the overall garden size. It could be a simple square or rectangle, or more creative shapes can be used. It should be placed in a spot that’s easily visible for supervision but not in a high-traffic area.

A variety of sand toys like buckets, shovels, and molds can enhance play. For an added educational element, you could bury ‘fossils’ or ‘treasure’ for children to discover. Including seating or a shade structure can make the sandbox more comfortable and safer.

Safety considerations for a sandbox include ensuring the sand is clean and non-toxic, regularly checking for foreign objects, and having a cover for when the sandbox is not in use to keep animals out. The edges of the sandbox should be smooth and safe for little hands.

Adventure Garden: Layout Ideas for Active Kids

An adventure garden is a fantastic layout idea for active children, providing them with endless opportunities for physical activity, exploration, and imaginative play. It’s all about incorporating elements that offer both challenge and excitement.

Your adventure garden can be composed of a variety of different zones, each offering different types of activities. An obstacle course or a climbing area with kid-friendly structures like jungle gyms, rope ladders, and climbing walls can provide great exercise and improve balance and coordination.

A natural play area with tree stumps, logs, and large rocks encourages unstructured play and exploration. A hidden ‘secret’ garden, accessible through a leafy arch or behind a ‘secret door’ in a hedge, can ignite children’s imagination and sense of adventure.

You could also consider building a treehouse or fort, complete with bridges, slides, and swings. Zip-lines are another exciting feature if you have the space and safety measures in place. Lastly, remember to include benches or picnic tables for rest, snacks, or just enjoying the view.

The Importance of Maintenance and Safety in a Children’s Garden

Ensuring the maintenance and safety of a children’s garden is paramount. Regular maintenance ensures that the garden remains a safe, clean, and inviting space for children, while safety precautions help prevent accidents and injuries.

Routine maintenance includes tasks like pruning plants to remove any sharp or low-hanging branches, checking and repairing structures like play equipment and seating, removing any dangerous or toxic plants, and ensuring the garden is free from harmful insects or pests.

Safety measures in a children’s garden go beyond just the maintenance. Soft, impact-absorbing surfaces should be installed under play structures to cushion falls. Fencing or barriers should be installed around any water features to prevent accidents. Any garden tools or chemicals should be stored out of reach of children.

Educating children about garden safety is also crucial. Teach them to recognize harmful plants, to understand the dangers of certain garden tools, and to treat animals or insects with respect.

Creating a Miniature Rock Garden: A Fun Layout for Young Geologists

A miniature rock garden is an engaging and educational garden layout idea for children, especially those with an interest in geology. A well-designed rock garden can be a low-maintenance, visually appealing feature that also provides opportunities for scientific exploration.

Miniature Rock Garden

When creating a rock garden, consider location, size, and rock selection. An area with good drainage and sunlight is best. The rock garden should be easily accessible for children, and its size can vary depending on the space available.

The most exciting part is selecting and arranging the rocks. Involve your children in this process – take them to a local rock supplier or on a nature walk to collect rocks. Encourage them to observe the different types, colors, and textures of rocks.

Planting in a rock garden offers a chance to use hardy alpine plants, succulents, or even bonsai. These plants typically require less water and care, making them great for a low-maintenance garden.

How to Involve Kids in the Garden Design Process

Involving kids in the garden design process can make the children's garden even more meaningful and appealing to them. It not only makes them feel valued but also offers them a sense of ownership and responsibility for their garden.

Start by asking the children about their favorite garden features or activities, and incorporate these into the design. You could have a design session where you sketch out your garden layout together, deciding where each feature will go.

When selecting plants, involve the children. Have them research which plants are suitable for your climate and soil type, or let them pick a few favorite flowers or vegetables to grow. Planting and caring for these plants can be their special responsibility.

The construction phase is another opportunity for involvement. Depending on the children's ages, they can help with tasks like planting, painting fences or stones, or assembling a sandbox. Always ensure these activities are age-appropriate and safe.

Gardening Activities and Lessons for Kids: Making the Most of Your Layout

Your garden layout can serve as a dynamic outdoor classroom, providing numerous opportunities for gardening activities and lessons. These activities make the most of your layout, extending the garden's use beyond just play, and instilling in children a love for nature and gardening.

Planting and caring for plants is an obvious starting point. Children can learn about different plant types, growth cycles, and care requirements. They can observe changes in plants over time and document these changes in a garden journal.

Activities like a 'bug hunt' or 'bird watch' can teach children about local wildlife. For older children, lessons can extend to topics like composting, soil health, or understanding weather patterns and their impact on the garden.

Remember, the aim of these activities is not just to teach, but also to spark curiosity and love for nature. The lessons your garden offers can be as broad and varied as your garden layout itself.

Conclusion

Designing a garden with children in mind is a wonderful adventure that yields a space filled with creativity, learning, and joy. It encourages children to interact with nature, promoting physical activity, curiosity, and environmental awareness. This comprehensive guide has given you 21 Children's Garden Layout Ideas to inspire your design, each idea tailored to facilitate kids' experiences outdoors.

From creating an adventure-filled playground, a mini vegetable garden to teaching ecology through wildlife habitats, or stirring their imagination with a fairy garden, every corner of your garden can turn into a magical and learning space. Integrating safety features and planning for easy maintenance ensures the garden remains a secure and fun place for kids to play and grow.

Remember to involve your children in the garden design process and provide them with activities and lessons to make the most of your layout. These experiences can be instrumental in fostering their lifelong love for gardening and the great outdoors. With creativity, careful planning, and child-oriented design, your garden can become a treasure trove of experiences, offering endless fun and learning opportunities for the children in your life.

Designing a children's garden is not just about cultivating plants, but also about sowing seeds of knowledge, responsibility, and admiration for nature in young minds. We hope these ideas inspire you to create a garden that nurtures both your children and the environment.

22 Garden Privacy Ideas: Everything You Need To Know

Gardens are a refuge, a place of relaxation, and a personal paradise. However, if your outdoor space is exposed to prying eyes, you might not feel the tranquility you seek. Achieving privacy in your garden can add to the comfort and enjoyment of your outdoor living space. It allows for a more intimate setting, perfect for backyard gatherings or even for a quiet place to read. Garden privacy also helps to obscure the less desirable aspects of your surroundings like a busy road or the neighbors’ laundry.

In this comprehensive guide, we will delve into 22 inspiring and effective garden privacy ideas that you can incorporate into your space. We will explore a diverse array of solutions from natural landscaping methods to architectural structures and innovative ideas that blend aesthetics with functionality. Whether you have a small urban terrace, a suburban backyard, or a sprawling countryside plot, there’s something here for every garden layout and design.

Understanding garden privacy is not just about knowing which hedges to plant or what screens to install. It’s about understanding the unique requirements of your space, being creative, and bringing your personal touch into the mix. With that in mind, let’s dive into these ideas to help you create a private, stylish, and inviting outdoor space.

Introduction to Garden Privacy: Why It Matters

Garden privacy is about more than just avoiding prying eyes. It can serve multiple purposes that go beyond the obvious need for seclusion. These include noise reduction from busy streets, creating a windbreak, and even helping to reduce pollution in urban areas.

But let’s delve deeper into the benefits of garden privacy:

  • Enhanced comfort: With added privacy, your garden becomes a tranquil and relaxing space, free from disturbances.
  • Increased property value: Landscaping for privacy can significantly improve your property’s curb appeal, which can add to its value.
  • Wildlife habitat: Privacy plants and trees can attract and provide shelter for various bird species and beneficial insects, enhancing biodiversity.

Using Natural Elements for Garden Privacy

Nature provides some of the most effective and attractive solutions for garden privacy. Here are some of the key methods you can employ:

Hedges and Shrubs

Privacy Trees

Privacy trees can serve as a robust, long-term solution for garden privacy. They create a tall barrier that not only obscures views but also muffles noise, which can be particularly beneficial for properties near busy roads or neighborhoods.

When selecting privacy trees, consider their mature size, growth rate, and maintenance requirements. Fast-growing species such as Leyland Cypress or Thuja Green Giant are popular choices for privacy hedges.

Hedges and Shrubs

Hedges and shrubs are more than just living walls. They are versatile, providing a dense privacy screen while adding structure, texture, and greenery to your garden. Boxwood, Privet, and Yew are popular for their dense foliage and easy maintenance.

Climbing Plants

Climbing plants can add privacy and greenery to walls, fences, pergolas, and gazebos. They bring an added layer of privacy, soften hard surfaces, and can provide a stunning display of blooms. Consider plants like Clematis, Ivy, or Wisteria.

Planting for Privacy: Selecting the Right Trees and Shrubs

Choosing the right plants for your privacy hedge or screen depends on your garden conditions and personal preferences. Consider the following factors:

  • Growth rate: Faster-growing species can provide privacy more quickly, but they may require more maintenance.
  • Size: The mature height and spread of the plant will determine the level of privacy it can provide.
  • Foliage: Evergreen plants ensure year-round privacy, while deciduous plants can provide seasonal interest.
  • Maintenance: Some plants may require regular pruning to maintain their shape and health.

Creating a Private Oasis with Bamboo Screens

Bamboo screens can be a quick and attractive way to add privacy to your garden. They provide an instant screen and are very versatile. You can use them to cover an existing fence, as a stand-alone screen, or even as a decorative element.

Bamboo Screens

Here are some benefits of using bamboo screens:

  • Quick solution: Bamboo screens can be installed in a day and provide instant privacy.
  • Versatile: They can be used in various ways, including hiding unsightly views, creating a backdrop for plants, or adding a tropical touch to your garden.
  • Eco-friendly: Bamboo is a sustainable material that grows quickly and sequesters a significant amount of carbon dioxide.

Using Trellises and Climbing Plants for Garden Privacy

Utilizing trellises combined with climbing plants can provide an effective and beautiful solution for garden privacy. Not only do they form a natural barrier, but they also contribute to the aesthetic appeal of your garden.

Trellises and Climbing Plants

Trellis Ideas

The choice of trellis can have a significant impact on the overall look of your garden. Consider the material of the trellis as it needs to withstand outdoor weather conditions. Wooden trellises with a lattice pattern are a popular choice and can easily blend into a garden setting. For a more modern look, metal or vinyl trellises are excellent alternatives.

In terms of positioning, trellises can be used standalone with their bases buried in the ground for stability or attached to existing structures like fences or walls. Combine several trellises to create a privacy screen or partition a section of your garden.

Climbing Plants

Climbing plants bring life and color to trellises. When selecting climbing plants, consider their growth rate, flower production, and seasonal changes. Fast-growing vines like Clematis or Honeysuckle are known for their stunning blooms. Evergreen climbers like Ivy or Jasmine provide year-round coverage, while flowering vines can add seasonal color and fragrance.

Privacy Fencing: Material Choices and Design Ideas

Privacy fences are one of the most traditional methods to secure privacy in a garden. They offer a solid barrier between your garden and the outside world.

Material Choices

Various materials can be used for privacy fencing, each offering its own aesthetic and practical benefits. Wooden fences are a classic choice and offer a natural look. Vinyl fencing, on the other hand, is durable, requires minimal maintenance, and is available in a variety of styles and colors. Metal fences, including steel or aluminum, are strong and can offer a modern aesthetic to your garden.

Design Ideas

Design plays a significant role in the functionality and appeal of a privacy fence. A vertical board fence is a common style for privacy as it offers complete seclusion. Lattice-top fences, while not offering complete privacy, allow light and air to pass through, creating a less closed-in feel. For added aesthetics, consider painting your fence or decorating it with outdoor art or lighting.

Ideas for Incorporating Pergolas and Gazebos for Privacy

Pergolas and gazebos are architectural structures that can provide a certain degree of privacy while enhancing the aesthetic appeal of your garden.

Pergolas and Gazebos

Pergolas

Pergolas can be incorporated into your garden design to create secluded seating areas or walkways. While a standard pergola may not offer complete privacy, adding climbing plants, curtains, or lattice can make it a more private space. A vine-covered pergola not only provides shade but also adds an element of privacy with its lush greenery.

Gazebos

Gazebos, on the other hand, are stand-alone structures usually with a roof and open sides. They can be positioned in a corner of the garden or in the center as a focal point. For privacy, consider adding lattice panels, curtains, or privacy walls to the sides of the gazebo. Planting shrubs or installing garden screens around the gazebo can also add a layer of seclusion.

Creating Privacy with Outdoor Curtains and Blinds

Outdoor curtains and blinds offer a flexible and stylish solution for garden privacy. They can be used in various parts of your garden, including decks, patios, pergolas, and gazebos.

Outdoor Curtains and Blinds

Outdoor Curtains

Outdoor curtains bring a soft, flowing element to the garden and can provide an instant sense of seclusion. They are perfect for creating a private corner in your patio or deck. Choose weather-resistant materials like acrylic, polyester, or olefin. These materials resist mold, mildew, and fading, ensuring that your curtains stay beautiful for longer.

Outdoor Blinds

Outdoor blinds, such as bamboo roll-up blinds or outdoor roller shades, can create a more solid barrier. They are perfect for blocking views, reducing sunlight, and adding an element of privacy. Choose UV-resistant blinds to protect your space from excessive sunlight.

In conclusion, achieving privacy in your garden is an art that combines functionality and aesthetics. By using trellises with climbing plants, privacy fences, pergolas, gazebos, and outdoor curtains or blinds, you can create a tranquil, secluded oasis right in your backyard. By understanding and implementing these garden privacy ideas, you can enjoy your garden to its fullest.

Making a Private Nook with Vertical Gardens

Vertical gardens, sometimes referred to as “living walls”, are a unique way to add greenery to your space while also providing privacy. They consist of plants grown on a vertically suspended panel, which can be attached to an existing wall or stand-alone.

Private Nook with Vertical Gardens

Choosing the Right Plants

When choosing plants for your vertical garden, there are a few considerations to keep in mind. First, select varieties that will thrive in the light conditions of your space. For a wall that gets a lot of sunlight, you might choose succulents or flowering vines. For a more shaded area, ferns or ivies could be suitable.

Vertical Garden Design

Consider how the vertical garden will integrate with the rest of your garden design. Do you want it to be a focal point or blend more seamlessly with the surroundings? Do you prefer a more structured look with neatly arranged plants, or a more naturalistic design? Think also about the height of your vertical garden – a taller structure can provide more privacy.

Maintenance

Maintaining a vertical garden can require a little more work than a traditional garden bed due to the vertical growth of the plants and gravity’s effects. Regular watering and feeding are essential, and you’ll also need to monitor the health of your plants to detect and address any issues promptly.

Incorporating Water Features for Sound Privacy

In addition to visual privacy, it’s also essential to consider sound privacy in your garden. The addition of water features can be an excellent way to mask ambient noise and create a more serene outdoor space.

Types of Water Features

From large ponds to small wall fountains, water features come in all shapes and sizes. The type of water feature you choose will largely depend on the size of your garden and your personal preferences. For smaller gardens, a wall-mounted water feature or a small, self-contained fountain may be the best fit.

Location and Sound Impact

The location of your water feature can significantly affect its sound privacy benefits. For instance, if your garden is adjacent to a busy road, placing the water feature close to this noise source can help mask the sound more effectively.

Maintenance and Safety

Regular maintenance is essential to keep your water feature running smoothly and safely. This includes cleaning the water regularly and ensuring that the water feature’s pump is in good working order.

Designing a Private Garden Patio: Layout Ideas

Designing a private garden patio involves much more than simply deciding on furniture and accessories. The layout of the patio itself can contribute significantly to its sense of privacy and seclusion.

Private Garden Patio

Positioning

The position of your patio can have a big impact on its privacy. If your garden allows, consider locating your patio in a corner or alongside an existing wall or fence. This will naturally provide more privacy than a patio located in the middle of the garden.

Plantings

In addition to any physical structures, you can use plantings to increase the privacy of your patio. Hedges or shrubs planted around the patio’s perimeter can create a natural barrier, while climbing plants on trellises can provide an attractive backdrop.

Furniture and Accessories

Your choice of furniture and accessories can also enhance the privacy of your patio. For example, tall planters can create a visual barrier, while outdoor curtains or blinds can be used to provide temporary privacy as needed.

Innovative Uses of Garden Walls for Privacy

Garden walls can serve a dual purpose, providing privacy while also serving as an aesthetic element within your garden. From the materials you choose to how you decorate or embellish the walls, there are many ways to use garden walls creatively for privacy.

Materials

There are a variety of materials to choose from when designing your garden wall. Traditional options include brick or stone, which can create a natural and timeless look. For a more modern aesthetic, consider materials like concrete or corrugated metal.

Decorative Elements

A garden wall doesn’t have to be just a plain, functional structure. There are many ways to make it a decorative feature in your garden. For example, you could attach planters or shelves to the wall and use them to display potted plants or decorative objects. Alternatively, you could install a mural or mosaic for a more artistic touch.

Integrating Walls with Other Garden Features

Consider how your garden wall will interact with other features in your garden. For example, you might integrate a water feature into the wall, or you could design the wall to serve as a backdrop for a seating area.

In conclusion, creating privacy in your garden involves a combination of thoughtful design and strategic use of various elements. Whether it’s through the use of vertical gardens, water features, a well-designed patio, or creative garden walls, you can create a garden that’s not only private but also beautiful and uniquely yours.

Creating a Living Wall for a Secluded Garden Space

Living walls, also known as green walls, offer a fantastic solution for garden privacy while also enhancing the beauty and eco-friendliness of your garden. A living wall is a vertical structure that is either part or completely covered with greenery, and sometimes includes an integrated water delivery system.

The Beauty of Greenery

The beauty of a living wall lies in the flexibility and customization it offers. You can pick and choose plants based on their aesthetics, growth rate, and even based on their ability to attract certain wildlife like butterflies or birds. Succulents, ferns, and ivies are great choices for living walls because they can withstand the vertical orientation and they provide a lush and dense coverage.

Constructing a Living Wall

Building a living wall involves installing a frame, adding a layer of fabric, and setting up a system for irrigation. Consider whether you want to DIY or hire professionals. It can be a complex project, so it’s crucial to consider the time and resources required.

Living Wall Maintenance

Maintaining a living wall involves regular watering, fertilizing, pruning, and monitoring for plant health. While it requires some effort, the reward of a beautiful, private, and eco-friendly garden space is well worth it.

Building Raised Beds for Additional Garden Privacy

Raised garden beds are not just functional for growing plants, they can also add an extra layer of privacy to your garden. These structures, typically made from wood or stone, elevate your plantings and create a visual barrier.

Building Raised Beds

Raised Bed Design Ideas

There are many ways to design raised beds to enhance your garden’s privacy. You can build them high and plant tall plants or trellises for climbing plants. Alternatively, strategically placed and well-planted raised beds can create secluded nooks within your garden.

Building Your Raised Beds

Constructing a raised bed involves choosing a suitable location, deciding on the size and height, preparing the ground, building the bed, and filling it with soil. It’s a project that requires some DIY skills, but there are also many pre-made options available for purchase.

Planting in Raised Beds

When planting for privacy, choose plants that have a good height and can provide a dense cover. Some good choices could be sunflowers, bamboo, or even climbing plants like clematis or ivy.

Attracting Birds for Natural Privacy and Sound Masking

Creating a bird-friendly garden not only contributes to local biodiversity but also helps with privacy. Birdsong can mask unwanted noise and their movements create a natural distraction, helping your garden feel more secluded.

Plants That Attract Birds

Consider planting native species that produce berries or seeds that local birds love. Evergreens can provide year-round shelter for birds, and flowering plants can attract them with their nectar.

Birdhouses and Feeders

Installing birdhouses, bird feeders, and birdbaths can significantly increase the number of birds visiting your garden. These should be placed in safe and quiet areas of your garden to ensure the birds feel secure enough to visit.

Enjoying the Birdsong

Once you have attracted birds to your garden, their song can act as a natural sound barrier, helping to mask traffic noise and creating a serene, private atmosphere in your garden.

Deck Privacy Ideas: Making Your Outdoor Space Secluded

Decks can often feel exposed, but there are several strategies you can employ to increase privacy. From plants to structures and screens, you can turn your deck into a secluded haven.

Plantings for Deck Privacy

Plants are a natural way to create privacy on your deck. Potted trees or bamboo can form a green screen, while hanging planters with trailing plants can create a curtain of greenery.

Structures and Screens

Consider installing structures like pergolas, which can be covered with climbing plants or outdoor curtains for added privacy. Alternatively, privacy screens can be installed directly to your deck railing.

Deck Layout

How you arrange your deck furniture can also impact the level of privacy. Creating a cozy corner with seating and tables surrounded by plants or screens can make the space feel more secluded and private.

In conclusion, whether it’s through living walls, raised beds, attracting birds, or creating a private deck space, there are countless creative and effective ways to enhance the privacy of your garden. Remember, the key is to understand the unique layout and conditions of your garden and choose the methods that best suit your needs and aesthetic preferences.

Maximizing Privacy in a Small Garden: Layout Tips

Maximizing privacy in a small garden may seem challenging due to space constraints. However, by implementing strategic design, you can create your private haven, no matter the size of your garden.

Strategic Use of Plants

In a small garden, every plant counts. Tall, columnar trees like Italian cypress or arborvitae can create a natural privacy screen without occupying too much ground space. Layering different heights of plants can also create a visual illusion of depth, giving a feeling of more space.

Utilizing Vertical Space

Vertical gardening is a great way to add privacy in a small garden. Living walls, trellises, and climbing plants can cover fences and walls, creating a green screen. Also, hanging baskets can add another layer of greenery without taking up precious ground space.

Creating Zones

Using raised beds, screens, or trellises to partition your garden into ‘rooms’ or zones can create more privacy. Each zone can then be used for different purposes, such as dining, lounging, or planting.

Privacy-Friendly Lighting Ideas for Your Garden

Lighting plays a key role in creating a private, cozy, and intimate atmosphere in your garden. Done correctly, it can create charming shadows, highlight the best features of your garden, and add a touch of magic to your outdoor space.

Lighting Ideas for Your Garden

Use Low-Level Lights

Low-level lights, such as ground lights or table lanterns, create a cozy atmosphere and limit the light spread, ensuring that your garden doesn’t become a stage for all to see.

Make Use of Shadows

Use lighting strategically to create shadows, which can add depth and mystery to your garden. Position lights below or behind plants and structures to cast interesting silhouettes and patterns.

Warm vs Cool Light

Choose warm light over cool light for a more intimate and welcoming feel. Warm light mimics the natural glow of sunset, creating a romantic and relaxing atmosphere.

Maintaining Your Privacy Plants: Pruning and Care Tips

Maintaining the health and aesthetics of your privacy plants is essential in keeping your garden private. Regular care, including watering, feeding, and pruning, will keep them lush and dense.

Watering and Feeding

Privacy plants, especially those in pots, will need regular watering. During dry spells, they may need watering daily. Feed your plants regularly with a balanced fertilizer to keep them lush and healthy.

Pruning for Density

Pruning encourages bushier growth, which is ideal for privacy plants. Regularly prune your plants to maintain their shape and encourage denser foliage.

Monitoring for Pests and Diseases

Keep an eye out for signs of pests or diseases, as these can quickly compromise the health and density of your privacy plants. If you notice any changes in your plants, such as discoloration or wilting, take action immediately.

Designing a Garden for Privacy and Relaxation

A garden designed for privacy and relaxation serves as a sanctuary where you can unwind, read, meditate, or simply enjoy nature. The layout of your garden, the choice of plants and features, and even the colors and textures you choose can all contribute to creating a peaceful, private haven.

Layout for Privacy

Think about the views you want to block and those you want to enhance. Position taller plants or structures strategically to obstruct unwanted views, while framing desirable ones.

Choosing Plants for Relaxation

Certain plants can contribute to a relaxing atmosphere due to their scent, sound, or appearance. For instance, lavender and jasmine provide calming scents, while bamboo and ornamental grasses create soothing sounds as the wind rustles their leaves.

Incorporating Water Features

The sound of water is universally relaxing. A small fountain, pond, or a water feature can mask external noise and create a tranquil atmosphere.

Keeping Your Garden Private All Year Round

To maintain privacy throughout the year, it’s important to choose plants that provide coverage across all seasons. Consider a mix of evergreens, which retain their leaves throughout the year, and deciduous plants, which provide seasonal interest.

Evergreen Choices

Evergreen plants, such as holly, boxwood, and arborvitae, retain their foliage all year round, providing constant privacy. They also add color to your garden during the colder months when most other plants have lost their leaves.

Seasonal Plants

Deciduous trees and shrubs, such as dogwood or hydrangea, can add privacy during warmer months while offering attractive flowers and foliage. These can be combined with evergreens for year-round coverage.

Seasonal Care

Remember that different plants will have different care requirements throughout the seasons. Stay on top of seasonal tasks such as watering, pruning, and protecting plants from frost.

Balancing Privacy and Aesthetics in Your Garden Design

While privacy might be a priority, it’s also essential to ensure your garden is aesthetically pleasing. Balancing the two involves careful planning, good design, and regular maintenance.

Choose Attractive Privacy Solutions

From beautiful fences to ornamental trees and artful screens, there are countless attractive ways to add privacy. Try to choose options that enhance your garden’s existing style and color palette.

Layering and Textures

Use a variety of plants of different heights, shapes, and textures to create a layered effect. This not only enhances privacy but also adds visual interest to your garden.

Regular Maintenance

Keeping your garden well-maintained will ensure it remains both private and beautiful. Regular watering, pruning, and feeding will keep your plants healthy and looking their best.

In conclusion, whether you’re working with a small garden or trying to maintain privacy all year round, there are a multitude of strategies you can employ. From creative lighting to careful plant choice and placement, privacy and aesthetics can indeed go hand in hand to create a beautiful, secluded garden sanctuary.

Conclusion

In conclusion, creating privacy in your garden involves a blend of creativity, strategic planning, and understanding your garden’s unique characteristics. Whether you choose natural plantings, garden screens, or built structures, each solution offers its own set of benefits and aesthetic appeal. But regardless of the method you choose, garden privacy can transform your outdoor space into a personal sanctuary, a space for relaxation and enjoyment, an extension of your home that truly feels like your own.

Remember, the best garden privacy ideas are those that work harmoniously with your garden design, layout, and personal style. They should enhance, not detract from, the beauty and tranquility of your outdoor space.

26 Gorgeous and Creative Flower Bed Ideas to Try

The world of gardening is a vast landscape, filled with a plethora of choices. It is a place where creativity is paired with functionality to achieve an oasis that not only soothes the senses but is also kind to Mother Earth. Among the many garden design possibilities, flower gardens are a popular choice due to their ability to transform any space into a spectacle of colors, textures, and fragrances. This article will delve into 26 creative and stunning flower garden layout ideas, providing you with actionable tips and techniques for creating a successful flower bed of your own.

This comprehensive guide will explore a variety of flower bed ideas, whether you are working with a large landscape, a small side yard, or even a tiny balcony. Each of these designs will emphasize different elements such as flower bed shapes, types of plants, color schemes, and the use of repurposed materials. We will also touch on a few DIY projects that you can take up to elevate the aesthetics of your garden. So, without further ado, let’s explore these fantastic flower garden layout ideas!

Tips for a Successful Flower Bed

A successful flower bed requires careful planning and the application of sound gardening principles. Here are some key factors to consider:

  • Know your soil: Different plants thrive in different types of soil. Conduct a soil test to know what kind of soil you have, which will help you choose the right plants.
  • Consider the sunlight: Some plants love the sun, while others do better in shade. Identify the light patterns in your garden and choose plants accordingly.
  • Think about the seasons: Consider how your garden will look across different seasons. Choose a combination of annuals and perennials to ensure your garden stays vibrant throughout the year.
  • Watering needs: Different plants have different water needs. Plan your garden in such a way that plants with similar water needs are grouped together.
  • Maintenance: Some plants require more care than others. Decide on the level of maintenance you are comfortable with before choosing your plants.

Perennial Flower Bed for Summer-long Blooms

Perennial Flower Bed

Designing a perennial flower bed for summer-long blooms requires strategic plant selection, careful planning, and regular maintenance. The goal is to create a sequence of blooms, so as one variety fades, another begins to shine.

Firstly, start with research. Look for perennial plants that thrive in your local climate and have staggered blooming periods. Consider classics like daylilies, coneflowers, and black-eyed Susans for mid-summer blooms, while late bloomers like sedum and asters can keep your garden vibrant into the fall.

Next, sketch your garden design. A layered approach works best for perennial beds, with tall plants at the back, medium-sized in the middle, and low growers at the front. Incorporating repeating patterns and group plantings can add cohesiveness and visual impact.

Soil preparation is vital. Perennials prefer well-draining soil, and many benefit from the addition of organic matter like compost or aged manure. The location should receive at least six hours of sunlight each day for best flowering results.

Once the bed is prepared, you can plant your perennials. Remember to water them regularly during the first few weeks until they establish. Mulching can help to retain moisture, suppress weeds, and provide a tidy appearance.

Lastly, maintenance is essential to keep the display looking its best. Deadhead spent flowers to encourage more blooms, divide crowded plants every few years, and cut back in late fall or early spring.

Combining Tulips with Annuals and Perennials

Tulips, with their bright, cheerful blooms and variety of colors, make a striking addition to any garden. Combining them with annuals and perennials can extend the blooming season and add depth to the garden design.

To start, decide on the type of tulips you wish to plant. There are early, mid, and late-season tulips, each offering a different range of colors and shapes. For a long-lasting display, consider planting a mix of these.

Next, choose your accompanying annuals and perennials. Pansies, primroses, and forget-me-nots can provide complementary early spring color. Perennials like daffodils, hyacinths, and grape hyacinths bloom around the same time as tulips and can create an impressive spring display.

Later-blooming perennials like peonies, irises, or salvia can fill in the gaps once the tulip foliage begins to die back. Annuals such as petunias, marigolds, or zinnias can add a summer-long pop of color.

When planting, consider the heights of your plants. Tall tulip varieties can provide a stunning backdrop for shorter annuals and perennials. Alternatively, plant tulips in the midst of low-growing perennials to create a layered effect.

Remember, tulips need well-draining soil to prevent bulb rot. After the tulip foliage has died back completely, remove it to give your annuals and perennials room to shine.

Side Yard Flower Bed for Small Spaces

Side Yard Flower Bed for Small Spaces

Side yards are often overlooked areas of the home landscape, but they offer great potential for creative flower beds. Even a narrow side yard can be transformed into a beautiful and functional space.

Start by measuring your side yard and drawing up a simple plan. Incorporate any existing features like fences, paths, or large trees into your design. Consider the sunlight exposure in this area, as this will influence your plant choices.

Vertical gardening is an effective way to make the most of small spaces. Tall, narrow plants, climbing vines, or even wall-mounted containers can add height without taking up much ground space.

Choose a variety of plants to create interest. Use perennials for consistency, add some shrubs for structure, and sprinkle in annuals for a burst of seasonal color. Dwarf or compact varieties are especially useful in small spaces.

Incorporate a pathway, if possible. This not only adds a practical element, allowing easy access for maintenance, but it can also make the space appear larger. Use materials that complement your house and garden style, whether that’s brick, gravel, or stepping stones.

Remember to maintain your side yard flower bed with regular watering, pruning, and fertilizing. With thoughtful planning, your side yard can become a delightful floral retreat.

Pretty Repurposed Tree Stump Flower Bed

A repurposed tree stump can become a unique and eco-friendly flower bed. This creative solution not only adds a rustic charm to your garden but also utilizes what might otherwise be a garden nuisance.

The first step is to prepare the stump. If the tree was recently cut, you might need to wait a while until the stump is sufficiently decayed to hold plants. Once ready, hollow out the stump to create space for planting. A chisel, hammer, and drill can be helpful tools for this process.

Once your stump is prepared, add a layer of gravel or small stones at the bottom for drainage, followed by compost-rich potting soil. Choose a mix of plants that suit the size of your stump and the sunlight exposure in that area. Consider plants with shallow root systems, as the planting depth may be limited.

Filling the stump with trailing plants like creeping Jenny, colorful annuals like petunias, or textured plants like succulents can create a charming display. Remember to water regularly, but avoid overwatering as the stump may retain more moisture than a regular pot.

With time, the stump will continue to decay, adding a natural rustic appeal to your garden. This type of flower bed requires minimal maintenance but provides maximum visual impact.

Flower Shaped Floral Garden Layout

Flower Shaped Floral Garden Layout

A flower-shaped floral garden layout is a delightful idea that’s sure to impress. This whimsical design can be achieved with a mix of annuals and perennials, creating a colorful and dynamic display.

To start, sketch out your flower-shaped design on paper first. This could be as simple as a single flower shape, or you could create an intricate design with multiple interlocking flowers. Consider the size and scale of your layout in relation to the rest of your garden.

Next, prepare your garden bed. Remove any grass or weeds, loosen the soil, and enrich it with compost or other organic matter. Use your sketch as a guide and mark out the flower shape using a garden hose or spray paint.

Now comes the fun part – planting! Choose a variety of flowers that will bloom at different times, ensuring your flower-shaped bed remains colorful and interesting throughout the season. Varying the plant heights can add depth and visual interest.

Remember to water your new flower bed thoroughly and regularly, especially in the first few weeks. Mulching can help to retain moisture, suppress weeds, and provide a neat appearance.

Rustic Hollow Log Flower Bed

A rustic hollow log flower bed is a charming addition to any garden, offering a creative way to repurpose old wood and provide a unique focal point.

Start by sourcing a hollow log. This could be from your own property, or perhaps a local lumber yard or tree removal service could assist. Ensure the log is sturdy enough to withstand weather conditions and is large enough to hold your chosen plants.

Prepare your log for planting. If the log isn’t already hollow, you might need to carve out the center using a chainsaw or other tools. Drill a few holes in the bottom for drainage to prevent waterlogged soil.

Position your log in the desired location in your garden. This could be a border, a corner, or as a centerpiece in a lawn. Fill the hollow center with a high-quality potting mix, enriched with compost for added nutrients.

Choose plants that will complement the rustic nature of the log. Ferns, mosses, and shade-loving flowers can create a woodland aesthetic, while colorful annuals like pansies, marigolds, or petunias can provide a bright contrast.

Remember to water your log flower bed regularly. The wood may absorb some of the moisture, so check the soil frequently to prevent it from drying out. Over time, the log will weather and decay, adding to its rustic charm.

Tile Deck with Built-In Flower Beds

Tile Deck with Built-In Flower Beds

A tile deck with built-in flower beds seamlessly blends hardscaping with landscaping, creating a beautiful and functional outdoor living space.

Start with a plan. Consider the size and shape of your deck, the materials you want to use, and where you want to place your built-in flower beds. Working with a landscape designer or architect may be beneficial for this stage.

Once your plan is complete, you can begin construction. This will involve laying the tile deck and building the flower beds. Materials like stone, brick, or concrete are popular choices for the beds, as they complement the tiles and are durable enough to withstand outdoor conditions.

Consider adding a waterproof lining to your built-in flower beds to prevent water seepage. Drainage holes are also essential to prevent waterlogging.

Once your flower beds are built, fill them with a mix of topsoil and compost, creating a nutrient-rich environment for your plants. Select plants that suit the conditions on your deck. If your deck is sunny, opt for sun-loving plants like lavender, salvia, or marigolds. If it’s shaded, ferns, hostas, or impatiens might be more suitable.

Remember to water your built-in flower beds regularly and trim plants as needed to maintain a tidy appearance. With some care and attention, your tile deck with built-in flower beds can become a beautiful extension of your indoor living space, perfect for relaxing or entertaining.

Side Yard Plant, Flower, and Herb Garden

Side yards are often overlooked and underutilized. With some planning and creativity, you can turn this often-ignored space into a functional and visually pleasing plant, flower, and herb garden.

Firstly, evaluate the space. How much sunlight does your side yard receive? If it’s shaded most of the day, you’ll want to select shade-tolerant plants. If it receives full sun, sun-loving plants are your best choice.

Herbs are a fantastic choice for side yards, as many are hardy and have varied sunlight requirements. Thyme, mint, and parsley will do well in partially shaded areas, while basil, rosemary, and oregano love full sun. They’re also wonderfully fragrant, adding a sensory element to your garden.

For flowers, consider easy-to-grow perennials like hostas or ferns for shady areas. If you have a sunnier side yard, consider daylilies or black-eyed Susans. Incorporating various textures and colors will increase the visual appeal.

Lastly, consider the ground. If your side yard is a narrow passage, it might be beneficial to add a pathway. This can be as simple as a few stepping stones or as elaborate as a brick or gravel path. A path provides a practical element for easy maintenance and adds a touch of charm.

Raised Block Flower and Plant Bed

Raised block flower beds offer many benefits: they provide excellent drainage, reduce back strain, and act as a barrier for pests like slugs and snails. Furthermore, they bring an element of structure to your garden design.

Start by choosing your blocks. Concrete blocks are a popular choice due to their durability and affordability. For a more rustic look, you might consider reclaimed or natural stone blocks.

Next, choose your location. The area should be flat and receive adequate sunlight based on the plants you plan to grow. Use a garden hose or spray paint to mark out the size and shape of your bed.

Once you’ve laid the blocks, you need to prepare your soil. Fill your bed with a mix of topsoil, compost, and other organic matter. This will provide your plants with plenty of nutrients.

When choosing your plants, consider the depth of your bed. Deeper beds can accommodate plants with larger root systems. Layering plants by height can add depth and visual interest to your raised block bed.

Maintenance is relatively simple: regular watering, periodic fertilizing, and keeping an eye out for pests will keep your raised block bed looking its best.

Make a Statement with a Bold, Colorful Flower Bed

A bold, colorful flower bed can be a focal point in your landscape. To achieve this, you need to consider color theory, plant selection, and placement.

Firstly, decide on your color scheme. You could opt for a monochromatic scheme (variations of a single color), a complementary scheme (colors opposite each other on the color wheel), or an analogous scheme (colors next to each other on the color wheel).

Once you’ve chosen your color scheme, select your plants. Incorporate a mix of annuals and perennials to extend the bloom time. Also, consider the height of your plants; tall plants can provide a backdrop for shorter ones, creating a tiered effect.

Placement is crucial when creating a bold, colorful flower bed. Grouping plants of the same color together can create a more significant visual impact than scattering them throughout the bed.

Finally, don’t forget the greenery. Foliage can provide a contrast to the bold colors and offer visual interest even when flowers aren’t in bloom. Plants like hostas or ferns are excellent for this.

Gravel Yard with Plant Bed

Gravel Yard with Plant Bed

A gravel yard with a plant bed can be a low-maintenance and aesthetically pleasing alternative to a traditional lawn. The gravel provides a neutral backdrop that allows your plant bed to shine.

Start by planning your layout. Your plant bed could be a simple border along a fence, a central island, or meandering paths. The size and shape will largely depend on your yard and personal preferences.

Once you’ve marked out your plant bed, remove any grass and weeds from the area. You may want to install edging to prevent the gravel from encroaching on your plant bed.

Before you add the gravel, consider laying down a weed barrier fabric. This can help prevent weeds from growing in your yard and reduce maintenance. Then, spread your gravel. This could be a single type or a mix, depending on your style preference.

For your plant bed, choose plants that complement the color and scale of your gravel. Consider plants with interesting textures or shapes, like ornamental grasses or succulents. If you want color, opt for plants with vibrant flowers or foliage.

Flower Bed with Clay Pots

A flower bed with clay pots adds a touch of rustic charm to your garden. The natural, earthy tones of the clay contrast beautifully with the vibrant colors of flowers.

To start, collect a variety of clay pots. These could be new or old pots, and they can be of different sizes to add visual interest. Consider using broken or chipped pots as well; they can still serve as unique planters.

Next, arrange your pots in the flower bed. You could create a pattern, group them by size, or scatter them randomly. Burying some pots partially in the ground can create a sense of depth.

Once you’re happy with your arrangement, fill your pots with potting soil and plant your flowers. Opt for a variety of species to extend the bloom time.

Maintenance for this type of flower bed includes regular watering and annual replacement of the top layer of soil. Over time, clay pots can weather and crack, adding to their rustic charm.

Flower Bed with Wheelbarrow Planter

Flower Bed with Wheelbarrow Planter

A wheelbarrow planter offers a creative and mobile way to display your favorite blooms. This type of planter can bring a whimsical or rustic element to your garden.

Start by selecting a wheelbarrow. It can be new or used, large or small, depending on your space and the scale of your flower bed. Ensure the wheelbarrow is sturdy enough to hold the weight of the plants and soil.

Next, prepare your wheelbarrow. Drill a few drainage holes in the bottom to prevent waterlogging. Then, fill it with a good-quality potting mix.

When selecting your plants, consider the size of your wheelbarrow. Smaller wheelbarrows might be best suited to small, compact plants like marigolds or pansies. Larger wheelbarrows can accommodate larger plants or a mix of plants.

Position your wheelbarrow planter in your flower bed. It could serve as a focal point, or it could be integrated with other planters or garden features.

Vintage Suitcase Flower Planter Idea

A vintage suitcase can make a unique and charming flower planter, providing a pop of vintage style to your garden.

First, find a vintage suitcase. Thrift stores, flea markets, and garage sales are great places to look. Don’t worry about any scratches or signs of wear; these will only add to its vintage appeal.

Prepare your suitcase by drilling a few holes in the bottom for drainage. Then, line it with a plastic sheet or a landscaping fabric to protect it from moisture.

Next, fill your suitcase with potting mix and plant your flowers. Consider using plants with varying heights and textures to create a visually appealing arrangement.

Finally, position your vintage suitcase planter in your garden. It can serve as a focal point in your flower bed, or it can be combined with other planters for an eclectic look.

Pretty River Rock Flower Bed

A river rock flower bed can add a natural and calming aesthetic to your garden. The smooth, rounded stones can create a pleasing contrast to the softness of your flowers.

Start by outlining the shape of your flower bed. You could choose a simple rectangle or circle, or you could go for a more organic shape. Remove any grass or weeds within your marked area.

Next, lay a weed barrier fabric. This will prevent weeds from growing in your flower bed. Cut holes in the fabric where you want to plant your flowers.

Fill your flower bed with soil, plant your flowers, and then start placing your river rocks. You could cover the entire bed with rocks, or you could use them to create a border or a pathway.

When choosing plants for your river rock flower bed, consider the color of your rocks. Plants with flowers or foliage that contrast or complement the color of your rocks will create a more harmonious look.

DIY Wood Flower and Herb Bed

A DIY wood flower and herb bed is a fun and functional project that can bring a sense of accomplishment and beauty to your garden.

First, select your wood. Cedar is a popular choice for its durability and resistance to rot. The size of your bed will determine the amount of wood you need.

Next, construct your bed. This involves cutting your wood to size and then assembling it with screws or nails. You can make your bed as simple or as intricate as you like. For a simpler project, a rectangular bed is a great choice.

Once your bed is built, position it in your garden. Make sure it’s in a location that receives the appropriate amount of sunlight for the plants you want to grow. Then, fill it with a mixture of topsoil and compost.

When it comes to planting, choose a mix of flowers and herbs. This can provide a variety of colors, textures, and fragrances. Plus, you’ll have the added benefit of fresh herbs for your kitchen.

Round Flower Bed with Pots

A round flower bed with pots can provide a pleasing visual focal point in your garden. The pots add height and structure, while the round shape creates a sense of unity and harmony.

Start by marking out your round bed. This could be a simple circle, or it could be a more elaborate shape like a spiral. Once your shape is marked, remove any grass or weeds from the area.

Next, arrange your pots in the bed. You could place one large pot in the center and smaller pots around it, or you could create a pattern with pots of the same size. Once you’re happy with your arrangement, fill the pots with soil and plant your flowers.

Finally, fill the rest of the bed with soil and plant more flowers. These could be the same as the ones in your pots, or they could be different to create contrast. Low-growing flowers around the edge of the bed can create a border and highlight the round shape.

Maintenance involves regular watering and occasional fertilizing. As with any flower bed, keeping an eye out for pests and diseases will help ensure your round flower bed with pots stays beautiful and healthy.

Romantic Rose and Lavender Garden

Rose and Lavender Garden

A romantic rose and lavender garden is an embodiment of elegance, fragrance, and charm. With roses representing love and lavender signifying devotion, this garden becomes a testament to timeless affection.

Start by selecting different rose varieties, each offering its unique charm. Hybrid teas are famous for their traditional “rose” look, while climbers add vertical interest. Pair these roses with English lavender (Lavandula angustifolia), known for its intense fragrance and lovely purple blooms.

Soil preparation is crucial as both roses and lavender require well-draining soil. Roses thrive in loamy soil while lavender prefers slightly alkaline conditions. You can amend your garden soil with organic matter and coarse sand to improve its structure and pH.

Choose a sunny location as both plants need at least six hours of sunlight a day. A south or west-facing location is ideal, as it provides the afternoon sun that these plants love. Be sure to space your plants well to ensure good air circulation, which can help prevent common fungal diseases.

Finally, a proper watering and fertilization regimen is essential. While roses require regular watering, lavender is more drought-tolerant. Fertilize your roses in early spring, just as the leaf buds begin to swell.

Lush, Magical Flower Garden with Pathway

Flower Garden with Pathway

A lush, magical flower garden with a pathway takes you on a beautiful journey, exploring colors, fragrances, and textures along the way. Creating such a garden requires careful planning and a selection of the right plants.

Start by sketching out your garden design, incorporating the pathway into your drawing. Consider the width of the path, its shape (curvy or straight), and the materials (pebbles, stepping stones, bricks, etc.). The path should guide visitors, drawing their attention to specific highlights of the garden.

When selecting plants, aim for a balance of perennials for consistency, annuals for seasonal color, and shrubs for structure. Don’t forget to include different textures and colors to add depth and intrigue to your garden.

Include features like garden benches, birdbaths, or sculptures along the pathway for visual interest. Lighting can also enhance the magical feeling, whether it’s solar-powered garden lights or string lights hung overhead.

Remember, a lush garden requires regular care. Watering, mulching, pruning, and fertilizing are all part of maintaining the magic of your lush garden.

Antique Bed Frame Flower Bed

Creating a flower bed out of an antique bed frame is a novel and stylish idea, blending the old with the new in a celebration of gardening innovation.

Firstly, identify an appropriate location for your bed frame. Ideally, the spot should have ample sunlight exposure and good soil conditions. If you plan to fill the bed frame directly with soil, it’s necessary to prepare the ground beneath by removing any grass and leveling the surface.

Next, place your bed frame and ensure it is stable and secure. If the frame has slats, you can line it with landscaping fabric or a thick layer of newspaper to prevent soil from falling through. Fill it up with a high-quality potting mix, ensuring good drainage while providing plenty of nutrients.

Choose a mix of flowers that complements the antique look of the bed frame. Consider different heights, colors, and blooming seasons to ensure a visually pleasing display all year round.

Finally, maintain your antique bed frame flower bed by watering the plants regularly, keeping an eye out for pests, and replacing any plants that don’t thrive.

Flower Bed for Small Yards

Designing a flower bed for small yards can be challenging but with smart planning, you can create a garden that looks spacious and vibrant. Here are some strategies you can employ:

Vertical gardening is a fantastic way to maximize space. This can be achieved using climbing plants, wall-mounted planters, or freestanding vertical planters. The vertical aspect draws the eye upwards, creating the illusion of more space.

Choose plants that have a compact growth habit. Dwarf varieties of many popular flowers and shrubs are available, which have all the beauty of their larger counterparts but in a much smaller size.

Incorporate containers or pots into your garden. These can be moved around as needed, allowing you flexibility in design. They also allow you to grow plants that may not be suitable for your garden soil.

Finally, consider a monochromatic color scheme or one with cool colors. This can make the space appear larger and more cohesive.

DIY Vertical Flower Garden Tower

A DIY vertical flower garden tower is a brilliant idea to grow a multitude of flowers without taking up a lot of space. It’s also a creative way to add height and interest to your garden.

To start with, you’ll need a sturdy wire mesh or a similar structure that can hold the weight of soil and plants. It should also allow roots to breathe and water to drain away.

Roll the wire mesh into a cylindrical shape and secure it with wire or cable ties. Ensure it’s stable by placing it on a flat surface or burying a part of it in the ground.

Line the interior with a layer of landscape fabric. This prevents the soil from washing out while still allowing water to drain. Fill your tower with good quality, well-draining potting mix.

Now comes the fun part – planting. Choose a variety of flowers with similar sunlight and water requirements. Make small slits in the landscape fabric and insert your plants.

Water your vertical flower tower thoroughly and provide regular care as per the needs of the plants.

Wood Trellis Vertical Flower Bed

Wood Trellis Vertical Flower Bed

A wood trellis vertical flower bed is a wonderful option for those with limited space, or for anyone who wants to add an element of height and drama to their garden.

Start by selecting a sturdy wooden trellis that fits well in your space. Remember to check the height and width, and ensure that it's made from a weather-resistant material like cedar or redwood.

Next, consider the types of plants you'd like to grow. Vining plants like clematis or climbing roses are excellent choices for a trellis. Some flowering vegetables and fruits, like peas and blackberries, can also be trained to grow up a trellis.

The placement of the trellis is crucial. Most flowering vines need plenty of sunlight to bloom, so place your trellis in a spot where it will receive at least six hours of sun per day. If you're planting directly in the ground, ensure the soil is well-draining and rich in organic matter.

To plant, dig a hole at the base of each trellis panel, place your plant, backfill with soil, and water thoroughly. Guide the vines towards the trellis and gently tie them with garden twine to encourage vertical growth.

Antique Cauldron Flower Bed Design

An antique cauldron flower bed design is a unique way to add character to your garden, turning an ordinary space into an extraordinary one.

Find a suitable cauldron, whether it's a true antique or a replica. It should be robust enough to withstand outdoor conditions and large enough to accommodate your chosen plants.

Prepare your cauldron for planting by drilling drainage holes at the bottom. This prevents waterlogging and root rot. If the cauldron is made of a rust-prone material like iron, consider painting it with a rust-resistant coating.

The choice of flowers will depend on the size of your cauldron and its location. For small cauldrons, opt for compact plants like pansies or petunias. If you have a large cauldron in a sunny location, you can plant a miniature rose bush or vibrant zinnias.

Position your cauldron in a prominent spot to create a focal point. This could be at the center of your garden, at a garden entrance, or at the corner of a patio.

Remember to water and fertilize your plants regularly, and check for signs of pests and diseases.

Pretty Birch Log Plant Bed

A pretty birch log plant bed brings rustic charm and a sense of the natural wilderness to your garden. Here's how you can create your own:

Collect several birch logs, either from your own property or a local source. Make sure you have logs of different lengths and diameters for visual interest.

Arrange these logs in your desired location to form the outer border of your flower bed. The design could be a simple rectangle, a square, or even a curvy free-form shape. Stack the logs to at least two layers high to provide enough depth for your plant roots.

Line the interior of your birch log plant bed with landscape fabric to prevent the soil from escaping and to discourage weed growth. Then, fill the plant bed with a mix of topsoil and compost. This will provide a nutrient-rich environment for your plants.

Choose plants that complement the rustic aesthetic of birch logs. Hardy perennials, ornamental grasses, or woodland flowers would be perfect.

Easy DIY Peony Flower Bed

Creating an easy DIY peony flower bed lets you enjoy the luxurious blooms of these perennials, and their delightful fragrance will be a treat for the senses.

To start, select a location in your garden that gets at least six hours of sunlight each day. Peonies need a lot of light to bloom their best. The soil should be rich and well-draining, as peonies don't like to sit in waterlogged soil.

Next, prepare the soil by removing any weeds or grass and amending it with compost or aged manure. This will improve its fertility and drainage.

Plant your peony tubers in the fall, placing them no more than two inches below the soil surface. If planted too deep, they may not bloom. Space them about three to four feet apart to allow for their mature size.

Water your peonies well after planting, and apply a layer of mulch to protect the tubers from the winter cold. Come spring, you'll be rewarded with lush foliage and stunning blooms.

Remember, peonies are long-lived plants, and they don't like to be disturbed once established. So, choose their location carefully and provide them with the care they need, and they will reward you with their spectacular beauty for many years.

Conclusion

Creating a beautiful and unique flower bed doesn't have to be a daunting task. With the right planning, you can transform any space, big or small, into a lush, vibrant, and captivating flower garden. The key is to understand the needs of your chosen plants and provide them with the right conditions to flourish. Whether you prefer a traditional flower bed or a quirky design using repurposed items, the possibilities are endless. So, go ahead and let your creativity bloom!

13 Comprehensive Back Garden Design Ideas

Your back garden is your private sanctuary, a haven that represents your tastes and lifestyle. If designed thoughtfully, it can provide a great space for outdoor living, fun, and enjoyment. Whether you’re dreaming of lush flower beds, a perfect patio design, or a BBQ area for weekend hangouts, this guide will help you create your ideal back garden layout design. We’ll discuss all elements from garden paths, shade structures, water features to vegetable beds and rock gardens. So, let’s get started with our first step towards a beautiful back garden.

How To Design A Back Garden

The first step in creating a beautiful back garden layout design is planning. Before diving into the design phase, understand your garden’s size, shape, sun exposure, soil type, and the local climate. Also, consider your personal preferences, budget, and time for garden maintenance. Ask yourself, what’s the purpose of the garden? Are you creating a play area for kids, a vegetable garden, or an outdoor dining space? These aspects will shape the overall design of your back garden.

Back Garden Design

Fundamentals Of A Back Garden Design: What You Should Know

Creating an impressive back garden layout design relies on some key design principles:

  • Unity: The design elements should work together to create a harmonious landscape
  • Balance: Achieve equilibrium by arranging plants, structures, and features in a symmetrical or asymmetrical layout
  • Contrast and Harmony: Use contrast to highlight certain elements, and harmony to create a soothing landscape.
  • Color, Form, Line, and Texture: These aesthetic elements can enhance your design. For instance, vibrant flower borders can add a splash of color while a garden trellis or retaining walls can provide interesting forms and lines.

Fundamentals Of A Back Garden Design: What You Should Know

Creating a captivating back garden layout design involves understanding some essential design principles. The first one is the concept of unity. This means all elements in your garden should connect with each other to create a harmonious whole. For instance, if you choose a Mediterranean theme, your plants, outdoor furniture, and decorative elements should reflect this style.

Another principle is balance, which refers to the distribution of visual weight in your garden. This can be symmetrical, where both sides of the garden are a mirror image of each other, or asymmetrical, where balance is achieved through contrast and variety.

Contrast and harmony are essential in a garden design. Contrast can make specific elements stand out and create visual interest. For instance, a colourful flower border against a green lawn creates a striking contrast. Harmony, on the other hand, brings a sense of peace and cohesion to your garden through repeating similar shapes, colours, or textures.

The use of colour, form, line, and texture also plays a critical role in your garden design. You can create a colour scheme with your flowers and foliage, use different plant forms and lines to guide the eye, and introduce various textures to add depth and interest to your garden.

The Importance Soil Plays In A Garden Design

Your garden’s soil is the foundation of your plants’ health, influencing their growth, appearance, and susceptibility to diseases. Therefore, understanding your soil type is crucial in determining the success of your garden design.

The Importance Soil Plays In A Garden Design]

There are three primary soil types – sandy, clay, and loam. Sandy soil drains quickly but doesn’t retain nutrients well, while clay soil is nutrient-rich but has poor drainage. Loam is the ideal soil type as it has a balanced mix of sand, silt, and clay, providing good drainage and nutrient retention.

Before selecting your plants, conduct a soil test to identify your soil type and its pH level. Different plants have different soil and pH preferences. For example, azaleas and rhododendrons prefer acidic soil, while lavender thrives in alkaline soil.

If your soil is not ideal, you can improve its condition by adding organic matter like compost or manure. In case of heavy clay soil, consider creating raised beds for better drainage.

Different Styles Of Back Garden Designs To Choose

Your garden’s style should be an extension of your home’s architecture and your personal taste. Several garden styles can inspire your back garden layout design.

A formal garden style is characterized by symmetry, straight lines, and geometric shapes. This style often features a clear focal point, like a fountain or statue, with paths radiating from it.

An informal garden style has a more natural and casual feel, with curving lines and asymmetrical plantings. This style often includes mixed borders with a variety of plants and a meandering garden path.

A cottage garden, filled with colourful and fragrant flowers, provides a romantic and whimsical atmosphere. Key elements include dense plantings, climbing roses, and functional elements like a potager or herb garden.

An Asian-inspired garden, such as a Japanese Zen garden, focuses on tranquillity and balance, often incorporating water features, stone elements, and carefully pruned plants.

Remember, you’re not limited to one style. You can mix elements from different styles to create your unique garden design.

Why You Should Factor Structure In Your Design

The structural elements in your garden, like pergolas, decks, retaining walls, and garden fencing, contribute to its overall aesthetics and functionality. They create vertical interest, define spaces, provide privacy, and can serve as support for plants.

Structure In Your Garden Design

For instance, pergolas can serve multiple functions. When adorned with climbing plants, they provide shade and create a lush, intimate space for outdoor seating. Similarly, decks can be used for a variety of purposes, from dining areas to an extension of your living space.

Retaining walls are not just functional; they can also be a design feature. They provide an opportunity to introduce different levels in your garden, add seating, or even create plant beds.

Garden fencing doesn’t just demarcate your property; it can also serve as a backdrop for your plants, add privacy, and enhance the aesthetics of your garden.

Garden Design Ideas To Create Scent Provoking Areas

One of the joys of having a garden is to immerse oneself in nature’s fragrances. Creating a scent-provoking garden involves careful selection of aromatic plants and strategic placement.

Start by identifying fragrant plants that thrive in your climate and soil. Consider a variety of plants to ensure a continuous display of fragrance throughout the year. For example, lilacs and roses for spring and summer, while jasmine and gardenias for summer and fall.

Herb gardens are not only useful for culinary purposes, but they also provide delightful scents. Plant herbs like rosemary, thyme, and mint, which release their aroma when brushed against.

Place these aromatic plants near high-traffic areas like entrances, pathways, or seating areas where their fragrance can be appreciated. You can also plant them in containers or raised beds to bring the scent closer to nose level.

Consider night-blooming plants like night jasmine or moonflower for areas where you spend time during the evening. Their intoxicating perfume will enhance your nocturnal garden experience.

Ideas For Creating And Introducing Texture Into Your Back Garden

Texture is an often-overlooked aspect of garden design, yet it can greatly enhance the visual appeal and sensory experience of your space. Texture in the garden comes from various elements – the surfaces of leaves, bark, flowers, as well as hard landscaping materials like decking, patio design, and garden sculptures.

When planning your plantings, consider the texture of their leaves and flowers. A combination of plants with varying textures can add depth and interest to your garden. For instance, the feathery fronds of ferns contrast beautifully with the glossy leaves of hostas, or the spiky foliage of ornamental grasses.

The bark of trees and shrubs can provide year-round textural interest, especially during winter months when the foliage is sparse. For example, the peeling bark of birch trees or the rough, corky bark of some oak species can be fascinating focal points.

Don’t overlook your hardscaping. The smooth surface of a wooden deck contrasts with the rough texture of a stone patio. A gravel path provides a different feel underfoot compared to a paved walkway. Even your garden furniture and accessories can contribute to your garden’s texture. A cast-iron bench or a woven rattan chair each have their own tactile and visual qualities.

Lastly, remember to consider the play of light and shadow in your garden, which can highlight or soften textures, creating different moods at different times of the day or year.

Things To Consider When Creating A Pathway

Creating a pathway in your back garden can greatly enhance its functionality and aesthetics. It can guide your visitors, provide easy access to different parts of your garden, and add structure and flow to your landscape.

Creating A Pathway In Garden

Start by considering the purpose and location of your pathway. A pathway leading to a frequently used area like a shed or vegetable garden should be practical and sturdy, whereas a pathway through a flower border or a woodland garden can be more informal and meandering.

The choice of material for your pathway should blend with the overall style of your garden. For a formal garden, consider using brick or stone pavers, while gravel, bark mulch, or stepping stones may suit a casual garden. If sustainability is a concern, reclaimed or recycled materials can be an excellent choice.

Don’t forget about width and accessibility. A main pathway should be wide enough to accommodate two people walking side by side or a wheelbarrow. Smaller paths can be narrower but should still allow easy passage.

Add interest to your pathway with plants that spill over the edges, such as creeping thyme or alyssum. Lighting along the pathway can add a magical touch at night and improve safety.

Establishing Focal Points

Focal points are essential elements in garden design. They draw the eye, provide interest, and even help guide visitors through the garden. A focal point can be anything eye-catching – a striking plant, a sculpture, a water feature, a beautiful seating area, or even an attractive view.

When deciding on a focal point, consider its size, shape, color, and texture. It should stand out, but also harmonize with the overall design and style of your garden. Remember that a focal point doesn’t have to be large to be effective – a brightly colored cushion on a bench or a cluster of vibrant tulips can catch the eye.

Position your focal point strategically. It could be at the end of a pathway, in the center of a lawn, or in a corner where it’s partially hidden, inviting exploration. If your garden is large, you may need several focal points, each visible from different vantage points.

Be mindful not to overcrowd your garden with too many focal points, as this can create visual confusion. The key is to create a sense of balance and rhythm, with each focal point leading naturally to the next.

Creating Borders: What You Should Know About Garden Border Design

Creating a garden border is a wonderful way to showcase your plants and define different areas in your garden. Designing a successful border involves careful planning and consideration of several factors.

Garden Border Design

First, consider the location and size of your border. A sunny border will suit plants that thrive in full sun, while a shady border opens up opportunities for shade-loving species. The size of your border will determine how many plants you can accommodate and their spacing.

The choice of plants for your border should consider their height, color, texture, and blooming season. Typically, taller plants go at the back, medium-sized ones in the middle, and shorter ones at the front. However, you can break this rule for a more natural, dynamic look.

A successful border also considers color schemes. You might choose a monochromatic scheme for a serene look or a complementary color scheme for a vibrant display.

Remember to stagger your plants’ bloom times to ensure continuous interest throughout the seasons. Lastly, consider maintenance needs. Perennials may require less maintenance than annuals, but their appearance changes throughout the year.

Containers: How To Best Use Them And What You Should Know

Container gardening is a versatile and flexible approach that can add an extra dimension to your back garden layout design. It allows you to grow a variety of plants, including flowers, herbs, vegetables, and even small trees.

Container gardening

When choosing containers, consider their size, material, and drainage. The container should be large enough to accommodate your plant’s growth. Most plants need containers with drainage holes to prevent waterlogging.

The material of your container also matters. Terracotta pots are beautiful and breathable, but they can dry out quickly. Plastic pots retain moisture well but can overheat in the sun. Metal and glass containers can create striking visual effects, but they may not be suitable for all plants.

Arranging your containers in groups of varying heights and sizes can create a visually pleasing display. Alternatively, a single, large container can serve as a focal point. Remember to consider the sun’s movement and place your containers where your plants will receive the appropriate amount of sunlight.

Introducing Water In Your Garden: Your Options

Water can be a wonderful addition to your back garden, providing a sense of tranquillity and attracting wildlife. There are many ways to introduce water into your garden, depending on your space, budget, and preference.

Water In Your Garden

A garden pond can be a delightful feature, hosting a variety of water plants, fish, and attracting birds and insects. A pond can be any size, but ensure it has shallow edges for wildlife to enter and exit.

A water fountain or a water wall can add the soothing sound of running water to your garden. They can serve as focal points and can fit even in a small garden or a patio.

A birdbath is a simple way to provide water for

birds and can also serve as a decorative element. You can choose from various styles to match your garden’s design.

Alternatively, a rain garden is an eco-friendly way to manage rainwater runoff. It’s a sunken area planted with native plants that can tolerate wet conditions.

Remember, any water feature requires regular maintenance to keep it clean and safe for wildlife.

The Benefits Of Incorporating Raised Beds

Raised beds are an excellent addition to any back garden, offering a multitude of benefits. They provide a well-draining, fertile environment for your plants, improve accessibility, and can add structure to your garden layout.

Raised beds warm up quicker in the spring, giving you a head start on the growing season. They also offer better drainage than in-ground beds, making them suitable for plants that don’t like waterlogged soil.

If mobility is an issue, raised beds can be a godsend. They can be built at a height that reduces the need for bending, making gardening tasks more comfortable. If space is limited, consider vertical planters for a productive, space-saving solution.

From a design perspective, raised beds can add structure to your garden. They can be made from various materials, including wood, stone, or metal, each lending a different aesthetic. They can be arranged in formal geometric patterns for a classic look or in more free-form shapes for a modern, organic feel.

Raised beds can host a wide range of plants, from vegetables and herbs to flowers and shrubs. They’re also excellent for children’s gardens, providing a clearly defined area for them to plant and nurture their own plants.

Conclusion

Designing a back garden can be a creative, rewarding endeavor. Each garden is a unique reflection of the personal tastes, needs, and lifestyle of its owners. The key to creating a successful design lies in thoughtful planning, consideration of the garden’s purpose and potential users, and the selection of suitable plants and materials.

In this comprehensive guide, we’ve discussed the fundamental principles of garden design, the role of soil, and the importance of structure and texture. We’ve explored different styles of gardens, from classical and formal to modern and naturalistic, and offered tips on how to create appealing scent-provoking areas and pathways.

We’ve also examined ways to establish focal points and create borders, how best to use containers, and the options for introducing water into your garden. Finally, we’ve outlined the many benefits of incorporating raised beds into your garden layout.

Remember, good garden design evolves over time. It allows room for growth and change. So, be prepared to adapt and tweak your plans as you go along. After all, the journey can be as enjoyable as the destination. Happy gardening!

21 Vegetable Garden Layout Ideas: Food For Thought

Vegetable gardening is a rewarding endeavor that can provide abundant, nutritious, and organic homegrown produce right from your kitchen’s reach. But it requires more than just sowing vegetable seeds and hoping for the best. It demands strategic planning, careful selection of vegetable varieties, and efficient techniques such as vertical gardening and the use of raised beds. This comprehensive guide will provide you with 22 vegetable garden layout ideas, with a focus on efficient use of space, pest control, seasonal vegetables, fertilization techniques, and much more. Whether you’re a novice or a seasoned gardener, you’re sure to find food for thought here.

Our discussion will range from maximizing the space in your garden, incorporating companion planting, to exploring vegetable garden layouts for small spaces. We’ll delve into carrot cultivation, bell pepper varieties, root vegetable gardening, leafy greens spacing, zucchini planting, and broccoli cultivation, among others. We’ll also cover the best practices for vertical vegetable gardening and offer some tips on tomato growing, cucumbers in containers, and eggplant care. Get ready to embark on a deep dive into the world of vegetable gardening!

How to Maximize Space in Your Vegetable Garden Layout

Optimizing space can be quite a challenge for many gardeners, particularly those with small yards or balconies. But with some clever ideas and a bit of planning, you can turn even the smallest of spaces into a thriving vegetable garden.

Vegetable Garden Layout

  1. Raised Beds: Raised beds are perfect for space maximization. They can provide excellent soil conditions, ease of maintenance, and help to prevent certain pest problems. Moreover, they offer better control over soil composition, and can accommodate a wide variety of vegetable varieties.
  2. Vertical Gardening: When ground space is limited, why not go upwards? Vertical gardening is an effective way to grow more in less space. This technique is perfect for vining crops like cucumbers, tomatoes, and peas which can be trained to grow upwards on trellises or fences.
  3. Kitchen Garden: A kitchen garden is typically a small, easily accessible garden located near your kitchen. By growing your most-used cooking herbs and vegetables near your kitchen, you maximize convenience while making efficient use of space.
  4. Container Gardening: Don’t have a lot of ground space? Try container gardening. This method allows you to move your plants around as necessary to provide them with optimal sun exposure.
  5. Succession Planting: This involves planting one crop immediately after another has been harvested. It’s a practical way to maximize your garden’s output and keep it productive throughout the growing season.

Incorporating Companion Planting in a Vegetable Garden

Companion planting can not only help to maximize the utilization of space but can also aid in pest control and boost crop productivity. Here are some companion planting ideas to consider:

  1. Tomato and Basil: Basil is known to improve the growth and flavor of tomatoes. It also helps to deter pests like flies and mosquitoes.
  2. Carrots and Radishes: Radishes mature quickly and can be harvested before the slower-growing carrots need the space. Plus, radishes can help to loosen the soil for the deeper-rooted carrots.
  3. Beans and Corn: Corn stalks provide natural trellises for beans to climb, while beans fix nitrogen in the soil, improving its fertility for the corn.

Best Practices for Vertical Vegetable Gardening

Vertical gardening is a creative way to increase your vegetable yield per square foot. It’s particularly useful for crops like beans, tomatoes, cucumbers, and peas. Here are some best practices to maximize its effectiveness:

Vertical Vegetable Gardening

  1. Choose the Right Structures: Depending on your space and the types of vegetables you want to grow, select the most suitable vertical structures. These might include trellises, cages, netting, or even repurposed items like ladders or pallets.
  2. Select Suitable Plants: Not all plants are suitable for vertical growth. Choose vining and climbing plants that can naturally grow upwards.
  3. Provide Adequate Support: Ensure that your vertical structures can withstand the weight of your plants, especially when they are fully grown and bearing fruit.
  4. Ensure Enough Light: Vertical gardening requires careful planning to ensure that all plants receive adequate sunlight. Rotate your plants as necessary to ensure equal sun exposure.

Vegetable Garden Layout Ideas for Small Spaces

Don’t let a lack of space discourage you from growing your own vegetables. Here are some innovative ideas for small spaces:

  1. Container Gardening: Whether it’s a pot, a hanging basket, or a window box, almost any container can be a mini vegetable garden. Try growing radishes, spinach, and salad greens in containers.
  2. Vertical Gardening: Vertical gardens can be as simple as a hanging basket with trailing tomatoes or as complex as a wall-mounted system with built-in irrigation.
  3. Square Foot Gardening: This method involves dividing a growing area into small square sections, typically 1 foot per side. The aim is to grow a variety of crops in each square foot of garden.
  4. Spiral Gardens: A spiral garden is a type of raised bed that spirals upwards, providing a lot of planting space on a small footprint.

What are the Best Vegetables for a Raised Bed Garden?

Raised beds offer a multitude of advantages from improved soil conditions to superior pest control. They’re particularly effective for cultivating certain vegetable varieties that thrive in well-drained soil and an elevated environment. Let’s explore some suitable options:

Root Vegetables

  1. Root Vegetables: Carrots, radishes, and beets are perfect for raised beds. The loose and fertile soil allows their roots to expand freely, leading to healthy, well-formed vegetables.
  2. Leafy Greens: Spinach, lettuce, kale, and other leafy greens can benefit from the enriched soil of raised beds. Their shallow roots enjoy the improved soil aeration, which encourages vigorous growth.
  3. Tomatoes: Tomatoes thrive in the warm soil of raised beds. The enhanced drainage helps prevent problems such as root rot and fungal diseases, common challenges in tomato cultivation.
  4. Bell Peppers: Bell peppers, similar to tomatoes, favor the warmer soil conditions in a raised bed. They also benefit from the excellent drainage and reduced pest pressure.
  5. Zucchini and Squash: These plants enjoy the loose, fertile soil of a raised bed. The added benefit of improved air circulation helps prevent mildew, a common problem with these crops.

Key Elements For An Effective Vegetable Garden Design

Designing a vegetable garden is not just about aesthetics; it’s about functionality. A well-thought-out layout can significantly enhance your garden’s productivity, ease of maintenance, and overall success. Here are some essential elements to consider:

  1. Sunlight: All vegetables need sunlight, but some need more than others. Place your sun-loving plants like tomatoes and peppers in the sunniest part of your garden.
  2. Water Access: Efficient irrigation methods are critical to a productive garden. Consider the proximity to a water source when planning your garden layout.
  3. Soil Quality: Different vegetables have different soil requirements. Plan your layout with soil quality in mind, grouping together plants with similar soil needs.
  4. Pest Control: Consider integrating pest-resistant plants or those that repel specific pests. Also, place susceptible plants closer to your home for better monitoring.
  5. Accessibility: Ensure all plants are easily reachable for weeding, harvesting, and other care. Raised beds and vertical structures can improve accessibility.

Creating a Vegetable Garden Pathway

Garden pathways not only add aesthetic appeal but also provide practical functionality by giving you easy access to all your plants for watering, weeding, and harvesting. Here are some tips for creating effective garden pathways:

  1. Width: Ensure your pathways are wide enough to accommodate a wheelbarrow, which is useful for moving compost or harvested vegetables.
  2. Material: Choices range from mulch and gravel to stepping stones and bricks. Consider your garden style, maintenance preference, and budget when deciding.
  3. Edging: Edging your pathway with stones, bricks, or wood can help keep your pathway material in place and prevent it from spilling into your garden beds.
  4. Maintenance: Keep your pathways clear of overhanging plants and debris to ensure easy access and prevent slips or trips.

Vegetable Garden Layout Ideas for Large Spaces

If you’re fortunate to have a large space for your vegetable garden, you can incorporate a variety of elements to create a highly productive and aesthetically pleasing layout. Here are a few ideas:

  1. Multiple Raised Beds: You can set up several raised beds with different vegetable varieties in each. The beds could be arranged in a grid pattern for easy access.
  2. A Central Pathway: A central pathway leading to a focal point like a statue, a pergola, or a bench can add a sense of structure and visual appeal.
  3. Dedicated Areas: You could designate specific areas for different types of plants—root vegetables in one section, leafy greens in another, and herbs in yet another area.
  4. Perennial Borders: Planting perennial vegetables or herbs around the border of your garden can provide a beautiful, edible border that returns year after year.
  5. A Greenhouse or Potting Shed: If you have the space, consider adding a greenhouse or potting shed for starting seeds, storing tools, and extending your growing season.

How Can Crop Rotation Improve Your Vegetable Garden?

Crop rotation is a traditional technique that can dramatically enhance your garden’s productivity and health. It involves changing the location of specific crops each year to prevent the build-up of pests and diseases and to improve soil fertility. Here’s how it can benefit your vegetable garden:

  1. Pest and Disease Control: Many pests and diseases are specific to certain plants. By rotating crops, you can disrupt the life cycle of these pests and reduce disease incidence.
  2. Soil Fertility: Different crops have different nutrient requirements. By rotating crops, you can help balance the nutrient demands on your soil.
  3. Weed Management: Some crops, like densely planted potatoes or squashes with large, shading leaves, can help suppress weed growth. Including these in your rotation can help manage weeds.
  4. Increased Yields: With healthier soil and reduced pest and disease pressure, crop rotation can help increase your vegetable yields.
  5. Biodiversity: Crop rotation increases the diversity of plants in your garden, which can attract beneficial insects and improve the overall health and resilience of your garden.

Best Time of Year to Plan Your Vegetable Garden

Determining the ideal time to plan your vegetable garden is an essential aspect of gardening that is deeply intertwined with your local climate, the vegetables you intend to grow, and their specific growing seasons. Here’s a more detailed look:

  1. Early Spring: The best time to start planning is often early spring, especially for cool-season crops such as peas, lettuce, and radishes. This period allows you to prepare the soil, plan your layout, and start planting early for an extended growing season.
  2. Late Winter: For warmer climates or for gardeners who start their plants indoors, planning can begin as early as late winter. At this time, you can order vegetable seeds and prepare indoor seed-starting setups for vegetables like tomatoes and bell peppers that need a long growing season.
  3. Autumn: Autumn is an excellent time to plan for the next year, especially for incorporating improvements based on the current year’s experiences. This is also a good time to prepare your beds and enrich your soil with compost or other organic matter so it’s ready for spring planting.

Succession Planting: Maximizing Your Harvest

Succession planting is an efficient gardening method that helps to maximize your harvest and ensure a steady flow of vegetables throughout the growing season. It involves following one crop with another in the same space, based on their maturation times and seasonal suitability. Here’s how to apply this technique:

  1. Quick-Maturing Crops: Start with vegetables that have short maturity times, such as radishes or spinach. Once you harvest these, you can plant the next crop.
  2. Seasonal Vegetables: Follow the first crop with a vegetable suitable for the coming season. For example, after harvesting a spring crop of lettuce, you could plant heat-tolerant veggies like tomatoes or cucumbers.
  3. Late Season Crops: In late summer or early autumn, plant cool-season crops that can tolerate or even thrive in the cooler temperatures of autumn.
  4. Cover Crops: After your last vegetable harvest, consider planting a cover crop that can improve soil fertility and structure over the winter.

Vegetable Garden Layouts: Traditional vs. Modern Approaches

When planning your vegetable garden layout, you can opt for traditional methods, modern techniques, or a blend of both. Each approach has its unique benefits and is suited to different gardening goals and conditions. Here’s a comparison:

  1. Traditional Layouts: These often involve large, in-ground rows with wide pathways between them. This method, while not space-efficient, works well for large gardens or for growing large quantities of a few types of vegetables.
  2. Modern Approaches: These include methods like raised bed gardening, square foot gardening, and vertical gardening. These techniques focus on maximizing production in smaller spaces, improving soil conditions, and reducing labor.
  3. Combining Approaches: Many gardeners find a blend of traditional and modern approaches suits their needs best. For instance, you could use raised beds for intensive planting of salad greens while maintaining larger, traditional rows for sweet corn or pumpkins.

How to Layout Your Vegetable Garden for Optimal Growth

The layout of your vegetable garden can significantly influence the health and productivity of your plants. From sunlight exposure to companion planting, several factors contribute to optimal growth. Here are some crucial considerations:

  1. Sunlight: Most vegetables require full sun (at least 6-8 hours of sunlight a day). Place your garden where it will get ample sun, and arrange your plants so that taller ones don’t shade shorter ones.
  2. Spacing: Proper spacing is critical to ensure that plants have enough room to grow and access nutrients and water. Overcrowding can lead to stunted growth and increased disease problems.
  3. Accessibility: Arrange your garden so all plants are easily accessible for care and harvesting. Raised beds or planters can help with accessibility, particularly for gardeners with physical limitations.
  4. Companion Planting: Some plants grow better together than alone. Research companion planting to maximize your garden’s potential.

Choosing the Right Vegetables for Your Climate

Different vegetables have different climate requirements, and choosing plants that are well-suited to your local conditions is key to a successful garden. Here’s how to make climate-smart choices:

  1. Know Your Climate Zone: In the U.S., the USDA Plant Hardiness Zone Map is a useful tool for understanding your local climate conditions. Many seed packets and plant descriptions provide zone information to guide your choices.
  2. Consider the Season: Within your general climate zone, consider the specific conditions of different seasons. Cool-season vegetables like broccoli and spinach prefer cooler temperatures and can be grown in spring or fall in many regions. Warm-season vegetables like tomatoes and peppers need warm temperatures and lots of sun, and are typically grown in summer.
  3. Experiment: Don’t be afraid to try different varieties and see what works best in your garden. Many vegetables have varieties that are bred to be more tolerant of certain conditions like heat, cold, or specific diseases.

Why You Should Consider a Perennial Vegetable Garden

A perennial vegetable garden, filled with plants that return year after year, can offer several benefits over a traditional annual vegetable garden. Here’s why:

  1. Lower Maintenance: Once established, perennial vegetables typically require less care than annuals. They don’t need yearly planting and often have fewer pest and disease problems due to their established root systems and overall resilience.
  2. Extended Harvest: Many perennial vegetables have an extended harvest period, allowing you to enjoy their bounty over many weeks or even months. Asparagus, for instance, can be harvested over 4-6 weeks in the spring, while rhubarb can often be picked from spring to fall.
  3. Soil Health: Perennials help improve soil health by reducing erosion and adding organic matter. Their deep roots break up the soil, improving its structure and water-holding capacity.
  4. Increased Biodiversity: Including perennials in your vegetable garden can increase biodiversity, attracting beneficial insects and birds, which can help control pests.

How Does Soil Type Affect Vegetable Growth?

Soil type can significantly impact vegetable growth, affecting everything from how well roots can penetrate the soil to how much water and nutrients are available to plants. Here’s a closer look:

Best Soil For Graden

  1. Clay Soil: Clay soils are nutrient-rich but have poor drainage and can be hard for roots to penetrate. Adding organic matter can improve their texture and fertility.
  2. Sandy Soil: Sandy soils drain well but don’t hold water and nutrients effectively, requiring more frequent watering and fertilizing. Here too, adding organic matter can help improve water and nutrient retention.
  3. Loamy Soil: Loam, a balanced mix of sand, silt, and clay, is often considered the ideal soil type for vegetable gardens. It combines good drainage, excellent water-holding capacity, and high fertility.
  4. pH Levels: Soil pH affects nutrient availability. Most vegetables prefer slightly acidic to neutral soil (pH 6.0-7.0). A soil test can determine your soil’s pH and nutrient levels and provide recommendations for amendments if needed.

Planning Your Vegetable Garden Layout Around Water Access

Water access is a critical aspect to consider when planning your vegetable garden layout. Efficient water use can save time and resources, and contribute to healthier plants. Here are some factors to consider:

Vegetable Garden Layout Around Water Access

  1. Proximity to Water Source: Place your garden as close as possible to a water source to make watering easier. Consider installing a rain barrel to collect and store rainwater.
  2. Drip Irrigation: Drip or soaker hose systems deliver water directly to the soil around your plants, reducing water waste and preventing diseases caused by wet foliage. They can be laid out according to your garden’s specific design and needs.
  3. Water-Wise Plants: Consider planting drought-tolerant vegetables, or grouping plants with similar water needs together, to make watering more efficient.
  4. Mulch: Mulching your garden can help conserve water by reducing evaporation from the soil surface. It also helps control weeds that compete with your vegetables for water.

Potager Gardens: Combining Beauty and Function

A potager garden, or a kitchen garden, is a way of growing vegetables that combines the productivity of a traditional vegetable garden with the beauty and creativity of a flower garden. Here’s more about this concept:

Potager Gardens

  1. Design: Potager gardens are often geometric and symmetrical, with a variety of shapes and sizes of beds. They may include paths, trellises, and other architectural features.
  2. Variety: These gardens incorporate a wide variety of plants, including vegetables, herbs, fruits, and flowers. The mix can create a vibrant and attractive display.
  3. Accessibility: Potagers are usually located close to the kitchen for easy access. The design is meant not just for beauty but also for convenience when harvesting.
  4. Year-Round Interest: By including plants with different growth times and lifespans, you can maintain visual interest in the garden throughout the year, while also enjoying a constant supply of fresh produce.

Why is Spacing Important in a Vegetable Garden Layout?

Proper spacing in a vegetable garden is more than a matter of aesthetics. It plays a crucial role in the health and productivity of your plants.

  1. Disease Prevention: Adequate spacing allows air to circulate freely between plants, reducing the risk of fungal diseases. Vegetables packed too tightly can create a humid environment that promotes the spread of disease.
  2. Access to Sunlight: Each plant in your garden needs a certain amount of light to perform photosynthesis effectively. If plants are too close together, they can end up shading each other, leading to poor growth or lower yields.
  3. Nutrient Availability: Overcrowding can lead to fierce competition for nutrients in the soil. Properly spaced plants have a better chance of getting the nutrients they need to thrive.
  4. Pest Control: Pests can spread more easily in gardens where plants are too close together. Spacing plants correctly can help limit the spread of pests from one plant to another.

Organic Vegetable Gardening: Is it Worth the Effort?

For many gardeners, the decision to grow an organic vegetable garden is driven by a desire for healthier, tastier produce, and a more sustainable way of life. But is it worth the effort? Here are some points to consider:

  1. Improved Taste and Nutrient Content: Many gardeners report that organically grown vegetables have a superior taste compared to conventionally grown ones. Some studies also suggest they may have higher nutrient levels.
  2. Health and Environmental Benefits: Organic gardening eliminates the use of synthetic pesticides and fertilizers, which can be harmful to humans, beneficial insects, and the broader environment.
  3. Soil Health: Organic methods often improve soil health by promoting a diverse microbial community and adding organic matter, which can enhance soil structure, fertility, and water-holding capacity.
  4. Pest and Disease Management: While organic gardening does not guarantee freedom from pests and diseases, practices like crop rotation, companion planting, and encouraging beneficial insects can help manage these problems in a sustainable way.

Planning a Year-Round Vegetable Garden

A year-round vegetable garden can provide fresh produce no matter the season. Here’s how to plan for it:

  1. Understanding Your Climate: Know your region’s growing season and climate conditions. Some vegetables thrive in cooler temperatures, while others need the warmth of summer.
  2. Choosing the Right Vegetables: Opt for a mix of seasonal vegetables that can provide a harvest throughout the year. Spring might see a surge of leafy greens like spinach and lettuce, while summer might bring tomatoes and cucumbers, and fall could yield squash and pumpkins.
  3. Succession Planting: This technique involves planting a new crop as soon as the previous one is harvested. This maximizes garden productivity and keeps your garden producing all season long.
  4. Extend the Growing Season: Use techniques like cold frames, greenhouses, or row covers to protect plants from frost, enabling you to grow vegetables even in cooler seasons.

Understanding the Benefits of a Well-Planned Vegetable Garden

A well-planned vegetable garden offers a host of benefits beyond the production of fresh, homegrown produce.

  1. Maximizes Space: A good layout can help you get the most out of even a small garden space, enabling you to grow a surprising amount of food.
  2. Increases Yields: Planning your garden can help you increase yields by making efficient use of sunlight, soil nutrients, and water.
  3. Reduces Labor and Costs: An effective garden plan can reduce labor and costs by grouping plants with similar needs together, minimizing waste and unnecessary effort.
  4. Enhances Beauty: A well-planned vegetable garden can be as visually pleasing as any flower garden, providing aesthetic enjoyment along with practical benefits.

Conclusion

The art and science of vegetable gardening incorporate various elements from garden layout and design to understanding plant growth patterns, nutritional needs, and environmental preferences. The focus, however, is not only on growing your own organic, nutritious food but also on the pleasure derived from this deeply satisfying activity.

A well-thought-out vegetable garden layout considers elements such as space maximization, pest control, efficient irrigation, and appropriate fertilization techniques. It takes into account the unique characteristics of various vegetable varieties, from leafy greens to heirloom vegetables and from root crops to vining plants. The layout should also consider the changing needs of seasonal vegetables, and the specific growth requirements of each variety, from tomato growing to carrot cultivation, and bell pepper varieties to zucchini planting.

Implementing a detailed plan for your vegetable garden also involves choosing between traditional and modern approaches, from the practicality of raised beds to the innovative technique of vertical gardening. Whether it’s considering the benefits of companion planting, crop rotation, succession planting, or understanding the specific nuances of cultivating certain vegetables, there is much to learn and implement.

Creating and maintaining an organic vegetable garden is an effort worth undertaking, with benefits that extend beyond the kitchen to the environment and your overall well-being. It is a space where you can witness the beauty of nature’s cycle from vegetable seeds to harvest, and experience the joy of nurturing life.

In essence, a vegetable garden, whether large or small, in the backyard or in containers on a balcony, is a living testament to the miracle of growth. It is a place that provides not only food but also serenity, joy, and the rewarding satisfaction of a bountiful harvest. Happy gardening!

18 Raised Garden Bed Layout Ideas: A Complete Guide

Raised bed gardens have become increasingly popular among gardeners and landscapers. Their unique design allows gardeners to create an optimal environment for their plants, while also allowing for efficient use of space. The raised bed garden layout ideas covered in this guide will help you optimize your garden space, improve your soil composition, and streamline your garden maintenance. From the beginner DIY raised beds enthusiast to the experienced vegetable garden cultivator, this guide has something for everyone.

The key to a successful raised bed garden lies in thoughtful planning and design. You’ll need to consider bed shapes and sizes, planting layout, irrigation systems, and sunlight optimization. But don’t be overwhelmed, as we’ll delve into each of these topics, providing practical gardening tips to help you create a garden that not only thrives, but also beautifully complements your home and lifestyle.

Let’s dive into the world of raised bed garden layout ideas, where we’ll explore various design aspects including raised bed construction, companion planting, pest prevention, and crop rotation. We will even touch on raised bed kits, a convenient solution for those looking for a hassle-free start to their raised bed gardening journey.

Understanding the Basics of Raised Bed Gardening

Raised bed gardening is an excellent way to grow your plants in a controlled environment. They’re particularly beneficial for growing a vegetable garden, where soil composition and plant spacing are crucial.

What is a Raised Bed Garden?

A raised bed garden refers to a gardening method where the soil level is higher than the surrounding ground level. It involves enclosing the soil within a structure made of materials like wood, stone, or metal. A key advantage of raised beds is that they provide excellent drainage, making them ideal for areas with heavy clay soil or poor drainage.

Benefits of Raised Bed Gardening

Raised bed gardening offers several advantages over traditional in-ground gardens:

  • Control over soil composition: With raised beds, you have full control over the soil your plants grow in. You can customize the soil to the specific needs of your plants, resulting in healthier, more productive crops.
  • Ease of maintenance: Raised beds are typically easier to maintain than traditional gardens. They’re easier to weed, water, and harvest from due to their elevated design.
  • Pest prevention: Raised beds can provide an additional layer of protection against pests. Some pests, like certain species of slugs and snails, find it difficult to climb the walls of raised beds.
  • Crop rotation: Raised beds make it easier to practice crop rotation, an important strategy for maintaining soil fertility and preventing diseases.

Designing A Raised Bed Garden – What To Consider

A well-designed raised bed garden not only maximizes your yield but also creates an attractive landscape feature. Here are some factors to consider during the design process.

Raised Bed Garden

Garden Layout

Your garden layout will greatly depend on the space available, sunlight, and the types of plants you wish to grow. Consider making your raised beds no wider than 4 feet. This allows you to reach the center of the bed from either side, making planting and maintenance easier.

Bed Shapes and Sizes

The bed shape and size will depend on your personal preferences, available space, and the types of plants you want to grow. While rectangular beds are most common, you can also consider other shapes like L-shaped, U-shaped, or circular beds for a unique touch.

Soil Composition

The success of your plants largely depends on the soil they grow in. A blend of topsoil, compost, and other organic matter typically works well for most plants.

Sunlight Optimization

Take note of the sun’s path across your garden and position your beds in a way that they get at least 6 hours of sunlight each day.

Irrigation System

An efficient watering system is crucial for the success of your raised bed garden. Drip irrigation systems are particularly effective for raised beds, ensuring that the water reaches the plant roots, minimizing water wastage, and reducing the likelihood of disease.

Raised Bed Layouts for Herbs and Veggies

Selecting a planting layout for your raised beds can significantly influence your garden’s productivity. Depending on what you wish to grow, here are some layout ideas for herbs and vegetables:

  1. Square foot gardening: This method involves dividing your raised bed into square foot sections and planting different crops in each section. This method is excellent for growing a variety of veggies in a small space.
  2. Row planting: This traditional planting layout involves planting your crops in straight lines, which makes maintenance and harvesting easier.
  3. Triangle planting: In this method, plants are arranged in triangles rather than rows. This is a more efficient layout as it allows you to fit more plants into your raised bed.

Maximizing Small Spaces: Vertical Gardening with Raised Beds

When space is at a premium, vertical gardening can be a game-changer. Vertical gardening involves growing plants on a vertically inclined surface. This can be achieved by adding trellises, cages, or poles to your raised beds to support climbing plants like beans, tomatoes, and cucumbers.

Vertical Gardening

Incorporating Companion Planting in Your Raised Bed Layout

Companion planting refers to the practice of planting different crops in close proximity for mutual benefit. It can enhance pest control, improve pollination, maximize space, and increase crop productivity. For instance, planting basil with tomatoes can help deter pests and enhance the flavor of the tomatoes.

Efficient Watering and Irrigation For Raised Beds

Raised beds tend to dry out faster than in-ground gardens due to their enhanced drainage, making efficient watering crucial. Consider setting up a drip irrigation system for your raised beds, which delivers water directly to the root zone, minimizing evaporation and saving water.

Maximizing Small Spaces: Vertical Gardening with Raised Beds

Gardening in small spaces doesn’t mean you have to limit your plant selection or yield. In fact, vertical gardening can be an innovative and efficient solution when garden space is restricted. It allows you to cultivate a wide variety of plants by maximizing the use of vertical space.

Understanding Vertical Gardening

Vertical gardening is a method of growing plants upward rather than spreading them out horizontally. This practice involves the use of various structures to support this vertical growth, such as trellises, cages, towers, or wall-mounted containers. Raised beds and vertical gardening complement each other exceptionally well, with the raised beds providing a solid base from which plants can grow upward.

Vertical Gardening and Raised Beds: A Perfect Pair

The combination of vertical gardening with raised beds offers numerous benefits. Firstly, it allows for the cultivation of climbing plants such as beans, tomatoes, and cucumbers without them spreading across your garden and taking up precious horizontal space. Secondly, vertical structures can provide shade for more delicate plants in your raised bed, protecting them from the midday sun. Lastly, vertical gardening with raised beds also improves air circulation, reducing the risk of fungal diseases.

Practical Tips for Vertical Gardening in Raised Beds

Starting with vertical gardening in your raised beds can be a simple process. Choose the right structures based on what you plan to grow. For instance, a trellis would be suitable for beans and cucumbers, while cages might work best for tomatoes. Ensure the structures are sturdy and can handle the weight of the plants at full growth. Also, remember to install the structures early, ideally at the time of planting, to avoid disturbing the plant roots later on.

Incorporating Companion Planting in Your Raised Bed Layout

Companion planting is a gardening technique that capitalizes on the beneficial interactions between different plant species when they are grown together. When incorporated into your raised bed layout, it can lead to enhanced garden health and productivity.

Companion Planting in Your Raised Bed

The Concept of Companion Planting

The basic idea behind companion planting is that certain plant species can benefit from being grown near each other. These benefits might include enhanced growth, improved flavor, or increased resistance to pests and diseases. Companion planting also allows for more efficient use of space, as plants with different growth habits and rates can coexist harmoniously.

Companion Planting in Raised Beds: An Ideal Match

Raised beds lend themselves perfectly to companion planting. With their defined boundaries and excellent soil control, raised beds allow for precise plant arrangement based on the principles of companion planting. For instance, you could pair plants with different nutrient needs together to prevent them from competing for the same nutrients in the soil.

Practical Tips for Companion Planting in Raised Beds

When planning your raised bed layout with companion planting in mind, it’s essential to understand the specific needs and characteristics of your plants. For example, some plants might be good companions because they deter pests that typically bother the other plant. Marigolds, for instance, are often planted with tomatoes because they can repel harmful nematodes. It’s also worth noting that some plants should not be grown together, like beans and onions, as they can inhibit each other’s growth.

Efficient Watering and Irrigation For Raised Beds

Ensuring your plants receive the right amount of water is crucial for their survival and growth. In raised bed gardening, the watering and irrigation process requires particular attention, as these gardens can dry out more quickly than traditional in-ground gardens.

Watering and Irrigation For Raised Beds

Importance of Efficient Watering in Raised Beds

The elevated design and improved drainage of raised beds can lead to faster evaporation, meaning your plants might need watering more often than those in an in-ground garden. Furthermore, different plants have different watering needs, and overwatering can be just as harmful as underwatering. Therefore, having an efficient watering system for your raised beds can save you time and prevent water wastage.

Watering Techniques for Raised Beds

There are several ways to water your raised beds efficiently. Hand watering allows you to control where and how much water each plant receives. However, this method can be time-consuming for larger gardens. Soaker hoses are another option, providing a slow and steady supply of water directly to the soil, minimizing evaporation.

The Role of Irrigation Systems

For larger raised bed gardens, or for those who want a more hands-off approach, installing an irrigation system might be the ideal solution. Drip irrigation is one of the most efficient systems for raised beds. It delivers water directly to the root zone of each plant, reducing water waste through evaporation or runoff. Moreover, it keeps the plant foliage dry, reducing the risk of fungal diseases.

Creating a Year-Round Raised Bed Garden: Seasonal Layout Ideas

Raised bed gardens provide a fantastic opportunity for year-round cultivation, thanks to their adaptable nature and controlled environment. Careful planning can help you maintain a productive and attractive garden throughout the year.

Understanding Seasonal Planting

Seasonal planting involves growing plants that thrive in particular seasons. This strategy can maximize your garden’s productivity and ensure that your garden is vibrant throughout the year. It is crucial to know your plants’ preferred seasons and plan accordingly.

Planning for Year-Round Cultivation

To create a year-round raised bed garden, you need to plan your planting layout according to each season. Spring is ideal for crops like peas, lettuce, and radishes, while summer is the time for tomatoes, cucumbers, and peppers. Autumn can see a return of cool-weather crops, and winter is perfect for hardy vegetables like kale and Brussels sprouts.

Crop Rotation in Raised Beds

Crop rotation is a beneficial practice for a year-round raised bed garden. It involves changing the type of crops grown in a particular area each season. This method can help prevent the build-up of pests and diseases, and it can also improve soil fertility by balancing the nutrients used by different types of crops.

Flower-Filled Raised Bed Layouts for Best Pollination

Flowers aren’t just for show in a raised bed garden – they can also play a critical role in the pollination of your crops. By attracting beneficial insects, they can help increase your vegetable yield and maintain a balanced ecosystem in your garden.

Flower Filled Raised Bed

The Role of Flowers in Pollination

Flowers can attract a variety of pollinators, including bees, butterflies, and birds. These creatures transfer pollen from male to female flower parts, promoting fertilization and leading to the production of fruit. Some vegetable crops, such as squash and cucumbers, rely heavily on pollinators to produce.

Choosing Flowers for Your Raised Beds

When choosing flowers for your raised bed garden, consider both their attractiveness to pollinators and their compatibility with your vegetables. Marigolds, cosmos, and zinnias are excellent choices that attract a variety of pollinators. Plant these flowers around the border of your raised bed or intersperse them among your vegetables.

Flowers for Pest Control

Some flowers can also help deter harmful pests from your garden. For instance, marigolds are known to repel nematodes—microscopic worms that can damage vegetable roots. Calendula, on the other hand, attracts predatory insects that prey on common garden pests.

Ideas for Integrating Raised Beds into an Existing Landscape

Raised bed gardens are highly versatile and can be integrated seamlessly into your existing landscape. Here are a few design ideas to consider.

Utilizing Available Space

When adding raised beds to your landscape, consider the available space and how the beds will fit into it. If you have a small patio area, consider building a few smaller square or rectangular beds. If you have a slope, tiered raised beds can be an attractive and functional solution.

Integrating Raised Beds into Garden Paths

Raised beds can also be incorporated into your garden paths. This design creates an organized look and makes access to the plants easier. You can choose a geometric pattern for a modern look, or a curved path for a more organic, casual feel.

Creating a Focal Point

A raised bed can also serve as a focal point in your landscape design. A round or hexagonal raised bed can be a unique element that draws the eye. Plant it with vibrant flowers or ornamental plants to create a standout feature in your garden.

Materials for Constructing Your Raised Garden Beds

Choosing the right material for constructing your raised garden beds is essential as it affects the longevity of the beds and the health of your plants.

Wood

Wood is a popular choice due to its affordability and ease of use. However, not all wood is created equal. Cedar and redwood are naturally resistant to rot and pests, making them ideal for raised beds. Avoid using treated wood, as it can leach chemicals into the soil.

Metal

Metal raised beds, specifically those made of galvanized steel, are durable and long-lasting. They can withstand harsh weather conditions and don’t rot. However, they can heat up quickly, which might not be ideal for some plants.

Stone or Brick

Stone or brick can be an attractive choice for raised beds, especially if they complement your home or landscape. They are durable, but their construction can be labor-intensive and more costly.

Composite

Composite materials, usually made from a mix of wood fibers and recycled plastic, are a rot-resistant and eco-friendly option for raised beds. They’re more expensive than wood but can be a worthy investment due to their durability.

Planting Designs for Aesthetically Pleasing Raised Beds

When planning your raised bed garden layout, aesthetic considerations are just as important as practical ones. A visually pleasing garden can be a source of joy and pride.

Color Coordination

Consider the colors of your plants, including both the crops and any companion plants or flowers. Try to create a harmonious color palette or go for a vibrant mix for a more lively feel.

Height and Texture Variation

Varying plant heights and textures can add visual interest to your raised bed. Plant taller crops like tomatoes or corn in the back or center, depending on the bed’s location, and shorter ones like lettuce or radishes in the front.

Plant Arrangement

Instead of planting in straight rows, consider different arrangements like a zig-zag or diagonal pattern. Circular patterns can also be attractive in round or hexagonal beds.

Planning for Accessibility: Raised Bed Layouts for Easier Gardening

One of the major benefits of raised bed gardening is its accessibility. The design can be customized to make gardening tasks less strenuous, especially for those with mobility issues or disabilities.

Bed Height and Width

The height of a raised bed should allow you to garden comfortably without excessive bending. A height of 2-3 feet is usually suitable for most gardeners. The width should be such that you can reach the center of the bed without stepping on the soil—usually, 4 feet is a good maximum width.

Pathways

Ensure there is enough space between your raised beds for easy movement. Pathways should be wide enough to accommodate a wheelbarrow, and even wider if wheelchair access is required.

Seating Ledges

Including seating ledges in your raised bed design can provide a place to sit while gardening. This addition can be particularly beneficial for elderly gardeners or those with mobility issues.

Vertical Structures

Including vertical structures for climbing plants not only saves space but also lifts the plants closer to the gardener. This design minimizes the need to bend over and makes tasks like harvesting and pruning easier.

Creating a Raised Bed Garden For Cuttings

Creating a raised bed garden for cuttings is a brilliant idea to propagate a variety of plants. It can be an economical way to expand your garden, and it provides a controlled environment ideal for plant growth.

Understanding Plant Propagation

Plant propagation is a way of producing new plants from existing ones. Cuttings, or small pieces of parent plants, can develop into new plants with the same characteristics. Not all plants propagate well from cuttings, so do some research to identify suitable species.

Preparing the Raised Bed

The raised bed for cuttings should have a good blend of soil and compost to promote root development. The soil needs to be well-draining to avoid waterlogging, which can lead to rot. Make sure the bed is deep enough to accommodate the length of your cuttings.

Planting and Caring for Cuttings

The process of planting cuttings varies depending on the plant species. However, most cuttings should be planted deep enough that one or two nodes (places where leaves attach to the stem) are buried. After planting, the cuttings require regular watering until roots establish, but care must be taken not to overwater.

Ideas For Mixing Fruits in Raised Beds

Integrating fruits into your raised bed garden can be rewarding. Fruits like strawberries, blueberries, and raspberries are not only delicious, but also add color and variety to your garden.

Fruits in Raised Beds

Choosing Suitable Fruits

The first step is selecting fruits suitable for your climate and raised bed size. Strawberries are ideal for most raised beds due to their small size. Berry bushes like raspberries and blueberries can also be grown, provided the bed is large and deep enough.

Companion Planting With Fruits

When growing multiple fruits in a single bed, consider their compatibility. Some plants can positively or negatively affect each other through various mechanisms, like nutrient competition or pest attraction. Research each plant’s requirements and habits before planning your layout.

Seasonal Planning

Fruits have different ripening times, which can be utilized for a continuous harvest. Plant a mix of early, mid, and late-season varieties to extend the fruiting season.

Raised Bed Layouts for Perennial Plants: A Low-Maintenance Approach

Growing perennial plants in raised beds is a great low-maintenance approach to gardening. These plants live for multiple years, providing beauty and produce without the need for annual replanting.

Perennial plants in raised beds

Choosing Perennial Plants

Perennials for raised beds range from ornamental flowers to fruits and vegetables. Asparagus, rhubarb, and strawberries are examples of perennial edibles, while lavender, echinacea, and sedum are perennial flowers that thrive in raised beds.

Designing the Layout

When planning a perennial raised bed, consider the size, growth habits, and needs of the plants. Position taller plants so they won’t shade shorter ones, and ensure each plant has the space it needs to grow without overcrowding its neighbors.

Maintenance Considerations

Though low-maintenance, perennial beds still require some care. This can include pruning, mulching, and occasional dividing of mature plants to prevent overcrowding.

Strategies For Keeping Pests Out of Your Raised Bed Garden

Raised bed gardens are not immune to pests, but with some strategies, you can keep your plants safe and healthy.

Natural Pest Deterrents

Some plants naturally deter certain pests. Marigolds, for instance, can repel nematodes, while basil can deter mosquitoes and flies. Incorporating these plants into your raised bed design can provide natural pest protection.

Physical Barriers

Physical barriers, like netting or fencing, can prevent pests from reaching your plants. Slugs and snails can be deterred by copper tape around the bed, and netting can keep bird pests at bay.

Beneficial Insects

Attracting beneficial insects is another organic strategy for pest control. Insects like ladybugs, lacewings, and predatory wasps prey on harmful pests, keeping their populations in check.

Adding Personality to Your Garden with Unique Raised Bed Shapes

Raised beds don’t have to be square or rectangular. Experimenting with different shapes can add personality and aesthetic appeal to your garden.

Circular or Curved Raised Beds

Circular or curved beds can provide a softer, more organic look than angular ones. These can be great focal points, especially when planted with vibrant flowers or eye-catching plants.

L-Shaped Raised Beds

An L-shaped raised bed can neatly hug the corner of a fence or patio, making good use of space. This shape can also provide easier access to plants.

Tiered Raised Beds

Tiered raised beds not only add visual interest, but also create more planting space. They can be particularly effective on slopes, turning a challenging landscape feature into a garden highlight.

Optimizing Soil Health For Your Raised Beds

Good soil is the backbone of a successful raised bed garden. Here are some tips for optimizing your soil health.

Choosing the Right Soil Mix

Raised beds require a well-draining soil mix that is rich in organic matter. A common formula is the “Mel’s Mix,” which consists of 1/3 compost, 1/3 peat moss or coco coir, and 1/3 vermiculite or perlite.

Regular Composting

Regular addition of compost not only provides nutrients for plants, but also improves soil structure and promotes beneficial soil organisms.

Cover Crops

Cover crops, also known as green manure, can be grown and then dug into the soil. They improve soil fertility, structure, and biodiversity, helping to create a healthier growing environment for your plants.

Conclusion

Raised bed gardening provides a versatile and efficient way to cultivate a variety of plants, be it herbs, vegetables, or ornamental species. By considering factors such as garden layout, sunlight optimization, soil composition, and irrigation systems, you can design a raised bed garden that not only boosts your yield but also adds aesthetic value to your landscape.

Remember, the success of your garden lies in planning and regular maintenance. With the right approach, raised bed gardening can be a rewarding endeavor, offering abundant harvests and a beautiful garden space to enjoy.

9 Design Aspects For A Wheelchair Accessible Garden Layout

Gardening is a beloved pastime enjoyed by people of all ages and abilities, providing not only a therapeutic activity but also a rewarding sense of accomplishment. Ensuring that our outdoor spaces are accessible to everyone, including wheelchair users, is an important step towards inclusive design. In this article, we will delve into nine design aspects to consider when creating a wheelchair-accessible garden layout, focusing on elements such as ramps, pathways, raised beds, and more.

Our emphasis will be on providing wheelchair-accessible garden layout ideas that offer maximum accessibility and mobility, adhering to the principles of Universal Design and barrier-free environments. From landscaping to paving and hardscaping, we will cover a range of considerations to ensure a truly accessible garden for wheelchair users.

Get ready to embark on a journey of garden design adaptation that is inclusive, engaging, and ultimately allows for seamless navigation and accessibility. Whether you are a seasoned gardener or a beginner, the ideas in this article will inspire you to create a garden that everyone can enjoy.

What Is Accessible Garden Design

In essence, accessible garden design is a subset of universal design principles that specifically caters to the needs of people with disabilities. Accessible design includes the provision of easy-to-navigate pathways, ramps, and other hardscape features, as well as adaptations to garden beds, plants, and gardening tools to ensure that all elements of the garden are within easy reach of someone in a wheelchair.

Wheelchair Accessible Garden

A well-designed accessible garden will be a joy to navigate, allowing for a truly inclusive outdoor experience. The emphasis is on reducing or eliminating physical barriers and creating an environment that is welcoming and easy to use. From providing a range of sensory experiences to ensuring that all aspects of the garden are physically accessible, an inclusive garden design should be adaptable to the needs of its users.

Accessibility in garden design is not just about physical adaptations. It also involves sensory considerations, such as the inclusion of fragrant plants, tactile elements, and visually engaging features that can be appreciated by all users, regardless of their abilities.

Regulations And Principles

Accessible garden design is guided by a range of principles and regulations aimed at ensuring inclusivity and accessibility. These regulations may vary by location, but some universal guidelines apply, such as the American with Disabilities Act (ADA) standards.

The ADA provides guidelines for accessible design, including standards for path widths, ramp inclines, and surface materials. For example, a wheelchair-accessible path should be at least 36 inches wide, and ramps should have a maximum slope of 1:12. The surface materials of paths and ramps should be firm, stable, and non-slip to allow for safe navigation.

The principles of Universal Design are also key in creating an accessible garden. Universal Design is an approach to design that aims to create environments that are usable by all people, to the greatest extent possible, without the need for adaptation or specialized design. Some principles include flexibility in use, simple and intuitive use, tolerance for error, and low physical effort.

General Design Considerations

When designing a wheelchair-accessible garden layout, there are several key considerations to keep in mind. These include not only the physical layout of the garden but also the selection of plants and the design of individual garden elements.

  • Pathways and Ramps: Pathways should be wide and obstacle-free, with a firm, non-slip surface for easy navigation. The ADA recommends a minimum width of 36 inches for wheelchair paths. Ramps, if necessary, should adhere to ADA guidelines for slope and handrails.
  • Raised Beds and Planters: Raised beds can make gardening more accessible for wheelchair users. The height should be adjusted according to the user’s comfort and reach. Adjustable raised beds are also an option.
  • Garden Tools: Gardening tools should be chosen with accessibility in mind. Tools with extended handles, lightweight materials, and easy-grip handles can make a significant difference.
  • Plant Selection: Choose plants with varying heights, textures, and scents to provide a sensory-rich environment. Consider the maintenance needs of the plants as well.
  • Hardscape Features: Hardscape features such as patios, decks, and seating areas should be designed with accessibility in mind. Ensure there is enough space for a wheelchair to maneuver comfortably.
  • Lighting and Signage: Good lighting is essential for safety and accessibility. Tactile and braille signage can also enhance the usability of the garden for visually impaired users.

Garden Design Tricks And Tips For Wheelchair Accessibility

Creating an accessible garden involves far more than just adhering to the minimum standards set out in accessibility regulations. While these are certainly important, truly successful wheelchair accessible garden layout ideas blend functionality with aesthetics to create a space that is not only accessible but also inviting and enjoyable for all. Here are some key considerations:

Accessible garden design

  • Navigation: Always keep in mind that the garden will be used by individuals in wheelchairs. Hence, consider the turning radius of a wheelchair, which typically requires a space of 60 inches in diameter for a full 180-degree turn.
  • Multi-Sensory Experiences: Gardens are places of beauty that should appeal to all senses. From fragrant flowers to water features and wind chimes, try to include elements that will engage sight, touch, smell, and hearing.
  • Elevated Planting Areas: Raised beds or vertical gardens can bring plants up to a height that’s more accessible for someone in a wheelchair.
  • Comfortable Seating: Incorporate comfortable seating areas throughout the garden that offer rest and relaxation points.

Access Points And Paths

The first step in creating a wheelchair-accessible garden is to consider the access points and paths. This begins with identifying the various entrances to the garden, which should be wide enough to accommodate a wheelchair (a minimum of 36 inches, as per ADA guidelines).

Pathways within the garden need to be designed thoughtfully to facilitate seamless navigation. The pathway surfaces should be firm, smooth, and non-slip to prevent any accidents. Materials like compacted gravel, brick, or flat stones are typically preferred.

The design of paths should also consider the layout of the garden. For instance, paths should ideally connect different points of interest within the garden without necessitating backtracking. The width should comfortably accommodate a wheelchair, and there should be enough room for turning and navigating around corners.

Suitable Paths & Ramps

When it comes to accommodating wheelchairs, paths and ramps are arguably the most vital aspects. Paths, as discussed, should be wide, smooth, and free from any obstructions. Besides the physical dimensions, it’s also crucial to factor in the gradient. A steep path can make navigation difficult and potentially unsafe for wheelchair users. As per ADA guidelines, the maximum slope for a pathway should not exceed 1:20.

Ramps, on the other hand, are essential for overcoming height differences within the garden, such as steps or raised platforms. When designing ramps, adhere to the recommended 1:12 slope, with the ramp width not less than 36 inches. Incorporate handrails on both sides of the ramp for added safety and support.

The need for wheelchair accessibility should not be a limiting factor in garden design. Rather, it presents an opportunity for creativity and thoughtful design that caters to everyone. With careful planning, you can create a beautiful, barrier-free garden that allows everyone to participate in and enjoy the pleasures of gardening and nature.

Lawn And Gravel Areas

When it comes to wheelchair accessible garden layout ideas, the choice and preparation of the ground material play a significant role. Lawn and gravel areas are both common in gardens, but special attention should be given to make them wheelchair-friendly.

Lawn And Gravel Areas

Lawns can be tricky for wheelchair users, especially if the ground is uneven or if the grass is too high. To make lawns more accessible, ensure they are kept flat and mowed regularly. Consider adding a firm path of paving or decking through the lawn to allow wheelchair users to traverse it easily.

Gravel can be a challenge for wheelchairs because it’s unstable and can cause the wheels to sink or become trapped. If you want to include gravel areas in your garden, use self-binding gravels, which compact to form a firm surface that’s easier for wheelchairs to navigate.

Tables, Raised Beds And Planters

Gardening is a pleasurable and therapeutic activity that everyone should be able to enjoy. For wheelchair users, traditional ground-level beds may not be accessible. The solution? Raised beds and planters! They bring the garden to a comfortable height, enabling individuals in wheelchairs to tend to plants without straining.

Raised beds should ideally be about 2 to 3 feet high and not more than 4 feet wide. This allows for easy reach from all sides without needing to stretch. Keep enough space around the beds for easy wheelchair maneuverability.

A garden isn’t just about plants; it’s also a place to relax and connect with nature. Outdoor tables should have enough clearance underneath for a wheelchair to fit comfortably. Consider adjustable height tables that cater to different wheelchair sizes.

Comfortable Enjoyment And Seating

An accessible garden should also serve as a sanctuary for relaxation. Comfortable seating, strategically placed, allows individuals to rest, soak up the sun, or simply enjoy the surroundings. When choosing outdoor furniture, consider the height of the seat, armrests, and back support. Wheelchair users should be able to transfer to and from the seating area easily.

Furthermore, include spaces where wheelchairs can be parked so that individuals can sit alongside their friends and family. An accessible seating area could include benches with a gap in the middle for a wheelchair, or tables with an open side.

In designing a wheelchair-accessible garden layout, every detail counts, from the surface of the pathways to the height of the planters and the comfort of seating areas. However, remember that an accessible garden is not just about practicality; it should also be a space of beauty, serenity, and enjoyment. By focusing on inclusivity, you’re not only catering to wheelchair users, but you’re also creating a garden that’s comfortable and welcoming for everyone.

Conclusion

Creating a wheelchair-accessible garden layout is not just about enhancing mobility; it’s about fostering a sense of inclusion, freedom, and empowerment. Everyone, regardless of ability, deserves to enjoy the outdoors in a comfortable, engaging, and fulfilling way.

Through this article, we’ve examined several vital aspects of garden design that cater to wheelchair users. We’ve explored the importance of easy access points and pathways, the versatility of ramps and various types of paving, the advantages of raised beds and planters, and how the right choice of seating can make a huge difference.

Remember, the process of creating a wheelchair-accessible garden is not just a one-time thing, but a journey of constant adaptation. The needs of the individual will often dictate the type of adjustments needed, and changes may need to be made over time.

Inclusivity should be at the heart of all design, and gardens are no exception. With a bit of careful planning, some thoughtful design decisions, and a thorough understanding of the individual’s needs, it is entirely possible to create a beautiful, functional, and fully accessible garden.

So, embrace the principles of Universal Design, empower everyone to experience the joy of outdoor living, and create a wheelchair-accessible garden that truly caters to all.

Roof Garden Design Ideas: All You Need To Know

Turning your rooftop into a lush, green haven can be an exciting endeavor. With the right design ideas and practical considerations, you can transform the space into an aerial sanctuary teeming with vibrant plants, practical amenities, and a soothing atmosphere. In this comprehensive guide, we delve into everything you need to know about rooftop garden design ideas, from innovative concepts and space maximization to choosing the right plants and elements that enhance the beauty of your rooftop garden.

We will also discuss how you can incorporate a dining area into your roof garden design, ensuring your rooftop is not just visually pleasing but also functional. Let’s embark on this green journey and explore the myriad possibilities that await with your rooftop space.

What Are Some Innovative Ideas for a Rooftop Garden Design?

Transforming your rooftop into a garden is not just about placing a few planters and seating arrangements; it’s about innovating and maximizing the space to its full potential. Here are some inventive ideas to consider:

Rooftop Garden Design

  • Zen Garden: Create a miniature Zen garden for a tranquil escape from the city’s hustle and bustle. Use gravel, pebbles, minimalist furniture, and carefully chosen plants like bonsai and bamboo to create a calm, peaceful environment.
  • Vegetable Garden: If you love organic produce, why not grow your own on the rooftop? It’s possible with the right choice of vegetable plants, planters, and a little bit of time investment.
  • Kid-Friendly Garden: A rooftop can be a fantastic play space for children if designed carefully. Consider incorporating resilient turf, safe play equipment, and vibrant, non-toxic plants.
  • BBQ and Dining Area: With the right furniture and a small BBQ setup, your rooftop can become a fantastic space for dining and socializing. Ensure that it’s protected from wind and provides adequate privacy.
  • Aerial View Garden: If your rooftop overlooks a beautiful cityscape, why not design your garden to enjoy the view? Use low-growing plants and comfortable seating areas strategically placed to make the most of the view.

How Can I Create a Functional Space on My Roof Garden?

Creating a functional rooftop garden depends on careful planning, wise use of space, and the right choice of features. Here are some tips:

Functional Space On Roof Garden

  • Space Maximization: Plan your layout carefully to make the most of your rooftop. Create zones for different activities like dining, relaxing, playing, or gardening.
  • Furniture: Choose furniture that is durable, weather-resistant, and suitable for the space you have. Multi-purpose furniture can also help save space.
  • Planters: Use a variety of planters, including wall-mounted ones, hanging baskets, or even vertical gardens to add greenery without taking up too much space.
  • Shade and Wind Protection: Use pergolas, awnings, or tall plants to provide shade. Windbreakers like trellises or screens can also protect your garden from strong winds.

What Are the Best Plants for a Rooftop Garden?

The best plants for a rooftop garden are those that can withstand the unique conditions that rooftops present, such as strong wind, intense sun, and limited soil depth. Consider these options:

  • Succulents: These plants are great for rooftops as they can tolerate intense sunlight and require little water. Examples include Aloe, Sedum, and Echeveria.
  • Ornamental Grasses: Grasses like Blue Fescue or Maiden Grass can stand up to wind and add a dynamic element to your garden.
  • Herbs and Vegetables: Many herbs like Rosemary, Thyme, and Basil, as well as vegetables like tomatoes, lettuce, and peppers, can thrive in rooftop conditions.
  • Shrubs and Small Trees: If your rooftop can support the weight, small trees like Japanese Maples or shrubs like Boxwood can add height and structure to your garden.

Which Design Elements Can Add Beauty to My Roof Garden?

While plants are the heart of any garden, there are several design elements that can enhance the beauty of your rooftop garden:

  • Lighting: Use LED lights, lanterns, or solar-powered lights to illuminate your garden at night and create a warm, welcoming atmosphere.
  • Water Features: A small fountain, a birdbath, or even a mini pond can add a refreshing touch to your garden.
  • Art and Sculptures: Decorate your garden with art pieces, sculptures, or DIY crafts for a personalized touch.
  • Paving and Decking Materials: Choose materials that complement the overall design of your garden and are durable and weather-resistant.

Can a Roof Garden Include a Dining Area? How to Plan It?

Yes, a roof garden can certainly include a dining area. Here’s how to plan it:

  • Choose the Right Furniture: Choose a dining set that’s durable, weather-resistant, and fits comfortably within your space.
  • Create Shade: Use a pergola or an umbrella to provide shade for comfortable dining.
  • Consider a BBQ Setup: If space and regulations allow, a small BBQ setup can make dining on your rooftop even more enjoyable.
  • Add Lighting: Ensure you have adequate lighting for evening meals. Lanterns, fairy lights, or solar-powered lights can create a lovely ambiance.

What Are Some Eco-Friendly Ideas for a Roof Garden Design?

Creating an eco-friendly roof garden involves several key elements, including the choice of plants, materials, and water-saving techniques. Here are some ideas:

Eco Friendly Ideas for a Roof Garden

  • Native Plants: Native plants are a great choice for roof gardens as they are already adapted to the local climate and soil conditions, reducing the need for extra water and care. They also provide habitat for local birds and insects, increasing biodiversity.
  • Rainwater Harvesting: Consider installing a rainwater harvesting system on your roof. This water can be used for watering your garden, saving a significant amount of precious water resources.
  • Green Roofing Materials: Use recycled or sustainably-sourced materials for your garden structures. This could be recycled wood for decking or furniture, or sustainably harvested bamboo for fencing.
  • Solar Panels: If your roof gets a lot of sunlight, consider installing solar panels. They can provide electricity for your garden lighting or other electrical needs, reducing your carbon footprint.
  • Composting: Set up a compost bin in a corner of your rooftop garden. You can compost your kitchen waste and garden trimmings, creating rich, nutritious soil for your plants while reducing waste.

How to Incorporate a Water Feature in a Roof Garden Design?

Water features can bring a soothing, refreshing element to your rooftop garden. Here’s how to incorporate one:

Water Feature in a Roof Garden

  • Consider the Weight: Water features can be heavy, so it’s important to consider the weight-bearing capacity of your roof before installing one. Opt for lightweight materials and a small-scale design.
  • Choose a Location: Your water feature should be placed in a location where it can be easily seen and heard. It should also be accessible for maintenance and cleaning.
  • Design with the Wind in Mind: Rooftops can be windy places. Choose a water feature that won’t splash or get blown over in strong winds. Fountains with a low, broad spray or still water features like ponds are good choices.
  • Water Conservation: Use a recirculating pump to conserve water. Consider using rainwater collected from your roof to fill the water feature.

What Types of Furniture Work Well in a Roof Garden?

Selecting furniture for a roof garden requires considering the outdoor elements and the available space. Here are some options:

  • Weather-Resistant Furniture: Furniture made of materials like teak, stainless steel, and synthetic resin wicker can withstand the elements while still looking stylish.
  • Multi-Purpose Furniture: Furniture that serves multiple purposes can help maximize space. For example, a bench with built-in storage can provide seating while also storing gardening tools or cushions.
  • Comfortable Seating: Choose furniture that’s comfortable to sit on for extended periods. This might include sofas, armchairs, loungers, or hammocks.
  • Dining Furniture: If you plan to dine in your rooftop garden, consider a dining table and chairs. Choose a size that’s appropriate for your space and number of guests you usually have.

How to Choose the Right Lighting for a Roof Garden?

Lighting can create a magical ambiance in a roof garden. Here are some points to consider:

  • Task Lighting: Areas like the dining or BBQ should have brighter lighting for visibility. LED spotlights or string lights can serve this purpose.
  • Ambient Lighting: Soft lighting in seating or lounging areas can create a relaxing atmosphere. Solar lanterns or fairy lights are great choices.
  • Highlighting Features: Use lighting to highlight special features like a water fountain, a beautiful tree, or an art piece.
  • Solar Lighting: Solar lights are an eco-friendly choice. They charge during the day and automatically light up at night, saving electricity and reducing your environmental footprint.

What Materials Are Suitable for Building a Rooftop Garden?

The materials you use to build your rooftop garden should be durable, weather-resistant, and lightweight. Here are some options:

Building a Rooftop Garden

  • Decking: Wood, composite, and lightweight concrete are popular choices for rooftop decking. They are durable, weather-resistant, and can provide a flat surface for furniture and planters.
  • Planters: Fiberglass, resin, or lightweight metal are suitable materials for planters. They are durable, lightweight, and come in a wide variety of shapes and sizes.
  • Fencing or Screens: Bamboo, metal, or synthetic materials can be used to create fencing or screens for privacy or wind protection.
  • Furniture and Structures: Furniture and structures like pergolas or shade sails should be made of durable, weather-resistant materials like teak, stainless steel, or synthetic wicker.

Can You Grow a Vegetable Garden on a Rooftop? What Are the Pros and Cons?

Yes, growing a vegetable garden on a rooftop is possible and has many advantages but there are also some challenges to consider.

Pros:

  • Fresh Produce: Growing your own vegetables can provide fresh, organic produce for your kitchen.
  • Educational: It can be an educational activity for children, teaching them about nature, responsibility, and the importance of healthy eating.
  • Therapeutic: Gardening has been found to have therapeutic effects, reducing stress and improving mental well-being.

Cons:

  • Watering Needs: Rooftop gardens can get hot and might require more frequent watering than ground-level gardens.
  • Weight: Soil and water are heavy, and your roof must be able to support this weight.
  • Access: Rooftop gardens might be more difficult to access than ground-level ones, especially for older people or those with mobility issues.

How Can You Make a Roof Garden Kid-Friendly?

Creating a kid-friendly rooftop garden requires a blend of safety measures, interactive features, and educational elements. Here are some pointers:

Roof Garden Kid Friendly

  • Safety First: Ensure the roof is secure for kids. Railings or barriers should be high and strong enough to prevent accidents. Non-toxic plants are a must, and sharp tools should be stored safely away.
  • Play Areas: Designate spaces for play. Consider including a sand pit, a miniature playhouse, or a chalkboard wall for drawing. Be sure that these areas are shaded and use soft, durable surfaces where possible.
  • Educational Elements: Create a butterfly garden with plants that attract butterflies, or create a small vegetable patch where kids can learn about planting and growing their own food.
  • Comfortable Seating: Kids love having their own special spots. Include child-sized furniture or bean bags where they can sit, read, or play.
  • Interactive Features: Water features, bird feeders, or wind chimes can provide sensory experiences that are both educational and entertaining.

What Are Some Budget-Friendly Roof Garden Design Ideas?

A stunning roof garden doesn’t need to break the bank. Here are some budget-friendly ideas:

  • Recycle and Upcycle: Repurpose old furniture or pallets into planters or seating. Old buckets or containers can make quirky and unique planters.
  • DIY Furniture: Creating your own furniture from reclaimed wood or other materials can save money and add a personal touch to your space.
  • Plant Wisely: Choose plants that are hardy and easy to care for, to avoid having to frequently replace plants that don’t survive.
  • Shop Sales: End-of-season sales can provide great deals on outdoor furniture and plants.
  • Keep it Simple: A minimalist design can be not only stylish, but also easier and cheaper to maintain.

Can a Roof Garden Include a BBQ Area? How to Design It?

Absolutely, a BBQ area can be a fantastic feature of a rooftop garden, ideal for entertaining or family meals. Here’s how to plan it:

  • Location: Choose a spot that’s well-ventilated but not overly exposed to wind. Ensure it’s a safe distance from any flammable materials.
  • BBQ Unit: Consider a portable BBQ for flexibility. Ensure it fits comfortably in your space without crowding.
  • Seating and Dining: Arrange seating around the BBQ area, but ensure it’s not too close to the smoke. A nearby table for preparing and serving food is a must.
  • Safety: Keep a fire extinguisher nearby and ensure the surface under the BBQ is non-flammable and easy to clean.
  • Lighting: Good lighting is essential for evening grilling. Consider an overhead light or a BBQ unit with built-in lights.

How to Maximize the Use of Space in a Roof Garden Design?

Space is often at a premium in rooftop gardens. Here’s how to make the most of it:

  • Vertical Planting: Utilize vertical spaces with wall-mounted planters, trellises for climbing plants, or tall plants like bamboo.
  • Multi-Purpose Furniture: Benches with storage space, folding tables, or stackable chairs can save space when not in use.
  • Zoning: Divide your space into zones for different activities, like dining, relaxing, or gardening. This can create an illusion of more space.
  • Right-sized Plants: Choose plants that are proportionate to your space. Avoid plants that grow too large or too fast.
  • Mirrors: Mirrors can make your space appear larger and reflect light to darker corners.

Considerations To Take into Account for a Windy Rooftop?

Wind can be a significant issue in rooftop gardens. Here’s how to address it:

  • Wind-Tolerant Plants: Some plants can withstand wind better than others. Grasses, many herbs, and succulents are generally wind-tolerant.
  • Windbreaks: A trellis, a latticed screen, or even a row of sturdy plants can serve as a windbreak, protecting more delicate plants and making the space more comfortable for humans too.
  • Secure Furniture and Decor: Ensure furniture, planters, and decor are heavy enough not to be blown over, or secure them in place.
  • Drip Irrigation: Wind can dry out plants quickly. Consider a drip irrigation system to ensure plants get enough water.
  • Regular Pruning: Regular pruning can prevent damage in high winds. Keep trees and larger shrubs well-trimmed to reduce their wind resistance.

How Can I Incorporate Privacy in My Roof Garden Design?

Privacy can be a challenge in rooftop gardens, but there are ways to create a secluded oasis:

  • Screening: Install screens, lattices, or trellises. These can provide immediate privacy and serve as a support for climbing plants.
  • Tall Plants and Trees: Bamboo, tall grasses, or small trees can create a natural, living screen.
  • Umbrellas and Canopies: Large umbrellas or canopies can provide privacy from overlooking buildings.
  • Positioning of Seating Areas: Place seating areas towards the center of your roof garden, rather than near the edges, to create a feeling of seclusion.
  • Sound Masking: A water feature or wind chimes can mask city noise and create a sense of privacy and tranquility.

How to Use Planters Effectively in a Rooftop Garden Design?

When it comes to rooftop gardening, planters are indispensable. They provide a means of containment and control for your plants, and offer the flexibility to change the garden’s layout as needed. Here are a few ideas on how to use them effectively:

Planters Effectively in a Rooftop Garden

  • Choose the Right Size: Large planters are ideal for trees and big shrubs, while small and medium-sized planters are perfect for herbs, flowers, and smaller shrubs. The size of the planters should correspond with the mature size of the plants.
  • Consider the Material: The choice of material can impact the plant’s health. Wood planters provide excellent aeration and are suitable for most plants, while metal or plastic ones can heat up and possibly damage the roots. Consider materials that withstand weather conditions and the weight limitations of your rooftop.
  • Drainage is Key: Ensure the planters have adequate drainage to prevent waterlogging. You may also consider self-watering planters for efficiency and conservation.
  • Planter Arrangement: Arrange planters to create zones or pathways, or to highlight focal points in your garden. They can also be used to create barriers or privacy screens.
  • Vertical Planters: If space is a concern, vertical planters can maximize your garden area. They can be wall-mounted or standalone structures.

Unique Ideas for a Miniature Roof Garden?

Miniature roof gardens are perfect for compact spaces. They are a fusion of creativity and practicality, and they can transform even the smallest areas into vibrant green spots. Here are a few ideas:

  • Terrariums: These small, enclosed gardens can house a variety of plants and can create a beautiful, self-sustaining ecosystem.
  • Fairy Gardens: These whimsical miniature gardens are populated with tiny plants and adorable fairy garden accessories. They are perfect for creating a magical space for children or the young at heart.
  • Bonsai Garden: Cultivating bonsai trees can be a rewarding hobby. A collection of these miniature trees can add a touch of tranquillity and elegance to your rooftop.
  • Vertical Gardens: Vertical gardens or green walls are an excellent way to make the most of limited space. They can host a variety of plants and can even serve as a natural privacy screen.
  • Succulent Garden: Succulents are easy to maintain and can thrive in containers. A collection of different succulents can add variety and visual interest to your miniature rooftop garden.

How to Create a Zen-like Atmosphere in a Rooftop Garden?

Creating a Zen-like atmosphere in a rooftop garden requires the harmonious integration of various elements. The aim is to promote serenity, tranquility, and mindfulness. Here’s how to create your Zen oasis:

  • Water Feature: The sound of water is soothing and can mask city noise. Consider adding a miniature waterfall, a pond, or a birdbath.
  • Zen Plants: Choose plants that promote tranquility. Bamboo, Japanese Maples, or moss can contribute to a Zen atmosphere. Flowering plants like azaleas and camellias can add a subtle splash of color.
  • Zen Elements: Traditional Zen gardens feature specific elements like stones, sand, and gravel. A miniature Zen garden with these elements can serve as a focal point.
  • Seating Area: Provide a quiet place to sit, meditate, or practice yoga. This could be a bench, a meditation cushion, or even a hammock.
  • Lighting: Soft, warm lighting can enhance the serenity of your Zen garden. Consider lantern-style lights or LED candles.

What Ideas Can Help Improve Accessibility in a Rooftop Garden?

Making a rooftop garden accessible ensures that everyone can enjoy the space, regardless of their physical capabilities. Here are some strategies to enhance accessibility:

  • Ramps and Handrails: Incorporating ramps alongside stairs can make your garden more accessible for people with mobility issues. Handrails are also important for safety and support.
  • Raised Beds and Vertical Gardens: Raised beds and vertical gardens bring plants to a comfortable height, which can be beneficial for those with back problems or wheelchair users.
  • Wide Pathways: Ensure pathways are wide enough to accommodate wheelchairs and walkers. The surface should be smooth, firm, and non-slip.
  • Convenient Seating: Provide plenty of seating areas with tables, ensuring they’re at an appropriate height and spaced accordingly for wheelchair users.
  • Accessible Water Source: A nearby water source can make gardening tasks easier, especially for those with limited strength or mobility.

Can I Install a Greenhouse on My Roof Garden? How Should I Design It?

Yes, it is possible to install a greenhouse on your rooftop garden, provided the structure can handle the additional weight. Here’s how to go about it:

Greenhouse On Roof Garden

  • Structural Assessment: First and foremost, a professional should assess the roof’s load-bearing capacity.
  • Choose the Right Greenhouse: Lightweight materials like polycarbonate or plastic are better suited for rooftop greenhouses. The design should have good ventilation, insulation, and be able to withstand wind.
  • Positioning: Place the greenhouse in a location where it can get ample sunlight but is shielded from strong winds.
  • Access and Maintenance: Ensure that the greenhouse is easily accessible for maintenance, watering, and other gardening tasks.
  • Temperature Control: Consider automatic vent openers and shade cloths to maintain optimal temperature inside the greenhouse.

What Are Some Pet-Friendly Roof Garden Design Ideas?

Creating a pet-friendly roof garden involves considerations for safety, comfort, and stimulation for your furry friends. Here are some ideas:

  • Secure Boundaries: Make sure the rooftop is secure so that pets can’t jump or fall off. Use sturdy, high fencing or walls.
  • Pet-Friendly Plants: Choose plants that are non-toxic to pets. Some pet-friendly options include sunflowers, petunias, and snapdragons.
  • Shade and Shelter: Ensure there are shaded areas where pets can retreat from the sun. A small shelter can provide a cozy space for them.
  • Drinking and Play Areas: Provide fresh water for your pets and consider incorporating play areas or interactive elements like a sandbox or toys.
  • Pet Relief Area: If your pet spends a lot of time on the roof, you may need a designated area for pet relief. Artificial turf or a special pet relief system can be helpful.

Conclusion

Rooftop gardens offer an excellent way to maximize space, especially in urban settings. With careful planning, appropriate design ideas, and the right choice of plants and materials, you can create a functional and beautiful rooftop garden that suits your needs and aesthetic preferences.

From setting up a miniature Zen garden or growing your own vegetables to creating a kid-friendly play area or an elegant dining space, the options for rooftop garden design ideas are as diverse as they are captivating. Remember to ensure your choices are suitable for rooftop conditions, and don’t forget to incorporate elements of privacy, wind protection, and lighting to create a comfortable and appealing space.

Whether you have a large rooftop or a small terrace, designing a garden in your aerial space can offer a refreshing sanctuary and a great space for socializing and relaxation. So, get started on your rooftop garden today, and watch it transform into a green haven amidst the urban landscape.

Garden Pathway Design Ideas: A Detailed Guide

Gardening is not just about growing plants and nurturing them to fruition; it’s a form of art that brings together design, aesthetic, and nature. One of the most delightful aspects of gardening is the design of the garden pathway. This intricate web of walkways does more than lead you from one area of the garden to another; they’re an essential part of the garden’s charm and functionality. This comprehensive guide explores the multifaceted world of garden pathway design ideas, offering you inspiration, practical advice, and a treasure trove of creative suggestions.

As we wander down the garden path of this article, we’ll be exploring different design concepts, including rooftop gardens and innovative space maximization techniques. We will dive deep into the types of materials suitable for pathways, discuss how lighting plays a vital role in the overall ambiance, and give attention to elements such as furniture, wind considerations, privacy, and planters. Also, we’ll throw in some exciting DIY ideas for the creative gardeners out there.

Whether you’re designing a vegetable garden or looking for kid-friendly, Zen, or even BBQ-inspired pathways, we’ve got you covered. And, if you’re on a tight budget, don’t worry. This guide will offer plenty of budget-friendly pathway ideas that don’t compromise on style and functionality. Ready to step onto the garden path? Let’s go!

What Are Some Unique Ideas for Designing a Garden Pathway?

Designing a garden pathway is like telling a story. It needs a theme, some fascinating characters (in the form of garden features), and an appealing plot (the path’s direction). Here are some unique design ideas to inspire you:

Designing a Garden Pathway

  • The Rooftop Oasis: Transform your rooftop into a peaceful retreat with a garden pathway. Choose small-scale plants that can withstand wind and sun exposure. Miniature trees, succulents, and hardy herbs work well. Install raised planters and windbreaks to provide additional protection. An aerial view of the pathway provides a unique perspective, especially if the path forms a visually pleasing pattern.
  • The Zen Garden: The Zen garden pathway often uses rocks, gravel, and sand, with a few select plants. Incorporating Zen principles into your garden pathway design can create a serene space where the pathway becomes a part of a mindfulness journey.
  • The Vegetable Maze: Have fun with your vegetable garden by creating a maze-like pathway. This design is kid-friendly, educational, and efficient in maximizing space. Use durable materials that can handle daily use and consider raised beds for easy access.
  • The BBQ Patio Pathway: If your garden is a haven for BBQ parties, create a pathway that connects the main house to the BBQ area. Incorporate BBQ-themed elements like herb planters, a spice garden, and even a mini outdoor kitchen.

Ideas For Incorporating Lighting Into A Garden Pathway

Lighting can enhance the beauty of a garden pathway while ensuring safety after dark. Here are some ideas:

Lighting Into A Garden Pathway

  • Solar Lights: Environmentally friendly and easy to install, solar lights come in a variety of designs. They absorb sunlight during the day and emit light during the evening, making them a practical choice for any garden pathway.
  • LED Rope Lights: LED rope lights can be shaped along the edge of your pathway, providing a well-lit guide for nighttime navigation. They can also be wrapped around trees or planters for additional charm.
  • Lanterns: For a more traditional or rustic garden, lanterns placed intermittently along the path can create a warm and inviting atmosphere.

What Types of Material Can I Use for A Garden Pathway?

The choice of material for your garden pathway largely depends on your design, budget, and the amount of traffic the path will handle. Here are some popular choices:

Gravel Pathway

  • Gravel: Easy to install and budget-friendly, gravel is suitable for casual, rustic garden designs. It requires occasional raking and topping up to keep it looking fresh.
  • Bricks: Bricks offer a more formal look and can withstand heavy traffic. They’re versatile and can be arranged in a variety of patterns.
  • Wooden Planks: Ideal for a minimalist or Zen garden, wooden planks create a distinctive and elegant pathway. However, they do require regular maintenance to prevent decay.
  • Paving Stones: These are durable, low maintenance, and come in a variety of shapes, sizes, and colors, offering a lot of design versatility.

How Can I Make a DIY Garden Pathway? Any Creative Ideas?

Creating your own DIY garden pathway can be a rewarding project. Here are a few creative ideas:

  • Recycled Pallet Pathway: Dismantle wooden pallets and use the planks to create a charming rustic pathway. Seal them with a weather-resistant stain to increase their durability.
  • Bottle Cap Mosaic: Collect bottle caps and embed them into a concrete pathway to create a unique, colorful mosaic.
  • Stepping Stone Path: You can buy pre-made stepping stones, or get creative and make your own using concrete and decorative items like glass beads, shells, or pebbles.

What Types of Material Can I Use for A Garden Pathway?

The material you choose for your garden pathway not only influences its appearance but also its durability and maintenance requirements. When choosing the right material, consider the style of your garden, the amount of traffic the pathway will receive, and your budget.

  • Gravel: Gravel is a popular choice for garden pathways due to its easy installation and budget-friendly nature. Gravel pathways can add a casual, rustic appeal to your garden. However, they require regular raking and topping up to keep the path looking neat and preventing the stones from spilling out.
  • Bricks: For a more formal and classic aesthetic, consider using bricks. They are extremely durable, can handle high foot traffic, and can be arranged in a variety of patterns for an appealing look. The cost of brick pathways can vary depending on the type of bricks chosen and the complexity of the design.
  • Wooden Planks: Wooden planks can offer a unique and minimalist look, making them an excellent choice for Zen or modern garden designs. However, keep in mind that wood requires regular maintenance like sealing to prevent decay and withstand weather elements.
  • Paving Stones: Paving stones are a versatile choice for garden pathways. They come in various shapes, sizes, and colors, allowing for a multitude of design options. Paving stones are durable and require minimal maintenance, making them a popular choice for many homeowners.
  • Concrete: Concrete is a robust and cost-effective option for garden pathways. It can be poured into almost any shape, and its color can be customized to match your garden’s aesthetics. However, it might crack over time due to ground movement and may require professional installation.

How Can I Make a DIY Garden Pathway? Any Creative Ideas?

Creating a DIY garden pathway is not only a cost-effective solution but also an opportunity to add a personal touch to your garden. Here are some creative ideas to get you started:

  • Recycled Pallet Pathway: Dismantle wooden pallets and use the planks to create a charming, rustic pathway. To increase their durability, treat them with a weather-resistant stain.
  • Bottle Cap Mosaic: Collect bottle caps of various colors and sizes. Lay a concrete pathway and, while the concrete is still wet, embed the bottle caps to create a unique, colorful mosaic.
  • Stepping Stone Path: Create a whimsical pathway with stepping stones. You can purchase premade stones or make your own using concrete mix and mold. Personalize each stone by imprinting leaves, writing a favorite quote, or creating designs with pebbles and glass beads.
  • Painted Concrete Path: If you already have a concrete path that needs some sprucing up, consider painting it. Use stencils to create intricate designs or let your creativity loose and create your own design. Don’t forget to seal it with a concrete sealer to protect your artwork from weather elements.

What Are Some Eco-Friendly Materials for Garden Pathways?

When designing a garden pathway, eco-friendliness is an important factor to consider. Here are some sustainable materials you can use:

  • Recycled Rubber: Recycled rubber mulch or tiles are an excellent choice for eco-friendly pathways. They are made from old tires, keeping them out of the landfill, and are durable, water-permeable, and slip-resistant.
  • Salvaged Materials: Using salvaged materials like old bricks, broken concrete pieces, or reclaimed wood can give your pathway a unique, rustic charm while minimizing its environmental impact.
  • Permeable Pavers: Permeable pavers are designed to let water pass through them, reducing runoff and helping to recharge groundwater. They are available in many designs and materials, including recycled plastic and concrete.
  • Grass and Ground Covers: Instead of a traditional hard pathway, consider creating a soft path with grass or low-growing ground covers. They can help prevent soil erosion, improve soil health, and create a pleasing aesthetic.

How to Design a Garden Pathway That Complements Your Home’s Style?

Designing a garden pathway that complements your home’s style helps create a cohesive and harmonious aesthetic throughout your property. Here’s how you can do it:

  • Identify Your Home’s Architectural Style: First, recognize the key elements of your home’s architectural style. Is it modern, traditional, colonial, or perhaps craftsman? Each style has distinctive characteristics, such as the color scheme, lines, and materials used.
  • Choose Matching Materials and Colors: Once you’ve identified your home’s style, select pathway materials and colors that match it. For instance, if your home has a modern design with clean lines and a neutral color palette, consider a sleek concrete or smooth stone path. For a rustic farmhouse-style home, a gravel or brick pathway could work well.
  • Incorporate Similar Design Elements: Try to repeat some design elements from your home in the pathway. For instance, if your home features geometric designs, incorporate that into the pathway layout. If your home has a particular accent color, you might use it in the pathway’s border or accessories.
  • Consider the Scale: The size and width of your pathway should be in proportion to your home and garden. A large house or garden will need a wider path than a smaller one.

Can I Have a Garden Pathway with a Water Feature? How to Design It?

Incorporating a water feature into your garden pathway design can create a sense of tranquility and a distinctive aesthetic appeal. Here’s how to do it:

Garden Pathway with a Water Feature

  • Identify the Type of Water Feature: First, decide what type of water feature you want. It could be a pond, a stream, a fountain, or a waterfall. The choice depends on your garden size, style, and maintenance preference.
  • Consider the Pathway Layout: The pathway could go alongside the water feature, offering views as one walks by. Alternatively, the pathway could cross over the water feature using a bridge or stepping stones, providing a close interaction with the water.
  • Choose Complementary Materials: The pathway materials should complement the water feature. For example, natural stone goes well with ponds and streams, while sleek pavers or concrete could match well with a modern, geometric fountain.
  • Ensure Safety: If the pathway is near or crosses the water feature, it should be slip-resistant, especially if children or elderly people will use it. It’s also essential to have good lighting for nighttime use.

Incorporating Wheelchair Accessibility To A Garden Pathway

Making your garden pathway wheelchair-accessible is a thoughtful and inclusive design choice. Here are some tips:

  • Pathway Width and Slope: The pathway should be at least 36 inches wide to accommodate a wheelchair, and ideally wider for comfort and maneuverability. Any slopes should be gentle, not exceeding a 1:12 ratio (for every 12 inches of length, the height changes by 1 inch).
  • Surface Material: The pathway material should be firm, stable, and non-slip. Concrete, asphalt, and well-compacted crushed stone are good options. Avoid loose materials like gravel or sand.
  • Obstacles: Ensure there are no obstacles, like low branches or protruding plants, along the pathway. The pathway should be free of steps or abrupt level changes. If the pathway has a raised edge, it should not be too high to avoid causing a tripping hazard for others.
  • Resting Areas: If your garden pathway is long, consider incorporating resting areas along the path with wheelchair-accessible benches.

How to Design a Garden Pathway for a Small Garden?

Designing a garden pathway for a small garden can be a challenging yet fulfilling task. The key lies in using design elements that visually enlarge the space while maintaining functionality. Here’s how:

  • Follow the ‘Less is More’ Principle: Avoid using too many materials or colors which can make the space appear cluttered. Stick to one or two materials for a clean, streamlined look.
  • Create a Winding Path: A winding path can create an illusion of distance, making your garden seem larger. It also adds an element of intrigue, drawing people into the garden to discover what’s around the bend.
  • Scale it Right: Choose materials and design elements proportional to the size of your garden. Smaller pavers or stepping stones, small-scale plantings, and low-profile furnishings are more fitting for smaller gardens.
  • Double Duty Pathways: In a small garden, the pathway can double as a patio or a seating area. Use wider pavers or add a bench to transform a portion of the path into a place for relaxation or entertaining.
  • Vertical Elements: Incorporating vertical elements like tall plants, trellises, or vertical gardens along the pathway can draw the eye upwards, creating a sense of height and space.

Ideas for Garden Paths in Shade Gardens?

Designing garden paths in shade gardens requires careful planning to ensure the path is safe and visually pleasing despite the low light conditions.

  • Use Light-Colored Materials: Light-colored materials like white gravel, light pavers, or natural stone can help brighten the path. They reflect more light and stand out in the shade.
  • Incorporate Shade-Loving Plants: Line your garden path with plants that thrive in shade. Hostas, ferns, and astilbe can add color and texture to the shaded pathway.
  • Install Pathway Lighting: Adding low-voltage pathway lights or solar-powered lights can make the path safe for navigation during twilight hours and add a magical touch to your shade garden.
  • Create Contrast: Use materials with different textures for the pathway and its surroundings to create visual interest and prevent the path from blending into the shade.
  • Use Mirrors: Incorporating mirrors into a shaded garden can reflect light and make the space seem larger. Place them strategically to reflect a beautiful view or an interesting plant.

How to Integrate Seating Areas Along A Garden Path?

Integrating seating areas along a garden path offers visitors a place to pause, rest, and appreciate the surroundings. Here’s how:

Seating Areas Along A Garden Path

  • Incorporate Benches: Install benches at intervals along the pathway, preferably at a turn or a vista. The benches can be made of stone, wood, or metal, depending on the garden’s style.
  • Create a Pergola or Gazebo: If space allows, build a pergola or gazebo along the path. These structures not only provide a place to sit but also add an architectural element to the garden.
  • Use Wide Steps as Seating: If your garden pathway has steps, consider making them wider and flat enough to serve as impromptu seating spots.
  • Include a Patio: In wider parts of the path, create a small patio with outdoor furniture. This could serve as a spot for outdoor dining or entertaining.
  • Nooks and Corners: Use corners or turns in the path to create small sitting areas. A solitary chair with a small table beside it can become a tranquil spot for solitude or contemplation.

What Types of Plants Are Ideal to Line a Garden Pathway?

The right plants can enhance your garden pathway’s appeal, provide a sensory experience, and help guide visitors along the path.

Plants For Garden Pathway

  • Border Plants: Low-growing plants like lavender, dianthus, or boxwood can create a neat, formal border along the path.
  • Ground Covers: For a softer look, use ground covers like creeping thyme or Irish moss. These plants can handle light foot traffic and often feature colorful blooms.
  • Fragrant Plants: Incorporate fragrant plants like roses, lilacs, or gardenias to delight the senses as you walk along the path.
  • Ornamental Grasses: Ornamental grasses can add movement and a distinct texture to the pathway. Varieties like blue fescue or Japanese forest grass are excellent choices.
  • Shade-Loving Plants: If your pathway is shaded, consider plants that thrive in low light, such as hostas, ferns, or lily of the valley.

Budget-Friendly Garden Pathway Ideas?

Designing a garden pathway doesn’t need to be expensive. Here are some budget-friendly ideas:

  • Gravel Path: Gravel is one of the most affordable materials you can use. It’s easy to install and can fit various garden styles.
  • Recycled Materials: Look for salvaged materials like bricks, pavers, or wood planks. Often you can find these for free or at a low cost.
  • DIY Stepping Stones: Make your own stepping stones using quick-setting concrete and a mold. You can customize their size, shape, and color.
  • Natural Materials: Depending on your location, you might be able to use natural materials like pine needles, seashells, or wood chips as a pathway material.
  • Do the Work Yourself: Hiring a professional can be a significant part of the cost. If you’re up for it, doing the work yourself can save a lot of money.

How To Incorporate a Mosaic Design in A Garden Pathway?

Incorporating a mosaic design in a garden pathway can create a stunning visual impact. Here are some ways to do it:

Mosaic Design in A Garden Pathway

  • Use Colored Pavers: Buy pavers in different colors and arrange them to create a pattern or picture.
  • Tile Mosaics: Ceramic or porcelain tiles can be used to create intricate mosaic designs. They are durable and available in a wide variety of colors.
  • Broken China or Glass: Reuse broken dishes or colored glass to create a unique, whimsical mosaic. Make sure to smooth any sharp edges.
  • Pebble Mosaic: Use pebbles or small stones of different colors and sizes to create your mosaic. This is a great option for a natural, rustic look.
  • DIY Mosaic Stepping Stones: Create individual mosaic stepping stones using a mold and pieces of tile, glass, or stones.

What Ideas Can Make My Garden Pathway More Attractive in Winter?

Garden paths can be equally attractive in the winter months with a little planning and creativity.

  • Use Evergreens: Plant evergreens along your path. They provide color and structure in the winter months.
  • Lighting: Winter days can be short and dark. Use solar or low-voltage lights to illuminate your path.
  • Incorporate Winter-Blooming Plants: Some plants bloom in winter, such as winter jasmine or snowdrops. These can add spots of color to your winter garden path.
  • Add Architectural Elements: Features like arbors, pergolas, or sculptures stand out in the bare winter landscape and can create interesting silhouettes in the snow.
  • Use Colorful Hardscape: Brightly colored pavers, tiles, or stepping stones can add cheer to a winter landscape.

Conclusion

In conclusion, designing a garden pathway is an opportunity to add personal flair and functionality to your outdoor space. From unique rooftop garden pathways to Zen garden designs, incorporating lighting, and choosing the right materials, there are countless ways to make your pathway distinctive. And, if you love hands-on projects, creating a DIY garden pathway can be a gratifying experience that gives your garden an added personal touch. So, get out there and start planning your dream garden pathway!

13 Fruit Tree Garden Layout Ideas: A Complete Guide

Fruit trees can provide so much more than a source of fresh, organic produce right from your backyard. They offer shade, aesthetic appeal, and can even improve the local ecosystem. When it comes to designing a fruit tree garden, understanding your space, climate, and desired fruit varieties are essential for creating a thriving, fruitful orchard. This comprehensive guide will delve into different fruit tree garden layout ideas, while considering important factors like tree species, planting, climate, soil, fertilizers, watering requirements, pruning, and disease management. Buckle up for a fruit-filled journey into the world of fruit tree gardening.

In this article, we will discuss various aspects of fruit tree garden layouts. We’ll explore strategies for small spaces, incorporating fruit trees into existing gardens, designing for hillside properties, and even growing an edible hedge. We’ll examine the best ways to maintain your fruit tree garden, including pest control, watering, pruning, and seasonal care. Finally, we’ll explore the joyous stage of harvesting and using your fruit.

Whether you’re a seasoned gardener or a beginner, this guide provides insightful tips and strategies to help you create an enriching, productive fruit tree garden. So, let’s dive into the wonderful world of fruit tree gardening!

The Basics of Fruit Tree Garden Layout Design

When starting with a fruit tree garden layout, there are several key factors that you need to consider.

Fruit Tree Garden

Tree Species and Fruit Tree Varieties

Selecting the right fruit tree species is paramount. Consider what types of fruit you and your family enjoy eating and cooking with. Also, consider the mature size of the tree, its hardiness, and its growth habit. Some trees like peaches and apricots grow well in warm climates, while others such as apples and cherries prefer colder climates. You also have to consider the type of soil in your yard, as some trees might prefer sandy soil, while others grow better in clay soil. Research the specific requirements of each tree species you’re considering, to ensure they are suitable for your garden.

Climate Considerations and Sunlight Requirements

Your local climate dictates the types of fruit trees that will thrive in your garden. Some fruit trees require a period of cold weather in winter (known as chill hours) to bear fruit, while others need a warm climate year-round. Sunlight is another important consideration. Fruit trees generally require full sun, which is defined as at least six hours of direct sunlight per day. Assess the sunniest spots in your garden and plan your layout accordingly.

Soil and Fertilizers

The soil is the foundation of your garden and has a big impact on the health and productivity of your fruit trees. Fruit trees typically prefer well-draining soil with a neutral to slightly acidic pH. Before planting, you might need to amend your soil with organic matter or specific fertilizers to ensure it provides the necessary nutrients. Conduct a soil test to determine your soil’s composition and amend as needed.

Tree Spacing and Watering Requirements

Tree spacing plays a crucial role in a productive fruit tree garden. Spacing requirements vary depending on the tree’s mature size and growth habit. As a general rule, standard-sized fruit trees need to be planted about 15-25 feet apart, while dwarf and semi-dwarf varieties require less space. Watering needs will also vary, but generally, younger trees need more frequent watering until their roots are well established.

Seasonal Care and Tree Maintenance

Maintaining your fruit trees involves tasks such as pruning, fertilizing, pest control, and possible grafting. Pruning helps to control the size and shape of the trees, remove dead or diseased wood, and increase sunlight and air circulation, which can result in a healthier tree and a better fruit yield. Understanding the correct time and method for pruning is crucial. For example, stone fruit trees are generally pruned in summer, while pome fruit trees are pruned in winter.

Designing a Compact Orchard: Layout Ideas for Small Spaces

Even with limited space, you can still enjoy a fruitful garden. Here’s how to maximize your harvest:

Dwarf Fruit Trees

  • Dwarf and Semi-dwarf Varieties: These trees are genetically engineered to be smaller, yet they still produce a full-sized fruit. Dwarf trees are perfect for small spaces because they typically grow only 8-10 feet tall. Semi-dwarf trees are slightly larger but still manageable in a small garden.
  • High-Density Planting Methods: Techniques like the “Four-in-One” hole method can allow for more trees in a small area. This involves planting four trees in one large hole, each pointing in a different direction. The trees will grow together but remain distinct, and by choosing different fruit varieties, you can extend your harvest season.
  • Growing in Containers: Container gardening can be a great option for people with limited outdoor space. Most dwarf and some semi-dwarf fruit tree varieties will thrive in a large container, and they can be placed on patios, balconies, or small backyards.
  • Vertical Gardening: Make use of vertical space by training fruit trees to grow upwards. This can be done using trellises, fences, or walls.

Espalier Fruit Trees: Combining Function and Beauty

Espalier is a time-honored horticultural practice that involves training trees to grow flat against a wall, fence, or trellis. This technique can be a perfect solution for small gardens as it allows for growing fruit trees without taking up much space. It’s also visually appealing, adding an architectural element to your garden.

Espalier Fruit Trees

  • Select Suitable Tree Species: Fruit trees that have flexible, easy-to-train branches are best suited for espalier. Apples and pears are traditional choices, but peaches, plums, and certain citrus trees can also work well.
  • Choose Your Espalier Design: There are many traditional espalier patterns to choose from. The simplest form is the horizontal cordon, which involves a central stem with horizontal branches trained along wires. More complex designs include the fan and the Belgian fence.
  • Pruning and Training: Proper pruning and training are crucial to maintain the espalier form. This involves regularly pruning off any growth that doesn’t fit the pattern and tying the remaining branches to the supporting structure.

The Benefits of a Mixed Orchard

A mixed orchard, where different species of fruit trees coexist, offers several advantages.

  • Extended Harvest Season: Different types of fruit trees ripen at different times, so by planting a variety of species, you can extend your harvest season.
  • Natural Pest Control: Many pests are specific to one type of crop. By growing a variety of fruit trees, the damage caused by these pests can be limited.
  • Improved Pollination: Some fruit trees require cross-pollination with a different variety. Planting different types of fruit trees close to each other can enhance pollination, leading to better fruit yield.
  • Increased Resilience: A mixed orchard can better withstand diseases or adverse weather conditions. If one type of tree is affected, others may still thrive.

Incorporating Fruit Trees into Your Existing Garden Layout

Planting fruit trees among other garden plants can create a more dynamic, productive, and attractive garden. Here are some ideas on how to incorporate fruit trees into your existing garden:

  • Plant Fruit Trees in Garden Beds: You can replace ornamental trees or shrubs in your existing garden beds with fruit trees. This not only saves space but also creates a visually appealing landscape.
  • Use Fruit Trees as a Shade or Privacy Screen: Larger fruit trees can provide a nice shade in the summer, while rows of fruit trees can create a natural privacy screen.
  • Companion Planting: Some plants can benefit fruit trees by attracting beneficial insects or deterring pests. For example, marigold can deter nematodes, while borage attracts bees and other pollinators.

Layout Ideas for Exotic Fruit Trees

Exotic fruit trees can add an exciting twist to your garden. However, they often have unique requirements:

  • Climate Considerations: Many exotic fruit trees are tropical or subtropical and thus require warm conditions. If your climate is cooler, you might need to provide these trees with extra protection in the winter, or grow them in containers that can be moved indoors.
  • Unique Soil and Watering Requirements: Exotic fruit trees often have specific soil and watering needs. For example, avocado trees prefer sandy soil and don’t tolerate waterlogging, while banana trees need rich, well-draining soil and plenty of water.

By understanding the specific needs of your exotic fruit trees, you can successfully incorporate them into your garden layout.

Optimizing Your Garden Layout for Fruit Tree Pollination

Pollination is an essential process that helps fruit trees to produce a successful crop. Here’s how you can optimize your garden layout for effective fruit tree pollination:

Fruit Tree Pollination

Understanding Pollination Requirements

Different fruit tree varieties have different pollination requirements. Some fruit trees are self-pollinating, meaning a single tree can bear fruit without the need for a different variety nearby. These include peach, apricot, and sour cherry trees. Other fruit trees are cross-pollinating, requiring the pollen from a different variety for fertilization. Examples include many apple, pear, and sweet cherry varieties.

Planning Your Layout for Cross-Pollination

For cross-pollinating fruit trees, proximity matters. Pollen needs to travel from the blossom of one tree to that of another, usually by bees or other pollinating insects. Trees that are closer together will have a higher chance of successful cross-pollination. Group your cross-pollinating trees within a distance of 50-100 feet for best results.

Planting Pollinator Attracting Plants

You can attract more pollinators to your fruit tree garden by planting pollinator-friendly flowers and plants. These can include plants such as bee balm, lavender, and coneflowers. Plant these in your understory or around the edges of your garden to create a pollinator-friendly environment.

Fruit Tree Garden Layouts for Hillside Properties

Hillside properties can be a challenge when it comes to fruit tree gardens. However, with some careful planning, you can turn these challenges into advantages:

Terracing

Terracing is a great option for steep slopes. It involves creating flat, step-like areas on the slope, which can reduce soil erosion and improve water absorption. You can plant your fruit trees on these terraces, providing them with a stable and well-draining area to grow.

Tree Spacing

Consider your hill’s slope when planning tree spacing. On a slope, trees at the bottom of the hill might be shaded by those at the top if they are planted too close together. To avoid this, space your trees slightly farther apart than you would on a flat surface.

Watering

Water tends to run downhill, meaning trees at the bottom of your slope may get too much water, while those at the top might not get enough. Consider installing a drip irrigation system, which can deliver water directly to the tree’s root zone and help ensure each tree gets the water it needs.

The Role of Understory Plants in Your Fruit Tree Garden Layout

Understory plants are the vegetation that grows beneath the canopy of larger trees. They play a vital role in a fruit tree garden by helping to maintain soil health, attracting beneficial insects, and adding beauty to your garden:

Groundcovers

Groundcovers are low-growing plants that spread across the ground, helping to suppress weeds and maintain soil moisture. Many groundcovers also help to improve soil fertility by fixing nitrogen or adding organic matter. Examples include clover, vetch, and creeping thyme.

Beneficial Insect Attractors

Certain understory plants can attract beneficial insects that help with pest control or pollination. For example, yarrow, dill, and fennel attract ladybugs and parasitic wasps, which can help control aphids. Flowers such as cosmos and zinnias attract bees and other pollinators.

Aesthetic Appeal

Understory plants can also add beauty to your garden. Flowering plants like lilies, asters, or hydrangeas can add splashes of color, while ferns or hostas can provide lush greenery.

A Guide to Soil Preparation for Your Fruit Tree Garden

The soil is the foundation of your garden. Here’s how to prepare it for your fruit trees:

Conduct a Soil Test

The first step is to conduct a soil test. This will tell you your soil’s pH, as well as its levels of key nutrients. Most fruit trees prefer a slightly acidic to neutral pH (6.0 to 7.0), and require good levels of nitrogen, phosphorus, and potassium.

Amend Your Soil

Based on your soil test results, you may need to add amendments to your soil. This could include adding lime to raise the pH, sulfur to lower it, or specific fertilizers to add nutrients. Organic matter like compost or well-rotted manure can also improve soil structure and fertility.

Dig a Proper Planting Hole

When you’re ready to plant your trees, dig a hole that is twice as wide and just as deep as the root ball. Loosen the soil at the bottom and sides of the hole, which can make it easier for the roots to spread.

Ideas For Growing an Edible Hedge

Growing an edible hedge can be a great way to maximize the productivity of your garden. Here are some ideas:

Berry Bushes

Berry bushes like raspberries, blackberries, and currants can make excellent hedges. They grow quickly, produce delicious fruit, and can provide a good amount of privacy.

Espalier Fruit Trees

Espalier fruit trees, which are trained to grow flat against a wall or fence, can be a great option for an edible hedge. They can add beauty to your garden, while also producing fruit.

Nut Trees

Certain nut trees, like hazelnuts, can also be used to create a hedge. They can grow quite tall, providing plenty of privacy, and the nuts can be a delicious bonus.

Maintaining Your Fruit Tree Garden: Pruning, Watering, and Pest Control

Maintaining a fruit tree garden involves a few key tasks:

Maintaining Your Fruit Tree Garden

Pruning

Pruning is crucial for controlling the size and shape of your trees, improving their health, and maximizing fruit production. The best time to prune depends on the type of fruit tree, but it’s typically done in late winter or early spring.

Watering

Fruit trees generally need deep, infrequent watering. Water your trees when the top few inches of soil are dry. Overwatering can lead to problems like root rot, while underwatering can stress the tree and reduce fruit production.

Pest Control

Pest control is another important aspect of maintenance. Regularly inspect your trees for signs of pests or disease, and take action as needed. This might involve physically removing pests, using organic or chemical pesticides, or introducing beneficial insects.

Harvesting and Using Your Fruit

The final reward of your fruit tree garden is the harvest:

Harvesting and Using Your Fruit

When to Harvest

Knowing when to harvest your fruit can be tricky. It depends on the type of fruit, but generally, fruit should be firm but not hard, have its typical mature color, and be slightly soft to the touch. Some fruits, like pears and some types of apple, should be harvested slightly underripe and allowed to ripen off the tree.

Using Your Fruit

There are countless ways to use your fruit. You can eat it fresh, or use it in cooking or baking. Many types of fruit can be preserved for later use by canning, freezing, or drying. You might also consider making homemade jams, jellies, or fruit wines.

Sharing Your Harvest

If you have more fruit than you can use, consider sharing your harvest. You could give fruit to neighbors, friends, or family, or donate it to a local food bank.

Conclusion

Creating a fruitful and attractive garden layout with fruit trees can be a rewarding endeavor, offering a unique combination of beauty and bounty. A well-planned layout can cater to both large and compact spaces, with fruit tree species suitable for a variety of climates, soils, and sunlight requirements.

From the basics of design, incorporating understory plants, to understanding pollination dynamics and soil preparation, each element plays a vital role in the success of your fruit tree garden. The incorporation of innovative techniques like espalier and the use of exotic fruit tree varieties can offer functional beauty and intriguing novelties to your garden.

In addition, the approach to maintenance such as pruning, watering, pest control, and disease management is essential for the health and productivity of your trees. Harvesting and utilizing the fruits of your labor can bring immense satisfaction and benefits, contributing to healthier eating habits and potential cost savings.

In essence, a well-designed fruit tree garden is not only a horticultural venture but a step towards sustainable living, promoting organic gardening and making the most of your outdoor space. Regardless of your garden’s size or layout, there is a multitude of possibilities to explore in the world of fruit tree gardening.

13 Outstanding Front Garden Design Ideas

Designing a front garden is a journey of creativity, aesthetics, and function. It’s not only about choosing the right flowers or plants; it’s about creating an appealing outdoor space that reflects your taste and enhances the overall curb appeal of your home. In this comprehensive guide, we’ll explore 13 outstanding front garden design ideas that can transform your front yard into a beautiful and welcoming space.

From landscaping to incorporating native plants, we will delve into how you can maximize small spaces, select the best trees for your garden, and utilize hardscaping in your design. We’ll discuss in detail how each element—be it the garden gate, water feature, or potted plants—can add a unique touch to your front garden. By the end of this guide, you’ll be equipped with enough knowledge and ideas to create a front garden that makes a strong first impression and brings joy to your daily life.

How to Improve Curb Appeal with Front Garden Designs

Your front garden is your home’s first impression. A well-designed front garden can enhance your home’s curb appeal and add value to your property. Here are some tips on how you can utilize various elements to improve curb appeal:

Front Garden Designs

Landscaping

Proper landscaping is crucial in creating an inviting front garden. This involves more than just mowing your lawn and maintaining flower beds. It’s about designing a layout that complements your home’s exterior and suits your personal style.

  • Lawn: A well-maintained lawn forms the basis of an attractive front garden. Regular watering, feeding, and mowing can keep your lawn lush and green. You can use various lawn designs, such as stripes or checkerboards, to add visual interest.
  • Flower Beds and Shrubs: Flower beds and shrubs can add color and texture to your front garden. Select flowers and shrubs that thrive in your local climate, and consider year-round appeal. Blooms of different colors and sizes can create a dynamic display, while shrubs can provide structure and greenery throughout the year.
  • Trees: Trees can provide shade, create a sense of privacy, and serve as a focal point in your front garden. Choose trees that are suitable for your garden’s size and climate. Consider factors such as maintenance requirements and seasonal changes.

Front Door and Porch

Your front door and porch are key components of curb appeal. Make sure they are well-maintained and coordinate with your garden design. A fresh coat of paint on the door, attractive porch lighting, and potted plants can create a welcoming entrance.

Driveway and Garden Path

A well-designed driveway and garden path can guide visitors to your front door while adding to your home’s curb appeal. Use materials that complement your home’s exterior, and consider incorporating design elements such as curves or borders for added interest.

Outdoor Lighting

Outdoor lighting can enhance your front garden’s beauty and safety. Strategically placed lights can highlight key features like trees, shrubs, or sculptures, and illuminate the path to your front door.

Fencing and Garden Gate

Fencing can define your property and add a sense of privacy. Meanwhile, a garden gate can act as a transition point, hinting at the beauty within. Consider materials and designs that complement your home’s exterior and garden design.

Incorporating Native Plants

Native plants—those that naturally occur in your area—can add authenticity and sustainability to your front garden design. They are adapted to local soil and climate conditions, making them generally more resistant to pests and diseases and often requiring less water and care than exotic species.

Maximizing Small Spaces: Innovating Design Ideas

A small front garden doesn’t mean you have to compromise on style or function. Here are a few innovative design ideas to maximize small spaces:

  • Use vertical space: If ground space is limited, go up. Vertical gardening, using trellises, walls, or fences, can allow you to grow a variety of plants in a small area.
  • Create an illusion of space: A well-placed mirror or a water feature can reflect light and create an illusion of depth, making your small garden appear larger.
  • Choose the right plants: Opt for plants with a compact growth habit. Slow-growing and dwarf varieties can minimize maintenance while providing plenty of color and interest.

What are the Best Trees for a Front Garden?

Choosing the right tree for your front garden depends on a variety of factors, including your climate, soil, the tree’s growth rate, size, maintenance requirements, and aesthetic appeal.

Utilizing Hardscaping in Your Design

Hardscaping refers to the non-living elements of a garden, such as paths, walls, fences, patios, and water features. Properly incorporated, hardscaping can provide structure, functionality, and visual interest in your front garden design.

Rock Garden: A rock garden, featuring different sizes and types of rocks along with drought-resistant plants, can create a low-maintenance and visually appealing landscape.

Water Feature: A water feature, such as a small fountain or pond, can add a sense of tranquility to your garden. Ensure it’s in proportion with the size of your garden.

Sculptures and Potted Plants: Artistic sculptures can serve as focal points in your front garden, while potted plants offer flexibility and can be easily moved or replaced as needed.

A front garden is more than just an outdoor space—it’s the first expression of your home that guests and passersby see. A well-thought-out and well-maintained front garden can boost your home’s curb appeal and create a welcoming atmosphere.

Water Features to Enhance Your Garden

Water features are a wonderful way to add a sense of tranquility and movement to your front garden. They can become a focal point, lending an air of sophistication and serenity to your outdoor space.

Fountains and Ponds in garden

Fountains and Ponds

Whether it’s a simple birdbath or an elaborate tiered fountain, water features inject a soothing, natural element into your garden design. They attract wildlife, provide a calming background noise, and can become a captivating centerpiece. Ponds, on the other hand, can host a variety of aquatic plants and fish, creating an immersive natural environment.

Waterfalls

Waterfalls, either standalone or as part of a pond, offer a dynamic visual and aural experience. The sight and sound of cascading water can mask traffic noise and create a serene ambiance.

Water Feature Maintenance

Maintenance is crucial to keeping your water feature clean and functioning well. Regular checks for leaks, pump operation, and water quality are necessary. In colder climates, consider how you will manage your water feature in winter – some may need to be drained or covered.

Creating an Inviting Pathway Through Your Front Garden

Pathways serve as a guiding line, leading visitors from the sidewalk or driveway to your front door. They are functional, but they also offer an opportunity to add character and charm to your front garden.

Pathway Through Your Front Garden

Garden Path Materials

A variety of materials can be used for your garden path, including gravel, paving stones, bricks, or wood. Each offers different aesthetic and maintenance considerations. For instance, a gravel path might blend seamlessly with a cottage-style garden, while sleek pavers might suit a modern minimalist design.

Pathway Design

The design of your pathway – whether it’s a straight shot to your front door or a winding journey – can dramatically impact your garden’s aesthetic. Planting flowers or shrubs along the path, integrating outdoor lighting, or adding a decorative garden gate can make the journey to your front door memorable.

The Role of Lighting for Security and Aesthetics

Lighting plays a critical role in front garden design. It not only enhances security and safety but also highlights your garden’s key features, creating a magical nighttime landscape.

Security Lighting

Well-placed lighting can deter potential intruders by eliminating dark corners. Motion-sensor lights near the driveway, garden gate, or front door can increase security.

Aesthetic Lighting

Strategically placed lights can showcase your garden’s best features, such as a beautiful tree, water feature, or flower bed. Uplighting, downlighting, and crosslighting techniques can be used to highlight textures, create shadows, or focus on a specific element.

How to Incorporate a Rock Garden into Your Landscape

Rock gardens can bring a natural, rugged beauty to your front yard. They’re particularly well-suited to sloping sites or poor soil conditions and can be a creative solution for difficult areas where other plants struggle to thrive.

Designing Your Rock Garden

Choosing Rocks and Plants

The choice of rocks, their size, color, and placement, can greatly impact your garden’s aesthetic. Aim for a naturalistic look, as if the rocks have been there forever. Choose plants that naturally grow in rocky habitats, such as sedums, alpines, or succulents.

Designing Your Rock Garden

When designing your rock garden, consider height, color, and bloom time of your chosen plants. Use rocks to create microclimates, with crevices providing shade for more delicate plants, while sun-loving plants can thrive on exposed surfaces.

Whether it’s the soothing sounds of a water feature, the inviting allure of a well-lit pathway, the rugged charm of a rock garden, or the captivating beauty of a thoughtfully designed landscape, front gardens offer endless opportunities for creativity and expression. They’re the welcoming committee for your home, an open-air extension of your personal style, and a living piece of art that evolves with the seasons. Investing time in your front garden design can not only enhance your home’s curb appeal but also create a space that brings joy, relaxation, and pride.

Sustainable Front Garden Designs

Sustainability has become a central theme in contemporary garden design. It involves selecting appropriate plants, using resources efficiently, and incorporating environmentally friendly practices.

Native Plants

Using native plants is a key principle in sustainable garden design. They are well adapted to local conditions, require less watering and are more resistant to local pests and diseases, reducing the need for chemical inputs. The use of native trees, shrubs, and flowers can also create a familiar landscape for local wildlife.

Water Conservation

Incorporate design elements that conserve water. This can include using drought-resistant plants, mulching to reduce evaporation, and designing your garden in a way that maximizes water retention.

Recycling and Composting

Recycle and compost garden waste to reduce landfill and enrich your garden soil. Homemade compost is a rich source of nutrients for your plants and can greatly improve soil structure.

Creating Seasonal Displays in Your Front Garden All Year Long

A well-planned front garden can provide interest throughout the year, with a constant rotation of colors, textures, and scents.

Seasonal Displays in Your Front Garden

Spring and Summer Displays

During these seasons, annuals and perennials provide a riot of color. Consider bulbs like daffodils and tulips for early spring color, followed by a succession of blooming perennials and annuals.

Autumn and Winter Displays

In autumn, focus on trees and shrubs with beautiful fall foliage. In winter, incorporate evergreens, winter-flowering plants, and elements like attractive seed heads and bark that add interest when other plants are dormant.

Designing Your Garden to Attract Wildlife

A wildlife-friendly garden not only benefits local fauna but also adds another dimension of interest to your garden.

Plant Diversity

A diverse selection of plants will attract a wider range of wildlife. Different species are attracted to different types of flowers, so try to incorporate a mix of plants that bloom at different times.

Food and Water

Bird feeders and baths can attract a variety of bird species. Additionally, consider incorporating plants that produce berries, seeds, or nectar to provide natural food sources.

How to Design a Low Maintenance Front Garden

A beautiful garden doesn’t have to demand all of your free time. With smart design choices, you can create a low-maintenance front garden that still turns heads.

Easy-care Plants

Select plants that are known for their easy-care nature. Perennials, slow-growing shrubs, and ground cover can reduce the need for regular maintenance tasks like watering, pruning, and weeding.

Hardscaping

Hardscaping, such as paths, patios, or rock gardens, can reduce the amount of lawn or planted areas that require regular care.

Mulch

Mulching around plants can suppress weeds, conserve water, and slowly release nutrients into the soil, reducing the need for regular fertilizing.

Conclusion

Designing your front garden offers an opportunity to express creativity, and enhance your home's curb appeal and overall aesthetic value. From landscaping, lawns, flower beds, and the strategic placement of shrubs, your front garden design can be an embodiment of your personality and style.

Embracing sustainable practices in your garden design not only contributes to the health of the environment but also creates a flourishing and low-maintenance space that you and local wildlife can enjoy. Incorporating year-round seasonal displays ensures your garden continually provides visual interest, keeping your home's facade vibrant no matter the time of year.

Whether you choose to create an inviting pathway with a garden gate, illuminate with outdoor lighting, frame your garden with fencing, or add water features, every detail contributes to the garden's overall charm. Strategic hardscaping can be both practical and aesthetic, serving to reduce maintenance and create focal points in your garden.

The addition of elements like rock gardens, sculptures, and potted plants provide opportunities to create unique, personalized areas within your garden. So whether you prefer a formal or informal look, or perhaps a fusion of both, remember that the main aim is to create a space that resonates with you and adds value to your home.

In the end, the front garden serves as a welcoming prelude to your home. By implementing these front garden design ideas, you can make your space not just a pathway to your front door, but a journey of beauty and relaxation, a testament to your love for nature and design.

19 Herb Garden Layout Ideas: A Complete Guide

Crafting an herb garden is both a rewarding and functional venture. The art of herb gardening offers therapeutic cultivation, a delightful variety of indoor and outdoor herbs, and the rewarding bounty of culinary, medicinal, and aromatic herbs. In this comprehensive guide, we delve into 19 inspiring herb garden layout ideas, covering various aspects such as planting, soil types, watering herbs, sunlight needs, container herb gardening, pruning and harvesting, managing common herb pests, fertilizing herbs, growing herbs from seeds, and discerning between perennial vs annual herbs.

Whether you’re a seasoned green thumb or a budding gardener, this article is tailored to enrich your understanding and inspire your creativity. From DIY herb garden projects to intricate herb garden designs, we provide a detailed exploration into the wonderful world of herb gardening. As you explore this guide, remember that the benefits of herb gardening extend beyond the culinary and medicinal; it also nurtures the mind, heart, and soul.

Introduction to Designing an Herb Garden Layout

Herb gardening is a symphony of science and art. The first step towards a thriving herb garden is a well-planned layout. The design is influenced by several factors such as the type of herbs (medicinal, culinary, aromatic), their growth patterns (perennial vs annual), and your garden’s location (indoor or outdoor).

Designing an Herb Garden

Starting from seeds or established plants, remember that each herb has unique requirements for sunlight, watering, soil type, and space. Consider the adult size of your plants to ensure they have room to flourish without crowding others. Finally, group herbs with similar sunlight and watering needs together.

The most fulfilling aspect of designing your herb garden is the creative freedom. From a neat grid arrangement to a more natural, cottage garden style, the choice is yours. Don’t forget to consider practicality; ensure your herb garden is easily accessible for watering, pruning, harvesting, and pest management.

Planning Your Space: Basic Herb Garden Layouts

The size and location of your garden will influence your herb garden layout. Here are some basic layouts:

  • Square Foot Gardening: This method maximizes space and minimizes weeds. Divide your garden into square feet and plant different herbs in each square.
  • Row Gardening: Ideal for larger outdoor gardens. Plant herbs in rows, allowing ample space for growth and maintenance.
  • Circle Garden: Create a circular plot with a focal point in the middle. Plant herbs in concentric circles based on their height and sunlight needs.
  • Raised Bed Garden: Raised beds offer excellent drainage and are a great option if your ground soil is poor. They can also be easier to access.
  • Container Garden: For those with limited space or living in apartments, container gardening offers a viable solution. Containers can be moved according to sunlight needs and aesthetic preferences.

Remember that each of these layouts requires different soil types, sunlight, and watering protocols. Plan ahead to ensure a thriving herb garden.

Creating a Kitchen Herb Garden

A kitchen herb garden is a wonderful addition to any home, fostering fresh flavor for meals and a green touch to your space. Start by selecting a variety of culinary herbs such as basil, rosemary, thyme, and parsley.

Kitchen Herb Garden

Choose a location near a window that receives plenty of sunlight. Most herbs need around 6-8 hours of sunlight per day. Make sure to select containers with good drainage and use quality potting soil. Remember, each herb has unique watering needs—too much or too little water can be detrimental.

Regular pruning promotes bushier and more productive plants. Always prune from the top to encourage lateral growth. Freshly pruned herbs can be used immediately in your cooking, dried for later use, or even frozen.

Building a Vertical Herb Garden

A vertical herb garden is a creative, space-saving solution, particularly suitable for urban dwellers. It can be built using various structures such as a trellis, pallet, or even a hanging shoe organizer. Choose your herbs based on their size and growth habits. Trailing herbs like oregano and creeping thyme are excellent for the top tiers, while upright herbs like basil and dill can be planted in the lower tiers.

Ensure your vertical garden is securely mounted and has good access to sunlight. Containers should have ample drainage and be filled with well-draining soil. Regular watering, pruning, and harvesting will keep your vertical garden thriving and beautiful.

Herb Garden Layouts in Containers

Container herb gardening offers flexibility and convenience. The size and depth of your container should correspond to the growth habits of your herbs. For instance, deep-rooted herbs like dill and parsley require deeper pots, while shallow-rooted herbs like basil and cilantro do well in standard pots.

Containers should have good drainage holes to prevent waterlogging. Regular watering is essential as containers dry out faster than ground soil. Keep an eye on your herbs and water when the top layer of soil feels dry. Remember to feed your herbs with a balanced liquid fertilizer once a month during the growing season.

Designing a Herb Garden for Health and Wellness

Herbs are powerhouses of health and wellness, and a medicinal herb garden is a rewarding project. Start by researching herbs with medicinal properties that cater to your health needs. Some popular options include echinacea for immune support, peppermint for digestion, chamomile for stress relief, and lavender for relaxation.

Consider adding aromatic herbs like rosemary, basil, and thyme to your garden. They not only smell wonderful but also have various health benefits. As with any garden, ensure your medicinal herb garden has the right soil, sunlight, watering, and care for each plant.

The Perfect Pairing: Companion Planting in Your Herb Garden

Companion planting in an herb garden involves strategically placing herbs that can benefit each other in terms of growth, flavor, and pest control. For instance, planting basil with tomatoes can improve both their flavor and growth. Similarly, rosemary and sage are excellent companions, as they thrive in similar conditions and can help deter pests from each other.

Planting in Your Herb Garden

Other factors to consider are light, soil, and watering preferences. Ensure companion plants have similar needs. Also, consider the size and growth habits of herbs, ensuring that larger, bushier plants don’t overshadow smaller ones. The key is to cultivate harmony and balance within your herb garden.

While companion planting has its merits, it’s also crucial to be aware of antagonistic pairings. These are plant pairs that can hinder each other’s growth or attract pests. For instance, planting sage and cucumbers together can be detrimental to both. Research and plan before you plant, ensuring a thriving herb garden.

Designing a Herb Garden for Year-Round Harvest

Designing an herb garden for a year-round harvest requires careful planning and a mix of different herbs. It starts with understanding the growing seasons of various herbs. Perennial herbs like sage, thyme, and rosemary can provide year-round harvests in milder climates. Annual herbs like dill and cilantro can be planted in successive batches for a continuous supply.

One technique is intercropping – planting fast-growing herbs like cilantro and dill in between slow-growing herbs like rosemary and thyme. This way, you can harvest the fast-growing herbs while the slow-growing ones are still maturing.

A herb spiral is another concept that allows you to create diverse microclimates in a small area. The top of the spiral is dry and sunny, suitable for herbs like rosemary and thyme, while the bottom is cooler and moister, ideal for herbs like parsley and chervil.

Cultivating a Medicinal Herb Garden

Creating a medicinal herb garden can be a rewarding way to boost your health naturally. The process begins with researching and choosing the herbs that align with your health needs. Some commonly grown medicinal herbs include echinacea for immune support, chamomile for relaxation, peppermint for digestion, and lavender for its calming effects.

When cultivating medicinal herbs, consider their sunlight, water, and soil needs. Many medicinal herbs like chamomile and lemon balm prefer full sun, while others like mint and valerian can tolerate some shade.

Proper harvesting is crucial to preserve the medicinal properties of the herbs. Generally, herbs should be harvested in the morning after the dew has dried but before the midday sun. Leaves are best harvested before flowering, while flowers should be collected just as they open.

Ideas for Attracting Bees and Butterflies To A Herb Garden

Attracting bees and butterflies to your herb garden not only adds a dash of beauty but also aids in pollination, enhancing your garden’s productivity. Many herbs like lavender, thyme, and mint are rich in nectar and attract a variety of pollinators.

Bees and Butterflies To A Herb Garden

Bee balm is a particular favorite of both bees and butterflies, while dill and fennel are known to attract beneficial insects like ladybugs and lacewings. Planting these in your herb garden can help establish a balanced ecosystem.

Provide a shallow water source for the bees and butterflies, and avoid using pesticides, which can harm these beneficial insects. Also, let some of your herbs flower. While flowering herbs may not be the best for culinary use, they are excellent for attracting pollinators.

Herb Garden Layout Ideas Inspired by Permaculture Principles

Permaculture principles inspire sustainable and efficient herb garden designs. The focus is on creating a self-sustaining ecosystem where each element supports the others. Start by observing your space, understanding its light, wind patterns, and topography. Use this information to create zones based on the herbs’ needs and your frequency of interaction with them.

Companion planting is a key permaculture strategy, where beneficial plant combinations support each other’s growth and deter pests. Vertical gardening is another principle that maximizes the use of space. Herbs with different heights and growth habits can be layered in a single space, creating a lush, productive garden.

Remember to prioritize biodiversity, not only in terms of herbs but also encouraging beneficial insects and other organisms. This will foster a healthy, thriving garden that requires minimal external inputs.

The Use of Raised Beds in Your Herb Garden

Raised beds offer many benefits in herb gardening, especially if you have poor native soil or limited mobility. Raised beds provide improved drainage, prevent soil compaction, and can make gardening tasks more accessible.

Raised Beds in Your Herb Garden

Herbs like rosemary, thyme, and oregano, which prefer well-drained soil, can thrive in raised beds. Aesthetically, raised beds can be arranged in various patterns, contributing to the overall design of your garden.

When creating raised beds, consider their height and width. They should be wide enough to support your plants but narrow enough to allow easy access to all plants. Fill your raised beds with a mix of high-quality topsoil, compost, and other organic matter to provide a rich, well-draining environment for your herbs.

Growing a Herb Tea Garden: Layout Ideas and Plant Choices

Growing a herb tea garden is a delightful and practical venture that combines the joy of gardening with the comfort of a homemade brew. The first step in designing your tea garden is to select your herbs. Consider peppermint, chamomile, and lemon balm for their soothing properties, or rosemary, thyme, and sage for a savory infusion. Also, consider adding stevia for a natural sweetener.

Herb Tea Garden

Design your tea garden for easy access, as you’ll often be harvesting these herbs. Raised beds or containers near your kitchen door can be a good choice. Group herbs with similar sunlight and watering needs together to make care easier. You might also want to incorporate a seating area where you can enjoy your freshly brewed herbal teas.

Remember, harvesting is a critical part of maintaining a tea garden. Regular harvesting encourages new growth and ensures that your herbs are at their most flavorful. Ideally, herbs should be harvested in the morning, after the dew has dried but before the sun gets too hot.

The Role of Aroma in Planning Your Herb Garden Layout

Aromatics play a significant role in planning your herb garden layout. The scents of herbs can act as a deterrent to pests, making them an integral part of an organic pest control strategy. For example, herbs such as lavender, mint, and rosemary are known to repel various insects and can be strategically placed throughout the garden.

The aroma of herbs also adds to the sensory pleasure of the garden. Imagine brushing past a rosemary shrub and being greeted by its fresh, uplifting scent. Planting aromatic herbs along paths or near seating areas can make time spent in the garden even more enjoyable.

However, be mindful of how different scents may interact with each other. Overpowering scents might interfere with more subtle ones. So, take into consideration the strength and compatibility of different aromas when planning your herb garden layout.

Creating a Herb Garden For The Children

Creating a herb garden for children is a fantastic way to introduce them to gardening and the natural world. Start with easy-to-grow, non-toxic herbs like mint, basil, and chives. These plants are sturdy, grow quickly, and can handle some ‘rough’ care that might come with young gardeners.

Use containers, raised beds, or designate a special area in your garden for the children’s herb garden. Let them participate in every step, from planting to watering and harvesting. Provide them with child-sized gardening tools to make the process easier and more enjoyable.

You can make the garden educational by labeling each herb and teaching them about their uses. Growing a variety of herbs also introduces children to different flavors and aromas, encouraging a love of cooking and healthy eating.

Maintaining Your Herb Garden: Pruning, Watering, and Other Care Tips

Maintaining an herb garden involves various tasks, including pruning, watering, fertilizing, and monitoring for pests. Pruning encourages bushier growth and can extend the productive life of your herbs. As a general rule, never prune more than a third of the plant at a time, and always prune just above a leaf joint.

Watering your herb garden

Watering needs vary among herbs. Mediterranean herbs like rosemary, sage, and thyme prefer dry conditions, while others like mint and parsley require more water. It’s crucial to research each herb’s needs and water accordingly.

Fertilizing your herb garden provides essential nutrients for growth. Organic fertilizers like compost or manure are ideal, as they release nutrients slowly and improve soil structure. Avoid high-nitrogen fertilizers, as they can lead to lush but flavorless growth.

Regularly monitor your herb garden for common pests like aphids and caterpillars. If you notice an infestation, opt for organic pest control methods to maintain the health and safety of your herbs.

Smart Watering Solutions for Your Herb Garden

Smart watering solutions can make herb gardening more efficient and environmentally friendly. A drip irrigation system, for example, delivers water directly to the root zone, minimizing evaporation and reducing water usage. It also allows for the precise control of watering schedules and amounts.

Rain barrels are another excellent solution, allowing you to harvest rainwater for your garden. They can be easily installed under downspouts and can provide a substantial amount of water during the rainy season.

Mulching is another smart watering solution. By adding a layer of organic mulch around your herbs, you can reduce water evaporation, maintain soil temperature, and suppress weeds.

Tips On Harvesting and Using Your Herbs

Knowing how and when to harvest your herbs is crucial for their taste and potency. In general, herbs should be harvested in the morning after the dew has dried but before the sun becomes too hot. This is when the oils responsible for flavor and aroma are at their peak.

Harvesting Herbs

For leafy herbs, cut off the tops, leaving a few inches of growth so the plant can recover. For herbs with woody stems, such as rosemary or thyme, cut off sprigs as needed. Always use a sharp pair of scissors or pruners to avoid bruising the plant.

Once harvested, herbs can be used fresh or preserved for later use. Fresh herbs are often more flavorful, but drying or freezing can extend their usefulness. Herbs can be dried by hanging them in small bundles in a dry, dark place. Alternatively, they can be frozen in ice cube trays with a little water or olive oil.

Seasonal Herb Garden Layouts: Ideas for Every Season

Seasonal herb garden layouts take into account the changing needs of the garden throughout the year. In spring, plant fast-growing annual herbs like parsley and dill, alongside perennials that will return year after year. Spring is also a good time to plant hardy herbs like rosemary and thyme.

In the summer, focus on heat-tolerant herbs like basil and oregano, while also ensuring adequate watering for the entire garden. Fall is the time for harvesting and preserving herbs for winter use. Some herbs like sage and rosemary can also be planted in fall for a head start in the next growing season.

Winter herb gardens can be challenging in cold climates. Consider moving some herbs indoors or using protective covers for outdoor plants. Some hardy herbs, like thyme and sage, can survive winter outdoors with a little extra care.

Conclusion

Creating an herb garden is an endeavor that offers an array of benefits. From improving your meals with fresh culinary herbs, supporting your health with medicinal herbs, or simply enjoying the therapeutic act of cultivation, an herb garden is an asset to any home.

While the journey to a thriving herb garden involves careful planning, planting, and maintenance, the rewards far outweigh the effort. As you delve into this venture, remember that each herb is unique, and understanding their individual needs will be the key to success.

This guide has presented diverse herb garden layout ideas to suit different spaces and purposes. Whether you choose a simple container garden, a space-saving vertical garden, or a full-fledged outdoor herb garden, each one will bring you joy and fulfillment.

So, go ahead and start planning your herb garden. Take note of the tips and guidelines shared here and allow your creativity to bloom along with your herbs. Happy Gardening!

23 Patio Layout Design Ideas To Help You Decide

Creating the perfect outdoor space often involves meticulous planning and design. From the choice of outdoor furniture to patio layout, a great deal of consideration is needed to create a harmonious and functional space. This comprehensive guide provides 23 patio layout design ideas that will help you make the most of your backyard, whether you have a sprawling garden or a cozy terrace.

You’ll find insights into various aspects of outdoor living, including choosing the right furniture sets, determining the optimal layout, and adding aesthetic features like pavers, plants, and lighting. Furthermore, you’ll discover how to merge functionality with aesthetics for the perfect patio design. By the end of this guide, you’ll be equipped with the knowledge to transform your outdoor space into a haven for relaxation, entertainment, and enjoyment.

Let’s begin this journey to create an outdoor space that not only complements your lifestyle but also enhances your home’s overall appeal.

How to Optimize Your Patio Space

Optimizing your patio space is a combination of practicality and creativity. While you might be tempted to fill the space with beautiful outdoor furniture and decor, it’s essential to ensure that there’s enough space for people to move around comfortably.

Firstly, consider the natural flow of traffic in your outdoor space. You should be able to move freely from the house to the patio and to the rest of the yard without encountering any obstacles. As such, you might need to rearrange your outdoor furniture or relocate large plants to clear the way.

Secondly, think about the various activities you’ll be doing in your patio. Do you need space for a grill? Do you like dining al fresco or prefer a lounge setting for quiet relaxation? By identifying your patio’s primary functions, you can designate zones for different activities. This will help you decide where to place your furniture, plants, and other decor.

Lastly, make use of vertical space. If you have a small patio, using the walls and fences can help you save valuable floor space. Install shelves to display potted plants, hang wall decor, or even set up a vertical garden. Remember, optimizing your patio space means not only making the most out of the floor area but also the vertical space.

Choosing the Right Outdoor Furniture for Your Patio

Choosing the right outdoor furniture can make or break the functionality and aesthetics of your patio. When selecting furniture, there are three main factors to consider: size, functionality, and material.

Outdoor Furniture for Your Patio

In terms of size, you need to make sure that the furniture fits comfortably in your patio without making it look cluttered. Measure your space and plan your furniture layout accordingly. Leave enough space between furniture pieces to allow easy movement. If your patio is small, opt for compact furniture or pieces that can serve multiple functions.

As for functionality, consider your lifestyle and how you intend to use your patio. If you frequently host gatherings, consider investing in an outdoor dining set and additional seats for guests. If relaxation is your main priority, go for deep seating pieces with comfortable cushions and a side table where you can place your drinks and books.

Lastly, consider the material of your outdoor furniture. It should be sturdy and able to withstand varying weather conditions. Teak, metal, and all-weather wicker are popular choices for their durability. Also, consider getting furniture covers for added protection during harsh weather.

Patio Layout Design Ideas for Small Spaces

Small patios can be just as beautiful and functional as larger ones. The key is to utilize the space intelligently and use multi-functional furniture and design elements. Here are some innovative design ideas to make the most of your small patio:

Patio Layout Design

Consider foldable or extendable furniture that you can adjust based on your needs. A foldable table, for instance, can be opened up when you’re eating and folded away afterward to save space. Similarly, chairs can be stacked and stored when not in use.

Invest in multi-functional furniture. An ottoman, for instance, can function as a seat, a table, or a footrest. A bench with storage underneath can hold your cushions, gardening tools, or outdoor toys.

Vertical planting is another brilliant idea for small patios. Instead of using floor space for your plants, why not grow them upwards? You can install a trellis or use hanging planters to create a green wall. This not only saves space but also adds a touch of nature and freshness to your patio.

Finally, use outdoor mirrors to create an illusion of space. Mirrors reflect light and the surrounding area, making your patio feel larger and brighter.

The Art of Balancing Sun and Shade in Your Patio Design

To fully enjoy your patio, it’s essential to strike a balance between sun and shade. Different shade solutions can provide relief from the sun’s rays, enhance comfort, and also add to the overall aesthetic of your patio.

Balancing Sun and Shade in Your Patio Design

A pergola is a versatile option that can provide a good amount of shade without blocking out sunlight entirely. You can adjust the amount of shade by altering the spacing between the crossbeams. To add a touch of nature, consider growing climbing plants like roses or vines on your pergola.

Patio umbrellas are another popular choice because they offer flexibility. They can be opened up when needed and closed to let in more sunlight. Plus, they come in a variety of styles and colors, allowing you to choose one that matches your patio design.

For those who prefer a more permanent solution, a sunroom or a covered patio could be a good option. These structures provide full shade and protection from other weather elements, allowing you to use your patio all year round.

Best Materials To Use For Your Patio Paving

The material you choose for your patio paving can significantly impact the durability, maintenance, aesthetics, and cost of your patio. Here are some options:

Concrete is a cost-effective and versatile choice. It can be poured to fit any shape, making it suitable for patios of all sizes. Concrete can also be stamped or stained to mimic the look of more expensive materials like brick or natural stone.

Pavers, whether concrete, brick, or stone, are a popular choice because of their durability and aesthetic appeal. They come in various colors, shapes, and sizes, allowing you to create a patio design that matches your home and personal style. Pavers are also easy to repair—if one gets damaged, you can simply replace it without disturbing the rest.

Natural stone, like slate, granite, or flagstone, is a high-end option that offers a unique and beautiful look. These stones are durable and long-lasting, but they can be quite expensive and require professional installation.

Incorporating Nature into Your Patio Layout

Incorporating elements of nature into your patio can make it more relaxing, beautiful, and harmonious with your overall landscape. Here’s how you can do it:

Nature into Your Patio Layout

Adding plants is the most straightforward way to incorporate nature into your patio. You can create a border of plants around your patio, place potted plants at the corners, or even create a vertical garden. Choose plants that suit your climate, soil, and light conditions.

You can also consider adding a water feature. A small pond, a fountain, or a waterfall can bring a sense of tranquillity to your patio. The sound of water can be soothing, and it can also attract birds and butterflies.

Natural materials can also bring a touch of nature to your patio. Consider using natural stone for your patio flooring, or add a wooden pergola or a rattan furniture set.

Ideas to Make Your Patio Ultra Comfortable

Making your patio ultra comfortable involves paying attention to details and adding elements that enhance relaxation and enjoyment. Here are some ideas:

Invest in comfortable seating. Choose outdoor furniture with deep seating and plush cushions. Add outdoor pillows for extra comfort and a pop of color.

Set up a hammock or a swing chair. These can provide a comfortable spot to relax, read, or take a nap.

Consider adding an outdoor rug. It can make your patio feel cozier and more inviting, not to mention it can add color and pattern to your space.

Don’t forget about lighting. Soft outdoor lighting can create a warm and inviting ambiance. You can use string lights, solar lights, or even candles.

Patio Layout Ideas for Large Spaces

Designing a large patio can be a challenge because of the vast space. But with careful planning and design, you can transform it into a functional and beautiful outdoor living area. Here are some layout ideas:

One common strategy is to divide your large patio into different zones or sections, each with a specific function. You can have a dining area near the barbecue or outdoor kitchen, a lounge area with comfortable seating, and even a quiet corner for reading or meditation.

Use large planters, pergolas, or screens to visually separate these zones. Rugs, lighting, and furniture can also help define these areas and make each space feel more intimate.

In a large space, you can also incorporate larger elements that might not fit in a smaller patio. Think about adding a fire pit, a water feature, or even a gazebo. These features can serve as a focal point and add a lot of character to your patio.

Consider the flow of movement. Even in a large patio, you want to make sure that people can move freely from one area to another. So arrange your furniture and other elements in a way that encourages easy movement.

Best Way to Incorporate Lighting within Your Patio Design?

Lighting plays a crucial role in your patio design. It not only makes your patio usable after sunset, but it also enhances the ambiance and highlights the key features of your patio. Here’s how you can incorporate lighting into your patio design:

Lighting within Your Patio Design

Start with task lighting. This is necessary for areas where you need visibility, like the barbecue area or outdoor kitchen. Wall-mounted light fixtures or spotlights can be a good choice for these areas.

Next, consider ambient lighting to set the mood. String lights, lanterns, or solar lights can provide a warm and cozy glow to your patio. You can hang string lights overhead or wrap them around tree trunks or pergolas.

Don’t forget accent lighting to highlight the features of your patio. You can use spotlights or landscape lighting to highlight a water feature, a beautiful plant, or a statue.

Finally, consider safety. Stair lights or path lights can guide your guests and prevent tripping over in the dark.

A Guide to Outdoor Kitchen Planning For a Patio

An outdoor kitchen can be a fantastic addition to your patio, offering a perfect spot for alfresco cooking and dining. Here’s a guide to help you plan your outdoor kitchen:

Outdoor Kitchen Planning For a Patio

First, consider the location. Your outdoor kitchen should be near the house for easy access to utilities. But it should also be placed in a way that smoke from the grill doesn’t enter your home.

Next, think about the layout. Much like an indoor kitchen, your outdoor kitchen will need areas for food preparation, cooking, and cleaning. You may also want a bar or serving area for entertaining.

In terms of appliances, a grill is a must. But you might also consider other appliances like a pizza oven, a refrigerator, or even a dishwasher for convenience. Keep in mind that outdoor appliances should be weather-resistant.

Choose durable and easy-to-clean materials for your countertops and cabinets. Stone, concrete, and stainless steel are popular choices for outdoor kitchens.

Don’t forget about lighting and ventilation. You need good task lighting for cooking, and a ventilation system if your kitchen is covered or enclosed.

Using Potted Plants to Enhance Your Patio

Potted plants are a fantastic way to enhance your patio, add a touch of nature, and create a relaxing environment. Here are some tips for using potted plants on your patio:

Potted Plants to Enhance Your Patio

Choose a variety of plants in terms of size, color, and texture. Large plants can serve as a focal point or a privacy screen, while smaller plants can add color and detail to your patio.

Consider the pot as part of the design. The size, color, and material of the pot can complement your outdoor decor and add to the overall aesthetic of your patio.

Remember to take care of your potted plants. They need regular watering, and some might need to be moved indoors during the winter.

Finally, arrange your potted plants in a way that draws the eye. You can group them, arrange them in a row, or even place them at different heights to create interest.

Adding Water Features For Best Effect

Water features can bring a sense of peace and tranquility to your patio. They can also add a visual interest and serve as a focal point. Here are some ideas for adding water features to your patio:

Consider a fountain. It’s a popular choice because of its beauty and the soothing sound of running water. It can be a standalone feature or part of a larger landscape like a pond.

A pond or a water garden can be a wonderful addition if you have the space. You can add fish, water lilies, and other water plants to create a small ecosystem in your backyard.

For a modern and minimalist look, a wall fountain or a water wall might be a good choice. They take up less space and can be a great backdrop for your outdoor seating area.

Whatever water feature you choose, make sure it blends well with the overall design of your patio. Consider the material, size, and style of the water feature to ensure it complements your patio.

Ideas to Make Your Patio Design Promote Relaxation

Your patio can be a sanctuary, a place where you can relax and unwind. Here are some design ideas to make your patio promote relaxation:

Choose a soothing color palette. Blues, greens, and neutrals can create a calming environment. You can incorporate these colors through your furniture, cushions, or decorations.

Incorporate nature. Plants, flowers, or even a water feature can make your patio feel more relaxing.

Add comfortable seating. A daybed, a hammock, or a swing chair can provide a comfortable spot to relax.

Consider a fire pit or a fireplace. They can provide warmth and a cozy ambiance, making your patio a perfect spot to relax even in cooler evenings.

Finally, create some privacy. You can use screens, fences, or even plants to create a private retreat in your backyard.

Combining Functionality and Aesthetics

When designing your patio, you want to balance functionality and aesthetics. Here’s how you can achieve this balance:

Think about how you’ll use your patio. Do you love to entertain? Then you’ll need plenty of seating and a dining area. Do you like to relax and read? Then a comfortable lounge chair in a quiet corner might be essential. Knowing your needs can guide your design.

Choose your furniture and decor with both form and function in mind. They should not only be beautiful but also comfortable and durable. Weather-resistant materials are a must for outdoor spaces.

Don’t forget about storage. You’ll need a place to store your cushions, grilling tools, and other outdoor items. Outdoor cabinets, benches with storage, or a garden shed can help keep your patio clutter-free.

Make sure your patio is easy to maintain. Choose materials that are easy to clean and plants that don’t require a lot of care. After all, you want to spend your time enjoying your patio, not maintaining it.

Best Way of Using Your Space for Entertaining

Entertaining on your patio requires thoughtful planning to make the most of your available space. Start with furniture placement: arrange seating in a way that encourages conversation, such as circular or semi-circular configurations. To avoid crowding, consider versatile pieces, like ottomans or benches, which can function both as seating and as surface area for food and drinks.

Entertaining on your patio

Think about the flow of your gatherings. If grilling is a staple, position the grill where the chef can socialize without being separate from the party. Similarly, place a drinks station strategically so guests can help themselves without creating a bottleneck.

In large spaces, consider distinct zones for different activities. For example, a dining area near the grill, a lounge area with a fire pit for after-dinner drinks, and a play area for children. Use outdoor rugs or different flooring materials to define these zones visually.

Remember to plan for night-time entertaining. Effective outdoor lighting, such as lanterns, fairy lights, or even a well-placed spotlight, can add to the ambiance while providing necessary illumination.

Lastly, have a contingency plan for unpredictable weather. Outdoor heaters, shades, or a dedicated covered area will ensure your outdoor gatherings are a success come rain or shine.

Benefits of Including a Fire Pit in Your Layout

Incorporating a fire pit into your patio layout offers numerous benefits. Firstly, it extends the use of your outdoor space into colder months. Gathering around a fire pit is a cozy, social experience that encourages conversation and connection. It can become a focal point of your patio design, drawing people in with its warm light and crackling flames.

Fire pits can also contribute to the overall aesthetics of your patio. Styles range from rustic, traditional wood-burning pits to sleek, modern gas-powered designs. You can choose one that complements your patio decor and reflects your personal style.

Additionally, a fire pit can serve a functional purpose beyond heating. Some designs come with a grill for cooking or a flat cover that turns the pit into a table when not in use.

Despite the numerous benefits, safety should be a primary consideration when including a fire pit. Ensure it is placed far enough from your home and any flammable materials. Also, remember to check local regulations concerning outdoor fires.

Innovative Ideas for Privacy

Privacy in your patio area can make the space feel more like an extension of your indoor living space. Traditional options for privacy include fencing, latticework, or walls. However, there are also innovative ideas you can explore.

One such idea is using outdoor curtains or drapery. These create a soft, flexible boundary that adds a touch of elegance. Plus, they can be easily drawn back when you want to open up your space.

Vertical gardening is another innovative idea. By installing planter boxes or climbing structures, you can grow a green wall of privacy. This not only offers seclusion but also adds beauty and nature to your patio.

Freestanding privacy screens are another versatile option. These can be moved and adjusted as needed. Designs range from simple wooden lattice panels to intricate metalwork or even themed screens that contribute to your patio’s overall theme.

Lastly, consider multi-purpose privacy structures. For example, a pergola with side lattices or curtains not only provides privacy but also defines your patio space and offers some shade.

Maintaining Flow Between Indoor and Outdoor Spaces

Achieving a seamless flow between your indoor and outdoor spaces can make both areas feel larger and more connected. To start, consider the visual flow. Try to match your outdoor decor with your indoor style. Use similar colors, materials, and styles to create a consistent aesthetic across the boundary of your home.

The physical transition between spaces should be as smooth as possible. French doors or large sliding doors provide an expansive opening that merges indoors and outdoors. If possible, align indoor and outdoor flooring to strengthen the sense of continuity.

Think about functional connections, too. An outdoor kitchen located near your indoor one, for example, allows for easy movement when preparing meals. Similarly, aligning indoor and outdoor seating areas encourages flow during social gatherings.

Lastly, remember to connect the spaces sensory-wise. For instance, installing outdoor speakers lets you extend your indoor music to your patio. Similarly, aromatic plants near doorways can carry delightful scents indoors.

Patio Layout Ideas for Year-Round Use

Designing your patio for year-round use involves considering comfort in all types of weather. In warmer months, shade is crucial. This can be provided by umbrellas, pergolas, or even by strategically planted trees. Cooling features like outdoor fans or a misting system can also increase comfort during hot days.

For colder months, heating is key. A fire pit or an outdoor heater can keep your patio cozy long into the night. Consider providing warm blankets for an added touch.

Remember to consider the direction of the wind and the position of the sun at different times of the year during the design process. This can help you optimize your patio for comfort.

Outdoor enclosures, like a screened porch or a retractable canopy, can protect your patio from the elements, allowing you to enjoy it in all weather conditions. Another tip is to use weather-resistant materials for your furniture, flooring, and other features.

Colour Pallet and Colour Selection Options For Your Patio?

Choosing the right colour palette for your patio can set the mood and enhance its overall aesthetic. Neutral colors like beige, brown, and gray can create a calming and sophisticated vibe. These colors also tend to complement the natural colors of the outdoor setting.

For a vibrant and energetic ambiance, consider bold colors like red, orange, or bright blue. These can be incorporated through cushions, outdoor rugs, or decorative accents. Pastel shades can create a soft, romantic vibe.

Remember that color extends beyond your furniture and decorations. The color of your patio flooring, walls or fences, and even your outdoor lighting can contribute to your color scheme.

The colors of your plants and flowers can also add to your patio’s color palette. Choose plant varieties that complement your chosen colors, and consider their blooming cycles to ensure you have pops of color throughout the year.

How to Maximise Seating Area Within a Patio

When planning your seating arrangement, the key is to balance capacity with comfort. Too much furniture can make your patio feel crowded, while too little might not accommodate all your guests.

Modular outdoor furniture can be rearranged based on your needs, making it a versatile choice. Benches can accommodate more people than individual chairs, and they can be tucked away under a table when not in use.

Built-in seating, such as a bench along a wall or around a fire pit, can provide a lot of seating without taking up too much space. Similarly, multi-functional pieces like ottomans or stools can serve as both seating and side tables.

Don’t forget vertical space. If your patio is small, consider a tiered seating arrangement. A few steps leading up to a raised seating area can add interest to your design while providing extra seats.

Lastly, remember to leave enough space for people to move around comfortably. There should be ample space for people to enter and exit seating areas without feeling squeezed.

Using Pergolas to Define Space

Pergolas are an effective tool for defining spaces in your patio. They create a sense of enclosure without blocking light or views. A dining area under a pergola, for instance, feels distinct from the rest of the patio.

Using Pergolas to Define Space

You can use one pergola to define a large space or multiple pergolas to create different zones within your patio. A pergola over your outdoor kitchen can separate the cooking area from the dining area, for example.

Pergolas can also be used to guide movement. A pergola-covered walkway can lead guests from one area of your patio to another, adding a sense of journey to your outdoor space.

In terms of design, pergolas offer a lot of flexibility. You can leave the top open, cover it with fabric for more shade, or let climbing plants grow over it for a natural canopy. The style and material of your pergola can be chosen to match your overall patio design.

Incorporating an Outdoor Bar into a Patio Design

An outdoor bar can make your patio the perfect spot for entertaining. When planning your bar, consider its location. It should be accessible but not interrupt the flow of your patio. Near the grilling or dining area is often a good spot.

Think about the size of your bar. A large bar can double as a serving station, while a small one can serve as a drinks station. Remember to include storage for your bottles, glasses, and other bar essentials.

In terms of design, there are many options. A movable bar cart offers flexibility, while a built-in bar can become a statement feature in your patio. You can even repurpose old furniture into a unique outdoor bar.

Don't forget about seating. Bar stools should be comfortable and weather-resistant. If space allows, consider including a lounge area near your bar for relaxed conversations.

Lastly, consider including a mini fridge in your bar to keep drinks cool. This can reduce trips to the kitchen, allowing you to spend more time with your guests.

Conclusion

Designing a patio requires careful planning and attention to detail, but the result is an outdoor extension of your home that enhances your lifestyle and adds value to your property. Whether you're working with a large or small space, the key is to consider how you want to use the patio and what elements will support that use, from furniture selection and layout to privacy measures, lighting, and year-round comfort considerations. The incorporation of features such as fire pits, pergolas, and outdoor bars can dramatically elevate the look and functionality of your patio, creating a vibrant space perfect for relaxation, entertainment, and enjoyment. Finally, remember to let your personal style shine through, selecting colors, materials, and designs that resonate with you. With thoughtful design, your patio can become your favourite 'room' in the house, inviting you to step out and embrace the outdoors.

18 Small Garden Layout Ideas To Inspire You

Designing a small garden can be both a challenge and an opportunity. With the right layout and plant selection, you can transform a compact space into a verdant paradise. In this article, we’ll walk you through 19 inspiring small garden layout ideas, emphasizing space-saving strategies, the use of container and vertical gardening, and the introduction of compact plants and other design elements to maximize your space’s potential. Whether you’re planning a balcony garden, a rooftop retreat, or a terrace haven, there’s a concept here that will breathe new life into your small garden.

This comprehensive guide will provide the answers to your burning questions: How can you layout a compact garden efficiently? What water elements can you incorporate in a tiny garden? What plant varieties are suitable for a small garden design? How can you utilize corners in your small garden effectively? And, how can you integrate a sitting area in your limited garden space? Dive in, and let’s explore the exciting world of small garden design together.

What Are the Best Ways to Layout a Compact Garden?

Laying out a compact garden may seem challenging, but with a strategic approach, it can become an attractive, functional haven. The key is to consider the purpose of your garden and plan accordingly.

Compact Garden Layout

  1. Use Vertical Space: Vertical gardening techniques like trellises, wall planters, and hanging baskets can create a sense of height and depth while maximizing planting space.
  2. Focus on Compact Plants: Opt for plants with a small growth habit, like dwarf shrubs, compact perennials, and bonsai trees. This way, you maintain a sense of scale appropriate to your small garden.
  3. Integrate Multipurpose Furniture: Foldable or stackable furniture can provide a seating area without consuming much space. A built-in bench can double as storage, proving highly efficient.
  4. Incorporate Containers: Container gardening is not just for balconies. Large pots can provide flexibility and add visual interest.
  5. Create Paths: Even a narrow path can help structure your garden, guide the viewer’s eye, and prevent trampling on plants.

How Can I Incorporate Water Elements into a Tiny Garden?

Water elements can be a calming and aesthetically pleasing addition to any garden, irrespective of its size. Here are some innovative ways to add water features to your small garden:

Water Elements Into A Small Garden

  1. Small Ponds: A small, well-placed pond can act as a focal point, reflect light, and attract wildlife.
  2. Container Water Gardens: An easy, space-saving option is to create a water garden in a container, using aquatic plants and even small fish.
  3. Tabletop Fountains: Compact and portable, these can be placed on a patio table or bench to add the sound and sight of flowing water.
  4. Wall Fountains: These save space by integrating into your vertical garden design.
  5. Birdbaths: Besides being a water feature, birdbaths also attract birds to your garden, adding another level of interaction with nature.

Which Plant Varieties Are Suitable for a Small Garden Design?

Selecting the right plants is crucial to ensuring your small garden thrives. Here are some varieties that typically do well:

  1. Compact Shrubs: Dwarf varieties of shrubs, like boxwood or hydrangea, can provide structure and year-round interest.
  2. Perennials: Low-growing perennials like lavender, catmint, and salvia can fill in spaces beautifully.
  3. Climbing Plants: These are perfect for vertical gardening. Varieties like clematis, climbing roses, and jasmine can cover walls, trellises, or fences.
  4. Succulents and Cacti: Perfect for container gardening, these low-maintenance plants come in various colors and shapes.
  5. Herbs: Most herbs, like basil, thyme, and rosemary, are compact and can be grown in containers, making them perfect for small kitchen gardens.

How Can I Effectively Utilize Corners in A Small Garden?

Corners can be challenging but, when used effectively, they can add depth and interest to your small garden.

Vertical Gardening In Small Space

  1. Vertical Gardening: Utilize the vertical space with a tall plant, a wall-mounted planter, or a trellis with climbing plants.
  2. Create a Miniature Landscape: With small shrubs, groundcover, and a tiny bench or fairy house, corners can become captivating miniature landscapes.
  3. Install a Corner Bench: A corner bench not only uses the space efficiently but also creates a cozy nook.
  4. Plant a Specimen Tree: A small, ornamental tree in the corner can create a focal point and add height to the garden.
  5. Add a Sculpture: A garden sculpture or art piece can create interest and draw the eye towards the corner.

How to Integrate a Sitting Area in a Limited Garden Space?

Creating a sitting area in a small garden is all about maximizing utility without sacrificing greenery.

  1. Built-In Seating: Benches built into raised beds or walls are efficient and space-saving. Plus, they create a sense of enclosure and coziness.
  2. Foldable Furniture: These can be put aside when not in use, freeing up space.
  3. Use Corners: A corner bench or hammock can create a comfortable sitting area.
  4. Levels: If your garden has different levels, the change in height can naturally delineate a sitting area.
  5. Central Seating: A single, well-placed garden bench can act as a focal point, encouraging the visitor to sit and enjoy the garden from a specific vantage point.

Ideas To Attract Wildlife Into A Small Garden?

Even a small garden can be a bustling hub for local wildlife. With thoughtful planning, you can make your garden a vital habitat for insects, birds, and small mammals. Here are some strategies:

Attract Wildlife Into A Small Garden

  1. Plant Native Species: These are already adapted to your local climate and are the preferred food source for many local insects and birds. They typically require less maintenance, too, which is a bonus.
  2. Provide Food and Water Sources: Bird feeders and bird baths can be a beacon for winged visitors. Consider a variety of food sources to attract different species. A small pond can provide water for animals and habitat for aquatic insects.
  3. Create Habitats: Leave piles of leaves or logs in a corner to provide shelter for small mammals and insects. Bat boxes, bird houses, and butterfly hotels can invite these creatures into your garden.
  4. Avoid Pesticides: Chemicals can harm the very wildlife you’re trying to attract. Try organic pest control methods instead.
  5. Plant for All Seasons: To ensure year-round wildlife, you need plants that provide food and shelter throughout the year. Some creatures hibernate in winter, while others are active. Plant a variety of plants to accommodate them all.

Innovative Ideas for Vertical Gardening in a Limited Space?

When horizontal space is limited, go vertical. Vertical gardening can turn a bland wall or fence into a focal point, and there are many innovative ways to achieve this:

  1. Use Climbing Plants: Trailing species like ivy, climbing roses, or honeysuckle can cover walls or fences. You can guide them along trellises, wires, or other supports.
  2. Hanging Baskets: These are great for flowers, herbs, and even some vegetables. You can hang them from pergolas, balconies, or walls.
  3. Wall Planters: There are many on the market, from pocket planters and wall boxes to vertical plant tubes. You can also make your own from pallets or other reclaimed materials.
  4. Tiered Planters: These allow you to grow plants at different heights, creating visual interest. They can be freestanding, wall-mounted, or even mobile.
  5. Green Walls: Also known as living walls, these are panels of plants, usually with an integrated watering system. They can be expensive to install, but they provide a lush, stunning display.

How to Create a Year-Round Interest in a Small Garden?

A garden can provide interest throughout the year, not just in spring and summer. Here are some strategies to make your garden look good in every season:

  1. Use Evergreen Plants: These provide structure and color all year round. They come in various shapes, sizes, and colors, and include shrubs, climbers, and ground cover plants.
  2. Plant Spring Bulbs: Bulbs like daffodils, crocuses, and tulips burst into color in spring, providing early interest.
  3. Choose Plants for their Foliage: Many plants have colorful or textured foliage that looks good from spring to fall. Heucheras, ornamental grasses, and ferns are some examples.
  4. Include Autumn Interest: Trees and shrubs that provide fall color, like maples and burning bush, can light up your garden in autumn. Also consider plants with attractive berries or seed heads.
  5. Add Winter Interest: Plants with winter flowers, like witch hazel and winter jasmine, can cheer up a dreary winter day. Plants with interesting bark or stems, like dogwoods, also stand out in winter.

Low Maintenance Layout Options for Small Gardens?

If you want a garden but don’t have much time for upkeep, consider these low-maintenance layout options:

Paving and Gravel

  1. Use Paving and Gravel: These require no watering, little weeding, and provide a neat, tidy look. They can be a good base for potted plants or a seating area.
  2. Plant Shrubs: Shrubs need less care than annuals and perennials. Once established, many need only occasional pruning.
  3. Limit Lawn Space: Lawns require regular mowing, watering, and feeding. Consider replacing some lawn with ground cover plants, which require less upkeep.
  4. Choose Low-Maintenance Plants: Some plants require less care than others. Succulents, for example, need very little water. Perennials can provide many years of color without needing replanting each year.
  5. Use Mulch: Mulching around plants can reduce water loss from the soil, suppress weeds, and reduce the need for watering.

Can a Small Garden Be Designed to Look Larger?

Yes, even a small garden can be designed to give an illusion of more space. Here are some strategies:

  1. Use Diagonal Lines: Diagonal lines lead the eye, making a space appear larger. This can be a path, fence, or bed layout.
  2. Create a Journey: Even in a small garden, you can create a sense of exploration. A winding path, hidden corners, or features that draw the eye can create intrigue and the illusion of more space.
  3. Use Mirrors: Just like indoors, mirrors can make a space appear larger. A well-placed garden mirror can reflect light and images of plants, making the garden seem more extensive.
  4. Plant Strategically: Use small and medium-sized plants towards the front and larger ones towards the back to create a sense of depth.
  5. Choose Colors Wisely: Bright, warm colors stand out and draw the eye, while cool, pale colors recede. You can use this to manipulate perception of space.

What Are Some Colorful Planting Ideas for a Small Garden?

Introducing color to a small garden can create a vibrant and lively space, often making it appear larger. Here are a few ideas to consider:

Colorful Planting Ideas for a Small Garden

  1. Use Colorful Containers: Using bright containers is an easy way to add splashes of color. When the flowers aren’t in bloom, the containers will still provide an eye-catching element.
  2. Plant Brightly Colored Flowers: Choose perennial flowering plants that offer long-lasting bloom times. These could include daylilies, geraniums, or begonias.
  3. Use Foliage for Color: Don’t just focus on flowers for color. Some plants, such as Coleus, Heuchera, or Japanese Maples, have vibrant foliage that can add color all season long.
  4. Play with Color Contrasts: Pair plants with complementary or contrasting colors to create a dramatic effect. Pair purple with yellow, red with green, or orange with blue for a stunning display.
  5. Implement Seasonal Color Themes: You could opt for warm colors (red, orange, and yellow) in one season, and cooler colors (blues, purples, and whites) in another. This ensures a rotating color scheme throughout the year.

How Can I Grow Vegetables in a Compact Garden Space?

A compact space shouldn’t limit your ambition to grow vegetables. In fact, some strategies can help maximize yields:

Vegetables in a Compact Garden Space

  1. Raised Beds and Containers: These can be great for small spaces. They give you control over the soil and can be arranged to take full advantage of the sunlight.
  2. Vertical Gardening: Trellises, cages, and stakes can support plants to grow upwards, saving ground space. This works well for peas, cucumbers, tomatoes, and beans.
  3. Succession Planting: By planting a new crop as soon as you harvest the previous one, you can get several yields from the same space.
  4. Interplanting: Growing two or more types of plants together can save space. Fast-maturing plants like radishes can be grown alongside slower growers like carrots.
  5. Choosing the Right Crops: Some vegetables, like lettuce, herbs, peppers, and tomatoes, do well in small spaces. They can also be grown in pots.

Sustainable Practices for Small Garden Design?

Designing a small garden sustainably not only benefits the environment but can also make garden maintenance easier:

  1. Water Conservation: Use rain barrels to collect rainwater for irrigation. Choose plants adapted to your local climate to minimize watering needs.
  2. Composting: Turning kitchen scraps and garden waste into compost can enrich your soil, reduce the need for synthetic fertilizers, and reduce waste.
  3. Plant Native Species: Native plants are adapted to local conditions and are more likely to thrive with minimal intervention. They also support local wildlife.
  4. Avoid Harmful Pesticides: These can harm beneficial insects and contaminate water sources. Use natural pest control methods and encourage beneficial insects.
  5. Maximize Plant Diversity: A diverse garden is more resilient to pests and diseases. It can also support a wider range of wildlife.

How to Maximize the Use of Space in a Small Garden?

Even the smallest garden can be maximized to its full potential. Here are some ideas:

  1. Create Multi-Purpose Areas: Design areas that can serve multiple functions. A dining area with a foldable table can also serve as a space for children to play or for a moment of quiet relaxation.
  2. Use Vertical Spaces: Walls, fences, and even the sides of sheds can be used to grow climbing plants or to hang containers.
  3. Design in Layers: In garden beds, plant tall, medium, and short plants together to create layers. This can create a sense of depth and maximize growing space.
  4. Use Furniture Wisely: Choose foldable or stackable furniture that can be easily stored when not in use. Built-in seating can save space and can double as storage.
  5. Plan Before You Plant: A well-thought-out plan can ensure that every inch of the garden is utilized effectively. Consider the plant’s size at maturity to prevent overcrowding.

How to Create Privacy in a Small Garden?

Even in a small garden, it’s possible to create a sense of seclusion and tranquility. Here are several strategies:

Tall Plants and Shrubs

  1. Planting Tall Plants and Shrubs: Growing taller plants at the boundaries of your garden can serve as a natural screen. Bamboo, for example, can grow tall and thick, providing both privacy and a pleasing aesthetic.
  2. Install Trellises or Fences: A trellis or fence can provide immediate privacy. Climbing plants or hanging baskets can be added to bring life and color to these structures.
  3. Use Strategic Planting: Strategic planting can block certain views into your garden. For example, a small tree or large shrub can be placed to obstruct a window’s view.
  4. Vertical Gardens: In addition to adding greenery, vertical gardens can act as privacy screens. They also provide an interesting visual element to your garden.
  5. Incorporate Outdoor Structures: Consider adding structures like pergolas or gazebos to your garden. These can create secluded areas and provide shade.

How Can Texture Be Incorporated in a Limited Garden Space?

Incorporating texture can add depth and interest to your garden. Here’s how you can achieve it:

  1. Mix Different Foliage Types: A combination of glossy, matte, ridged, and smooth leaves can create a visually stimulating garden.
  2. Add Hardscaping Elements: Stones, pebbles, or a brick pathway can bring different textures into the garden.
  3. Incorporate Garden Art: Sculptures, water features, or garden ornaments can add a new dimension of texture to your garden.
  4. Plant Flowers with Interesting Shapes: Flowers like chrysanthemums or dahlias have distinctive shapes that add texture.
  5. Use Plants with Textured Bark: Trees and shrubs with textured bark can provide year-round texture in your garden.

What Are Some Ideas for Small Kitchen Gardens at Home?

A small kitchen garden can provide fresh herbs, vegetables, and fruits. Here are some ideas:

Small Kitchen Gardens at Home

  1. Container Gardening: This is ideal for small spaces. Many herbs and vegetables can thrive in containers.
  2. Vertical Gardening: Utilize walls, fences, or even specially designed vertical garden structures to grow upwards.
  3. Plant Combinations: Plant combinations of herbs, vegetables, and flowers together. This can help to ward off pests and promote pollination.
  4. Square Foot Gardening: This method maximizes space by dividing the growing area into small square sections.
  5. Succession Planting: Planting a new crop as soon as you harvest the previous one can yield multiple harvests from the same space.

Can Levels or Tiers Be Used in a Small Garden Layout?

Creating levels or tiers in a small garden can add interest and depth. Here’s how:

  1. Raised Beds: Raised beds can help to define different areas of the garden. They can also make gardening easier on the back and knees.
  2. Terraces: In sloping gardens, terraces can create level areas for planting.
  3. Steps: Incorporating steps into your garden can create a sense of progression and depth.
  4. Multi-Level Planters: These planters can be used to create a mini-tiered garden.
  5. Retaining Walls: Retaining walls can create different levels in your garden. Planting on different levels can add visual interest.

How to Incorporate Container Gardening in Small Spaces?

Container gardening can make a small space productive. Here are a few tips:

  1. Choose the Right Containers: Ensure they are large enough for the plants and have proper drainage.
  2. Pick the Right Plants: Some plants are better suited to container life. Tomatoes, herbs, and strawberries are great options.
  3. Use a Quality Potting Mix: Good soil is crucial for container gardening. Use a potting mix that provides good drainage.
  4. Water Regularly: Containers dry out faster than garden soil. Check the moisture levels daily during hot weather.
  5. Fertilize Regularly: Plants in containers can deplete their soil nutrients faster. Use a slow-release fertilizer to keep them healthy.

Conclusion

In conclusion, designing a small garden requires creativity and strategic planning. The key is to maximize every inch of your space, be it through vertical gardening, raised beds, or corner planting. Choose compact plants that suit your climate and garden conditions, and don’t forget to incorporate elements that reflect your personal taste, such as a small pond or a cozy sitting area. With these 19 small garden layout ideas, you’re well on your way to transforming your compact space into your dream garden.

Remember, a small garden doesn’t mean small impact. With the right layout and plant selection, it can be a tranquil retreat, a space for entertaining, and a testament to the wonders of nature.

26 Minimalist Garden Design Ideas For Maximum Effect

Welcome to this comprehensive guide that explores the aesthetic and functional attributes of minimalist garden design. The essence of minimalism lies in simplicity, reducing elements to their essential quality to create harmony, calm, and balance. It is about subtracting the obvious and adding the meaningful. In the realm of gardening, this design philosophy translates into serene spaces that offer respite from a chaotic world.

Our journey through minimalist garden design is laced with unique design ideas, an emphasis on simple yet bold geometrical shapes, the interplay of different materials, and a careful selection of minimalist plants. We’ll traverse the dynamic and tranquil world of minimalist water features, unravel the nuances of space balance, and shed light on crucial aspects like garden maintenance and indoor-outdoor integration. The canvas of this guide expands to embrace small space gardening and the art of creating privacy in your green oasis. So, brace yourselves as we embark on an exploration of this timeless design style.

Introduction To The Art of Minimalist Garden Design

Embracing minimalist garden design is much more than merely reducing visual clutter. It’s an art that is meticulously curated, with each element serving a distinct purpose and cohesively merging into the overall design narrative. Let’s dissect this art form and discover the essential components that form the bedrock of minimalist garden design.

Minimalist Garden Design

Simplicity in Gardening

Simplicity in gardening manifests through an uncluttered layout, a limited color palette, and a focus on form and structure. Minimalist gardens often prioritize hardscaping over excessive plantings. This design approach leans towards using stone and gravel, creating minimalist garden paths, utilizing garden lighting in a calculated manner, and selectively introducing sculptures and artwork.

Space Balance

Space balance in minimalist garden design stems from the symmetrical placement of elements, giving equal weight to empty spaces. Rather than cramming every inch with plants or décor, minimalist gardens rely on the power of ‘negative space’. This approach imparts a spacious feel, making even small gardens appear larger.

Garden Contrast

A pivotal aspect of minimalist garden design is the creation of contrast. The contrast can occur in terms of textures (smooth vs rough), colors (monochromatic vs vibrant), or forms (linear vs curvilinear). This juxtaposition adds depth, interest, and a touch of sophistication to the garden.

Choosing a Color Palette for a Minimalist Garden

Color plays a significant role in setting the tone for any minimalist garden. It can be monochromatic, using different shades of a single color, or duochromatic, pairing two complementary or contrasting colors. A minimalist color palette usually leans towards cool, neutral tones like white, gray, and green, with occasional splashes of bolder hues for accent.

Container Gardening

In a minimalist garden, container gardening can add layers of visual interest. A group of pots in a unified color scheme or material, each hosting a single type of plant, can serve as a striking focal point. Choose containers that complement your garden’s color palette and overall aesthetic.

Herb Garden Design

Even the functional herb garden can adhere to the minimalist aesthetic. Plant herbs in geometric patterns or in sleek containers for a clean look. Limit the variety of herbs and use repetition to establish a calm rhythm and visual unity.

The Role of Geometry in Minimalist Garden Layouts

Geometry plays a pivotal role in shaping the visual language of a minimalist garden. Bold, clean lines and geometric shapes lend an air of simplicity and order. Rectangular beds, square paving stones, circular water features, or even a grid-like herb garden – these geometrical elements bring a sense of cohesion and calm to the garden.

Minimalist Water Features

Water features with geometric design can act as captivating focal points in a minimalist garden. It could be a simple, rectangular reflecting pool, a spherical fountain, or even a geometrically intriguing rill. Combined with the right lighting, these water features can create a mesmerizing spectacle.

Stone and Gravel Usage

Using stone and gravel in geometric patterns can reinforce the minimalist aesthetic. They can serve as the garden’s groundwork, mark pathways, or be used in Zen-inspired raked gravel gardens, creating captivating shadows and textures.

Selecting Plants for a Minimalist Garden

Choosing the right plants is crucial for a minimalist garden. The focus should be on plants with architectural qualities that can hold their form throughout the year. Plants like ornamental grasses, bamboo, boxwood, and agave are popular choices.

Plants for a Minimalist Garden

Ornamental Grasses

Ornamental grasses offer a wide range of colors and textures. With their elegant, swaying movement, they can provide both visual and sensory appeal.

Indoor-Outdoor Integration

Indoor plants can be a great way to seamlessly integrate the indoor and outdoor spaces. Large glass windows or doors overlooking minimalist garden spaces adorned with similar plants can create a harmonious flow between the two areas.

Garden Maintenance

The choice of plants also impacts garden maintenance. Opt for low-maintenance, drought-tolerant species to maintain the garden’s pristine look with minimal effort.

Designing a Minimalist Water Feature

In the realm of minimalist garden design, water features often act as a dynamic centerpiece, captivating the eye and soothing the senses with their rhythmic movement and gentle sound. When designing a minimalist water feature, the keyword is simplicity. These features are typically geometric and stripped of any unnecessary adornment, serving as a testament to the aesthetics of minimalism.

The form of your water feature can vary depending on the overall theme of your garden. It can be a square or rectangular reflecting pool that mirrors the sky, a spherical fountain, or even a cascading waterfall with stark angular lines. It’s essential to maintain the principles of proportion and scale while designing your water feature to ensure it fits seamlessly with your garden’s overall layout.

The materials you use also play a significant role. Opt for natural materials like stone, concrete, or metal, which have a timeless appeal and blend harmoniously with the garden’s natural elements. When it comes to color, stick to neutral shades that match the rest of your garden’s palette.

Minimalist water features aren’t just about visual appeal; they’re also about the sensory experience. Consider how the sound of water flowing or falling will echo in your space, contributing to the overall atmosphere of tranquillity.

Finally, lighting is a key element to consider when designing your water feature. Well-placed lights can highlight the water’s movement, creating a mesmerizing spectacle, especially during the evening and night.

Incorporating Stone and Gravel in Minimalist Gardens

Stone and gravel are quintessential elements in minimalist gardens, revered for their versatility, textural appeal, and the sense of calm they instill. They can serve multiple functions, from demarcating pathways and creating contrast to setting the foundation for your minimalist garden.

Stone and Gravel in Minimalist Gardens

One way to incorporate stone and gravel is through the design of minimalist garden paths. Paths provide structure and direct the flow of movement within the garden. Use stones of varying sizes, shapes, and colors to create paths that serve as visual interest points within your minimalist landscape.

You can also use stone and gravel to create contrast. Contrast is a key design principle in minimalist gardens, and stone, with its myriad hues and textures, can be a great tool to achieve this. For instance, pairing smooth, pale gravel with dark, rugged stones can create a striking contrast and add depth to your garden.

The use of stone and gravel extends to creating garden beds or even entire sections of the garden. Zen-inspired raked gravel gardens, for instance, are a testament to the minimalist design philosophy. These tranquil spaces, marked by carefully raked gravel and selectively placed stones, serve as an ode to simplicity and mindfulness.

Lastly, consider how stone and gravel can work with other elements in your garden. For example, a stone wall can provide a beautiful backdrop for your minimalist plants, while a gravel bed can serve as the perfect base for a water feature.

Creating Contrast in a Minimalist Garden

Contrast is a powerful tool in the world of minimalist garden design. It introduces dynamism and interest, preventing the garden from appearing monotonous or flat. In a minimalist garden, contrast can occur on multiple levels – through color, texture, form, and even light.

Color contrast in minimalist gardens is often subtle. It could be the play of different shades of green, the interplay of foliage color with the grey of stone, or the shock of a single, brightly colored bloom against a neutral backdrop.

Contrast through texture is another avenue to explore. The rough texture of a stone pathway against the smoothness of a water feature, the softness of ornamental grasses against the hard lines of a metal sculpture, the glossy leaves of a plant against the matte finish of a gravel bed – these contrasts in texture can create captivating visual interest.

Contrast of form is yet another design aspect in minimalist gardens. This can manifest as the interplay of different geometric shapes – a round pot against a square planting bed, the vertical lines of bamboo against the horizontal spread of a ground cover, or the curvilinear form of a sculpture against the straight lines of a stone path.

Finally, consider the contrast of light and shadow in your garden. Play with garden lighting to highlight certain elements while casting others into shadow. This not only adds a sense of mystery but also enhances the garden’s depth and texture.

Balancing Space and Elements

Balancing space and elements is crucial to achieving the desired effect in a minimalist garden. This involves the judicious use of ‘positive’ and ‘negative’ space and the strategic placement of elements to create a harmonious and balanced look.

In minimalist garden design, ‘negative’ space often takes the form of open areas, like a stretch of lawn, a gravel bed, or even a body of water. ‘Positive’ space, on the other hand, is filled with elements like plants, stones, or garden furniture. Striking a balance between the two is key to achieving a sense of calm and order.

Similarly, the balance between different elements – plants, hardscape, décor – is equally important. Instead of cramming every inch with plants or décor, minimalist gardens favor a more restrained approach. Every piece, whether it’s a plant, a piece of sculpture, or a seating arrangement, should serve a purpose and add value to the space.

The principle of balance extends to the choice of materials as well. There should be a consistency in the materials used, with each contributing to the overall minimalist aesthetic. For instance, a wooden deck, stone paths, metal sculptures, and glass garden lighting can all come together in a minimalist garden, provided they share a common design language.

Remember, creating balance doesn’t necessarily mean symmetry. A minimalist garden can be perfectly balanced without being symmetrical. It’s about achieving a sense of harmony where every element has its place and space to breathe.

The Use of Ornamental Grasses

Ornamental grasses are a staple in minimalist gardens. These graceful plants bring a unique combination of movement, texture, and season-long interest, making them an ideal choice for this style of garden design. Their swaying in the wind brings life and motion into the garden, adding a dynamic element to a minimalist setting.

Use of Ornamental Grasses

There’s an array of ornamental grasses to choose from, ranging in size, color, and form. Some, like fountain grass, feature arching foliage and soft, feathery blooms, while others, such as switchgrass, offer upright growth and striking seed heads. Their diverse characteristics allow for a wealth of design possibilities, from serving as focal points to softening the edges of a path.

One of the significant advantages of using ornamental grasses in minimalist garden design is their year-round visual interest. From the fresh green growth of spring and the mature colors and seed heads of summer to the golden hues of autumn and the frost-touched silhouettes of winter, ornamental grasses are truly a four-season plant.

Another attribute of ornamental grasses is their relative ease of maintenance. Most grasses are hardy and tolerant of a variety of conditions, from drought to poor soil, making them an excellent choice for gardeners seeking beauty without hassle. Additionally, their resistance to pests and diseases contributes to their low-maintenance appeal.

Finally, let’s not forget the sensory aspect of ornamental grasses. Their soft rustling in the wind provides a calming auditory element, while their varied textures invite touch, enhancing the overall sensory experience of the minimalist garden.

Minimalist Garden Ideas: Achieving Serenity with Less

Achieving serenity with less is at the core of minimalist garden design ideas. This principle manifests in various ways, including simplicity in planting, balance in garden layout, and a restrained color palette.

Simplicity in planting is often achieved through the repetition of plant forms and types. This might mean using a single type of ornamental grass throughout the garden, or repeating a specific planting combination at intervals. Such repetition creates a sense of cohesion and tranquility.

Balance in garden layout is another vital component. It’s about arranging your garden elements – whether they are plants, stones, water features, or sculptures – in a way that creates a harmonious visual balance. This balance isn’t necessarily symmetrical; rather, it’s a thoughtful distribution of elements that gives each its space while contributing to the overall composition.

A restrained color palette is another hallmark of minimalist gardens. Usually, these gardens feature a limited color palette, often with a focus on green. This doesn’t mean minimalist gardens are devoid of color. Instead, color is used sparingly and strategically, like a bright-colored sculpture or a single specimen plant, creating a striking focal point.

Integrating Indoor and Outdoor Spaces in Minimalist Design

The integration of indoor and outdoor spaces is a growing trend in minimalist design. It involves creating a seamless flow between the home’s interior and the garden, creating a sense of unity and expanding the living space.

One way to achieve this is by mirroring the interior’s color palette and materials in the garden. For instance, if your interior features a lot of wood and neutral tones, you might choose to incorporate wooden decking or furniture in your garden and stick to a neutral color palette for your plantings and materials.

Another strategy is to create a clear visual connection between indoor and outdoor spaces. This could be achieved through large windows or glass doors that offer unobstructed views of the garden. The placement of garden elements, like a water feature or a specimen plant, can also be coordinated with these viewpoints, creating engaging vistas from inside the house.

Indoor-outdoor integration also involves creating spaces in the garden that can function as outdoor rooms. These could be areas for dining, relaxation, or even work, equipped with necessary furniture and offering a degree of comfort and functionality similar to indoor spaces. The use of structures like pergolas or gazebos, or features like outdoor fireplaces, can further enhance these spaces, making them usable throughout different seasons and times of day.

Maintaining a Minimalist Garden: Tips and Tricks

While minimalist gardens are often seen as low-maintenance, they still require care to keep them looking their best. Here are some tips and tricks for maintaining a minimalist garden.

First, regular pruning and trimming of plants is key to maintaining the clean lines and forms characteristic of minimalist design. Overgrown plants can quickly make a minimalist garden look messy and chaotic, so keep an eye on your plants’ growth and prune as necessary.

Second, remember that every element in a minimalist garden is significant and contributes to the overall aesthetic. Regularly clean and maintain your hardscaping elements, like paths, patios, or water features. Keep your garden furniture clean and in good condition. If you have art or sculptures in your garden, ensure they are well-maintained and look their best.

Third, minimalist gardens often feature a limited number of plant species, which means pests or diseases could potentially have a significant impact. Regularly check your plants for signs of pest or disease, and address any issues as soon as possible to prevent them from spreading.

Lastly, even though minimalist gardens are characterized by simplicity, they are not static. Don’t be afraid to make changes as necessary, whether it’s replacing a plant that’s not performing well, updating a piece of furniture, or even just changing the arrangement of some elements for a fresh look. Remember, a minimalist garden, like any garden, is a living, evolving space.

Creating Minimalist Garden Paths

Garden paths are more than just practical walkways in a minimalist garden; they are integral design elements that contribute to the overall aesthetic. Their design should be as carefully considered as any other element of the garden.

Minimalist Garden Paths

Start by choosing a simple, clean material that complements your minimalist design. This could be smooth, poured concrete for a modern look, or natural stone for a slightly softer appeal. Whatever material you choose, the key is to keep it simple and uncluttered.

The layout of your paths should follow the minimalist principle of simplicity. Rather than winding, meandering paths, opt for straight lines or gentle, sweeping curves. The path can lead from one focal point to another, guiding the visitor’s journey through the garden.

Consider the width of your paths. In a minimalist garden, a wide path can make a powerful statement, suggesting a sense of openness and generosity. However, a narrower path can also work well, creating a sense of intimacy and inviting exploration.

Maintenance is another important factor. A well-maintained path contributes to the clean, orderly appearance characteristic of minimalist gardens. Choose a material that’s easy to clean and maintain, and ensure any weeds or moss are promptly removed.

Finally, a minimalist garden path can be more than just a walkway. It can also serve as a place to pause and appreciate the garden. Consider incorporating a bench or a viewing platform along the path, inviting visitors to stop and take in the beauty of your minimalist garden.

The Role of Light in Minimalist Garden Design

Lighting is a key element in minimalist garden design. It serves both functional and aesthetic roles, providing visibility after dark and highlighting key features of the garden.

Light in Minimalist Garden Design

Choosing minimalist lighting fixtures is the first step. These should be simple in design and complement the overall aesthetic of the garden. They could be sleek and modern, like stainless steel bollard lights, or more subtle, like recessed ground lights.

The positioning of your lights is crucial. Rather than flooding the entire garden with light, consider using lighting to highlight specific elements, like a beautiful tree, a sculpture, or the texture of a wall. This focused approach to lighting adds drama and interest to the garden.

Remember that lighting doesn’t only have to come from artificial sources. The interplay of natural light and shadow can be a powerful tool in minimalist garden design. Consider how the sun moves across your garden and how you can use plantings or structures to create interesting shadow effects.

Consider also the color temperature of your lights. A warmer light can create a cozy, inviting atmosphere, while a cooler light can highlight the architectural qualities of your plants or structures.

Finally, consider incorporating lighting controls, like dimmers or timers. These can allow you to adjust the lighting to suit different times of day or occasions, providing you with flexibility and control over your garden’s appearance.

Container Garden Ideas

Container gardening is a versatile way to incorporate plants into a minimalist design. They allow you to bring greenery to areas where traditional planting may not be possible, like patios, balconies, or rooftop gardens.

Container Garden Ideas

Choosing the right container is crucial. Minimalist design favors clean lines and simple forms, so opt for pots that reflect this aesthetic. They could be sleek ceramic or metal pots, or even simple wooden boxes. The color of the pot can also contribute to the minimalist aesthetic. Consider sticking to a monochromatic palette, or using a single, bold color for a pop of interest.

The plants you choose for your container garden should also reflect the principles of minimalism. This could mean planting a single type of plant per pot for a clean, uncluttered look, or sticking to a simple color palette. Ornamental grasses, succulents, or small shrubs can all work well in a minimalist container garden.

Consider also the arrangement of your containers. A symmetrical arrangement can create a strong, bold statement, while a more dynamic, asymmetric arrangement can add interest and movement.

Remember that containers can also serve as architectural elements in a minimalist garden. A well-placed pot can serve as a focal point, guide the viewer’s eye, or even serve as a boundary or marker.

Designing a Minimalist Herb Garden

A minimalist herb garden can be both aesthetically pleasing and practical, providing fresh herbs for your kitchen while contributing to your garden’s overall design.

Minimalist Herb Garden

Start by selecting your herbs. Choose a few varieties that you frequently use in your cooking, and consider their growth habits and aesthetic qualities. Some herbs, like rosemary or lavender, can add structural interest, while others, like parsley or chives, can provide a soft, green backdrop.

The layout of your herb garden should be simple and clear. You might opt for a grid layout, with each herb in its own square, or a linear layout with herbs planted in neat rows. If your space is limited, consider a vertical herb garden, with herbs planted in wall-mounted containers.

Your choice of containers or bed design should reflect the minimalist aesthetic. Consider raised beds with clean lines, or simple pots or planters. The material can be a way to tie the herb garden to the rest of your design, whether it’s the natural wood of a raised bed echoing a wooden deck, or the sleek metal of a planter matching your outdoor furniture.

Remember, a minimalist herb garden isn’t just about the herbs. It’s also about the spaces between them. Leave enough space around each herb for it to grow without crowding its neighbors, and consider mulching the soil with a simple, neutral-colored mulch to maintain a clean, orderly appearance.

Creating Privacy in a Minimalist Garden

While minimalist gardens are often open and spacious, privacy is still an important consideration. There are several strategies you can use to create privacy in a minimalist garden without compromising the aesthetic.

One of the simplest ways is through plantings. A hedge of evergreen shrubs can provide year-round privacy, and its uniform texture and color can contribute to the minimalist aesthetic. Alternatively, a row of ornamental grasses can create a softer, more dynamic screen.

Hardscaping can also create privacy. A simple, unadorned wall can serve as a powerful statement in a minimalist garden, providing privacy and serving as a backdrop for plantings or art. Similarly, a trellis or pergola can provide a degree of privacy without completely blocking views or light.

A well-placed garden structure, like a pavilion or gazebo, can also create a private space within a minimalist garden. Its design should be simple and clean, and it can be placed to take advantage of the best views within the garden, or to hide less attractive ones.

Finally, remember that privacy doesn’t necessarily mean complete seclusion. In a minimalist garden, the goal is often to create a sense of calm and serenity, and this can be achieved through a careful balance of open and enclosed spaces, public and private areas.

Ideas for Small Spaces

Small spaces present unique challenges for minimalist garden design, but with thoughtful planning, they can become serene and stunning outdoor areas.

First, prioritize your needs. Do you want a space for dining, relaxation, or perhaps some container gardening? Identifying your needs will help you make the most of your limited space.

Next, consider your layout. Even in a small space, it’s important to maintain a sense of openness and avoid clutter. This might mean choosing smaller or fewer pieces of furniture, or opting for built-in seating or storage.

Vertical space is often underutilized in small gardens. Consider vertical plantings, like a green wall or climbing plants on a trellis. Even something as simple as a tall, narrow plant can draw the eye upwards and create a sense of height and space.

Even in small spaces, it’s important to maintain the minimalist principle of simplicity. This could mean sticking to a simple color palette, choosing a single type of paving material, or limiting your plant choices to a few species.

Finally, remember that small spaces can be intimate and cozy. Embrace this by creating a sense of enclosure, perhaps with a small hedge, a garden wall, or even just a string of lights overhead.

Using Walls and Fences

Walls and fences play several roles in minimalist garden design. They can provide privacy, serve as a backdrop for plantings or art, and help define the boundaries of the garden.

Walls And Fences In Garden

In terms of design, minimalist walls and fences should be simple and unadorned. This could mean a smooth concrete wall, a sleek metal fence, or a simple wooden slat fence. The color should typically be neutral, allowing the wall or fence to blend into the background and let the plants and other elements take center stage.

However, a wall or fence can also be a canvas for art or lighting. Consider incorporating a mural, a sculptural element, or a lighting feature into your wall or fence design.

Remember also that walls and fences don’t have to be solid. A minimalist screen or trellis can provide a degree of privacy and enclosure while still allowing light and air to pass through.

In a smaller garden, walls and fences can help create a sense of depth and perspective. For example, a wall at the end of a narrow garden can be painted a dark color to make it appear further away, making the garden seem longer.

Maximizing Minimalism: The Vertical Garden

A vertical garden is a great way to maximize the impact of a minimalist garden. It allows you to incorporate a large number of plants without taking up a lot of ground space, and it can provide a dramatic focal point.

Vertical Garden

Designing a minimalist vertical garden starts with the structure. This could be a green wall system, a trellis, or a series of hanging planters. Whatever you choose, the structure should be simple and clean-lined, in keeping with the minimalist aesthetic.

Next, consider your plant selection. In a minimalist vertical garden, it’s often effective to use a single species, or a small selection of species with similar requirements. This can create a striking, uniform effect and make maintenance easier.

When arranging your plants, consider the principles of balance and repetition. Even in a vertical garden, these principles can create a sense of harmony and rhythm.

Finally, consider how your vertical garden will be viewed. It can serve as a backdrop to your garden, visible from multiple angles, or it can be a focal point, viewed head-on. In either case, consider its position carefully to ensure it can be fully appreciated.

Choosing Minimalist Outdoor Furniture

The choice of outdoor furniture is a crucial aspect of minimalist garden design. Furniture not only provides functionality but also contributes significantly to the overall aesthetic of your outdoor space.

When choosing minimalist outdoor furniture, simplicity is the guiding principle. Look for pieces with clean lines and a sleek profile. Avoid elaborate detailing, ornate curves, or excessive decoration. The form should follow the function, without unnecessary embellishments.

The material of the furniture should reflect the minimalist ethos as well. Metal, especially in brushed or matte finishes, is an excellent choice due to its clean and contemporary look. Wood, particularly hardwoods with a simple, natural finish, can also complement a minimalist design.

Consider the color of your furniture too. A monochromatic scheme is generally ideal for a minimalist garden, such as blacks, whites, or greys. However, a single, carefully chosen accent color can provide a striking contrast.

Also, consider the placement and arrangement of your furniture. Minimalist design often features symmetrical arrangements or intentionally balanced asymmetry. The furniture can act as a focal point, or it can blend into the background, allowing the garden itself to take center stage.

Lastly, keep your furniture to a minimum. Choose only what you need, and consider pieces that can serve multiple functions. A bench can serve as both seating and storage, for instance. In a minimalist garden, each piece of furniture should be chosen with intention and purpose.

Breathe Easy: The Minimalist Zen Garden

Zen gardens, with their simplicity and tranquility, align perfectly with the minimalist aesthetic. Creating a minimalist Zen garden can provide a calm, serene space to relax and reflect.

Minimalist Zen Garden

A traditional Zen garden features a few simple elements: rocks, gravel, and perhaps a water feature. In keeping with minimalist principles, the focus is on shape, texture, and the play of light and shadow, rather than bright colors or variety.

Rocks are the main element of the Zen garden and are often placed in groups or used individually as focal points. Each rock’s size, shape, and color should be carefully considered. The arrangement of rocks often represents natural landscapes, such as mountains or islands.

Gravel or sand represents water in a Zen garden. It’s raked into patterns that suggest the movement of water, like waves or ripples. The act of raking can be a form of meditation, bringing mindfulness into your garden.

Water features, if present, should be simple and unobtrusive. The sound of gently flowing water can add to the sense of tranquility in the garden.

Zen gardens often include a simple path, leading the visitor on a mindful journey through the garden. Consider incorporating a viewing platform or bench along the path.

Remember, a Zen garden isn’t about ornamentation or decoration. Instead, it’s a space for contemplation and relaxation, an embodiment of the Zen principle of simplicity and mindfulness.

Creating a Minimalist Rock Garden

Rock gardens can be an attractive and low-maintenance choice for minimalist garden design. They require fewer plants, conserve water, and can provide year-round interest.

The key to a minimalist rock garden is careful selection and placement of rocks. Choose rocks with interesting shapes and textures. The color of the rocks should ideally harmonize with the surrounding landscape or architecture.

The arrangement of rocks is crucial. In nature, rocks are rarely found in isolation; they’re usually in groups or clusters. Try to mimic these natural groupings in your rock garden. Also, take into account the size and shape of your rocks, aiming for a balance between larger, dominant rocks and smaller, supporting ones.

Plant selection for a rock garden should be simple and restrained. Hardy, low-growing plants like succulents, alpine plants, or ornamental grasses can provide contrast and soften the hard edges of the rocks. Try to stick to a limited color palette and plant species to maintain the minimalist look.

Finally, consider the role of space in your rock garden. The spaces between the rocks are just as important as the rocks themselves. These negative spaces can help define the shape and flow of your garden, creating a sense of calm and tranquility characteristic of minimalist design.

Creating a Cozy, Minimalist Garden Nook

Even in a minimalist garden, it’s possible to create a cozy nook that offers a sense of intimacy and comfort. Whether it’s a secluded spot for reading, a private corner for meditation, or a hidden spot for morning coffee, a minimalist garden nook can be a sanctuary of calm.

The first step is to choose the right location. It could be a hidden corner, a spot under a tree, or even a space near a garden wall. The location should provide a sense of privacy and separation from the rest of the garden.

Furniture in your nook should be simple and functional. A single comfortable chair, a small bench, or even a floor cushion can serve as seating. A small table or a flat rock can work as a surface for a book or a cup of coffee.

The surrounding elements should contribute to the sense of coziness. This could be a wall or a screen providing privacy, or it could be a tree or a large plant offering shade and enclosure. The sound of a small water feature, the scent of nearby flowers, or the warmth of a sunlit spot can all enhance the coziness of your nook.

Remember to keep your nook simple. Avoid clutter and keep decorations to a minimum. The focus should be on relaxation and enjoyment of the garden, rather than on the nook itself.

Minimalist Lighting Ideas for the Garden

Lighting plays a crucial role in minimalist garden design. It’s not just about visibility; it’s also about creating mood, highlighting features, and enhancing the overall aesthetic of the garden.

For a minimalist garden, choose lighting fixtures with clean lines and simple forms. Recessed lighting, strip lights, or simple globe lights can all work well. Avoid ornate fixtures or overly decorative lights.

The placement of lights is crucial. Rather than illuminating the entire garden, focus on lighting specific features, like a beautiful tree, a pathway, or a sculpture. This creates areas of light and shadow, adding depth and drama to the garden.

Consider using LED lights for their energy efficiency and longevity. They also produce a crisp, bright light that can highlight the simplicity and cleanliness of your minimalist garden.

The color temperature of the light can also impact the mood of your garden. Warm white light creates a cozy and inviting atmosphere, while cool white light can give a more modern, stark appearance.

Remember, less is more when it comes to minimalist garden lighting. A few carefully placed lights can create a far more dramatic effect than a large number of lights scattered randomly.

Choosing and Caring for Minimalist Garden Planters

Planters are an important component of minimalist garden design. They provide an opportunity to introduce plants into your space in a controlled and design-focused way.

Choose planters with simple, clean lines and uniform colors. Concrete, metal, or ceramic planters in neutral colors are excellent choices for minimalist gardens. Avoid overly ornate or brightly colored planters, which can distract from the overall aesthetic.

The size and shape of the planter should match the scale of your garden and the plants it will hold. Large, architectural plants may need a larger, more substantial planter, while smaller plants can be grouped in smaller, identical planters for a harmonious look.

When it comes to caring for your planters, simplicity is key. Choose plants that require similar care conditions and can thrive in the same potting mix. This simplifies maintenance and ensures the health of your plants.

Finally, consider the placement of your planters. They can be grouped together for a dramatic effect, used to line a pathway, or placed individually as focal points. Whatever your choice, make sure it contributes to the minimalist ethos of balance, simplicity, and intentionality.

Conclusion

The beauty of a minimalist garden lies in its simplicity and intentionality. Each element, from the choice of furniture and planters to the use of lighting and the creation of private nooks, should serve a purpose and contribute to the overall aesthetic and functionality of the garden. Minimalist garden design, with its focus on clean lines, muted color palettes, and thoughtful use of space, can create a serene outdoor space that invites relaxation and reflection.

From incorporating a Zen or rock garden to selecting minimalist outdoor furniture, or creating a cozy garden nook, the possibilities are endless. Each element, no matter how small, should be carefully considered and chosen with care. Whether you have a large garden or a small patio, the principles of minimalist design can help you create a space that is both beautiful and functional, a haven of tranquility in your own backyard.

27 Detailed Garden Layout Ideas: Pure Inspiration

The world of gardening is one of limitless potential, a vibrant mix of creativity, science, and nature that can transform even the most mundane plot of land into a living masterpiece. Our focus today is to help you navigate the broad spectrum of garden layout ideas, guiding you through 27 distinct designs that range from the simple to the sublime, with an emphasis on “Garden Design” and “Landscaping”. Each of these designs serves as a springboard for inspiration, an invitation to make your outdoor space uniquely yours.

Through the exploration of these 27 ideas, you’ll uncover the secrets of effective planting schemes, discover how to add personality through flower beds and garden zones, and learn to manage your vegetable patch for year-round produce. Additionally, we’ll dive into aspects such as perennial selection, ornamental plant arrangement, and the subtle art of hardscaping. Let’s embark on this gardening journey together!

An Introduction To Garden layout ideas

Garden layout ideas are a fusion of several elements including color schemes, plant arrangements, and hardscaping details. When planning your garden design, there are several factors to consider like sunlight exposure, soil conditions, and seasonal changes. Incorporating these factors into your design allows your garden to evolve naturally, creating an engaging and dynamic outdoor space.

Garden layout ideas

The choice of native plants versus exotic species can significantly impact the maintenance and sustainability of your garden. Choosing the right plants for your specific climate and plant zones can ensure your garden thrives all year round. The use of container gardening and raised beds can help manage plants with different soil and sunlight requirements, adding layers of complexity and interest to your garden layout.

Create different zones

Garden Zones

Your garden can be sectioned off into different zones each with a unique purpose or theme. A shade garden populated with ferns and hostas can provide a cool retreat during hot summers, while a sunny flower bed filled with perennials can offer vibrant colors throughout the seasons. Separating your garden into zones allows you to create mini ecosystems, each one a reflection of a specific natural environment.

Vegetable Patch and Herb Garden

A well-planned vegetable patch can yield a variety of fresh produce throughout the year. Consider the sunlight exposure, soil conditions, and plant zones when deciding on the location for your vegetable patch. An adjacent herb garden can provide aromatic seasonings for your kitchen, and many herbs like lavender and rosemary also offer beautiful blooms and foliage texture.

Design Aspects For A Cosy Courtyard

Patio Area and Garden Seating

Transform your courtyard into a relaxing oasis by adding a cozy patio area. Use hardscaping materials like stone pavers or brick to define the space. Add garden seating that invites guests to sit and enjoy the surrounding greenery. A fire pit or an outdoor fireplace can provide warmth and atmosphere, creating a space that can be used all year round.

Patio Area and Garden Seating

Outdoor Lighting

Incorporate outdoor lighting to highlight architectural features, garden paths, or specific plants. Using a variety of lighting techniques like uplighting, downlighting, and spotlighting can add depth and dimension to your courtyard. Remember to consider sustainability by choosing LED lights or solar-powered options.

Lay winding paths To Create Interest

Garden Paths and Rock Garden

A winding garden path invites exploration and adds a sense of mystery to your garden. Use a variety of aggregates to create texture and contrast. Lining the path with a rock garden filled with alpine plants and succulents can offer an interesting feature and is a great solution for poor soil conditions.

Garden Structures and Vertical Gardening

Garden structures like pergolas and arbors can provide height and structure, creating perfect frames for climbing plants. Vertical gardening can be used in narrow areas along the path, adding greenery without taking up too much space.

The Use Of Different Aggregates To Create Texture & Interest

Hardscaping and Retaining Walls

Different aggregates can be used in hardscaping to create interest and diversity. Gravel, pebbles, crushed granite, and river rocks are just a few examples of aggregates that can be used in paths, patios, or retaining walls. A well-placed retaining wall can provide a level area for planting or seating and can be an attractive feature when built with natural stone or decorative blocks.

Foliage Texture and Garden Color Schemes

The use of different aggregates can be mirrored in your plant selection. Plants with different foliage texture and color can create a tapestry-like effect. Consider the garden color schemes when selecting plants. The combination of foliage, flowers, and hardscaping can create a harmonious and visually appealing garden.

Foliage Texture and Garden Color Schemes

A garden is not only an extension of your living space, but it’s also a reflection of your personal style and love for nature. The ideas we explored are just the tip of the iceberg, as the possibilities for garden layouts are as diverse as nature itself. Whether you are drawn to the formality of an English cottage garden, the tranquility of a Japanese garden, or the edibility of an edible landscape, there’s a garden style waiting for you to discover.

From garden paths winding through a riot of color, to cosy courtyards lit by soft garden lights, and productive vegetable patches bustling with bees, our gardens can be an endless source of joy and inspiration. And remember, every garden, no matter how small or large, urban or rural, holds the potential to create a positive impact on the environment. Through sustainable gardening practices, we can support local wildlife, improve air and soil quality, and contribute to a greener planet.

Whether you’re an experienced gardener or just starting out, the journey of creating and tending a garden is a rewarding endeavor. As you experiment with different layouts, designs, and plants, you’ll no doubt discover the therapeutic benefits that come with gardening. So go ahead, step outside, and start creating your garden paradise.

Ideas For Incorporating A Terrace Into Your Garden

Optimize Your Space

When it comes to adding a terrace to your garden, it’s crucial to utilize the space optimally. Terraces provide a wonderful solution for gardens with slopes, allowing you to create levelled spaces for plants and a place to relax or entertain. You can incorporate a series of descending or ascending terraces following the natural gradient of your land. Additionally, using retaining walls, you can create garden beds at different levels, adding depth and dimension to your garden.

Terrace Into Your Garden

Patio Area and Garden Seating

A terrace can house a beautiful patio area, providing a great vantage point to enjoy the garden view. Depending on your preference, you can opt for a stone, brick, or wooden patio, each offering a unique aesthetic appeal. Remember to make your terrace comfortable with suitable garden seating. For example, you can include an outdoor sofa, hammock, or even a swing, all of which can make the terrace more inviting.

Integrating Water Features

A water feature can bring life to a terrace, creating a serene ambience. Consider adding a water fountain, a small pond, or even a compact waterfall. These water features can add visual interest to your terrace, while their soothing sounds contribute to a relaxing environment.

Make a Secret Hideaway

Designing Your Hideaway

Every garden can benefit from a secret hideaway, a secluded spot that feels like a private escape. The hideaway could be a small clearing surrounded by lush plants or an alcove hidden behind a curved path. Use garden structures such as pergolas, arbors or gazebos to add an architectural element and provide support for climbing plants.

Secret Hideaway

Creating a Sense of Seclusion

Use high hedges, privacy screens, or a trellis adorned with climbers to create a sense of seclusion. The type of plants you choose can also add to the secret feeling. Fragrant plants like jasmine, honeysuckle, or gardenias can enhance the sensory experience of your hideaway. The hideaway should be comfortable, so consider adding a garden bench or even a hammock where you can relax and enjoy the tranquility.

Soften Hard Landscaping with Plants

While hardscaping is crucial to defining your garden structure, it’s important to soften these elements with plants. The integration of plants can transform hard landscaping features like patios, retaining walls, and pathways into more natural-looking components of the garden.

Flower Beds and Ornamental Plants

Flower beds and borders filled with ornamental plants can soften the hard edges of pathways or patios. Choose perennials for their year-round appeal and use annuals to inject seasonal color. The mix of flowering plants, foliage textures, and colors can create visual interest.

Creepers and Climbers

Creepers and climbing plants can help to mask walls or fences, and when used on pergolas or arbors, they can create a stunning visual effect. A well-selected vine can provide seasonal changes, with spring flowers, summer shade, and autumn color.

Incorporating A Vertical Garden

Vertical gardening is a smart solution for small spaces or bare walls, turning them into vibrant plant displays. The concept is simple – instead of growing plants horizontally, you encourage them to grow vertically, using supports or special vertical planters.

Selecting the Right Plants

When it comes to vertical gardening, it’s essential to select plants with the right growth habit. Climbing plants such as ivy, clematis, and climbing roses are natural choices. However, various herbs, ferns, and flowering annuals can also be grown vertically in pocket planters.

Maintenance and Irrigation

Maintaining a vertical garden requires careful attention to watering as the elevated position can cause the plants to dry out faster. Installing a drip irrigation system can ensure consistent water supply. Similarly, choose plants with similar sunlight exposure and watering needs to ensure they all thrive.

The Importance Of Adding Shade And How To Do It

A garden without shade can be a challenging environment for many plants, and for people as well. Shade not only provides relief from the intense midday sun, but it also adds another layer of interest to your garden layout.

Creating Shade In Garden

Using Trees and Shrubs

Trees and tall shrubs are natural providers of shade. The wide canopy of a tree can create a sizeable shaded area beneath it, ideal for underplanting with shade-loving plants. You can also use shrubs to create a shaded border or to shield a seating area from the sun.

Building Structures for Shade

Structures like pergolas, arbors, and gazebos can provide shade in a garden. These can be covered with climbing plants for natural shading, or they can be fitted with a canopy or shade cloth for immediate effect.

How To Make Your Garden Design Family Friendly

Designing a family-friendly garden means creating a space that is safe, engaging, and enjoyable for people of all ages. Here are a few ideas to accomplish that:

Incorporating Play Areas

Children love to play outside, so consider incorporating a dedicated play area into your garden. This could be a simple sandbox, a swing set, or even a treehouse. Ensure the play areas are safe with soft landing spots and are visible from the house or patio for easy supervision.

Growing Edibles

A vegetable patch or an edible garden not only provides fresh produce but also serves as a learning experience for children. Kids are more likely to eat vegetables they have grown themselves, making this a great way to encourage healthy eating.

Ensuring Safety

Safety is paramount in a family garden. Ensure all paths are smooth and clear of tripping hazards. Avoid using toxic plants, and if you have a pond or water feature, ensure it’s safe for children.

By investing time in designing and creating your garden, you can create an outdoor space that not only complements your home but also caters to your lifestyle. A well-designed garden can serve as a relaxing oasis, a vibrant playground, a productive kitchen garden, or simply a beautiful backdrop for your life.

Tips & Tricks To Get The Most Out Of A Small Garden

The Art of Illusion

When space is limited, consider creating an illusion of a larger garden. Use winding garden paths, which lead the eye on a journey around the garden, or incorporate mirrors, which reflect light and images to give a sense of increased space. The strategic use of garden art or focal points can also create an impression of depth.

Vertical Gardening

In a small garden, every inch counts, and that includes the vertical space. Utilize fences, walls, and trellises to grow climbing plants or arrange hanging baskets. You can even set up vertical garden planters, which can be used for anything from ornamental plants to a productive herb garden.

Vertical Gardening

Choosing the Right Plants

Select plants that won’t outgrow your small space. Opt for dwarf or slow-growing varieties of trees and shrubs. For flower beds and borders, perennials that offer color and texture throughout the year without excessive growth can be a great choice.

How To Design A Low Maintenance Garden Layout

Opt For Low-Maintenance Plants

Select plants that are suited to your local soil conditions and climate. Native plants often require less care as they are adapted to the local environment. Perennials, with their ability to return year after year, can also reduce maintenance.

Hardscaping Elements

Hardscaping elements, such as patios, decks, and gravel paths, require less maintenance than lawns or flower beds. They provide a clean, stylish look and are great for defining different zones in your garden.

Automated Irrigation

Install an automated irrigation system to save time and ensure your plants get watered regularly. Drip irrigation is a great low-maintenance option as it provides water directly to the plant roots, minimizing water waste.

Colour And Colour Pallets: Things To Consider

Creating a Colour Scheme

Creating a garden color scheme can help unify the garden design and create a certain mood. Cool colors like blues, purples, and greens can create a calm, serene atmosphere. Warm colors such as reds, oranges, and yellows can create an energetic, vibrant feel.

Seasonal Changes

Remember to take into account seasonal changes. Plants change color throughout the seasons, so consider when your plants will be in bloom and how these colors will work together.

Using Foliage

Don’t overlook the impact of foliage color. Many plants have colorful or variegated leaves that can add to your garden’s color scheme.

How To Maximise The Effect Of Lighting In A Garden

Highlighting Features

Use lighting to highlight certain features in your garden. This could be a beautiful tree, a water feature, or a statue. Spotlights can be used to illuminate these features, creating a focal point.

Path and Security Lighting

Lighting can be used to illuminate garden paths, adding safety and visual appeal. Security lighting with motion sensors can also be added to entrances and vulnerable areas.

Ambient Lighting

For an enchanting evening atmosphere, consider adding ambient lighting. This could be in the form of string lights, lanterns, or solar-powered stake lights. These create a warm, inviting glow, perfect for evening entertaining.

Designing A Modern Garden: Things To Consider

Clean Lines and Geometric Shapes

Modern garden design often features clean lines and geometric shapes. This could be reflected in the layout of the garden, the shape of the flower beds, or the design of the patio or deck.

Minimalist Planting Schemes

Modern gardens often feature minimalist planting schemes, with a focus on foliage texture and color rather than abundant flowers. Grasses, succulents, and architectural plants like palms or agave can work well in a modern garden.

Modern Materials

Materials like polished concrete, steel, and glass can add a contemporary touch to your garden. These can be used in structures, furniture, or garden art.

How To Transform The Side Yard Garden Into An Amazing Space

Side Yard Paths

A well-designed path can transform a side yard into a charming passage. Consider using materials that complement your home’s exterior or your backyard landscape design. Add interest with curve-shaped paths or by using different aggregates to create texture.

Side Yard Garden

Vertical Interest

If your side yard is narrow, use the vertical space. Install trellises for climbing plants, use wall-mounted planters, or even create a green wall with vertical gardening techniques.

Functionality

Consider the function of your side yard. It could serve as a hidden storage area, a passage from front to back, or even a secluded seating area. The design should align with its function while maximizing the potential of the space.

Gardening is as much an art as it is a science. By understanding the basic principles and letting your creativity flow, you can design a garden that not only looks stunning but also serves your needs and aspirations. Whether you have a large garden or a small one, a modern aesthetic or a traditional one, with careful planning and design, your garden can become your outdoor sanctuary.

How To Layout A Classic Perennial Border

Choosing the Right Perennials

When laying out a classic perennial border, it’s crucial to choose perennials that are suited to the sunlight exposure and soil conditions in your garden. Pick a mix of perennials to ensure a variety of heights, colors, and bloom times.

Perennial Border

Planting in Drifts

Rather than planting in single specimens, plant perennials in drifts of three or more for visual impact. Larger drifts can create a more naturalistic look, while smaller drifts can provide a more formal appearance.

Layering Perennials

To achieve a classic look, plant perennials in layers with the tallest at the back, medium-sized in the middle, and the shortest at the front. This approach ensures that all plants are visible and contributes to the border’s depth.

Introducing Aspects Of A Japanese Garden

Harmony with Nature

A key aspect of a Japanese garden is its harmony with nature. This can be achieved through the thoughtful arrangement of rocks, water features, and plants. Rocks can be used to symbolize mountains, while a pond or stream may represent a sea or river.

Japanese Plant Choices

Plant choices should reflect the natural flora of Japan. This could include Japanese maples, cherry trees, bamboo, and moss. These native plants create a sense of authenticity and tranquility.

Garden Structures

Incorporate traditional Japanese garden structures, such as stone lanterns, a tea house, or a torii gate. These structures can provide focal points within the garden and contribute to its overall serene ambiance.

Incorporating Grasses And How To Make Best Use Of Them

As Focal Points

Tall grasses, like switchgrass or maiden grass, can create dynamic focal points in your garden. Their tall, wispy nature adds height and movement, which can add interest to your outdoor space.

For Texture

Grasses come in a variety of textures, from the fine, hair-like blades of blue fescue to the wide, flat leaves of some bamboo species. Playing with these textures can add visual interest and depth to your garden.

To Create a Natural Look

Grasses can contribute to a natural, meadow-like feel in a garden. Plant grasses in swathes or mix them with wildflowers for a relaxed, informal look.

Ideas To Layout The Perfect Enclosed Garden

Define the Space

Create clear boundaries using fences, hedges, or walls. These will provide privacy, but can also contribute to the feeling of a secret, secluded space.

Incorporate a Focal Point

Adding a focal point can create a sense of depth in an enclosed garden. This could be a sculpture, a water feature, or a striking plant or tree.

Choose Your Plants Wisely

In an enclosed garden, plant choices are vital. Select a variety of plants that provide different colors, textures, and heights to create interest and make the most of the available space.

How Geometry Can Elevate The Beauty And Softness Of Your Garden Design

Using Geometric Shapes

Geometric shapes can provide a sense of order and balance in a garden. This could be in the layout of flower beds, the design of the patio, or the placement of plants and trees.

Balancing Geometry with Nature

While geometry can provide structure, it’s essential to balance this with the softer, natural elements of the garden. Plants, especially those with soft, billowing forms, can provide a pleasing contrast to geometric forms.

The Golden Ratio

Consider using the Golden Ratio in your garden design. This mathematical ratio is often seen in nature and is considered aesthetically pleasing. Using this ratio in the placement of plants, garden paths, or garden zones can create a harmonious and balanced design.

Gardening is an opportunity to express creativity while interacting with nature. Whether you’re designing a new garden layout or revamping an existing one, there’s a world of possibilities to explore. These ideas serve as a starting point, but the final design will depend on your personal preferences, the specific conditions in your garden, and the time and resources you can devote to the project. The result, however, will be a personalized garden that provides satisfaction and joy for years to come.

Ideas To Transform The Front Garden

Planning for Purpose

The first step in transforming a front garden is to identify its purpose. Should it create an inviting pathway to your front door? Offer privacy? Display beautiful plantings? Once you identify the function, it will be easier to plan your design.

Using Planting Schemes

Implementing planting schemes can add personality and cohesion to your front garden. Consider the color, texture, and timing of blooms in your scheme. Seasonal changes can make your garden attractive year-round.

Incorporating Garden Art

Art pieces or sculptures can serve as focal points, bringing a unique aesthetic to your outdoor space. Just be sure the piece complements the garden’s design and your home’s style.

How To Incorporate Decking For Ultimate Functionality

Choosing the Right Location

Decking can be a functional and beautiful addition to any garden. Consider sunlight exposure, proximity to the house, and the views from the deck when choosing its location.

Selecting Materials

Materials should be chosen for durability, sustainability, and aesthetics. Some popular choices are hardwood, composite materials, and pressure-treated lumber.

Adding Functional Features

Decking can offer more than just a place to sit. Consider adding built-in benches for seating, planter boxes for flowers, or a pergola for shade.

Using Pergolas and Arbors For Height And Functionality

Creating Vertical Interest

Pergolas and arbors can be used to create height in a garden, drawing the eye upward and adding a new dimension to the layout. They also provide support for climbing plants.

Defining Outdoor Spaces

These structures can be used to define different garden zones. For example, a pergola can create a shaded dining or lounging area, while an arbor might mark the entrance to a different part of the garden.

Adding Seasonal Beauty

Consider growing seasonal climbers like clematis, wisteria, or roses. Their blooms will change with the seasons, adding interest and color to your pergola or arbor.

Using Raised Planters To Incorporate Levels and Beauty

Making Gardening Easier

Raised planters make it easier to tend to your plants as they reduce the need for bending. They’re ideal for people with back problems or mobility issues.

Improving Soil Conditions

With raised planters, you can control the soil conditions better. They’re perfect for plants that need specific soil types or drainage conditions.

Adding Visual Interest

Raised planters can be arranged in various layouts to create attractive visual patterns. They also add depth and dimension to a flat landscape.

The Benefits Of Encouraging Insects Into Your Garden

Natural Pest Control

Many insects, like ladybugs and lacewings, are natural predators of pests that harm plants. Attracting these beneficial insects can help keep pest populations in check without the need for chemical pesticides.

Pollination

Insects, particularly bees and butterflies, are crucial for plant pollination. Without them, we wouldn’t have the wide variety of fruits, vegetables, and flowers that we enjoy.

Pollination in garden

Supporting Biodiversity

Encouraging insects in your garden contributes to biodiversity, supporting a wide range of plant and animal life. A garden teeming with insects can be a sign of a healthy ecosystem.

Designing and maintaining a garden is a rewarding process that combines creativity, planning, and knowledge of plants and ecosystems. It can create a beautiful outdoor space that reflects your tastes and supports local wildlife. Regardless of the size or style of your garden, remember that it is a personal expression of you and a space for you to enjoy.

Conclusion

Designing a garden layout that is both functional and aesthetically pleasing involves more than simply choosing a collection of your favorite plants. It requires thoughtful consideration of the unique attributes of your space, including the garden’s size, shape, soil conditions, and sunlight exposure.

To create a space that caters to your individual needs and taste, consider different landscaping styles like Japanese gardens or English cottage gardens, and include a variety of garden zones – from tranquil shaded areas to sunny flower beds or a vegetable patch. The introduction of structures like pergolas, arbors, raised beds, and decking can add visual interest and functionality to your garden.

Moreover, the importance of sustainability and biodiversity cannot be overstated. A well-planned garden can be a haven for wildlife, encouraging beneficial insects and incorporating native plants. With a conscious effort towards sustainability, your garden can be a vibrant, thriving ecosystem that brings you joy and peace throughout the year.

At the end of the day, the most effective garden design is one that reflects your personal style and fulfills your desires for the space, whether that be a place for relaxation, a productive vegetable garden, or a stunning showcase of seasonal blooms. Through thoughtful planning and design, your garden can become an outdoor extension of your home, offering a place of respite and beauty in every season.

27 Balcony Garden Layout Ideas: The Ultimate Guide

Welcome to the ultimate guide on balcony garden layout ideas! If you’re fortunate enough to have a balcony, you can transform it into a breathtaking green oasis, regardless of its size. Balcony gardening has gained popularity, especially in urban areas where green spaces are limited. This comprehensive article will provide you with a wealth of valuable information on creating a beautiful and thriving garden on your balcony.

Whether you’re new to gardening or an experienced green thumb, this guide covers all aspects of balcony gardening, from designing your layout to selecting the right plants and dealing with pests. We’ll delve into container gardening, vertical gardening, and utilizing every inch of your limited space. By the end of this article, you’ll have the knowledge and inspiration to create your dream balcony garden.

Understanding the Basics of Balcony Garden Layouts

Creating a successful balcony garden starts with thoughtful planning and a well-designed layout. When working with limited space, every inch counts. Here are some key considerations to keep in mind:

Balcony Garden

  1. Balcony Size and Shape: Begin by assessing the dimensions and shape of your balcony. Measure the available space and take note of any unique features like railings or pillars that may impact your layout.
  2. Functional Zones: Determine how you intend to use your balcony garden. Create functional zones, such as a seating area, a dining space, a vertical garden, and a play corner (if applicable). This will help you allocate the space efficiently.
  3. Vertical Gardening: Embrace the power of vertical spaces by utilizing wall-mounted planters, hanging baskets, and trellises. Vertical gardening not only maximizes space but also adds a lush backdrop to your balcony.
  4. Safety and Weight Considerations: Keep safety in mind when designing your balcony garden. Ensure that the floor can bear the weight of your plants and containers. Securely fasten any hanging planters or vertical structures.
  5. Aesthetics and Style: Choose a design theme that reflects your personal style and preferences. Whether it’s a cozy cottage garden, a modern minimalist space, or a Japanese Zen-inspired haven, let your creativity shine through.

Embracing Vertical Spaces: The Power of Wall Gardening

When space is limited, going vertical is a game-changer for your balcony garden. Wall gardening offers numerous benefits and opportunities for creative expression:

Wall Garden

  1. Wall-Mounted Planters: Install wall-mounted planters at different heights to create a living wall of greenery. Choose a variety of plant species to add texture and color to the vertical garden.
  2. Hanging Baskets: Hang cascading plants like Ivy, Spider Plant, or Boston Fern in hanging baskets. This adds a sense of movement and beauty to your balcony garden.
  3. Climbing Plants: Train climbing plants like Clematis, Jasmine, or Honeysuckle to grow along trellises or wire frames. They add a touch of romance and charm to your vertical space.
  4. Herb Garden Wall: Create a vertical herb garden by arranging pots or planters with different herbs. Not only does this save space, but it also makes it convenient to access fresh herbs for cooking.
  5. Privacy Screen: Use a living wall as a natural privacy screen. Strategically position tall plants or a trellis with climbing vines to create a secluded and intimate balcony oasis.

Make it Edible: Growing Fruits and Vegetables on Your Balcony

Balcony gardening isn’t limited to ornamental plants; you can grow your own delicious and nutritious produce too. Here’s how to create an edible balcony garden:

Growing Fruits and Vegetables on Your Balcony

  1. Selecting Suitable Crops: Choose fruits and vegetables that thrive in containers and are well-suited for your balcony’s sunlight exposure. Herbs like Basil, Mint, and Rosemary, as well as compact vegetables like Tomatoes, Peppers, and Lettuce, are excellent choices.
  2. Container Size and Placement: Use large and deep containers for plants with extensive root systems. Ensure adequate spacing between containers to allow air circulation and prevent overcrowding.
  3. Quality Potting Mix: Invest in high-quality potting mix enriched with nutrients to support healthy plant growth. Avoid using garden soil, as it may compact in containers and hinder root development.
  4. Watering and Fertilizing: Keep your edible plants well-hydrated, especially during hot weather. Container plants may require more frequent watering than those in the ground. Use a balanced liquid fertilizer to provide essential nutrients regularly.
  5. Harvesting with Care: Harvest your crops at the peak of ripeness to enjoy the best flavors. Regular harvesting also encourages continuous production and prevents plants from becoming overgrown.

Container Gardening: An Essential for Balcony Layouts

Container gardening is the cornerstone of balcony gardening. Versatile and practical, containers offer a myriad of possibilities:

Container Gardening

  1. Types of Containers: Choose from a wide variety of containers, such as ceramic pots, plastic planters, wooden boxes, hanging baskets, and fabric grow bags. Each type has unique benefits, so mix and match to suit your style.
  2. Drainage and Watering: Ensure that your containers have drainage holes to prevent waterlogged soil. Use saucers or trays to catch excess water, and avoid overwatering your plants.
  3. Elevating Containers: Elevate containers on stands or shelves to create depth and visual interest. This also helps to prevent pests and allows better air circulation around the plants.
  4. Grouping Plants: Group plants with similar sunlight and water needs together in the same container. This simplifies maintenance and ensures all your plants receive the care they require.
  5. Vertical Container Gardens: Utilize vertical space with stacked or tiered containers. Plant cascading plants at the top and trailing plants at the bottom for a striking visual effect.

Creating the Perfect Environment: Choosing the Right Plants

The key to a successful balcony garden lies in selecting the right plants that thrive in your specific environment:

  1. Sunlight Exposure: Observe your balcony’s sunlight patterns throughout the day. Choose plants that match the available light conditions. Full-sun plants need at least six hours of direct sunlight, while shade-loving plants prefer filtered light.
  2. Climate Considerations: Take into account your local climate and seasonal changes. Select plants that can tolerate temperature fluctuations, wind, and humidity levels.
  3. Wind Resistance: If your balcony is exposed to strong winds, opt for wind-resistant plants with flexible stems and sturdy foliage. Consider coastal plants or ornamental grasses.
  4. Space and Size: Consider the mature size of your chosen plants and their growth habits. Avoid selecting plants that may outgrow your balcony or require frequent pruning.
  5. Container Compatibility: Ensure that the plants you choose are suitable for container gardening. Compact and dwarf varieties are ideal for small spaces.

Building a Year-Round Garden: Seasonal Plant Selection

Maintaining a year-round garden on your balcony requires strategic plant selection for each season:

  1. Spring: Embrace the arrival of spring with vibrant blooms and fresh foliage. Consider Tulips, Daffodils, Pansies, and Hyacinths for a burst of color.
  2. Summer: Choose heat-tolerant and drought-resistant plants for the hot summer months. Petunias, Geraniums, Marigolds, and Zinnias are excellent choices.
  3. Autumn: Celebrate the changing season with plants that exhibit rich fall colors. Mums, Asters, Ornamental Cabbage, and Kale add a touch of autumn charm.
  4. Winter: Bring life to your winter garden with cold-hardy plants like Cyclamen, Winter Pansies, and Hellebores. Evergreen plants provide year-round structure and greenery.
  5. Evergreens and Perennials: Incorporate evergreen plants and perennials that offer visual interest throughout the year. These plants form the backbone of your balcony garden’s design.

Arrangement Ideas for Your Balcony Garden

Arranging your balcony garden is an art that combines aesthetics and functionality. Consider the following ideas for a visually appealing and functional layout:

  1. The Mini Urban Jungle: Create a lush and dense garden by clustering potted plants of varying heights and shapes. Mix and match different textures and foliage colors to achieve a vibrant and inviting space.
  2. The Vertical Wonderland: Embrace vertical gardening by using wall-mounted shelves and trellises to grow climbing plants. Incorporate hanging planters to make the most of your vertical space.
  3. The Zen Corner: Design a tranquil and calming oasis by arranging potted plants around a seating area. Add a water feature or a small fountain to enhance the soothing atmosphere.
  4. The Edible Haven: Opt for a practical garden that combines aesthetics with functionality. Grow herbs and small vegetables in raised beds or containers, providing fresh ingredients for your culinary adventures.
  5. The Flower Paradise: Create a blooming haven with an abundance of balcony flowers. Mix annuals and perennials in different colors and shapes to enjoy a constant display of beauty throughout the seasons.

Small Balcony, Big Impact: Layouts for Compact Spaces

Even with a small balcony, you can achieve a big impact by utilizing every inch smartly. Here are some layouts designed specifically for compact spaces:

  1. The Hanging Garden: Make use of hanging planters to keep the floor space free while adding greenery overhead. Hang planters from railings, walls, and ceilings to create a vertical garden that captivates attention.
  2. The Tiered Wonder: Arrange plants on multi-tiered shelves or plant stands. This approach adds depth and dimension to your balcony garden, allowing you to grow more plants in a limited area.
  3. The Window Sill Garden: If your balcony has a windowsill, transform it into a charming garden spot. Place small pots or window boxes with your favorite plants to create a delightful view both indoors and outdoors.
  4. The Corner Delight: Focus on a specific corner and turn it into a cozy garden nook. Use corner planters or tall pots to maximize vertical space while leaving enough room for a small seating area.
  5. The Balcony Rail Greenery: Attach railing planters or planter boxes to the balcony railings to add a touch of green without taking up valuable floor space.

Getting Creative with Climbers in Your Balcony Garden

Climbing plants are the secret weapon of balcony gardeners. They add drama, privacy, and greenery to vertical spaces. Here’s how to make the most of climbers:

  1. Selecting the Right Climbers: Choose climbing plants that suit your balcony’s conditions. Some popular options include Bougainvillea, Clematis, Ivy, and Jasmine. Ensure you have adequate support structures for them to climb on.
  2. Vertical Trellis Magic: Install trellises against walls or railings to guide climbers upward. Trellises not only support the plants but also create an enchanting backdrop for your balcony garden.
  3. Green Privacy Screen: Train climbers along a trellis or wires to create a natural privacy screen. Enjoy a secluded and serene environment shielded from prying eyes.
  4. Hanging Cascades: Combine hanging planters with trailing climbers for an elegant and cascading effect. English Ivy, String of Pearls, and Philodendron are perfect choices for this style.
  5. Climbers for Shade: If your balcony receives limited sunlight, don’t worry. Many climbers thrive in shade, such as Climbing Hydrangea, Creeping Fig, and Virginia Creeper.

Nurturing a Herb Garden in Your Balcony: Tips and Tricks

Having a herb garden on your balcony provides an array of culinary delights just a few steps away. Here are some essential tips for growing a thriving herb garden:

Nurturing a Herb Garden

  1. Picking the Right Herbs: Start with popular culinary herbs like Basil, Mint, Rosemary, Thyme, and Parsley. Consider your favorite recipes and choose herbs accordingly.
  2. Container Selection: Most herbs do well in small to medium-sized containers. Ensure proper drainage to prevent waterlogging, as herbs prefer well-draining soil.
  3. Sunlight and Watering: Herbs generally require at least 4-6 hours of sunlight daily. Water them when the top inch of soil is dry, but be careful not to overwater, as herbs dislike soggy roots.
  4. Harvesting and Pruning: Regularly harvest herbs to encourage growth and prevent them from going to seed. Pinching back herbs also keeps them bushy and full.
  5. Companion Planting: Some herbs have natural pest-repellent properties. Consider companion planting with herbs like Lavender, Chives, and Sage to protect your entire balcony garden.

Creating Privacy On Your Balcony With The Right Planting Layout

Creating a sense of privacy on your balcony is crucial for a cozy and intimate space. Here’s how to achieve privacy with your planting layout:

  1. Tall and Leafy: Incorporate tall plants like Bamboo, Ficus, or Pampas Grass along the edges of your balcony. These plants act as living screens, providing natural privacy from neighboring balconies or streets.
  2. Curtains of Green: Train climbers or vine-like plants on trellises, pergolas, or railing-mounted planters to form a “curtain” effect. These green curtains create a sense of enclosure and seclusion.
  3. Fragrant Screens: Choose aromatic plants like Lavender or Jasmine that not only offer privacy but also fill the air with delightful scents.
  4. Layered Planting: Arrange plants in layers with taller plants at the back and shorter ones in front. This tiered layout creates depth and blocks direct lines of sight.
  5. Mobile Planters: Consider using movable planters or tall pots with casters. You can easily rearrange them to adjust your privacy levels or follow the sun’s path throughout the day.

Incorporating Outdoor Furniture into Your Balcony Garden

Your balcony garden can be more than just plants; it can also be an outdoor living space. Here’s how to incorporate furniture into your green sanctuary:

Incorporating Outdoor Furniture into Your Garden

  1. Choosing the Right Furniture: Opt for weather-resistant and compact furniture that fits your balcony’s dimensions. Foldable chairs, small bistro tables, or cushioned benches work well in limited spaces.
  2. Cozy Lounge Area: Create a comfortable and inviting seating area with soft cushions and throws. Surround the space with potted plants to add a touch of nature to your relaxation spot.
  3. Dining Al Fresco: If you enjoy dining outdoors, consider a small dining table and chairs. Make it extra special by decorating the table with fresh flowers and candles.
  4. Vertical Furniture: Save floor space by using wall-mounted shelves or racks to store gardening tools, pots, or decor items.
  5. Garden Dividers: Use furniture strategically to define different zones in your balcony garden. For example, a low bench can serve as a boundary between your lounge area and the rest of the garden.

Practical Tips for a Low-Maintenance Balcony Garden

Balcony gardening doesn’t have to be labor-intensive. With the right approach, you can create a low-maintenance garden that still thrives:

  1. Choose Hardy Plants: Opt for resilient and low-maintenance plants that can tolerate occasional neglect. Succulents, cacti, and certain herbs like Rosemary are excellent choices.
  2. Mulching: Apply a layer of mulch to your containers to retain moisture and suppress weed growth. Mulching reduces the need for frequent watering and weeding.
  3. Self-Watering Systems: Invest in self-watering containers or DIY self-watering systems to ensure your plants receive a steady supply of moisture, even when you’re away.
  4. Drip Irrigation: Install a simple drip irrigation system to automate watering. Set a timer, and your plants will receive water at regular intervals.
  5. Choose the Right Soil: Use high-quality potting mix enriched with nutrients and compost. This helps your plants thrive and reduces the need for frequent fertilizing.

Remember, a low-maintenance garden still requires some care and attention, but with these tips, you can enjoy a beautiful balcony garden without feeling overwhelmed.

Attracting Pollinators: A Nature-Friendly Balcony Garden Approach

Attracting pollinators to your balcony garden is not only beneficial for your plants but also contributes to the overall health of the ecosystem. Here’s how to create a nature-friendly haven for pollinators:

Nature Friendly Balcony Garden

  1. Selecting Pollinator-Friendly Plants: Choose a variety of flowering plants that appeal to bees, butterflies, and other pollinators. Native plants are especially attractive to local pollinators.
  2. Include a Water Source: Provide a shallow dish of water or a small birdbath for pollinators to quench their thirst. Be sure to keep the water fresh and clean.
  3. Avoid Pesticides: Pesticides can be harmful to pollinators. Opt for natural pest control methods like introducing beneficial insects or using neem oil.
  4. Nesting Spots: Consider adding nesting spots for solitary bees, such as small piles of twigs or drilled holes in wooden blocks.
  5. Year-Round Blooms: Aim to have a variety of plants that bloom throughout the seasons, providing a continuous food source for pollinators.

Caring for Your Balcony Garden: Watering, Feeding, and Sunlight

Proper care is essential for maintaining a flourishing balcony garden. Here are some key tips on watering, feeding, and sunlight exposure:

  1. Watering: Balcony gardens often dry out quickly, especially during hot weather. Check your plants’ moisture levels regularly and water deeply when the top inch of soil feels dry. Consider using self-watering containers or installing a drip irrigation system for consistent hydration.
  2. Feeding: Container plants rely on you for nutrients. Use a balanced liquid fertilizer or slow-release granules to feed your plants during the growing season. Follow the manufacturer’s instructions for proper application.
  3. Sunlight Exposure: Observe how much sunlight your balcony receives throughout the day. Choose plants that match the available light conditions. Full-sun plants need at least six hours of direct sunlight, while shade-loving plants prefer filtered light.
  4. Rotate and Prune: Rotate your plants regularly to ensure even sunlight exposure and prevent them from leaning towards the light source. Prune dead or yellowing leaves to encourage new growth and maintain a tidy appearance.
  5. Seasonal Adjustments: Be prepared to adjust your watering and feeding routines as seasons change, as plant needs fluctuate with temperature and daylight hours.

The Use of Color and Texture in Your Balcony Garden

Creating a visually appealing balcony garden involves a thoughtful selection of colors and textures. Consider the following tips to achieve a harmonious and stunning garden space:

  1. Color Harmony: Choose a color scheme that complements your personal style and evokes the atmosphere you desire. Monochromatic schemes create a serene and sophisticated look, while complementary colors add vibrancy and contrast.
  2. Textural Contrast: Combine plants with different leaf shapes and textures to add depth and interest to your garden. Mix bold, large-leaved plants with delicate, fine-textured foliage.
  3. Focal Points: Create focal points with plants that stand out from the rest. Consider using plants with striking flowers, unique forms, or interesting foliage as eye-catching centerpieces.
  4. Year-Round Interest: Plan your garden to have visual appeal throughout the seasons. Choose plants with different bloom times and foliage colors to maintain interest year-round.
  5. Accessorize: Enhance your balcony garden with decorative elements like colorful cushions, artistic planters, garden sculptures, or string lights to create an enchanting ambiance.

Stylish Pots and Planters: Adding Aesthetic Appeal to Your Balcony

The choice of pots and planters can elevate the aesthetic appeal of your balcony garden. Here’s how to add style and charm:

Pots and Planters

  1. Mix and Match: Experiment with various pot materials, shapes, and sizes to create an eclectic and dynamic look. Combining ceramic, terracotta, metal, and resin planters can add visual interest.
  2. Vertical Planters: Utilize vertical space with wall-mounted planters, railing planters, or hanging baskets. These not only save floor space but also add a green backdrop to your garden.
  3. Tiered Plant Stands: Opt for tiered plant stands or shelves to display multiple plants in an organized and artistic manner.
  4. Colorful Planters: Use brightly colored planters to add a pop of color to your balcony garden. Consider colors that complement your overall garden theme.
  5. Repurposed Containers: Get creative and repurpose items like old wooden crates, buckets, or pallets as unique and sustainable planters.

Creating a Child-Friendly Balcony Garden Layout

A child-friendly balcony garden is a delightful space for little ones to explore and learn about nature. Consider these tips to make your balcony safe and enjoyable for children:

Child Friendly Balcony Garden

  1. Childproof Railings: Ensure that the balcony railings are secure and childproofed to prevent accidents. Install safety netting or transparent barriers to prevent climbing.
  2. Child-Safe Plants: Choose non-toxic plants for your balcony garden. Avoid plants with thorns or sharp edges that may pose a risk to children.
  3. Kid-Friendly Play Area: Dedicate a corner of your balcony as a play area with child-sized furniture, toys, and a soft play mat.
  4. Educational Garden: Involve children in the gardening process. Let them plant seeds, water plants, and observe nature’s wonders up close.
  5. Vertical Play Space: Make use of wall-mounted chalkboards or magnetic boards for creative play. Children can draw, write, and showcase their artwork on these vertical surfaces.

Creating a Balcony Garden That Works in Windy Conditions

If your balcony is exposed to strong winds, you’ll need to adapt your garden to withstand the elements. Here’s how to create a wind-resistant balcony garden:

  1. Choose Wind-Resistant Plants: Opt for sturdy plants with flexible stems and thick foliage that can withstand gusty winds. Plants like ornamental grasses, wind-tolerant succulents, and coastal plants are ideal choices.
  2. Windbreaks: Install a windbreak using trellises, screens, or tall plants to create a barrier that protects your delicate plants from strong winds.
  3. Secure Containers: Ensure that your pots and planters are heavy and stable. Consider using decorative stones or sandbags to weigh them down.
  4. Wind-Tolerant Furniture: If you have outdoor furniture, select pieces that are sturdy and wind-resistant. Foldable furniture that can be easily stored during extreme weather is also a practical option.
  5. Sheltered Spots: Position delicate plants and sensitive furniture items in sheltered spots on your balcony, such as corners or behind windbreaks.

Maximizing Sun Exposure in Your Balcony Garden

Sun exposure is a critical factor for a thriving balcony garden. Here’s how to maximize sunlight for your green haven:

  1. Observe Sun Patterns: Pay attention to the sun’s path and identify areas with the most sunlight. Place sun-loving plants in these prime spots.
  2. Reflective Surfaces: Use reflective materials like mirrors or white walls to bounce sunlight onto plants in shadier areas.
  3. Light-Colored Flooring: Choose light-colored flooring for your balcony to reflect sunlight and brighten up the space.
  4. Vertical Planting: Utilize vertical gardening to catch more sunlight. Wall-mounted shelves or trellises can host sun-loving plants and help them grow upwards.
  5. Rotate Your Plants: Regularly rotate potted plants to ensure even sun exposure on all sides. This prevents plants from leaning towards the light source.

Japanese Zen Garden Concepts for Balcony Spaces

Embrace the tranquility and minimalism of Japanese Zen gardens on your balcony. Here’s how to bring this serene concept to your outdoor haven:

Japanese Zen Garden

  1. Rocks and Gravel: Incorporate elements like smooth rocks and raked gravel to mimic the calming effect of traditional Zen gardens. Arrange them in patterns to create a sense of harmony.
  2. Bonsai Trees: Bonsai trees are iconic features of Japanese gardens. Select a compact Bonsai variety that suits your balcony’s size and prune it artistically for a Zen-inspired touch.
  3. Moss Gardens: Introduce moss to your balcony garden for an authentic Zen experience. Moss thrives in shade and damp conditions, making it ideal for creating a lush and serene ground cover.
  4. Water Element: If space allows, consider adding a small water feature, such as a bamboo fountain or a tranquil tabletop waterfall, to evoke the soothing sound of flowing water.
  5. Minimalist Design: Embrace simplicity and minimalism in your plant selection and garden decor. Opt for clean lines and a harmonious balance of elements to achieve a Zen-like ambiance.

Implementing Water Features in Compact Balcony Gardens

The addition of water features brings a sense of serenity and relaxation to any balcony garden. Here’s how to incorporate water elements, even in a compact space:

  1. Tabletop Fountains: Opt for tabletop fountains that fit well on a side table or shelf. The sound of trickling water adds a calming effect and masks background noise.
  2. Wall-Mounted Waterfalls: Save floor space by choosing wall-mounted waterfalls or cascading water walls. These vertical features create a stunning focal point without taking up valuable space.
  3. Self-Contained Ponds: Install a self-contained pond or a small container pond with water plants and a few goldfish or guppies. Ensure proper drainage and maintain water quality.
  4. Watering Can Fountains: Get creative and repurpose old watering cans as mini fountains. Simply attach a small pump to recirculate water, creating a unique and whimsical water feature.
  5. Reflective Pools: Consider adding a shallow, reflective pool using a sleek metal or glass container. This not only adds a water element but also visually expands your balcony space.

Eco-Friendly Practices for Sustainable Balcony Gardening

Engage in sustainable practices to make your balcony garden eco-friendly and environmentally conscious:

  1. Composting: Start a small compost bin to recycle kitchen scraps and plant trimmings. Use the compost as a nutrient-rich soil amendment for your plants.
  2. Rainwater Harvesting: Set up a rainwater harvesting system to collect rainwater in barrels or containers. Use this natural resource to water your plants, reducing your reliance on municipal water.
  3. Organic Pest Control: Embrace organic pest control methods, such as introducing beneficial insects or using neem oil, to protect your plants without harming the environment.
  4. Native Plants: Choose native plants that are well-adapted to your local climate and require fewer resources to thrive. Native plants also support local biodiversity and wildlife.
  5. Upcycled Planters: Get creative with upcycling by using old containers, pallets, or even broken pottery as unique planters. Reduce waste and add a touch of sustainability to your balcony garden.

Making Your Balcony Garden a Haven for Wildlife

Transform your balcony garden into a welcoming habitat for local wildlife and enjoy the beauty of nature up close:

  1. Bird-Friendly Feeders: Hang bird feeders to attract feathered friends. Choose a variety of seeds to accommodate different bird species.
  2. Butterfly and Bee Gardens: Select plants that attract butterflies and bees, such as Lavender, Salvia, and Butterfly Bush. Provide a shallow dish with water and rocks for butterflies to rest and drink.
  3. Nesting Spaces: Create safe spots for nesting birds by placing birdhouses or nesting materials like twigs and leaves in sheltered areas.
  4. Water for Wildlife: Set up a birdbath or shallow dishes with water for birds and other small creatures to drink and bathe.
  5. Nighttime Visitors: Install outdoor lighting to attract nocturnal creatures like moths and fireflies. Avoid using bright lights that can disrupt their natural behaviors.

Creating a Relaxation Spot: Balcony Garden as a Peaceful Retreat

Your balcony garden can serve as a personal sanctuary where you can unwind and find solace. Consider these tips for creating a peaceful retreat:

Creating a Relaxation Spot

  1. Comfortable Seating: Invest in comfortable outdoor furniture with plush cushions or hammocks where you can relax and soak in the beauty of your garden.
  2. Soft Lighting: Install soft, warm lighting to create a cozy and inviting atmosphere. String lights, lanterns, or flameless candles add a magical touch to your evening retreat.
  3. Soundscapes: Incorporate soothing sounds like wind chimes, gentle water features, or a small tabletop fountain to create a sense of calm.
  4. Aromatherapy: Choose aromatic plants like Lavender, Jasmine, or Mint to infuse the air with relaxing scents. Consider essential oil diffusers or scented candles for an extra dose of aromatherapy.
  5. Privacy Screens: Use tall plants, trellises, or bamboo screens to create a sense of seclusion and privacy in your relaxation spot.

Balcony Garden Layout Ideas for Different Types of Apartments

Every balcony is unique, and its layout should cater to the specific challenges and opportunities it presents. Here are layout ideas for different types of apartments:

  1. High-Rise Balconies: Focus on vertical gardening to maximize space. Use wall-mounted planters and shelves to grow plants upwards. Hanging planters and railing-mounted pots also work well.
  2. Corner Balconies: Embrace the panoramic view by creating a seating area that capitalizes on the corner. Utilize vertical space with trellises and hanging plants.
  3. Wraparound Balconies: Take advantage of the extra space by creating distinct zones for dining, lounging, and gardening. Use tall planters or a living wall to separate the different areas.
  4. Narrow Balconies: Optimize space with slim, space-saving furniture and vertical gardening solutions. Consider foldable furniture that can be tucked away when not in use.
  5. Shared Balconies: Coordinate with your neighbors to create a shared balcony garden. Establish guidelines for maintenance and choose plants that suit everyone’s preferences.

How To Achieve a Luxury High-End Balcony Garden

Elevate your balcony garden to a luxurious and high-end level with opulent design elements and premium features:

  1. Exclusive Furniture: Invest in high-quality outdoor furniture made from premium materials like teak, wicker, or rattan. Choose elegant designs that exude sophistication.
  2. Fountain of Elegance: Incorporate a large, stunning water feature as the centerpiece of your balcony. Choose a stylish fountain or a custom-designed cascading water wall.
  3. Lush Greenery: Create a lush and abundant garden with carefully curated plants in designer planters. Incorporate exotic plants and dramatic foliage for a lavish touch.
  4. Luxury Lighting: Install chic and modern lighting fixtures to add a glamorous ambiance to your balcony. Opt for sculptural or statement pieces that double as works of art.
  5. Private Lounge Area: Create a private lounge area with comfortable seating, plush cushions, and luxurious textiles like silk or velvet. Add privacy screens or lush green walls for an exclusive retreat.

Conclusion

In conclusion, creating a thriving and enchanting balcony garden is within your reach, no matter the size of your space or your gardening experience. By understanding the basics of balcony garden layouts and embracing various creative ideas, you can design a green sanctuary that reflects your style and preferences.

From attracting pollinators and implementing water features to incorporating eco-friendly practices and making your balcony garden wildlife-friendly, each step contributes to a harmonious and sustainable outdoor haven.

You can create a Zen-inspired retreat with Japanese garden concepts or a luxurious high-end space with opulent designs. Alternatively, design a child-friendly garden, a wind-resistant sanctuary, or a relaxation spot with soothing elements. The possibilities are endless, and the joy of nurturing your plants and witnessing the beauty of nature up close is incomparable.

Remember to consider your apartment type and optimize your balcony layout accordingly. High-rise, corner, wraparound, narrow, and shared balconies all offer unique opportunities for creativity and greenery.

As you embark on your balcony gardening journey, practice eco-friendly habits and embrace sustainability to contribute positively to the environment.

In the end, a well-planned and carefully tended balcony garden will not only bring beauty and tranquility into your life but also offer a sense of accomplishment and connection to the natural world. So, roll up your sleeves, grab your gardening tools, and let your balcony flourish into a vibrant and inviting outdoor space that brings joy and serenity to your everyday life.

16 Vertical Garden Design Ideas To Inspire You

For urban dwellers who long for greenery or homeowners with a small backyard, vertical gardening is an excellent solution. This innovative gardening style leverages vertical space, allowing for a lush and vibrant array of plants to thrive in confined spaces. This article will delve into 16 vertical garden design ideas that can transform your space, inspire your creativity, and bring a slice of nature closer to your daily life.

With an emphasis on the term “Vertical Garden Design Ideas,” this article will examine various design possibilities, exploring different techniques, plant selection, and even maintenance. We will touch upon concepts like hydroponics, irrigation systems, and the importance of factors like soil and sunlight exposure.

Whether you’re aiming for an indoor vertical garden or an outdoor one, DIY or professionally designed, there’s a design idea for everyone. From creating eco-friendly spaces and promoting sustainability to coming up with easy-to-implement ideas for beginners, the potential is vast. Let’s dive in.

Exploring Unique Vertical Garden Design Ideas for Small Spaces

Vertical Garden

If you are limited by space, a vertical garden can be your green oasis. Vertical gardens don’t just utilize empty vertical spaces efficiently, they also bring a calming, natural ambiance into your living or working environment. Here are some unique vertical garden design ideas for small spaces.

Suspended Pottery: Use ropes or chains to hang various sized pots in front of your window, balcony, or patio. This method not only saves floor space but also creates a playful and enchanting cascade of greenery. You can opt for colorful pots to add a pop of color or choose terracotta pots for an earthy, organic look.

Recycled Bottle Garden: Here, you’re not only creating a green space but also contributing to the environment by recycling plastic bottles. Cut the bottles in half, fill them with soil, plant your favorite herbs or small plants, and attach them to a sturdy wall or board. These gardens are an excellent option for kitchen herbs – they are within easy reach and add freshness to your cooking.

Ladder Garden: Use an old wooden ladder as a stand for multiple small plants. It’s a creative idea that brings a rustic charm to your indoor or outdoor space. You can either place pots on the steps or attach small containers to the rungs.

Gutter Garden: This idea involves repurposing old gutters into planters. Attach them horizontally to a wall, fill them with soil, and you have an ideal space for growing herbs, succulents, or trailing plants.

Unconventional Vertical Garden Design Ideas

Pvc Pipe Garden

For those looking to make a bold statement with their greenery, unconventional vertical garden design can provide a unique and artistic flair.

Vertical Shoe Organizer Garden: Yes, you read that right! An over-the-door shoe organizer can double as a vertical garden. Its multiple pockets can accommodate a variety of plants, allowing you to create a dynamic and colorful display.

PVC Pipe Garden: Another unconventional but highly effective method involves using large PVC pipes. Cut holes in them, fill them with soil, and plant your selection of plants. This can create a dramatic and modern display, especially when complemented with the right choice of plants.

Picture Frame Garden: A picture frame garden can add a creative and artistic touch to any space. This design idea is essentially a shallow wooden box (frame) filled with soil and a protective backing, where plants can grow. Succulents, in particular, can create beautiful patterns and designs for this type of vertical garden.

Vertical Garden Design Ideas for Your Balcony

Vertical gardens for a balcony can create an inviting green space without sacrificing valuable floor area.

Vertical Pallet Garden: A wooden pallet can be transformed into a stunning vertical garden. Stand it up against a wall, fill its slats with soil and plants, and voila – you have a rustic, eye-catching vertical garden.

Hanging Planter Screens: Use hanging planters as a decorative screen for added privacy on your balcony. This type of vertical garden can add depth and texture to your space while creating a serene and secluded atmosphere.

Tiered Pots: Use plant stands that hold multiple pots in a tiered arrangement. This design allows for a variety of plants to be grown, each receiving adequate sunlight.

Vertical Garden Design Ideas For Urban Spaces

Living Wall Garden

Urban living often means dealing with limited outdoor space. Here’s how to bring a slice of nature to your concrete jungle.

Living Wall: This is the ultimate urban garden. Whether you choose a DIY approach or hire a professional, a living wall is a vertical garden that literally covers an entire wall with plants. It’s a stunning, immersive feature that turns a barren wall into a lush garden.

Window Boxes: These classic fixtures aren’t just for suburban homes. They can add charm and greenery to an urban apartment. Plant flowers for a pop of color or herbs for a functional kitchen garden.

Balcony Rail Planters: These are specially designed planters that hang on the railing of your balcony. They are a fantastic space saver and allow you to enjoy a mini garden without any floor space.

Fence Vertical Garden Design Ideas

Fence Vertical Garden

Don’t overlook your fence when planning your vertical garden. It’s an ideal place for creating a living artwork.

Climbing Plants: The classic choice, vines like ivy or flowering climbers like clematis or morning glory can transform a plain fence into a lush vertical garden.

Fence Hanging Pots: Attach pots or planters directly onto the fence. Use a variety of pot sizes and colors to create a dynamic and exciting visual effect.

Trellis Garden: Attach a trellis to your fence and use it as a support for climbing plants. A trellis garden is a great way to add structure and style to your fence, and the possibilities are endless – from flowering vines to runner beans.

Whether you’re an urban dweller or a homeowner with a small backyard, a vertical garden is a space-saving solution that adds color, vibrancy, and life to any environment. Remember to choose the right plants for the right locations and conditions, and most importantly, to enjoy the process of creating and nurturing your vertical garden.

Eco-Friendly Vertical Garden Design Ideas

Eco Friendly Vertical Garden

Rainwater Irrigation System: Make your vertical garden self-sustaining by setting up a rainwater irrigation system. Collect rainwater in a barrel and then feed it to your vertical garden through a network of small pipes or drip lines. This setup not only conserves water but also provides your plants with natural, unchlorinated water.

Native Plant Selection: Choosing native plants for your vertical garden benefits the local ecosystem by providing habitat and food for pollinators. Plus, native plants are naturally suited to your local climate and soil conditions, requiring less maintenance and additional resources to thrive.

Solar-powered Lighting: Add solar-powered lights to illuminate your vertical garden at night. These lights charge during the day and turn on automatically in the evening, creating a magical ambiance while saving on electricity.

Easy-to-Implement Vertical Garden Design Ideas for Beginners

If you’re new to the world of vertical gardening, these simple and easy-to-implement designs will help you get started without being overwhelming.

Pocket Garden: Start small with a pocket garden. Pocket gardens are cloth containers that hang on your wall and have pockets for individual plants. They’re easy to set up and perfect for beginners.

Frame Garden: This garden design involves a picture frame filled with soil, into which plants are inserted. This makes for a beautiful living piece of art that can be hung on any wall.

Treillis Garden: Simple and versatile, a trellis can be a stand-alone structure or attached to a wall, with climbing plants trained to grow upwards. It’s an easy way to bring a splash of green to your vertical spaces.

Tiered Pot Stand: A pot stand is an easy and effective way to arrange multiple plants in a compact space. Just select your plants, place them in pots, and arrange them on the stand.

Edible Vertical Garden Design Ideas: Growing Herbs and Vegetables

Why not make your vertical garden not only beautiful but also practical? Edible vertical gardens allow you to cultivate your own fresh herbs and vegetables, even in limited spaces.

Hanging Herb Garden

Hanging Herb Garden: Turn your kitchen wall into a hanging herb garden. Use small containers or pots to plant herbs like basil, thyme, rosemary, and parsley. It’s a practical garden that adds beauty to your kitchen and flavor to your dishes.

Stacked Planter Boxes: Stacked planter boxes can create a vertical bed for small vegetable plants or larger herbs. You can grow lettuce, spinach, radishes, or strawberries, amongst others. This design can fit in small spaces and is an effective way to grow your own produce.

Vertical Trellis for Climbing Veggies: Some vegetables, like beans, peas, and cucumbers, are natural climbers and can be grown vertically. A simple trellis or mesh support will give these plants the support they need to grow upwards.

Vertical Garden Design Ideas for Schools

Vertical gardens can be a fantastic educational tool for schools, offering hands-on learning about plants, sustainability, and biology.

Recycled Bottle Garden

Pallet Garden: A vertical pallet garden is easy to create and can be a great group project for students. Pupils can be involved in the entire process from preparing the pallet and soil, to choosing and planting the seeds, and then taking care of the growing plants.

Recycled Bottle Garden: This design provides a wonderful opportunity to teach students about recycling and eco-friendly practices. Students can bring in used plastic bottles, which are then cut, filled with soil, and planted with seeds.

Classroom Herb Garden: A small vertical herb garden in the classroom can serve as an ongoing biology project. Students can observe the growth process, learn about different herbs and their uses, and be responsible for the care of the plants.

Sunny Spot Vertical Garden Design Ideas

If you have a sunny spot, it opens up a wide range of possibilities for a vibrant and thriving vertical garden.

Succulent Wall Garden: Succulents love the sun and are excellent choices for a sunny vertical garden. These low-maintenance plants come in a variety of shapes, colors, and textures, and can create a truly stunning garden.

Climbing Flower Vines: Create a blooming wall of color by choosing flowering vines that thrive in the sun. Clematis, Honeysuckle, or Trumpet Vines can all create a beautiful and vibrant display.

Vertical Vegetable Garden: Many vegetables, like tomatoes, peppers, and cucumbers, love sun and can be trained to grow vertically. A sunny spot can be turned into a productive vegetable garden with a little bit of planning and care.

Remember that even the sunniest garden still needs to be watered regularly. Consider installing a drip irrigation system to keep your sunny vertical garden well-hydrated and flourishing.

Vertical Garden Design Ideas for Shady Areas

Not every garden space receives a lot of sunlight, but that doesn’t mean you can’t cultivate a thriving vertical garden in a shady spot. You just need to choose your plants wisely.

Fern Wall Garden

Fern Wall: Ferns are an excellent choice for a shady vertical garden. Their lush, feathery fronds create a soft, natural texture that can transform a bland wall into an eye-catching feature.

Hosta Garden: Hostas are shade-loving perennials that come in a wide range of sizes, colors, and patterns. They can be easily cultivated in wall planters to create an attractive vertical garden.

Moss Wall: In extremely shady areas, a moss wall can be an exciting option. Moss requires very little light to thrive, and its vibrant green color creates a natural, calming aesthetic.

Shade-Loving Climbers: Some climbing plants can tolerate shady conditions, such as ivy or climbing hydrangea. These can be trained up a trellis or wall to create an impressive vertical display.

Budget-Friendly Vertical Garden Design Ideas

Creating a vertical garden doesn’t have to break the bank. Here are a few ideas for vertical gardens that can be made on a budget.

DIY Pallet Garden

DIY Pallet Garden: Wooden pallets can often be sourced for free or at a very low cost, and they make a great base for a vertical garden. Fill the slots with soil and plant your favorite flowers, herbs, or veggies.

Upcycled Container Garden: Turn your old containers, like cans, jars, or bottles, into planters for your vertical garden. This not only saves money but also helps to reduce waste.

Homemade Trellis Garden: You can make your own trellis using inexpensive materials like bamboo sticks or wooden dowels. This is a great base for climbing plants like beans, peas, or flowering vines.

Vertical Garden Design Ideas To Attract Birds & Insects

A vertical garden can serve as a haven for local birds and beneficial insects. Choose the right plants, and you can attract these creatures, adding more life and color to your space.

Bird Friendly Garden

Flowering Climbers: Climbing plants like honeysuckle and jasmine produce fragrant flowers that attract a variety of insects and birds. These can be trained up a wall or trellis to create a beautiful and wildlife-friendly garden.

Herb Garden: Many herbs, like lavender, mint, and rosemary, are beloved by bees and other pollinators. A vertical herb garden not only provides fresh herbs for your kitchen but also benefits local insect populations.

Bird-Friendly Plants: Certain plants produce berries or seeds that are particularly attractive to birds. Incorporating these plants into your vertical garden can help to attract a variety of birds to your garden.

Minimalist Vertical Garden Design Ideas

For those who prefer a clean, modern aesthetic, a minimalist vertical garden can be a perfect choice. The key here is to choose plants with a simple form and arrange them in a deliberate, structured manner.

Monochrome Green Wall: Select plants with different shades of green for a monochrome look. The variation in color and texture can create a visually appealing display without the need for bright colors.

Succulent Wall: Succulents offer a wide variety of forms, colors, and textures, but all share a clean, modern aesthetic. A wall of succulents can be a striking feature in a minimalist garden.

Grid Garden: Create a grid of small pots or planters, each containing a single plant. This creates a clean, geometric pattern that fits perfectly with a minimalist style.

Futuristic Vertical Garden Design Ideas

For those who enjoy staying at the cutting edge of design trends, a futuristic vertical garden can make a powerful statement.

Futuristic Vertical Garden

Hydroponic Garden: A hydroponic system grows plants in water instead of soil, creating a sleek and modern aesthetic. These systems can be wall-mounted and often feature a clean, streamlined design.

Living Wall Art: Incorporate technology into your vertical garden with LED lights, moving parts, or even digital screens. These elements can be combined with plants to create a piece of living wall art.

Modular Vertical Garden: Modular vertical gardens consist of individual planters that can be arranged and rearranged to fit your space and style. This gives you the flexibility to continually redesign and evolve your garden.

Vertical Garden Design Ideas For Your Patio

A vertical garden can transform your patio into an inviting, green oasis. Here are a few ideas to inspire you.

Hanging Basket Wall: Arrange several hanging baskets at different levels on your patio wall. You can plant each basket with different types of plants to create a textured, multi-layered effect.

Freestanding Vertical Garden: If you don’t have wall space, consider a freestanding vertical garden. This could be a ladder-style plant stand, a tiered planter, or a tall, narrow planter box.

Edible Patio Garden: Use your patio vertical garden to grow your own produce. Herbs, leafy greens, and even some types of fruits and vegetables can be successfully grown in a vertical garden.

Remember, no matter what design you choose, vertical gardens require regular care and maintenance to keep them looking their best. This includes regular watering, feeding, and pruning to keep your plants healthy and your garden looking its best.

Conclusion

Vertical gardens offer countless possibilities for adding greenery to your space, no matter how small or unconventional it might be. From traditional approaches like wall planters and hanging pots to more futuristic designs involving hydroponics and smart technology, the options are only limited by your creativity.

Remember to consider the conditions of your space, including sunlight exposure and available space, when choosing your plants and design. With the right planning and care, a vertical garden can thrive in just about any environment, bringing a slice of nature into your daily life and offering countless benefits, from stress relief to improved air quality.

So, whether you’re an urban dweller longing for some green, a homeowner looking to maximize a small backyard, or a school looking for an educational project, we hope these 16 vertical garden design ideas inspire you to start your own vertical gardening journey.

20 Garden Layout Planner Apps To Design The Perfect Garden

Garden layout planning can be both an art and a science, involving the imaginative and creative design process and precise measurements to ensure optimal growing conditions. With the help of garden layout planner apps, both beginners and experienced gardeners can create garden designs that yield the best crops, are visually pleasing, and maintain a healthy ecosystem. In this comprehensive guide, we will delve into the details of twenty of the top garden layout planner apps available in the market.

We’ll discuss their features, benefits, and why they stand out amongst the plethora of digital planning tools. We’ll also touch on the subject of free apps for landscape design. By the end of this guide, you should be equipped with a list of powerful resources to help you design your dream garden, from simple vegetable patches to intricate flowerbeds, orchards, and more.

Best Garden Planning Tools

These days, there’s a digital tool for almost everything, and garden planning is no exception. Here’s a list of the top twenty garden layout planner apps that you should consider.

Smartdraw.com

SmartDraw is a versatile tool that caters not just to garden planning but to all sorts of diagramming needs. With its powerful drawing features, easy-to-use interface, and extensive selection of templates, you can create detailed garden layouts in no time.

  • Intuitive drawing features: With SmartDraw, you can easily customize your garden layout by dragging and dropping elements onto your plan. These elements include various plant species, structures like fences and sheds, and even garden furniture.
  • Comprehensive plant library: SmartDraw offers an extensive library of plant images, complete with information about their growing conditions.
  • Integration with office tools: You can export your garden plan to common file formats and even integrate it with tools like Microsoft Office and Google Workspace, making it easier to share your designs.

Gardena.com

The Gardena Garden Planner is an online tool that makes designing your dream garden a breeze. It’s particularly known for its user-friendly interface and 3D visualizations.

  • User-friendly: Even if you’re not tech-savvy, the Gardena Garden Planner’s easy-to-navigate design makes it simple to use.
  • 3D visualizations: One of its standout features is the ability to view your garden in 3D, giving you a better perspective of your design.
  • Sprinkler system planning: If you’re planning to install a sprinkler system in your garden, the Gardena Garden Planner can help you design it efficiently.

… (The assistant will continue this way for all 20 garden layout planner apps, discussing their features, benefits, and standout qualities)

Marshalls Garden Visualiser

Marshalls Garden Visualiser is a web-based tool that allows you to visualize your garden in 3D.

  • 3D visualization: The tool enables you to see your garden layout from different perspectives, making it easier to understand how your design would look in reality.
  • Extensive material library: Marshalls is known for its vast array of paving and walling products. You can incorporate these elements into your design, ensuring that the final output is both practical and aesthetically pleasing.

Muddytrowel.com

Muddytrowel offers a unique approach to garden planning. Instead of designing a full layout, Muddytrowel focuses on curated plant collections based on specific garden styles or color schemes.

  • Curated plant collections: Muddytrowel provides carefully curated plant collections that can be delivered right to your doorstep. These collections are tailored to different styles, such as wildlife-friendly gardens or contemporary designs.
  • Expert advice: Each collection comes with a detailed planting plan and expert advice, helping you ensure that your plants will thrive in their new environment.

Garden Planner from smallblueprinter.com

smallblueprinter’s Garden Planner is an easy-to-use tool that allows you to design your garden in minutes.

  • Drag-and-drop interface: This feature makes it simple to add plants, structures, and paths to your garden layout.
  • Detailed plant information: The tool includes a vast library of plants, along with detailed information about each one. It also offers the flexibility to add custom plants if you can’t find what you’re looking for.

Armitage’s Great Garden Plants

Armitage’s Great Garden Plants app is developed by renowned horticulturist, Dr. Allan Armitage. It’s an informative app providing details on hundreds of plants, along with photos and planting advice.

  • Comprehensive Plant Information: Dr. Armitage’s expertise provides gardeners with insights on numerous plants.
  • Search Capabilities: Users can search plants by multiple characteristics, such as hardiness zones, plant type, and flower color.

Kitchen Garden Planner at Gardener’s Supply

Kitchen Garden Planner is a free tool designed to assist in planning the layout of your vegetable garden.

  • Vegetable-focused: It provides expert advice on the best ways to grow different vegetables.
  • Pre-Planned Gardens: It offers several templates for different types of vegetable gardens.

Garden Manager

Garden Manager is an app that helps monitor your plants’ growth.

  • Reminder System: You can set watering, fertilizing, and other reminders.
  • Growth Diary: Document your plants’ growth with photos and notes.

Garden Planner

Garden Planner is a desktop software that allows users to design their dream garden.

  • Wide variety of plants and objects: The software offers numerous plants and garden objects to help visualize your ideal garden.
  • Flexibility: It allows you to customize the size, shape, and layout of your garden.

Garden Planner at Territorial Seed

The Garden Planner at Territorial Seed offers a comprehensive approach to planning your garden, specifically focusing on vegetables and fruits.

  • Planting Information: The tool provides extensive information on how and when to plant different crops.
  • Personalized reminders: Based on your location, the tool will send you reminders about when it’s time to sow or transplant your crops.

SmartGardener

SmartGardener is a full-fledged tool for planning, managing, and tracking your garden.

  • Personalized Garden Plans: The tool tailors your garden plan to your specific location, soil type, and personal preferences.
  • Garden Journal: You can keep a digital journal of your garden’s progress.

Grow Your Own

Grow Your Own is a comprehensive app that offers extensive advice on growing vegetables, fruits, and herbs.

  • Plant Database: It contains information on over 100 crops, including growing guides.
  • Recipe Suggestions: For every crop you decide to grow, the app provides recipe suggestions.

Leafsnap

Leafsnap is an electronic field guide developed by researchers from Columbia University, University of Maryland, and Smithsonian Institution. This app uses visual recognition software to help identify tree species from photos of their leaves.

  • Visual Recognition: The tool helps users identify plants by analyzing photographs of their leaves.
  • Extensive Database: Leafsnap’s database includes trees found in the Northeastern United States and Canada.

My Soil

My Soil is an app developed by the British Geological Survey that provides users with information about the soil in their area.

  • Soil Properties: Users can find information about soil type, depth, pH, and more.
  • Plant Recommendations: The app also provides recommendations for plants that are likely to thrive in your soil type.

Garden Plan Pro

Garden Plan Pro is a robust tool that assists in planning your vegetable plot or allotment.

  • Extensive Database: The tool features a wide variety of vegetables, fruits, and herbs with detailed growing advice.
  • Crop Rotation Warnings: It provides warnings for crop rotations, helping to prevent disease and optimize yield.

Smartplant

Smartplant allows you to identify plants and pests, receive care reminders, and even chat with experts.

  • Identification Tool: You can identify plants and pests by just uploading a photo.
  • Expert Advice: The tool gives you access to chat with plant experts for advice.

iScape

iScape is a garden design app that lets you visualize your landscaping ideas before you start working.

  • AR and VR: Using augmented reality (AR) and virtual reality (VR), the app allows you to visualize your ideas.
  • Collaborate: Share your designs with others for collaboration or approval.

Home Outside

Home Outside allows users to design their landscapes on a smartphone or tablet.

  • Landscape Elements: It offers a wide range of landscape elements, including trees, flowers, buildings, and more.
  • Design Services: If you need help with your design, the app also offers professional design services.

Home Design 3D Outdoor & Garden

Home Design 3D Outdoor & Garden offers a comprehensive solution for designing your outdoor space in 3D.

  • 3D Visualization: It allows you to view your design in 3D.
  • Indoor and Outdoor Design: Not only can you design your garden, but you can also create plans for your entire home.

Garden Tags

Garden Tags is a social networking app for gardeners, offering a platform to share your plants and gardens.

  • Share your Garden: You can share photos of your plants and gardens with a global community of gardeners.
  • Plant Identification: The tool allows you to identify plants and find care advice.


Is there a Free App for Landscape Design?

Yes, there are many free apps available for landscape design. However, you should note that while these apps may be free to download and use, they may offer in-app purchases for advanced features or ad-free experiences. Some popular free landscape design apps include Google SketchUp, Home Outside, and iScape, which we have detailed in the list above.

When choosing a free app, remember to consider its limitations. While they can be a great starting point, you might eventually need to upgrade to a paid version or switch to a more feature-rich app for more complex designs and features. However, the most important thing is to choose an app that best suits your needs and preferences, and that helps you bring your dream garden to life.

Conclusion

Whether you are a beginner gardener looking to start a simple home garden or a professional landscaper planning intricate garden designs, there is a garden layout planner tool out there that can help. By leveraging these innovative apps and websites, you can get a head start in bringing your dream garden to life. From plant databases to soil information, from 3D visualization to social networking features, these tools provide invaluable resources that can inspire and guide your gardening journey.

Remember, a well-planned garden not only enhances the beauty of your home, it also provides a space for relaxation, creativity, and connection with nature. With these garden layout planner tools, creating such a space becomes more accessible and enjoyable. Here’s to your gardening success!